6.1.2 Sweep Structure Maintenance
This topic describes the systematic instruction to create and maintain a Sweep Structure and link the accounts to the sweep structure.
- On the Create Account Structure - Structure Details screen, specify the
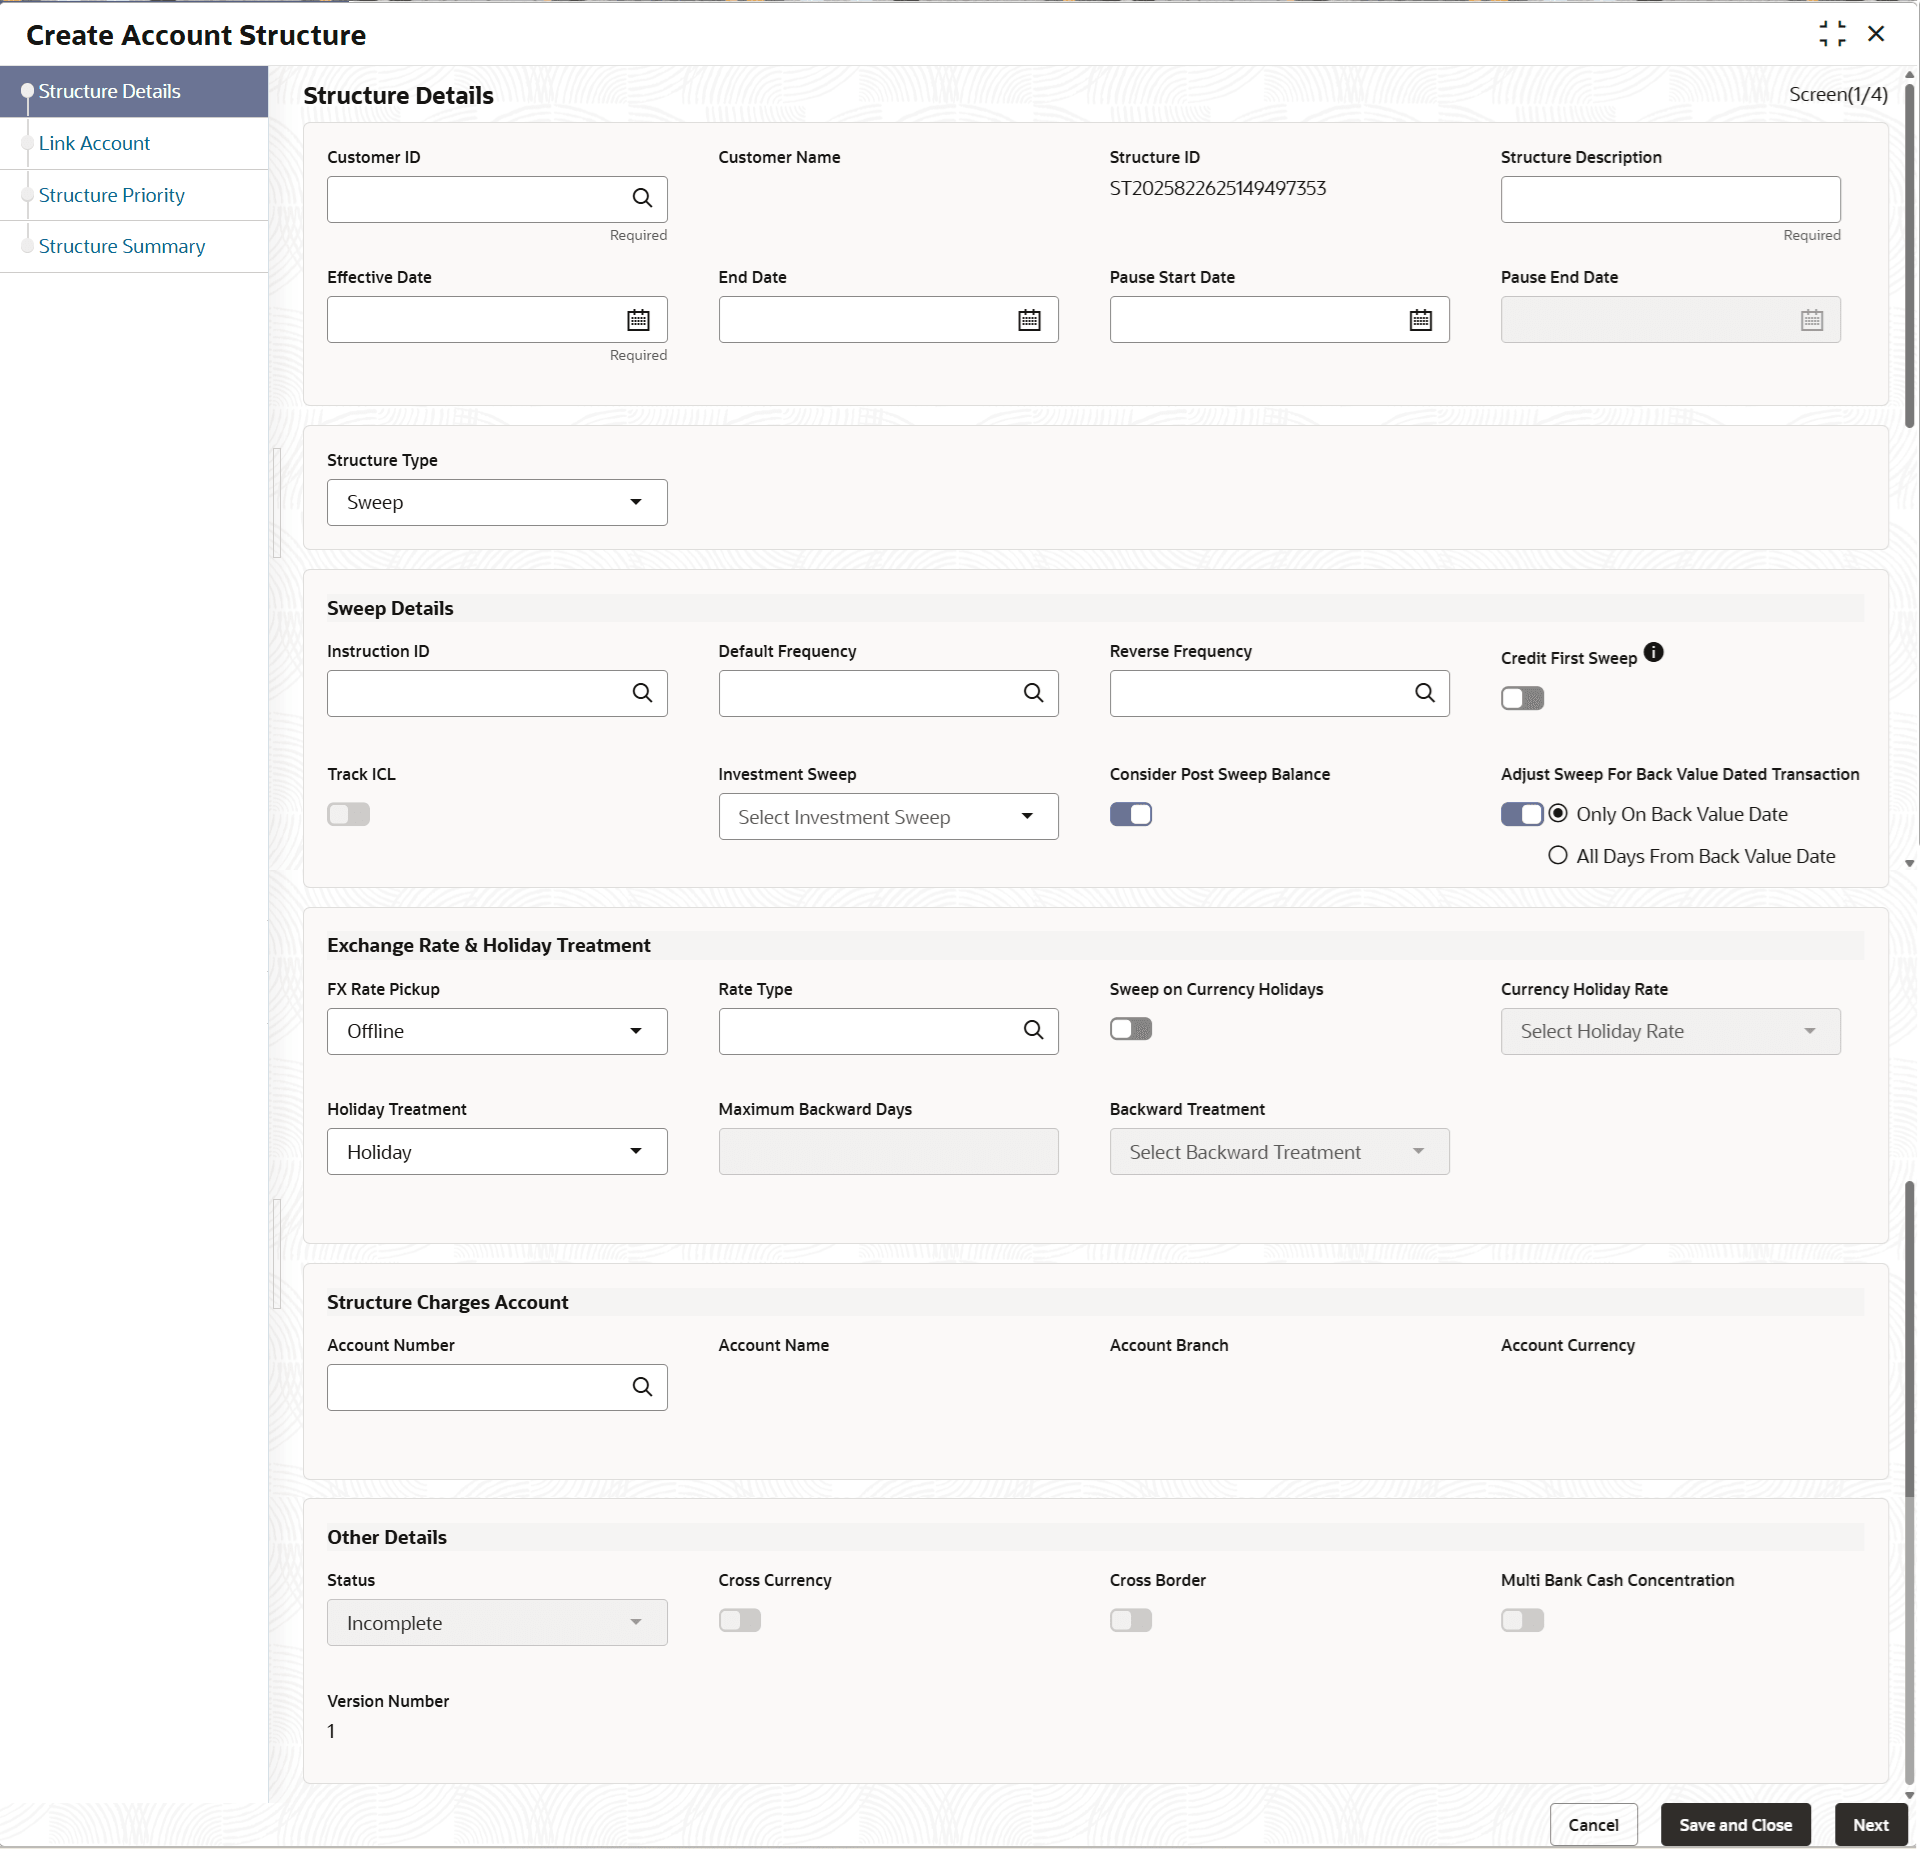
fields.The Create Account Structure - Structure Details screen displays.
Figure 6-2 Create Account Structure - Structure Details
- Select the Sweep option from the Structure Type drop-down list.
For more information on fields, refer to the field description table.
Table 6-2 Structure Details - Sweep – Field Description
Field Description Structure Details This section displays the Structure Details fields. Customer ID Click Search to view and select the customer ID from the list. The list displays all the customer IDs maintained in the system. Customer Name Displays the customer names based on the Customer ID selected. Structure ID Displays the unique structure ID. Structure Description Specify the description for the new structure. Effective Date Select the date from when the structure becomes effective. Note: This date cannot be less than the system date but can be a future date.
End Date Select the date till when the structure is effective. Note: This date should always be greater than the effective date.
Pause Start Date Select the date from when the structure gets paused. Note: This field can be a future date but should not be less than the system date.
Pause End Date Select the date till when the structure gets paused. . Structure Type Select the type of structure from the drop-down list. The available options are:- Sweep
- Pool
- Hybrid
Sweep Details This section displays the Sweep Details fields. Instruction ID Click Search icon to view and select the instruction ID from the list. The list displays all the instruction types maintained in the system. If the Instruction ID is applied at the structure level, then all the pairs of the structure is processed with the same Instruction ID. Note: This field is editable only if the Structure Type is selected as Sweep.
Default Frequency Click Search icon to view and select the default frequency to be executed from the list. The list displays all the frequencies maintained in the system. The frequency defined at the structure level is applied to all the account pairs in the structure, but the user can override and define a specific frequency for a specific pair of account. This changed preference overrides the global preference. Note: This field is editable only if the Structure Type is selected as Sweep and Hybrid.
Reverse Frequency Click Search icon to view and select the reverse frequency to be executed from the list. The list displays all the frequencies maintained in the system. The frequency defined at the structure level gets defaulted to all the account pairs in the structure, but the user can override and define a specific frequency for a specific pair of account. This changed preference overrides the global preference. Note: This field is editable only if the Structure Type is selected as Sweep.
Credit First Sweep Switch on the toggle to enable credit first sweep. With the credit first sweeps option, system first performs all the upward movements from child to parent at each level irrespective of priority maintained at each pair followed by the downward sweeps. Priority is considered only for downward movements from parent to child at each level. Note: This field is editable only for Structure Type is selected as Sweep and Hybrid.
Track ICL Switch on the toggle to enable the ICL tracking. Investment Sweep Select the investment sweep for the structure from the drop-down list. The available options are:- Term Deposit
- Money Market
Note: This field is editable only if the Structure Type is selected as Sweep.
Consider Post Sweep Balance Switch on the toggle to consider the post sweep balances on the accounts. When sweeping from level II, this toggle should be checked if the Original Account Balance + Sweep Amount is to be considered for further sweep processing.
If this toggle is not checked, the sweep are performed on the account participating in the structure based on the original fetched balances. Do not consider the incremental balances post sweep.
Adjust Sweep For Back Value Dated Transaction Switch on the toggle to enable the sweep for Back Value Dated Transaction. The available options are:- Only on Back Value Date - The System would check and perform sweeps for back value dated transactions only on the transaction's value date.
- All Days from Back Value Date -The system would check and perform sweeps for back value dated transactions on the transaction's value date as well as on subsequent days if there is any impact on the balances for the subsequent days.
Note: This field is applicable only if the Structure Type is selected as Sweep.
Exchange Rate & Holiday Treatment This section displays the Exchange Rate & Holiday Treatment fields. FX Rate Pickup Select the FX rate pickup for the structure from the drop-down list. The available options are:- Online: The system needs to integrate with an external system to fetch the rates in an online mode.
- Offline: This option is selected by default wherein the rate available in the system is used for cross currency calculations.
Rate Type Click Search to view and select the Rate Type from the list. The list displays all the Rate Type maintained in the system. Holiday Treatment Select the type of holiday treatment from the drop-down list. The available option are:- Next Working Date - Perform the action on the next working day.
- Previous Working Date - Perform the action on the previous working day.
- Holiday – Do not perform the sweep and mark it as holiday.
Maximum Backward Days Specify the maximum number of days the system can go back to execute the structure when the execution day falls on a holiday. Note: This field is enabled only if the Holiday Treatment is selected as Previous Working Date.
Backward Treatment Select the backward treatment to be applied from the drop-down list. The available options are:- Move Forward - The action is performed on the next working day.
- Holiday - Do not perform the sweep.
Note: This field is enabled only if the Holiday Treatment is selected as Previous Working Date.
When the Maximum Backward Days set is also falling on a holiday, then the system determines the day on which the action is executed based on the Backward Treatment.
Structure Charges Account This section displays the Structure Charges Account fields. Account Number Click Search to view and select the required account number to collect the charges. The charge account number will be the accounts belonging to the parent customer and linked child customers. Account Name Displays the account name based on the account number selected. Account Branch Displays the account branch based on the account number selected. Account Currency Displays the account currency based on the account number selected. Other Details This section displays the Other Details fields. Status Displays the current status of the structure and is populated by the system. The available options are:- Active: The structure is complete and is in Active status.
- Paused: The structure is on temporary hold.
- Incomplete: The structure is still being created.
- Expired: The structure is expired.
- In-Active: The structure is not active and is in operational at a future date.
Cross Currency This field gets automatically selected on save if the underlying structure is created with accounts which are in different currencies. Cross Border This field gets automatically selected on save if the underlying structure is created with accounts which are from two or more different countries. Multi Bank Cash Concentration This field gets automatically selected on save if the underlying structure created has external bank accounts. Version Number Displays the version number of the structure. - Click Next in the Structure
Details screen to link the accounts.The Link Account screen displays.
- Click Start Building Structure to add the header account for the
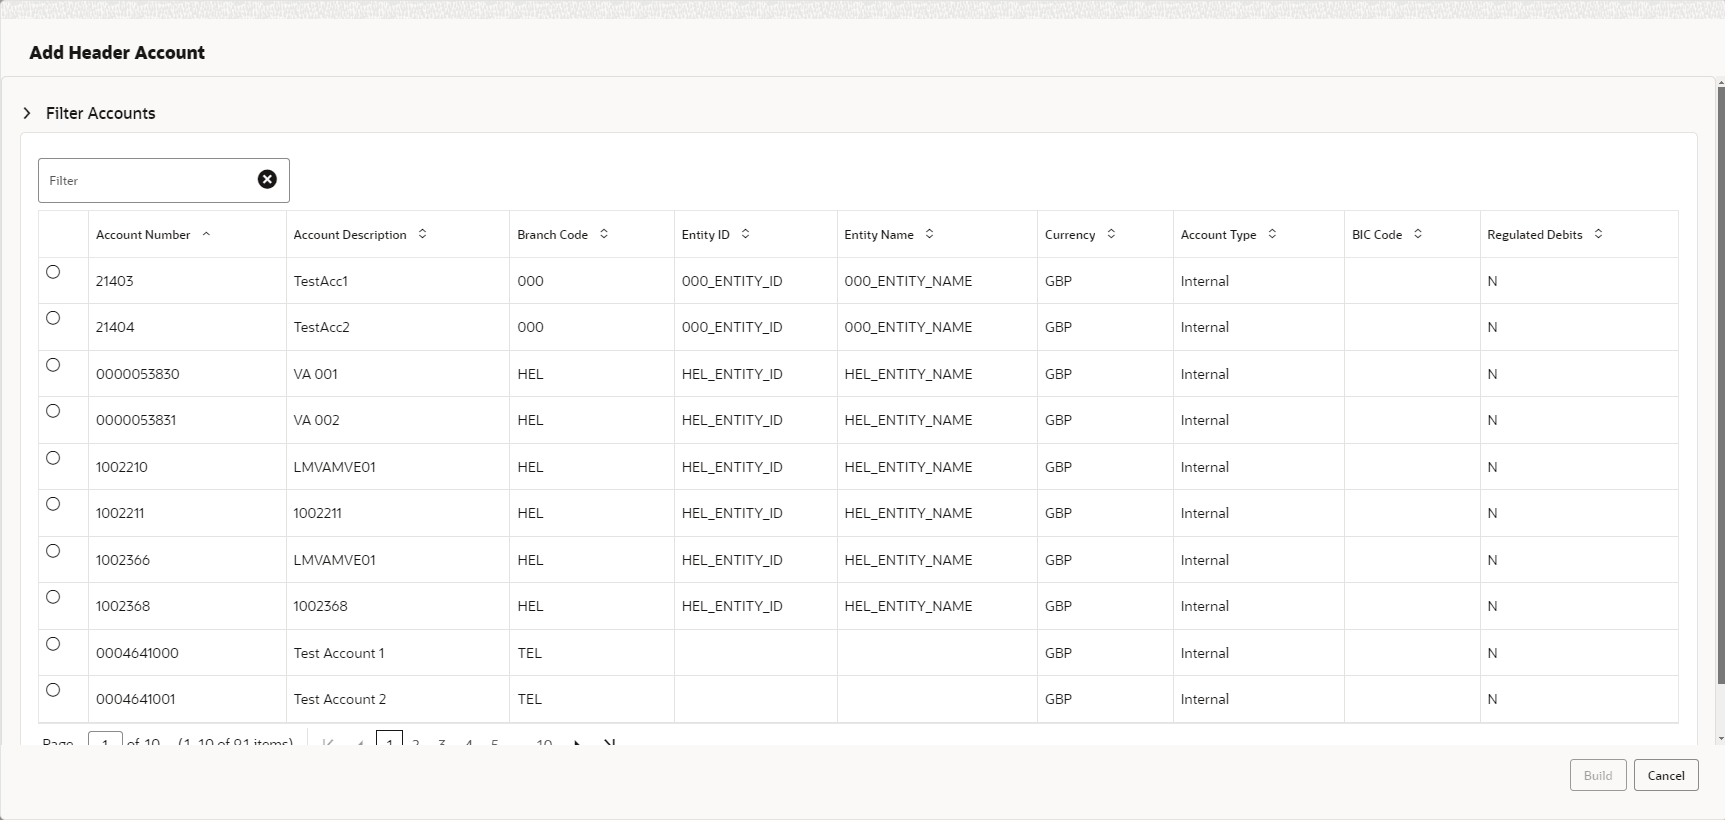
structure.The Add Header Account screen displays. For more information on fields, refer to the field description table.
Table 6-3 Add Header Account – Field Description
Field Description Filter Account Specify and search the complete or partial account details to display the list of accounts that matches across the fields. Account Number Displays the account number for the structure creation. Account Description Displays the description of the account. Branch Code Displays the branch code of the account. Entity ID Displays the Entity ID of the account. Entity Name Displays the name of the Entity ID. Currency Displays the currency of the account. Account Type Displays the account type. The available options are- External
- Internal
BIC Code Displays the BIC code for the account. Regulated Debits Displays whether the account is regulated for debits or not. The available options are- Yes
- No
- Select the account in the Add Header Account screen to add the header account.
- Click Build to add the selected header account to the
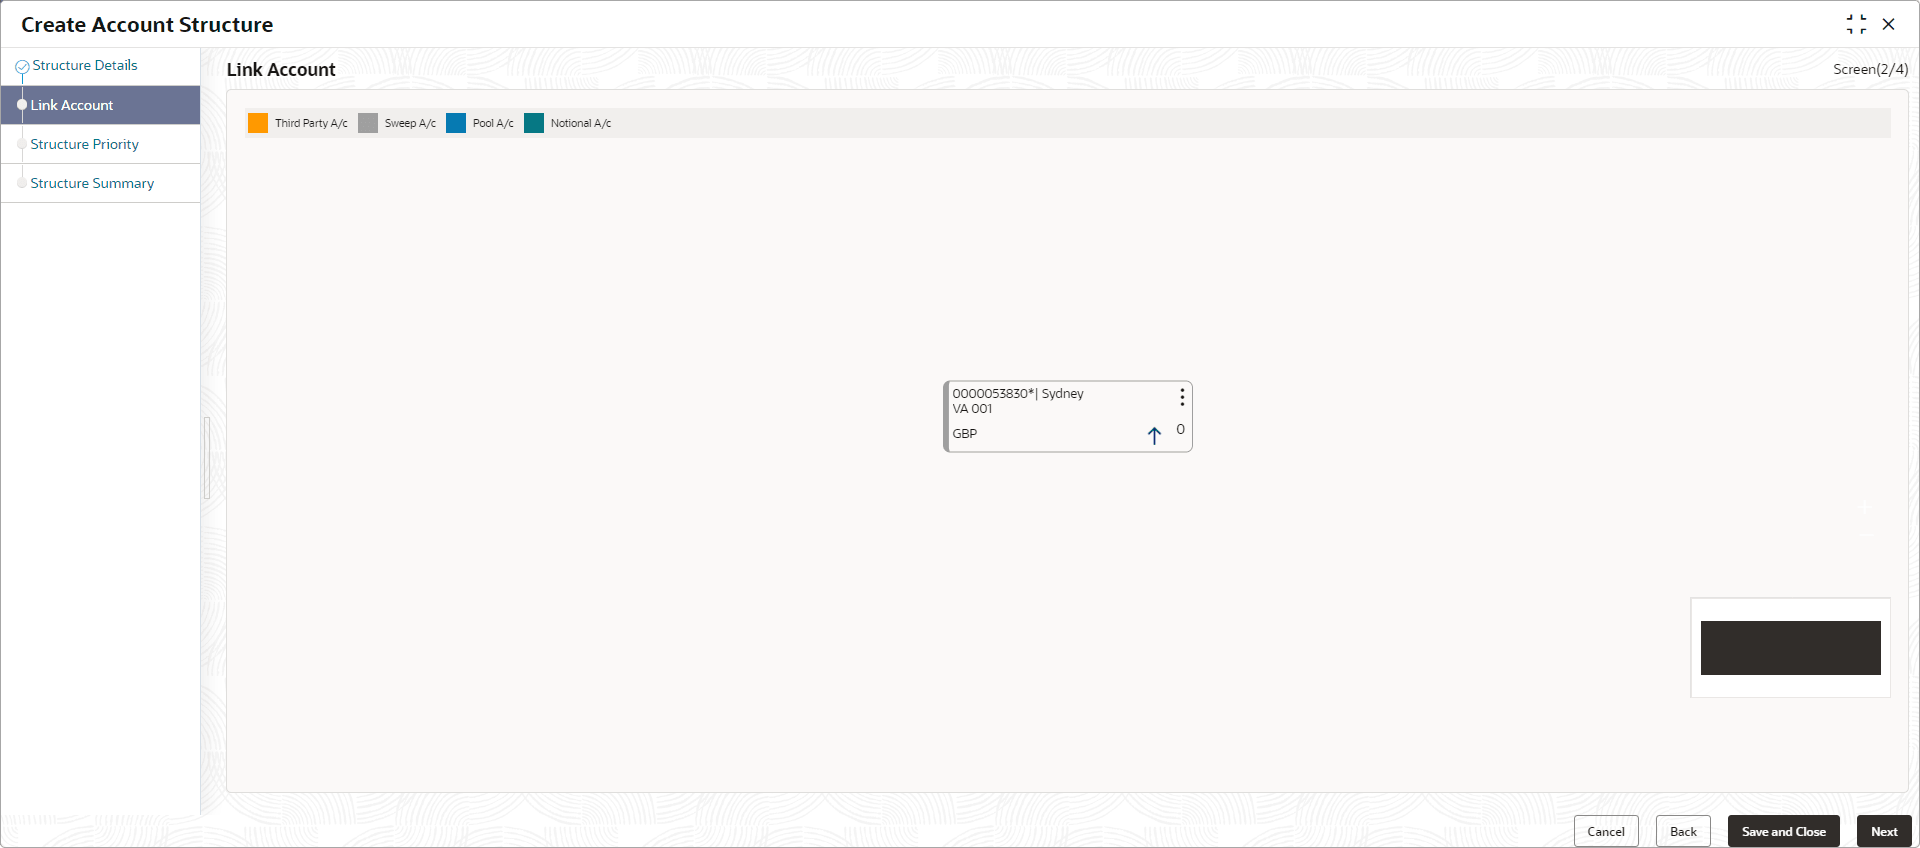
Structure.The selected account is added to Create Account Structure – Added Header Account screen.For more information on fields, refer to the field description table.
Figure 6-5 Create Account Structure – Added Header Account
Table 6-4 Create Account Structure – Added Header Account - Field Description
Field Description Account Number Displays the account number of the header account. Account Description Displays the description of the account. Location Displays the location of the account. Currency Displays the currency of the account. 
Displays the sweep direction and number of the child account(s) linked to the header account. Note: The upward arrow indicates sweeps direction from child to parent, while the downward arrow signifies the sweeps direction from parent to child.
- Perform anyone of the following actions on the header node.
- Click
 and then click Link Account to add the
child accounts for the header account.
and then click Link Account to add the
child accounts for the header account.Note:
For more details information, please refer to the Step 6. - Click
 and then click View Account Details to
view the account details of header account.The Account Details screen displays
and then click View Account Details to
view the account details of header account.The Account Details screen displaysTable 6-5 Account Details - Field Description
Field Description Customer Name Displays the name of the customer. Entity Name Displays the name of the entity. Account Number Displays the account number. Description Displays the description of the particular account. Bank Name Displays the bank name in which the account is maintained. Note: This field appears only for External Accounts.
Bank Code Displays the bank code of the account. Available Balance Displays the available balance in the account IBAN Displays the IBAN number of the account. Branch Code Displays the branch code of the account. Account Category Displays the category of the account. Location Displays the location of the account. Country Code Displays the country code for the account Hold Select the toggle to enable the hold for the account. Hold Start Date Select the hold start date for the account. Hold End Date Select the hold end date for the account. - Click
 and then click Delink Account to delink
the child account from header account.
and then click Delink Account to delink
the child account from header account.Note:
This option is disabled for the Header Account. - Click
 and then click Delink Account Hierarchy
to delink all the child accounts and header account from the
structure.
 - Click
 and then click Replace Account to
replace the header account in the structure.
and then click Replace Account to
replace the header account in the structure.Note:
This option is disabled, if the account being replaced has child accounts. - Click
 and then click Set Child Instructions to
set the child instructions of the child account for the header
account.
- Click
Create Account Structure - Append Accounts in Structure
- Click and then click Link Account to add the child
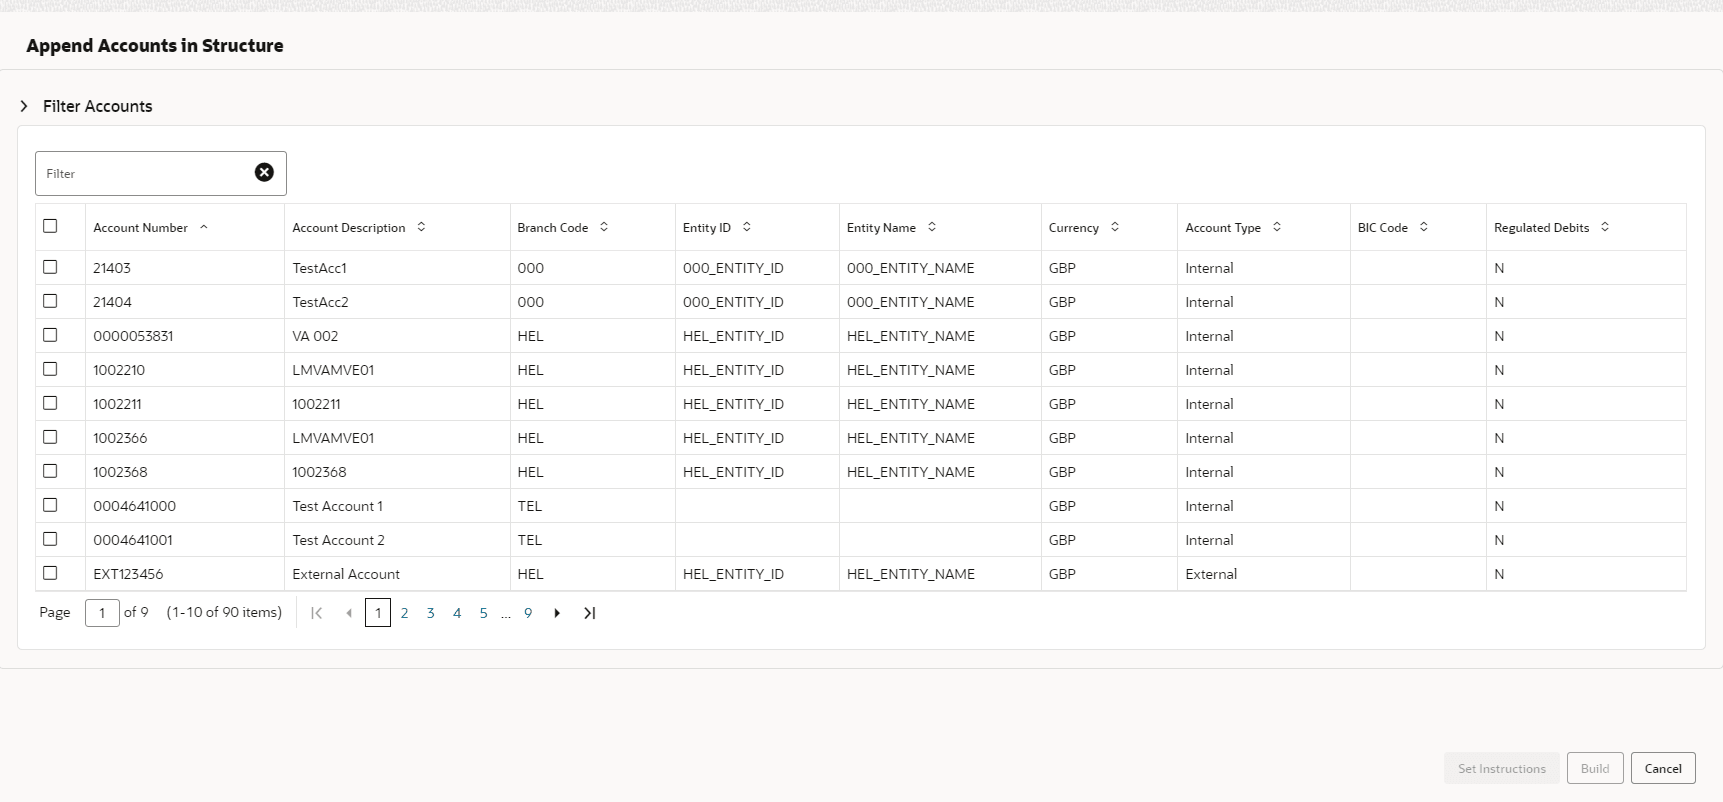
accounts for the header account.The Append Accounts in Structure screen displays. For more information on fields, refer to the field description table.
Table 6-6 Append Accounts in Structure – Field Description
Field Description Filter Account Specify and search the complete or partial account details to display the list of accounts that matches across the fields. Account Number Displays the account number for the structure creation. Account Description Displays the description of the account. Branch Code Displays the branch code for the account. Entity ID Displays the Entity ID for the account. Entity Name Displays the name of the Entity ID. Currency Displays the currency of the account. Account Type Displays the account type. The available options are- External (An account which is external to the Bank and linked for liquidity management)
- Internal (An account which is internal to the Bank)
BIC Code Displays the BIC code for the account. Regulated Debits Displays whether the account is regulated for debits or not. The available options are- Yes
- No
- Select the Checkbox of the accounts to be added as child accounts for the header account.
- Click Set Instructions to set the instruction of the
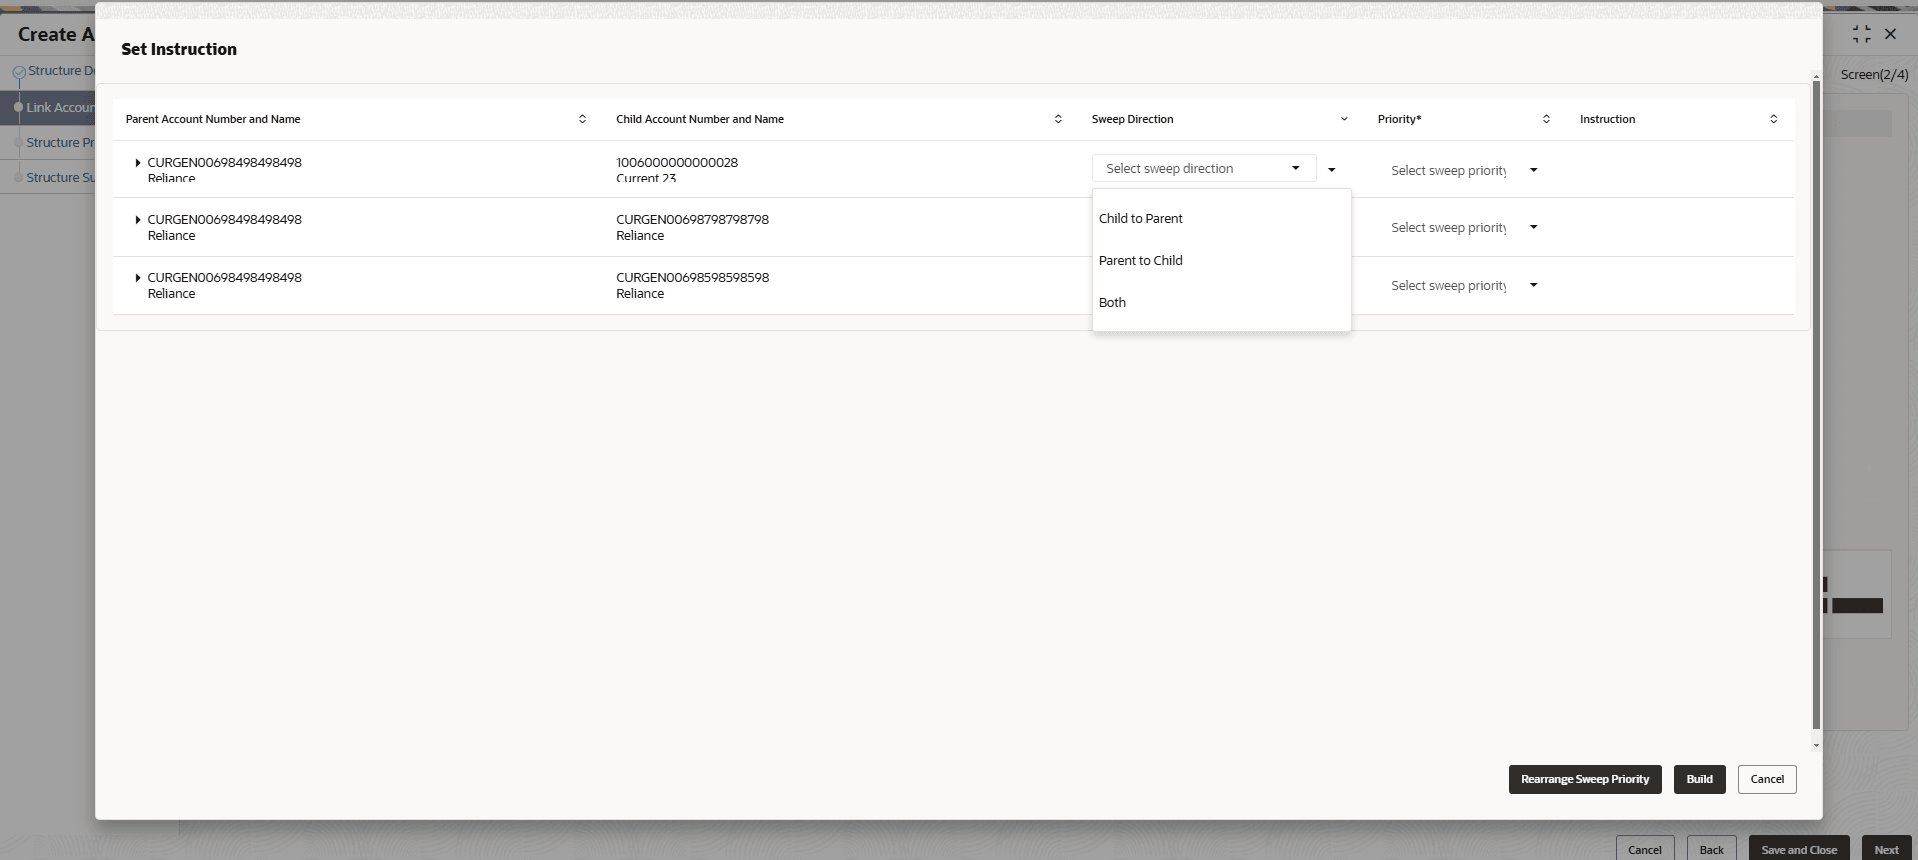
selected child accounts.The Set Instructions screen displays. For more information on fields, refer to the field description table.
Table 6-7 Append Accounts in Structure – Field Description
Field Description Parent Account Number and Name Displays the parent account number and name of the structure. Child Account Number and Name Displays the child account number and name of the structure. Sweep Direction Displays the sweep direction of the structure. The available options are- Child to Parent
- Parent to Child
- Both
Priority Specify the sweep priority used to determine the order of execution across pairs at a level in the structure. Instruction Displays the instruction type for the account pair. - Click Expand icon to view the instructions for the account pair.
Set Instructions - Instruction & Frequency
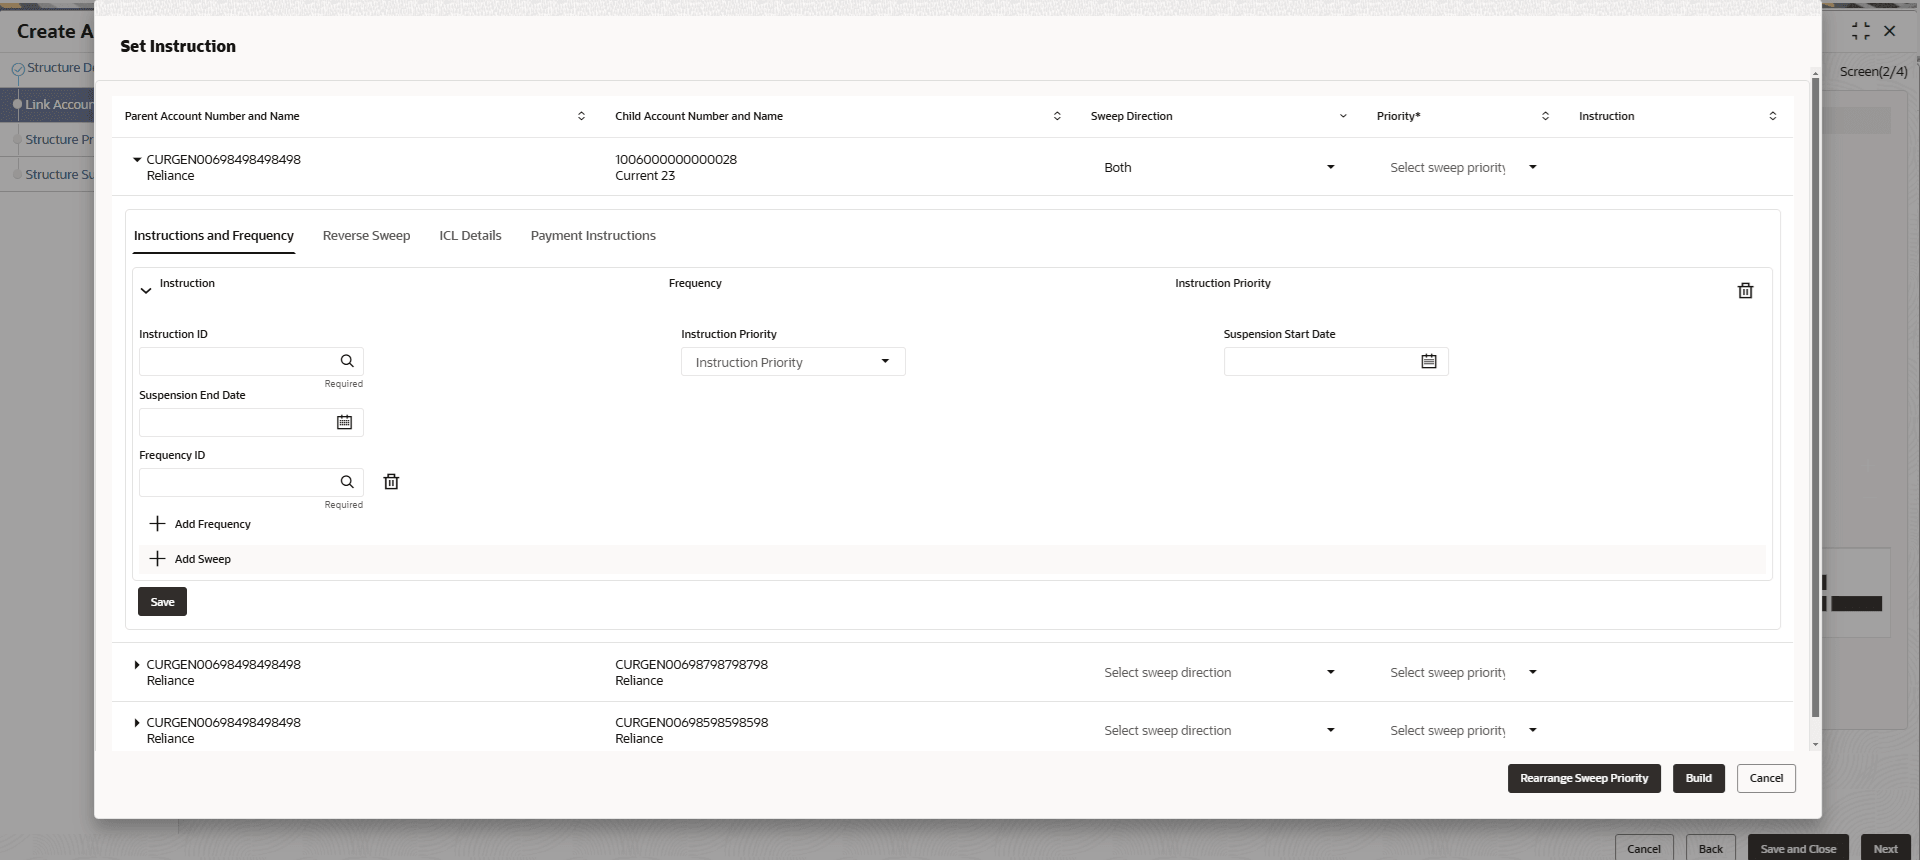
- Click Instruction & Frequency tab to set the
instruction and frequency for the account pair.The Set Instructions – Instruction & Frequency screen displays.For more information on fields, refer to the field description table.
Figure 6-9 Set Instructions – Instruction & Frequency
Table 6-8 Set Instructions – Instruction & Frequency – Field Description
Field Description Instruction ID Click the Search icon and select the instruction ID to set within the account pair. Instruction Priority Specify the instruction priority across multiple instructions within an account pair. Suspension Start Date Select the suspension start date of the account pair. Suspension End Date Select the suspension end date of the account pair. Frequency ID Click the Searchicon and select the frequency at which the account structure should be executed. Collar Amount Specify the collar amount set for executing sweep is displayed. Note: This field appears if the Instruction ID is selected as Collar Model from the list.
Value set at the product processor is displayed in an editable form.
Maximum Specify the maximum amount for child to parent sweep execution. Value set at the product processor is displayed in an editable form.
Maximum Deficit Specify the maximum amount for parent to child sweep execution. Value set at the product processor is displayed in an editable form.
Minimum Specify the minimum amount for child to parent sweep execution. Value set at the product processor is displayed in an editable form.
Minimum Deficit Specify the minimum amount for parent to child sweep execution. Value set at the product processor is displayed in an editable form.
Threshold Amount Specify the threshold amount for executing sweep. Note: This field appears if the Instruction ID is selected as Threshold Model or Collar Model from the list.
Value set at the product processor is displayed in an editable form.
Multiple Specify the amount in multiples of which the sweep is to be executed. Value set at the product processor is displayed in an editable form.
Percentage Specify the percentage for which the sweep is to be executed. Note: This field appears if the Instruction ID is selected as Percentage Model from the list.
Value set at the product processor is displayed in an editable form.
Fixed Amount Specify the fixed amount for which the sweep is to be executed. Note: This field appears if the Instruction ID is selected as Fixed Amount Model or Range Based Model from the list.
Value set at the product processor is displayed in an editable form.
- Perform the following actions on the Set Instructions – Instruction
& Frequency screen.
- Click icon to delete the Instruction or Frequency of the account pair.
- Click Add Sweep to add the multiple instruction for the account pair.
- Click Add Frequency to add the multiple frequency for the account pair.
Set Instructions - Reverse Sweep
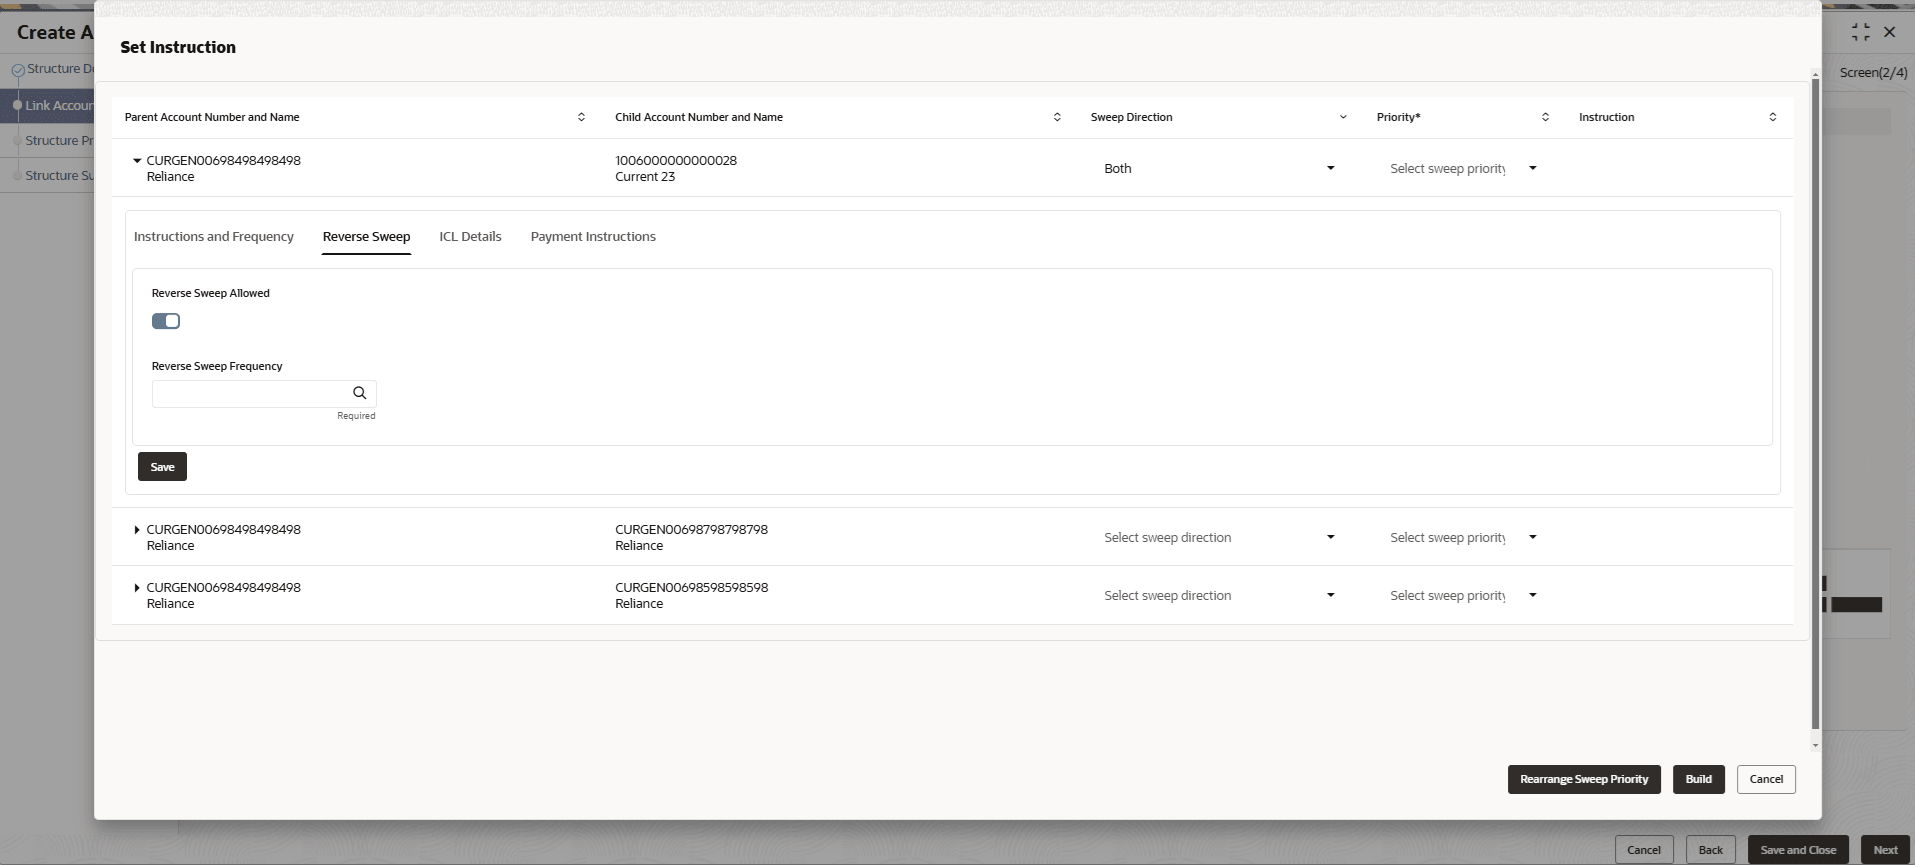
- Click Reverse Sweep tab to set the reverse sweep
instruction for the account pair.The Set Instructions – Reverse Sweep screen displays.For more information on fields, refer to the field description table.
Figure 6-10 Set Instructions – Reverse Sweep
Table 6-9 Set Instructions – Reverse Sweep – Field Description
Field Description Reverse Sweep Allowed Select the Reverse Sweep Allowed toggle to enable the reverse sweep for the account pair. Reverse Sweep Frequency Select the frequency at which the reverse sweep for the account structure should be executed. Note: This field appears only if the Reverse Sweep Allowed toggle is enabled
Set Instructions - ICL Details
- Click ICL Details tab to set the Intercompany loan
instruction for the account pair.The Set Instructions – ICL Details screen displays.For more information on fields, refer to the field description table.
Figure 6-11 Set Instructions – ICL Details
Table 6-10 Set Instructions – ICL Details – Field Description
Field Description Track ICL Select the Track ICL toggle to enable the ICL for the account pair. ICL Reference Specify the Intercompany Loan Reference details. Note: This field appears only if the Track ICL toggle is enabled
Loan Type Displays the type of the loan. - If Reverse Sweep Allowed toggle is ON, the Loan Type is displayed as Fixed.
- If Reverse Sweep Allowed toggle is OFF, the Loan Type is displayed as Open.
Note: This field appears only if the Track ICL toggle is enabled
Child to Parent Account Group Click Search and select the account group to maintain Interest Rate for reallocation at Parent-Child Pair level. The Child to Parent Account Group interest rate will be applicable for reallocations happening for a sweep from Child to Parent direction. (Reallocation will be from Parent to Child)
Parent to Child Account Group Click Search and select the account group to maintain Interest Rate for reallocation at Child-Parent Pair level. The Parent to Child Account Group interest rate will be applicable for reallocations happening for sweep from Parent to Child direction. (Reallocation will be from Child to Parent)
Note: This field appears only if the Parent to Child sweep toggle is enabled.
Set Instructions - Payment Instructions
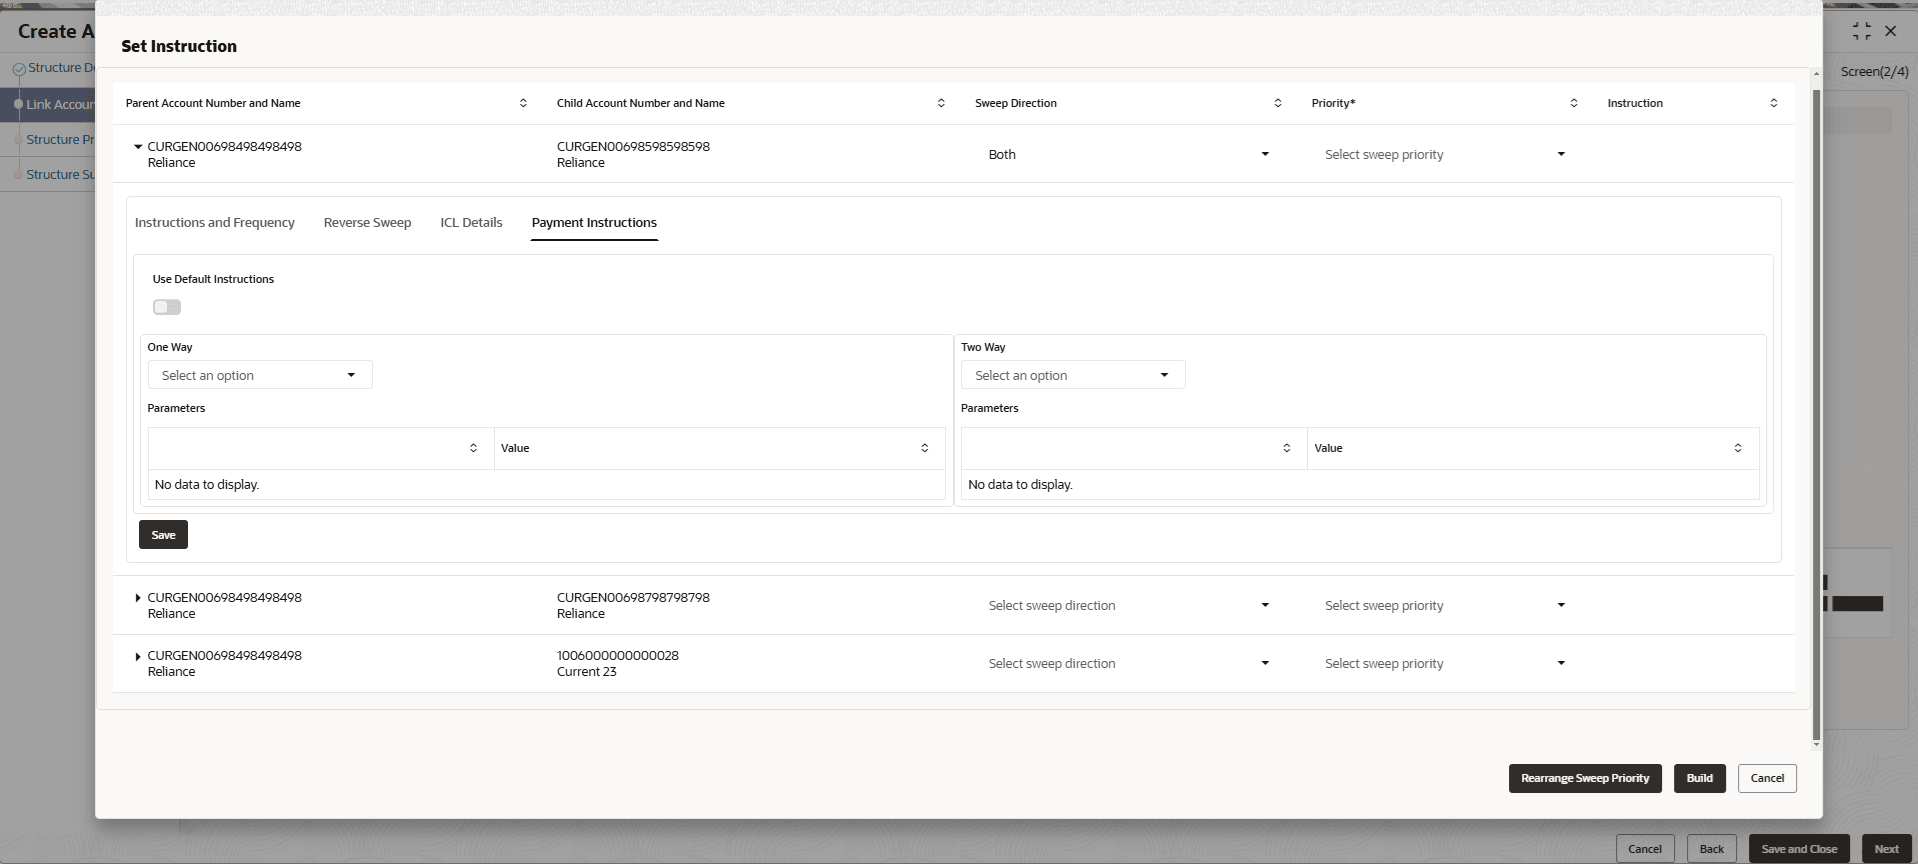
- Click Payment Instructions tab to set the payment
instruction for the account pair.The Set Instructions – Payment Instructions screen displays.For more information on fields, refer to the field description table.
Figure 6-12 Set Instructions – Payment Instructions
Table 6-11 Set Instructions – Payment Instruction – Field Description
Field Description Use Default Instructions Select the Use Default Instructions toggle whether the default payment instruction is being applied or not. The system always defaults the toggle ON for the account pair to use the default payment instruction.
Child to Parent Select the child to parent parameters from the drop-down list. The list displays all the parameters that are set for the account in Payment Parameters setup. Note: This field appears only if the Use Default Instructions toggle is disabled.
Parent to Child Select the parent to child parameters from the drop-down list. The list displays all the parameters that are set for the account in payment parameters setup. Note: This field appears only if the Use Default Instructions toggle is disabled.
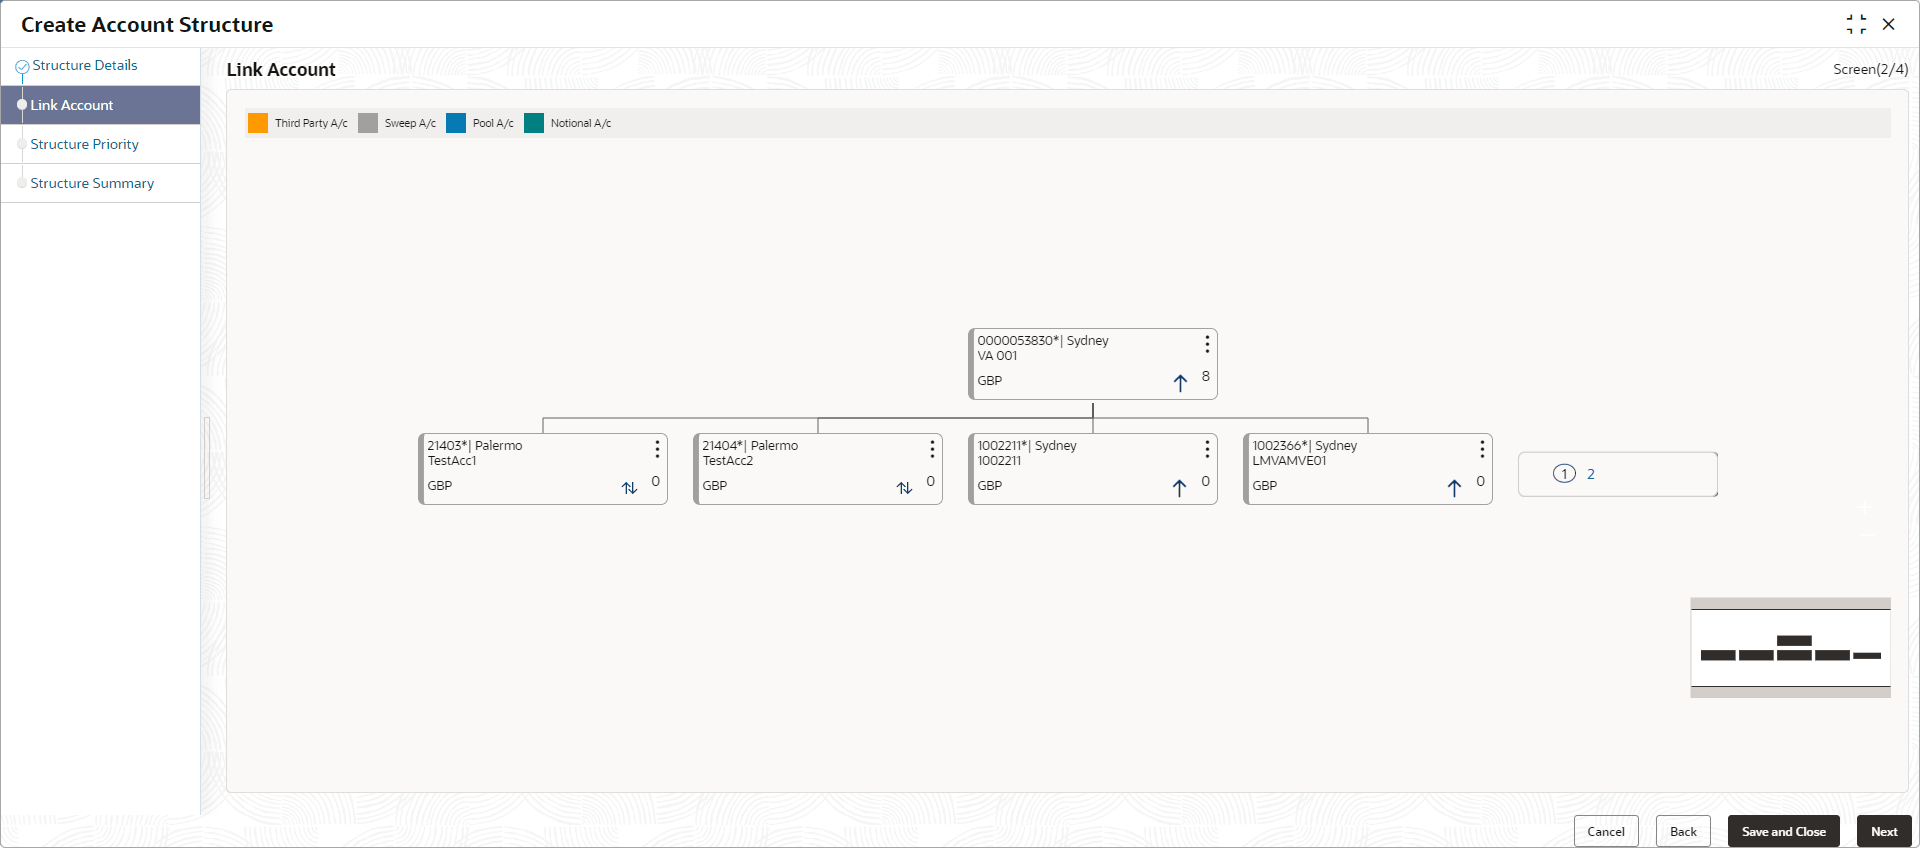
Parameters Displays the table with the name and value set for the selected parameter. - Click Build to add the child accounts to the
structure.The Create Account Structure - Link Account - View screen displays.
Figure 6-13 Create Account Structure - Link Account - View
Note:
Only Header node and its immediate child accounts will appear on the screen initially. To view further nodes, click on the respective nodes to expand and view its child accounts. Pagination will be displayed at every level of structure layer and displayed if the number of nodes exceeds the allowed limit as per the configuration - Perform anyone of the following actions on the child accounts node.
- Click
 and then click Link Account to add the
additional child accounts.
 - Click and then click View Account Details to
view the account details of the accounts.The Account Details screen displays
Table 6-12 Account Details - Field Description
Field Description Customer Name Displays the customer name. Entity Name Displays the entity name. Account Number Displays the account number. Description Displays the description of the particular account. Bank Name Displays the bank name of the account. Note: This field appears only for External Accounts.
Bank Code Displays the bank code of the account. Available Balance Displays the balance of the account. IBAN Displays the IBAN number of the account. Branch Code Displays the branch code of the account. Account Category Displays the Category of the account. Location Displays the location of the account. Country Code Displays the country code of the account. Hold Select the toggle to hold the account. - Click
 and then click Delink Account to delink
the child account from parent account.
 - Click
 and then click Delink Account Hierarchy
to delink all the child accounts and parent account of the
structure.
 - Click
 and then click Replace Account to
replace the account in the structure.
and then click Replace Account to
replace the account in the structure.Note:
This option is disabled, if the account being replaced has child accounts. - Click
 and then click Set Child Instructions to
set the child instructions to the child account.
- Click
- Click Previous to navigate to the previous screen (Structure Details).
- Click Next to save and navigate to the next screen
(Structure Priority).The Alert Message - Accounts in Multiple Structure popup screen displays. If an account added is already a part of another structure.
Figure 6-15 Alert Message - Accounts in Multiple Structure
- Click Confirm to confirm and proceed to next datasegment.
- Click Cancel to cancel the action and stay on the same datasegment.
- Click Save and Close to save and close the Structure screen. In such case, the structure gets saved and available in Summary screen.
- Click Cancel to discard the updated details and close the Structure screen. In such case, the structure will not get saved.
Parent topic: Create Account Structure
