5.4.1 Account Closure
This topic describes the systematic instructions to search and close an account.
- Click Corporate Account Services, and under
Corporate Account Services, click Account
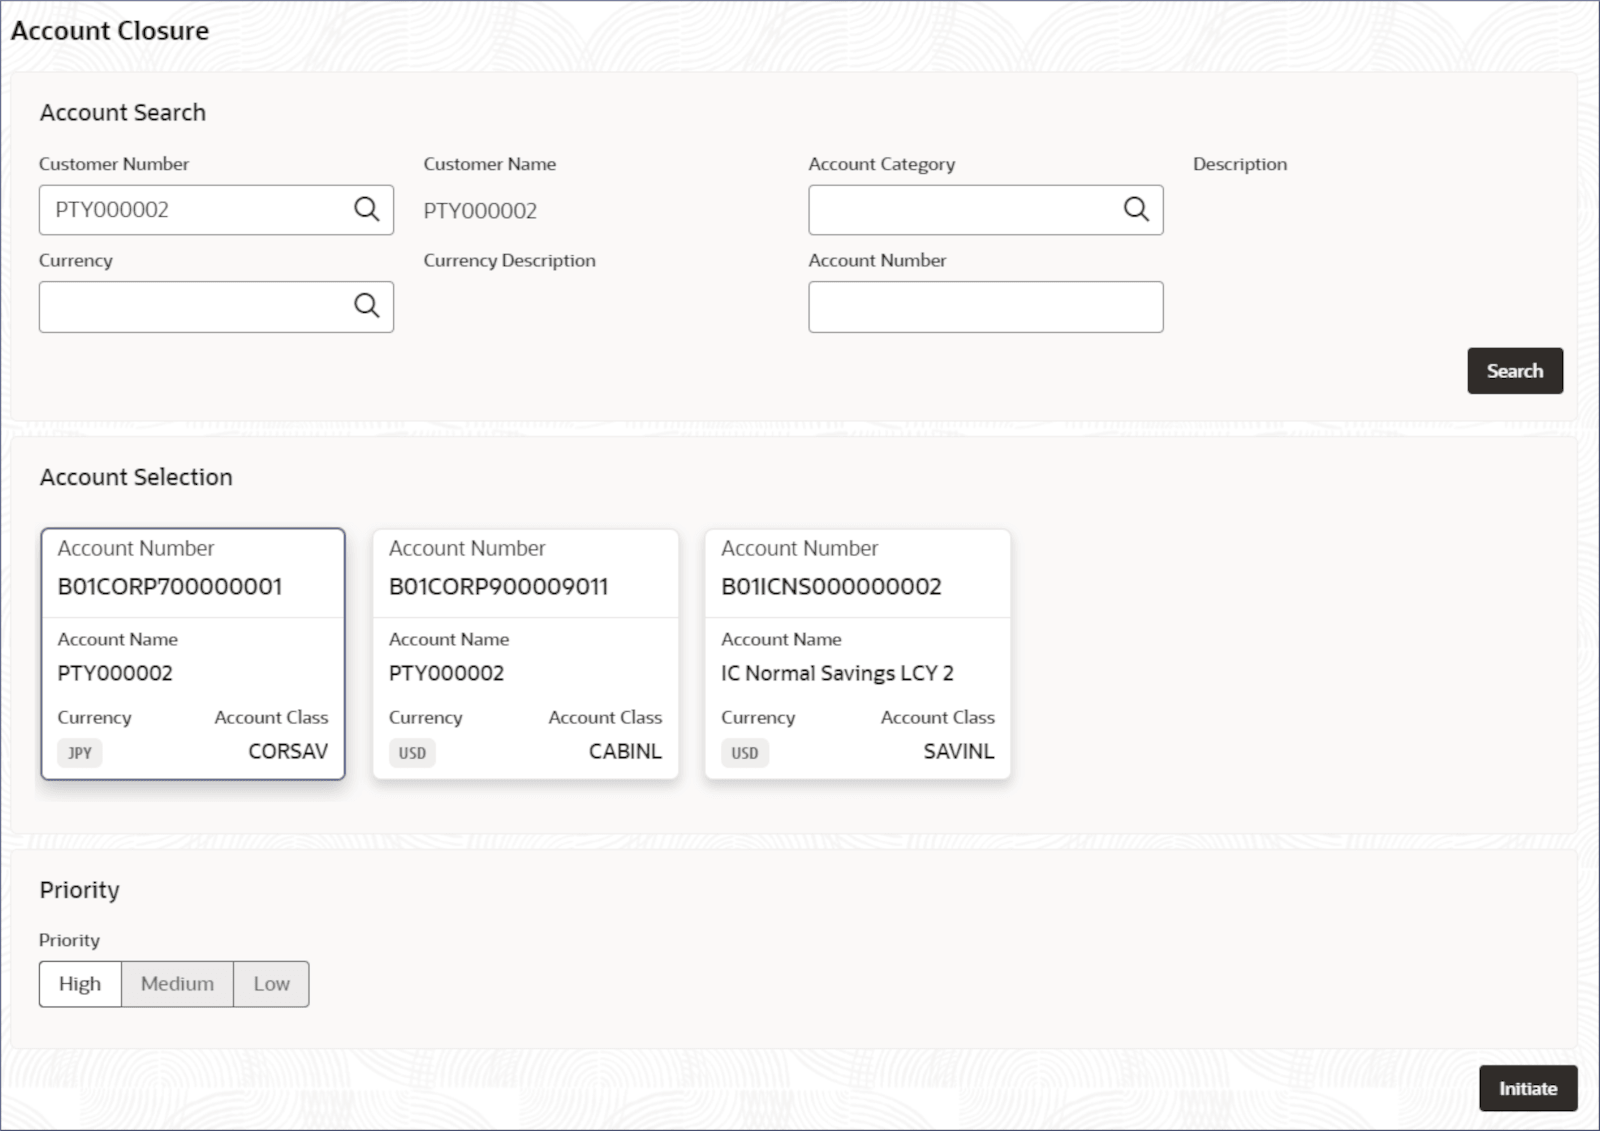
Closure.The Account Closure page displays.
- Specify one or more fields in the Account Search
section.
Table 5-6 Account Search- Field Description
Field Description Customer Number Specify the CIF number of the customer owning the account. Customer Name The name of the selected customer is auto-populated. Account Category Specify the account category to which the account belongs. Description The description of the selected account category is auto-populated. Currency Specify the operating currency of the account. Currency Description The description of the operating currency is auto-populated. Account Number Specify the Account number. - Click the Fetch
icon.
The Account Number dialog displays.
- Search for the required account by providing some or all of the following details: Account Number, Account Name, or Account Currency.
- Select the required account from the results.
- Click the Fetch
icon.
- Click Search.The accounts matching the search filters display in the Account Selection section.
- Click an account tile to select it, then click
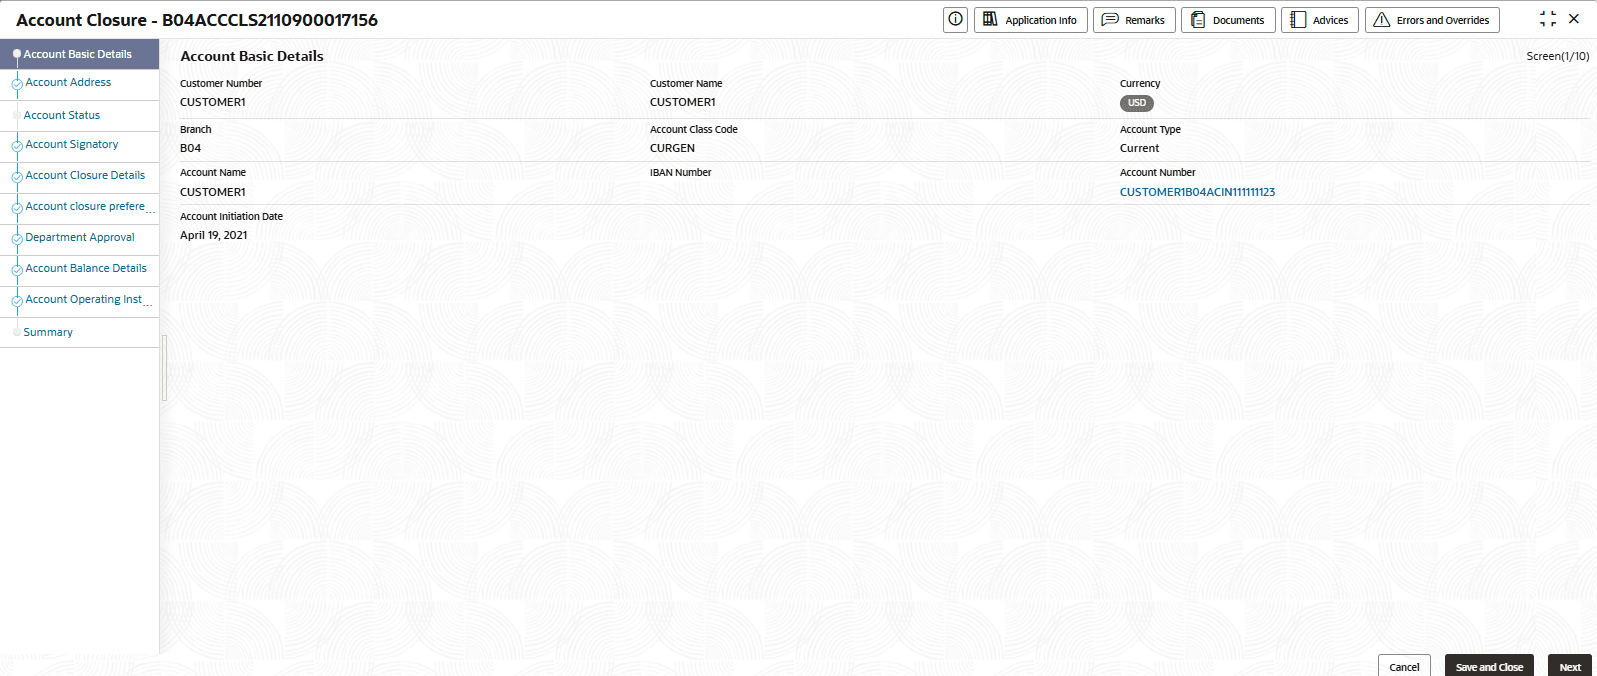
Initiate.The Account Closure - <Application Number> page displays the Account Basic Details screen.
Tip:
Make a note of the Application Number. This is needed to identify the task at the entry, enrich, and approval stages in the matching process, on the Free Tasks page. - For more information the field descriptions on the Account Basic Details screens, see the Account Basic Details step in the Account Creation topic and click Next.The Account Address page displays.
- For more information on the Account Address screens, see the Account Address step in the Account Creation topic and click Next.The Account Status page displays.
- For more information on the Account Status screens, see the Account Status step in the Account Creation topic and click Next.The Account Signatory page displays.
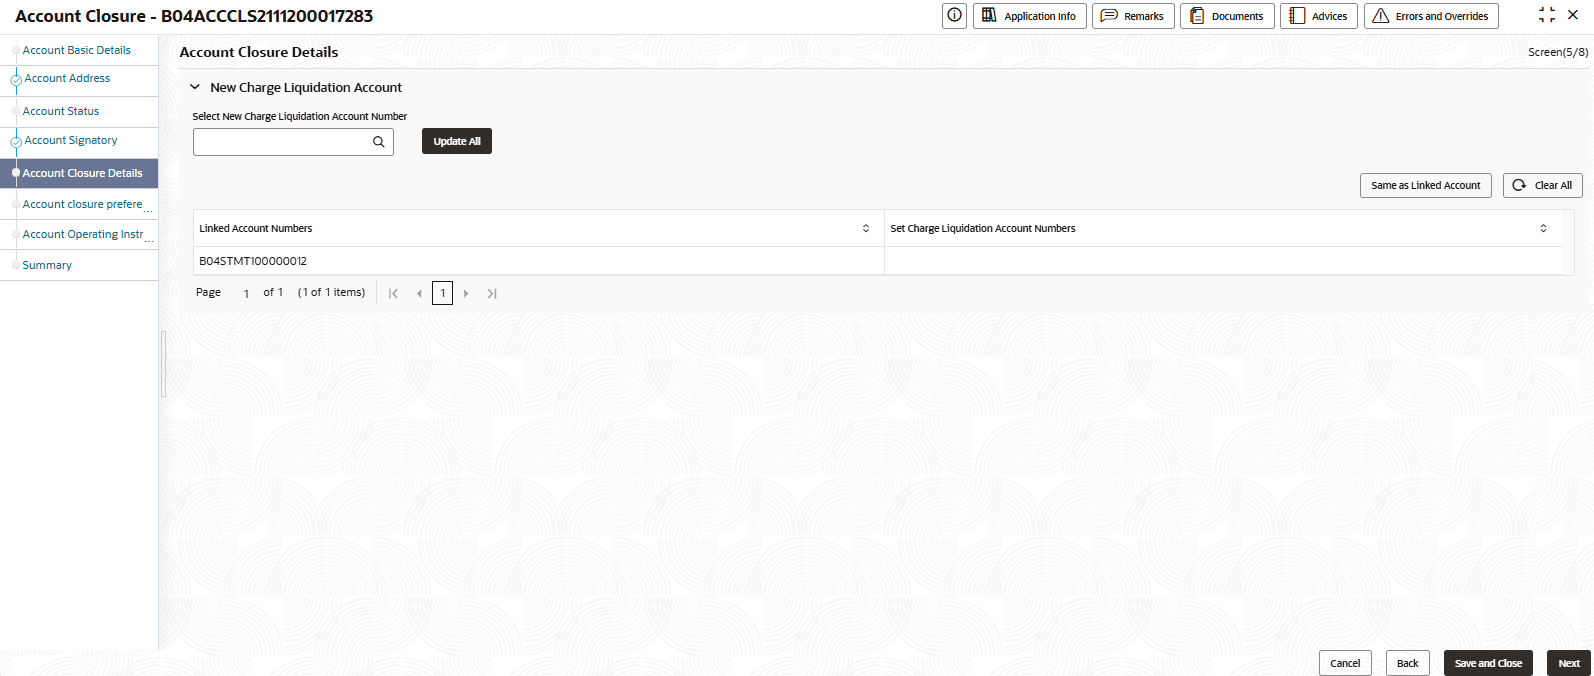
- For more information on the Account Signatory screens, see the Account Signatory step in the Account Creation topic and click Next.The Account Closure Details page displays.
- Provide the details on the Account Closure Details page.
- Specify the Field on the screen.
Table 5-7 Account Closure Detail
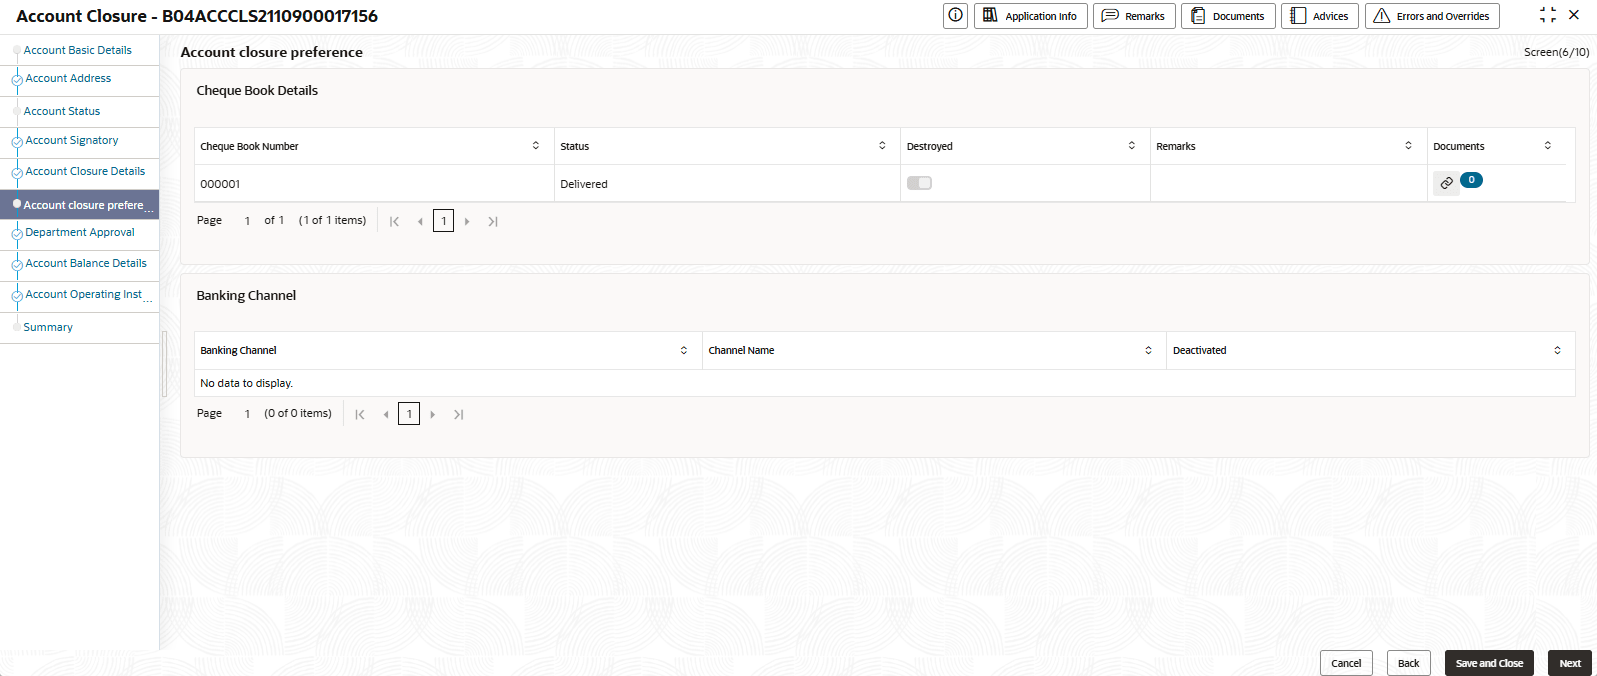
Field/Column Name Description Update All An Update All option should be available for the user to link the new account across multiple records. Same as Linked Account The user should have a Same as Linked Account option to link the Linked Account Number. Clear All Selecting this option indicates that consolidation will be removed. Linked Account Number Displays the Linked Account Number. Set Charge Liquidation Account Numbers Displays the list of accounts which can be selected as new Charge Liquidation Account. Set Interest Liquidation Account Numbers Displays the list of accounts which can be selected as new Interest Account. Set Statement Account Numbers Displays the list of accounts which can be selected as new Statement Account. - Click Next.The Account Closure Preference page displays.
- Specify the Field on the screen.
- Provide the details on the Account Closure Preference page.
- Specify the fields on the screen.
Table 5-8 Account Closure Preference - Column Description
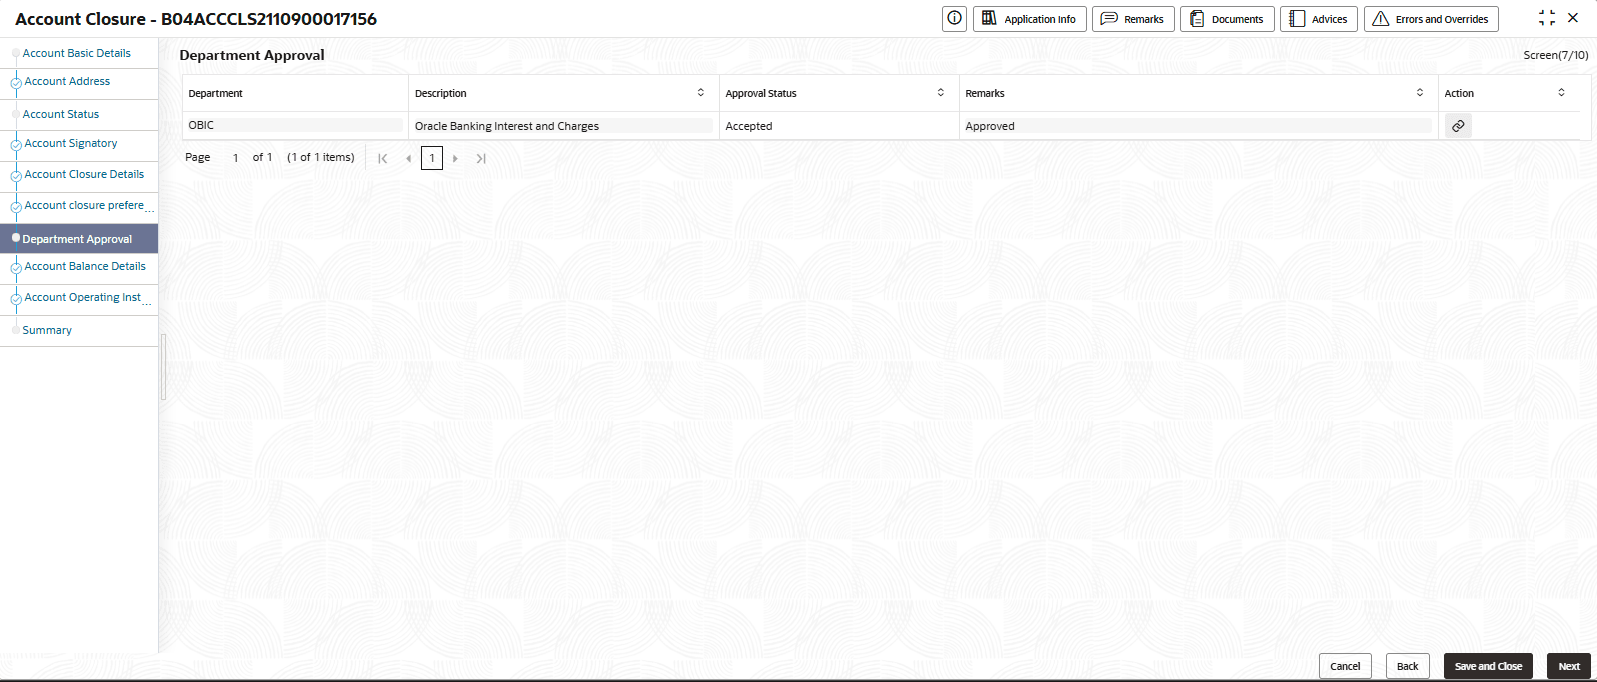
Column Name Description Cheque Book Number Display the Cheque book number. Status Display the current status of the record. Destroyed User can enable this feature. Remarks Displays the remarks. Documents User can update the documents. Banking Channel Display all the active Banking channel for the account. Channel Name Display all the active Banking channel name for the account. Deactivated Displays the Deactivated status. - Click Next.The Department Approval page displays.
- Specify the fields on the screen.
- Provide the details on the Department Approval page.
- Specify the column on the screen.
Table 5-9 Department Approval - Column Description
Column Name Description Department Display all the department considering the source code. Description Display the brief description of the source code. Approval Status Display the current status of the record: - Accepted
- Rejected
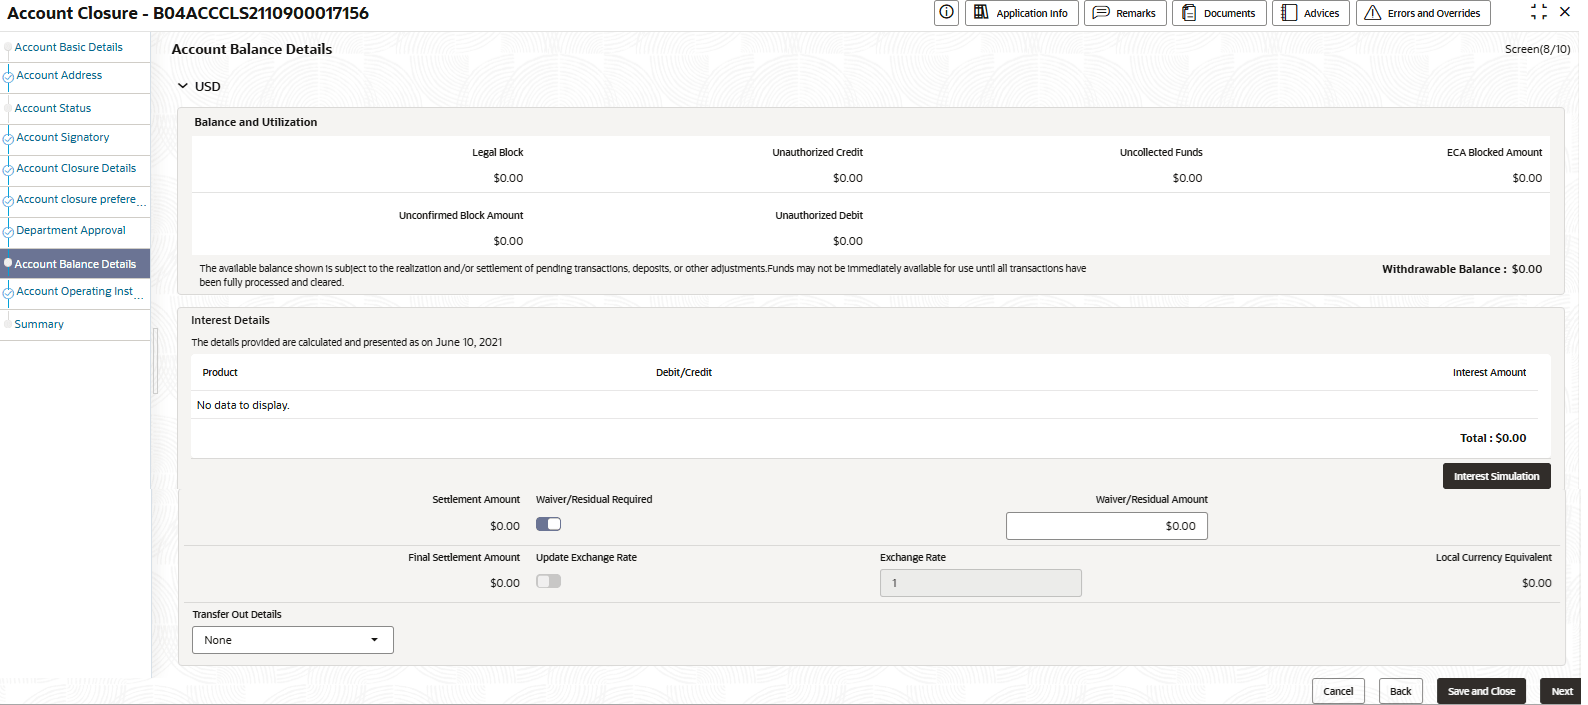
Remarks Displays the remarks. Action User can update the documents. - Click Next.The Account Balance Details page displays.
- Specify the column on the screen.
- Provide the details on the Account Balance Details page.
- Specify the fields on the screen.
Table 5-10 Account Balance Details - Column Description
Field/Column Name Description Legal Block Displays the legal block. Unauthorized Credit Total amount of Credits that await authorization. Uncollected Funds Uncollected funds that are applicable to the account. ECA Blocked Amount Amount blocked in the account due to External Credit Approval (ECA) sought by external applications such as Liquidity Management applications. Unconfirmed Block Amount Displays the unconfirmed block amount. Unauthorized Debit Total amount of Debits that are await authorization. Withdrawable Balance This includes sum of balances of Legal Blocks, Unauth Credit, Uncollected funds , Blocked Amount , Unauth Debit. Product Displays the interest product details. Debit/Credit Displays the type of transaction: - Credit
- Debit
Interest Amount Displays the interest amount. Settlement Amount Displays the settlement amount. Waiver/Residual Required Enable this feature to add the waiver/residual amount. Waiver/Residual Amount Displays the waiver/residual amount. Final Settlement Amount Displays the final settlement amount. Update Exchange Rate Displays the exchange rate to convert the original currency to the currency of the local branch. Exchange Rate Displays the exchange rate. Local Currency Equivalent Displays the local currency equivalent amount. Transfer Out Details Select the required option in the drop down. Available options are: - None
- Manager Checks
- Internal Account
- External Account
- Click Interest Simulation.The Interest Simulation page displays.
- Specify the fields on the screen.
Table 5-11 Interest Simulation - Field and Description
Field/Column Name Description From Date Specify the From date. To Date Specify the To date. Product Displays the Product. Debit/Credit Displays the type of transaction: - Debit
- Credit
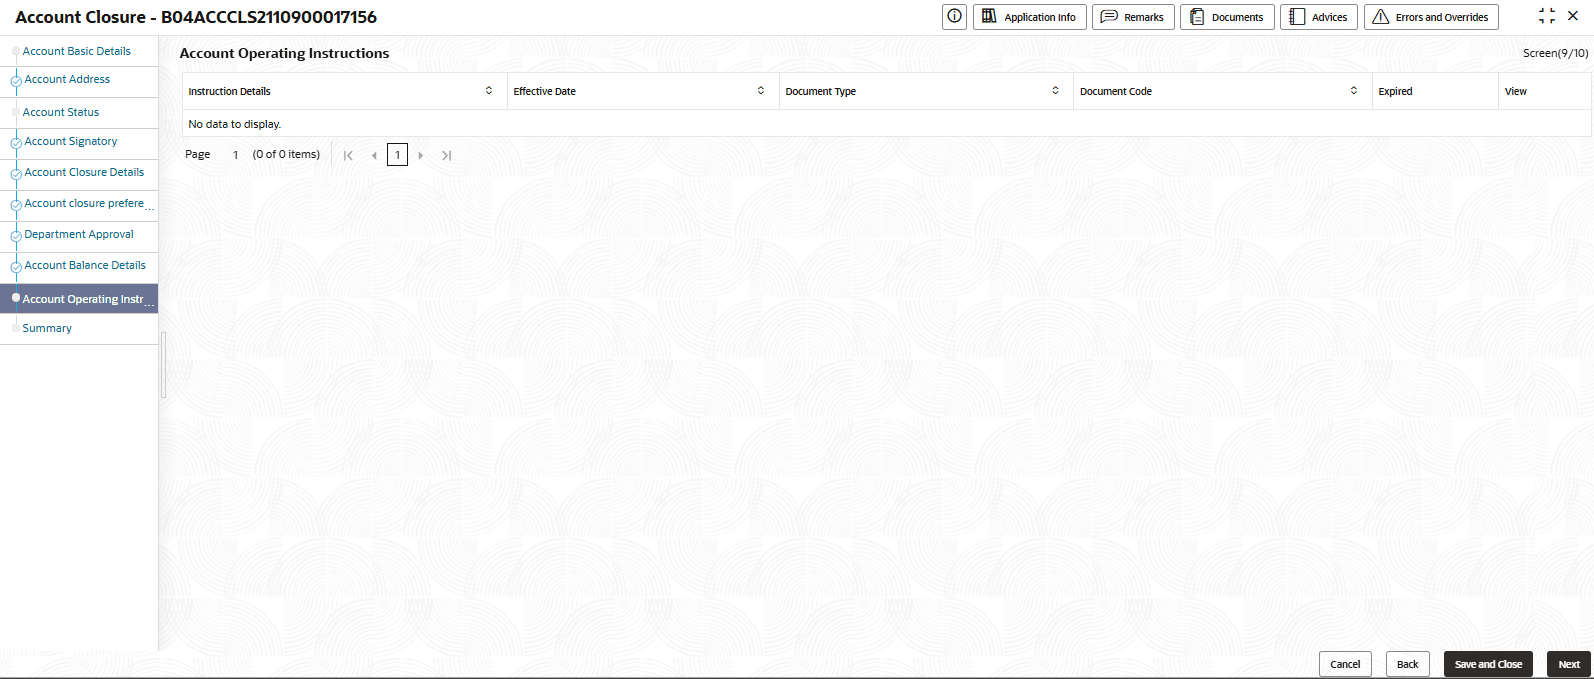
Projected Interest Amount Displays the Projected Interest Amount. - Click Next.The Account Operating Instructions page displays.
Figure 5-17 Account Operating Instructions
- Specify the fields on the screen.
- Provide the details on the Account Operating Instructions page.
Table 5-12 Account Operating Instructions
Column Name Description Instruction Details Displays the Instruction Details. Effective Date Displays the date from which the block is active. Document Type Displays the Document Type. Document Code Displays the Document Code. Expired Displays the Expired date. View View the Document. - Click Next.The Summary page displays.
- Click Submit from the Summary
screen.The Stage Movement Submission dialog displays the Overrides stage.
- Complete the Stage Movement Submission process.
- Accept any Overrides generated and click Proceed Next.The Checklist stage fetches and displays checklists mapped to this stage.
- Confirm the checklist items and then click Proceed Next.The Outcome stage displays.
- Select PROCEED from the drop-down list and click Submit.The account closure is approved.
- Accept any Overrides generated and click Proceed Next.
- Confirm that all stages of the Account Closure process are complete.
- Click Tasks, and under Tasks, click Completed Tasks.
- The Completed Tasks page should display the Approve stage.
Parent topic: Account Closure
