5.1.1 Create Journal Transactions
This topic describes the systematic instructions to create journal transactions.
- Click Corporate Account Transactions, under
Corporate Account Transactions, click
Journal Transactions, then click
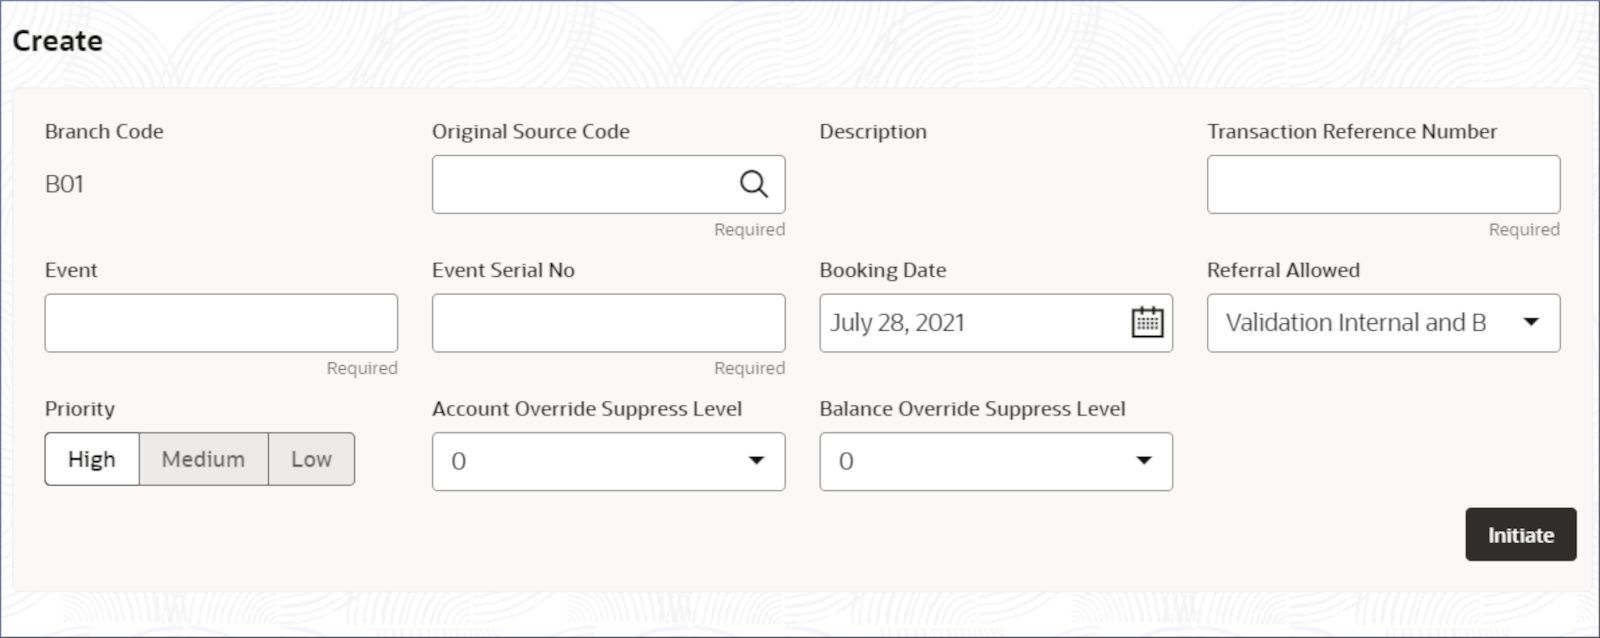
Create.The Create screen displays.
- Specify the transaction details on the Create
screen.
Table 5-1 Create - Field Description
Field Description Branch Code Displays the branch code of the current active branch. Original Source Code Specify the DDA source-system's code for unauthorized credit or debit transactions. Description Displays the DDA source code description. Transaction Reference Number Specify a unique reference number to identify the transaction. Event Specify a name for the transaction event. Event Serial Number Specify a serial number for the event. Booking Date Specify the booking date for the journal entry. This field displays the Branch date by default. Referral Allowed Select the referral validation process from the following: - Validation Internal and Balance Internal (Default) - All referral validations are performed by the internal system and the balance is verified in the internal customer account.
- Validation External and Balance External - All referral validations are performed by the external system and the balance is verified in the external customer account.
- Validation Internal and Balance External - All referral validations are performed by the internal system and the balance is verified in the external customer account.
- No Referral -
The transaction is not sent for referral validation.
Note:
The transaction fails if sufficient funds are unavailable in the account. And the transaction is rejected.
Priority Specify the priority of the transaction from the following options – - High (Default)
- Medium
- Low
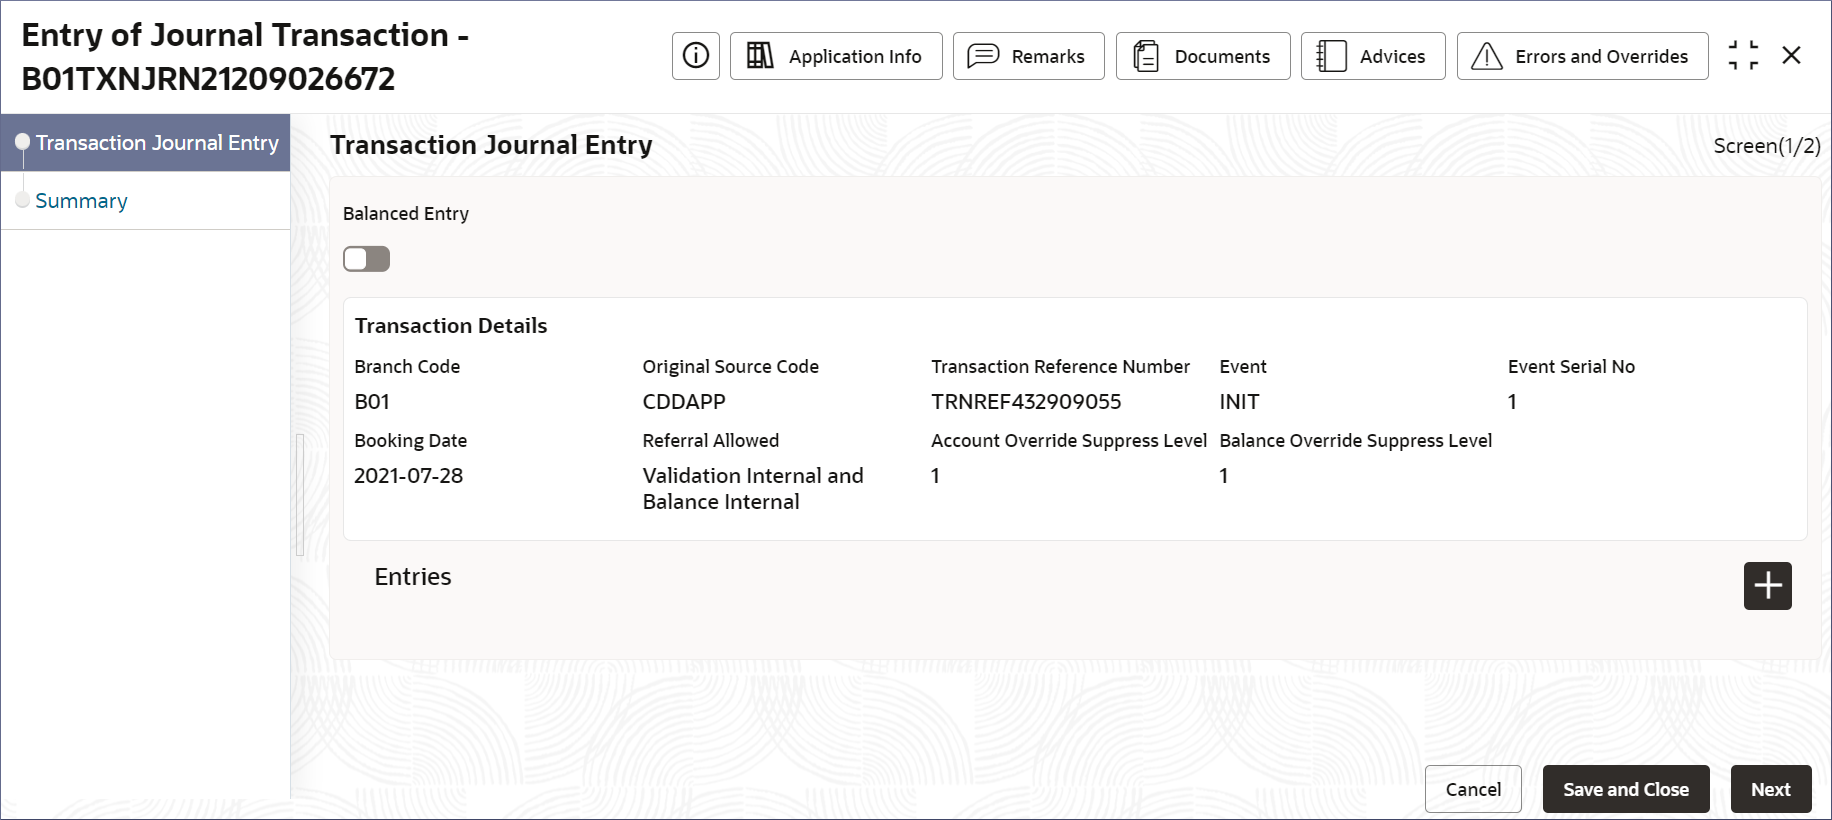
Account Override Suppress Level Specify the level of suppression to override transaction accounting errors. The system ignores accounting errors allowed within the suppress tier. Balance Override Suppress Level Specify the level of suppression to override balance limit errors. The system ignores balance limit errors allowed within the suppress tier. - Click Initiate.The Entry of Journal Transaction <Application Number> screen displays the transaction details specified on the Create page.
Tip:
Note the Application Number. It is needed to identify the tasks on the Free Tasks page. - Turn on the Balanced Entry option to record the transaction entry as a balanced accounting.
- Click + in the Entries
section.The Entries screen displays the Journal Entry fields.
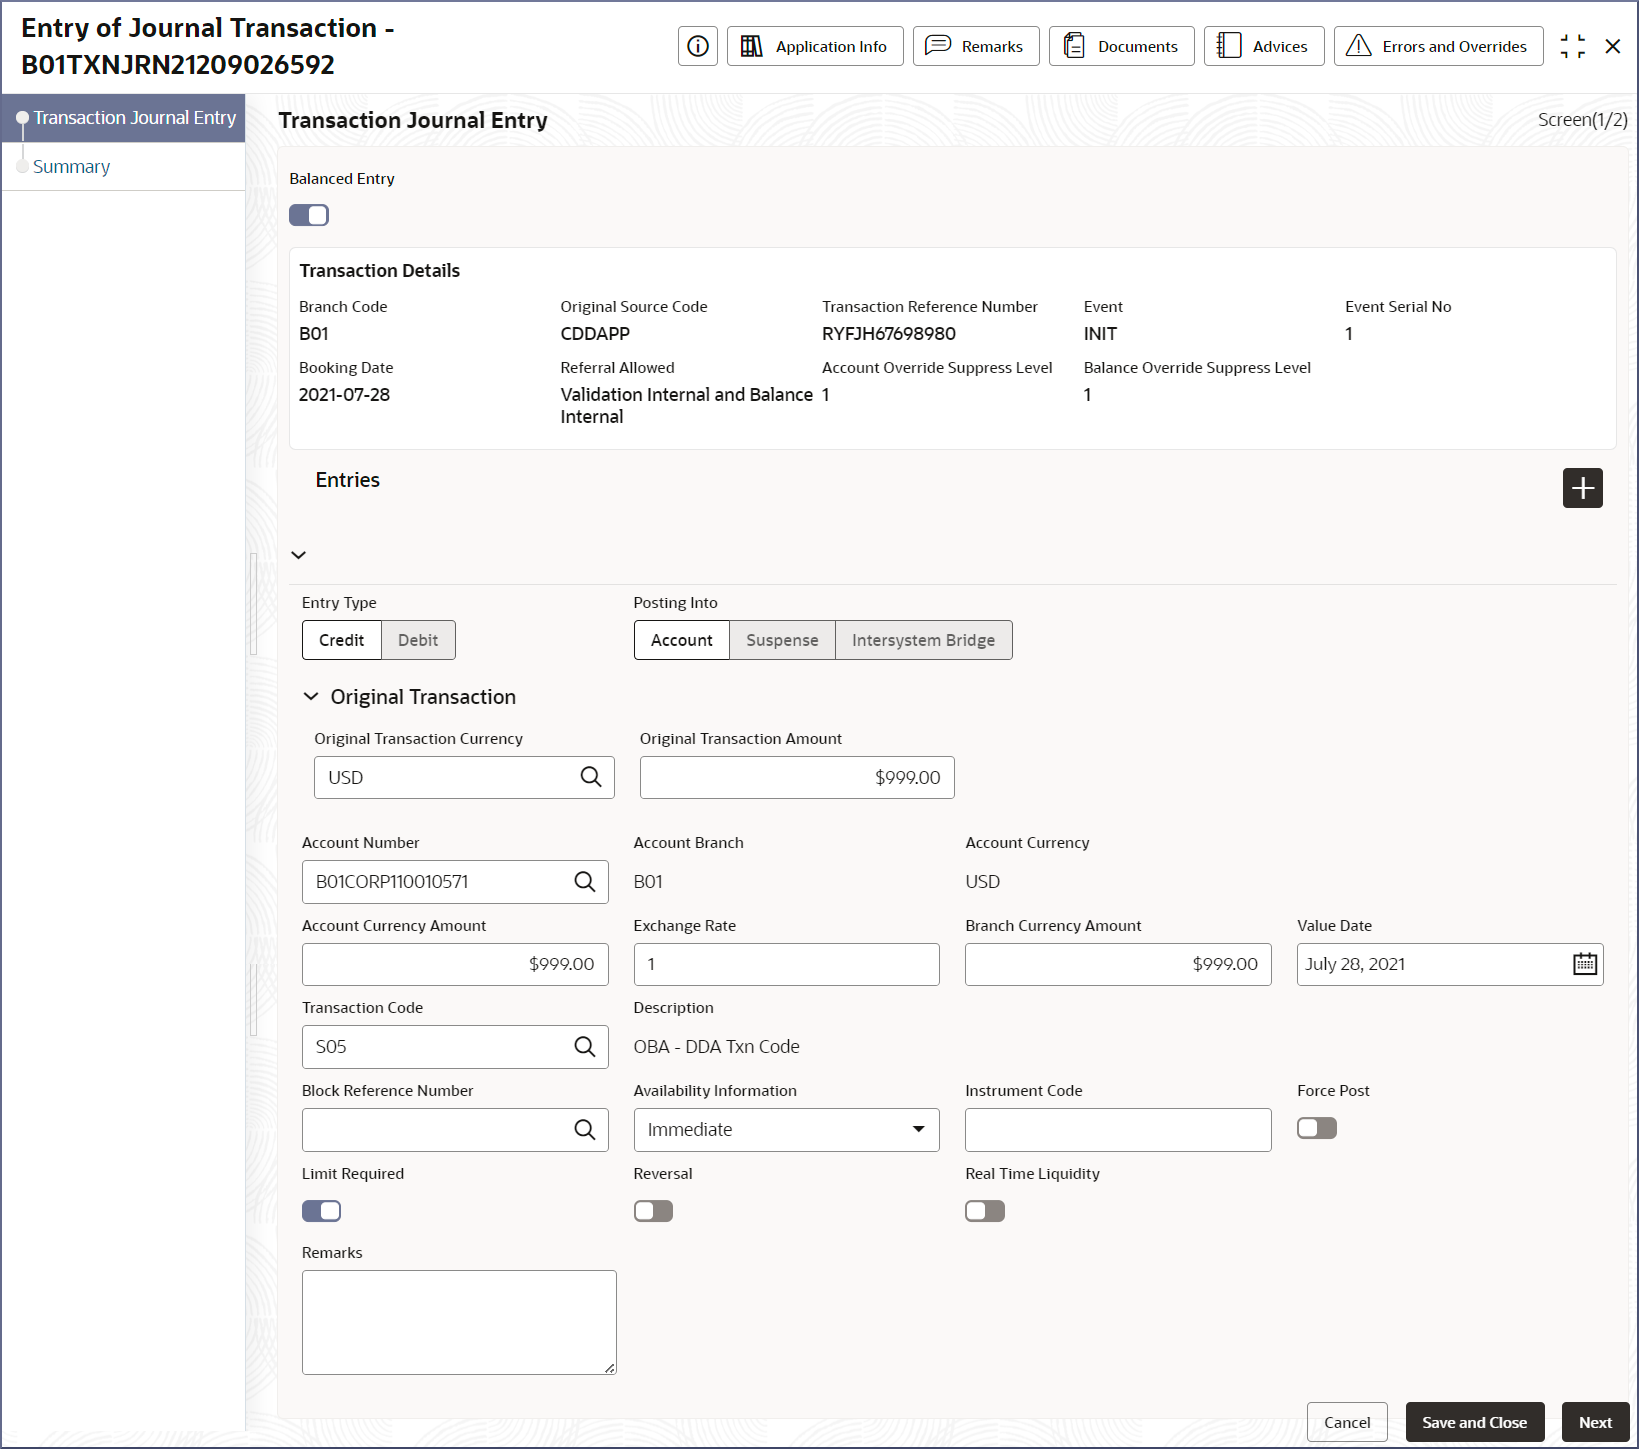
- Specify the fields in the Entries section.
- Turn on the Balanced Entry option to record the transaction entry as a balanced accounting.
- Specify the fields listed under the Entries section described in the table below.
Table 5-2 Transaction Journal Entry- Field Description
Field Description Entry Type Specify whether the journal transaction entry is a Credit or a Debit entry. Posting Into Select the account type to post. The available options are Account, Suspense, and Intersystem Bridge. Original Transaction Currency Specify the currency of the transaction. Original Transaction Amount Specify the transaction amount in the transaction currency. Account Number Specify the account number to post the transaction entry. Account Branch Displays the code of the branch holding the account receiving the transaction entry. This field is auto-populated. Account Currency Displays the primary currency of the account. This field is auto-populated. Account Currency Amount Specify the transaction amount in the primary currency of the account. Exchange Rate Specify the exchange rate when the transaction currency differs from the branch's local currency. Branch Currency Amount Specify the transaction amount in the branch currency. Value Date Specify the value date of the transaction. Transaction Code Specify the transaction code required to post the transaction. Description Description of the transaction code. This field is auto-populated. Block Reference Number Specify the unique identifier assigned to an account block. Availability Information Specify the availability. The available values are - - Value Date
- Immediate
- Available in 'n' days
Instrument Code Specify the instrument number used for the transaction. It could be a check number or any other identifier associated with the payment. Note:
The instrument code is valid for transactions that are unauthorized and related to debit transactions.Auto Release Turn on this option to release funds automatically on the availability date. Note:
Auto-release is valid for transactions that are unauthorized and related to debit transactions.Force Post Turn on this option to process and approve the transaction even if it fails to meet requirements or encounters errors during the usual processing flow. Note:
It is valid only for unauthorized debit transactions.Limit Required Turn on this option to ensure the transaction does not exceed a predetermined limit. Note:
It is valid only for unauthorized debit transactions.Reversal Turn on this option to indicate that this transaction reverses or cancels a previous transaction entry. Reversal Accounting Reference Specify the accounting reference number of a previous transaction you want to reverse. Real Time Liquidity Turn on this option to ensure instant fund availability for the transaction. Note:
RTL is valid only for unauthorized debit transactions.Remarks Provide details on the remarks that should be included when posting the transaction.
- Click Next to continue.The Summary screen displays the Transaction Journal Entry tile.
- Click the Transaction Journal Entry tile.The Transaction Journal Entry summary dialog displays.
- Review and Close the Transaction Journal Entry dialog.
- Click Submit.The Stage Movement Submission dialog displays the overrides on the Entry stage.
- Complete the Stage Movement Submission process.
- Accept any Overrides generated and click Proceed
Next.The Checklist stage fetches and displays checklists mapped to this stage.
- Confirm the checklist items and then click Proceed
Next.The Outcome stage displays.
- Select PROCEED from the drop-down list.
- Click Submit.The Stage Movement Submission process creates the Approval of Journal Transaction Entry task.
- Accept any Overrides generated and click Proceed
Next.
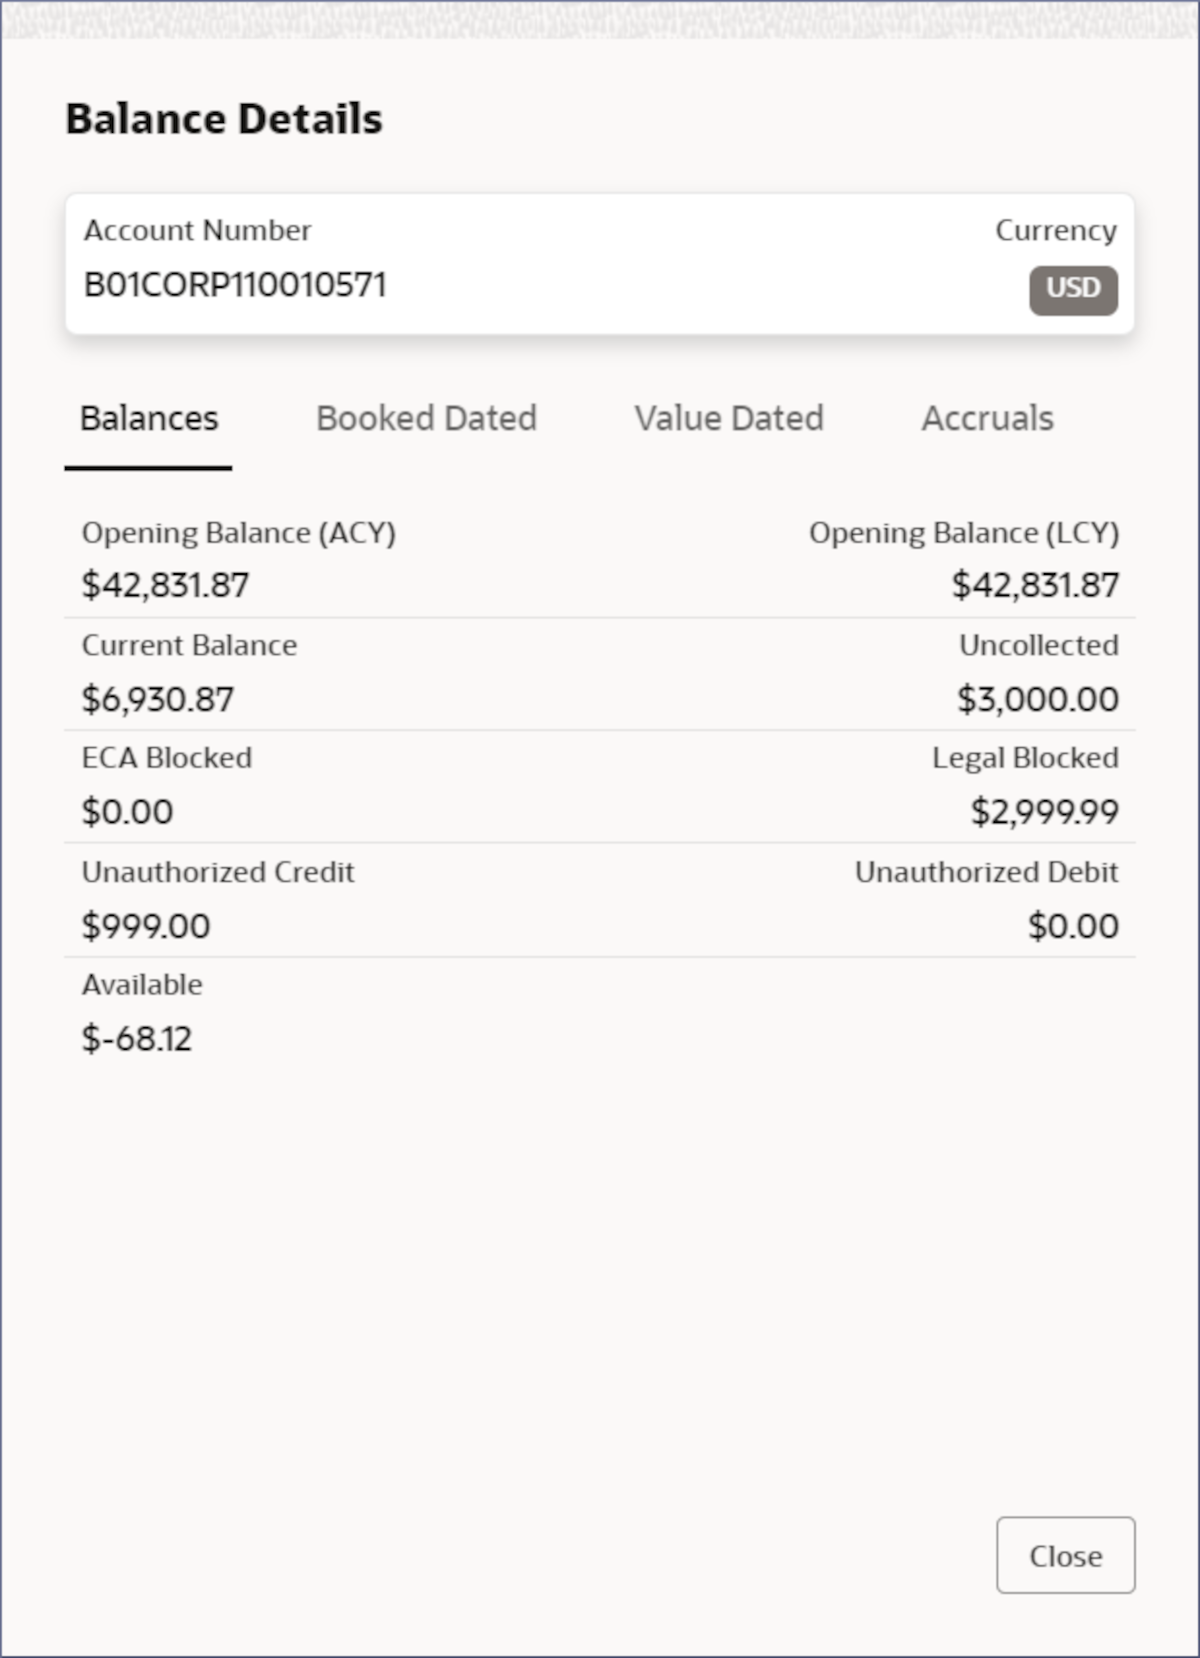
- (Optional) View the account balance and verify that the unauthorized
transaction amount reflects in the account balance.The Account Balance details dialog shows the unauthorized credit amount of $999.00 created by the unauthorized credit transaction entry for the account in Step 5.
Note:
To view balance details of an account, see Balance Details. - Acquire and edit the Approval of Journal Transaction
Entry task.
Note:
This and the remaining steps are performed by the back office accounting department personnel with the appropriate authority to approve the transaction.- Click Tasks, under Tasks,
click Free Tasks.The Free Tasks page displays.
- Search the listed tasks with these column values. Process Name column contains Transaction Journal Creation, the Stage column contains Approval of Journal Transaction, and the Application Number column has the number noted in Step 3.
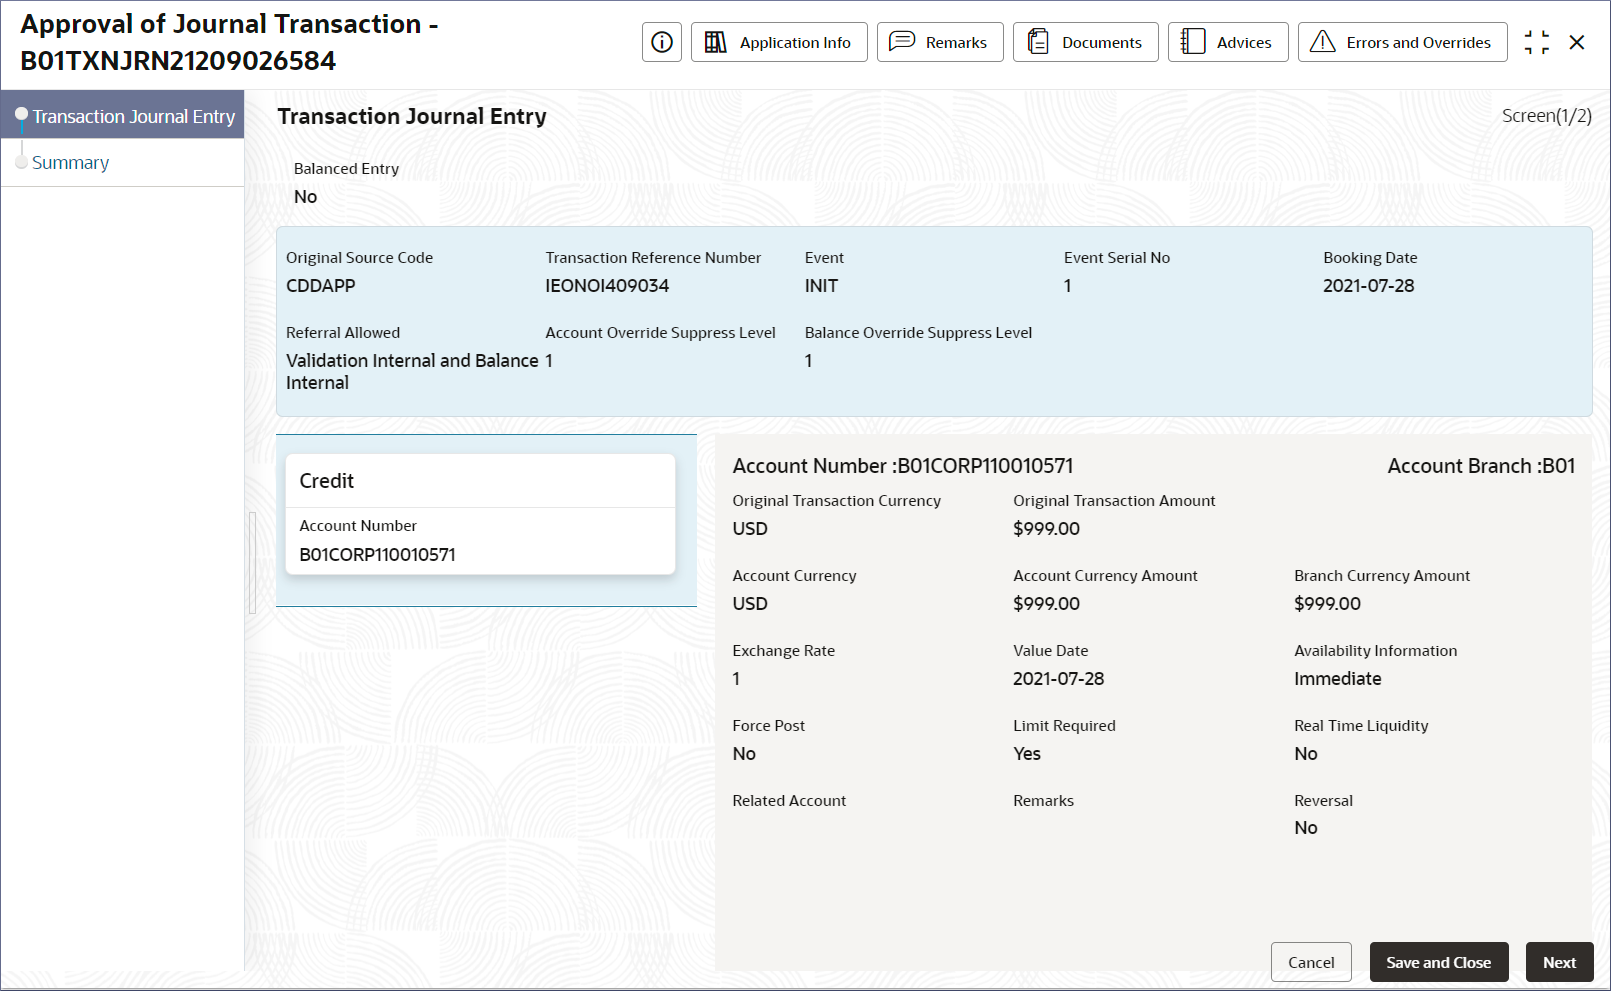
- Click Acquire and Edit.The Approval of Journal Transaction - <Application Number> page displays.
Figure 5-5 Approval of Journal Transaction
- Click Tasks, under Tasks,
click Free Tasks.
- Scrutinize and ensure that the transaction journal entry is correct.
- Click Submit from the Summary screen. The Stage Movement Submission dialog displays.
- Complete the Stage Movement Submission process.
- Accept any Overrides generated and click Proceed
Next.The Checklist stage fetches and displays checklists mapped to this stage.
- Confirm the checklist items and then click Proceed
Next.The Outcome stage displays.
- Select PROCEED from the drop-down list.
- Click Submit.The transaction journal entry is approved, and the transaction executed.
- Accept any Overrides generated and click Proceed
Next.
- Confirm that the unauthorized transaction entry is approved.
- Click Tasks, and under
Tasks, click Completed
Tasks.The Completed Tasks page should display the two stages of the Journal Transaction entry: Entry and Approval.
- View the account balance details in the 360 view.Confirm that the current balance includes the unauthorized transaction amount. For more information on viewing Balance details, see Balance Details.
- Click Tasks, and under
Tasks, click Completed
Tasks.
- View the account balance details.Check that the current balance includes the unauthorized transaction amount.
Parent topic: Journal Transactions
