- Retail Accounts User Guide
- Configurations
- Business Product
- Create Business Product
1.1.1 Create Business Product
This topic describes the systematic instructions to create business product. The maintenance screen allows the user to configure business product parameters.
Note:
The fields marked as Required are mandatory.- On Home screen, under Menu, click Retail Account Configurations. Under Retail Account Configurations, click Business Product.
- Under Business Product, click Create Business
Product.The Create Business Product screen displays.
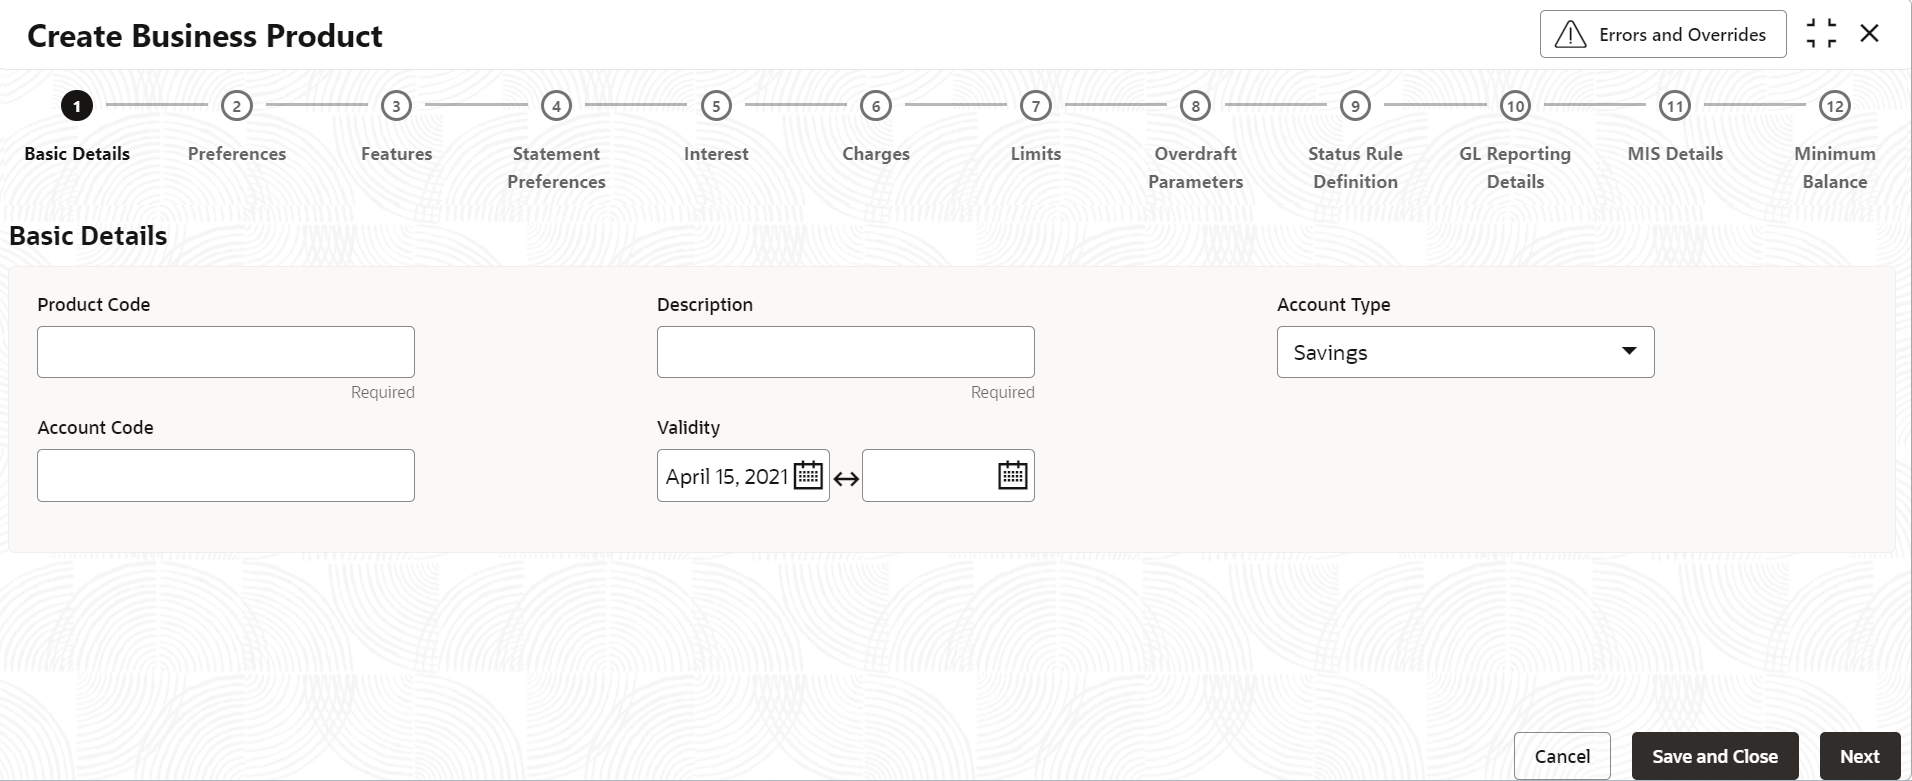
Figure 1-1 Create Business Product - Basic Details
- Specify the fields on the Basic Details screen.
For more information on fields, refer to the field description table below.
Table 1-1 Basic Details - Field Description
Field Description Product Code Specify the six digit alpha numeric unique product code for the creation of accounts. Description Specify the brief description of the business product. Account Type Select the type of the account from the drop-down list. The different types of accounts are: - Savings
- Current
The default value is Savings.
Account Code As per your bank’s requirement, you can choose to classify business products into different account codes. The bank can decide the way the business products are to be assigned to different account codes. The business product or an account code can be part of the customer account mask.
If the customer account mask consists of an account code, the value in this field is replaced in the account number.Validity Specify the validity period of the business product by specifying the start date and the end date. End date is optional.
- After specifying the fields in the Basic Details screen,
click Next.The Preferences screen displays.
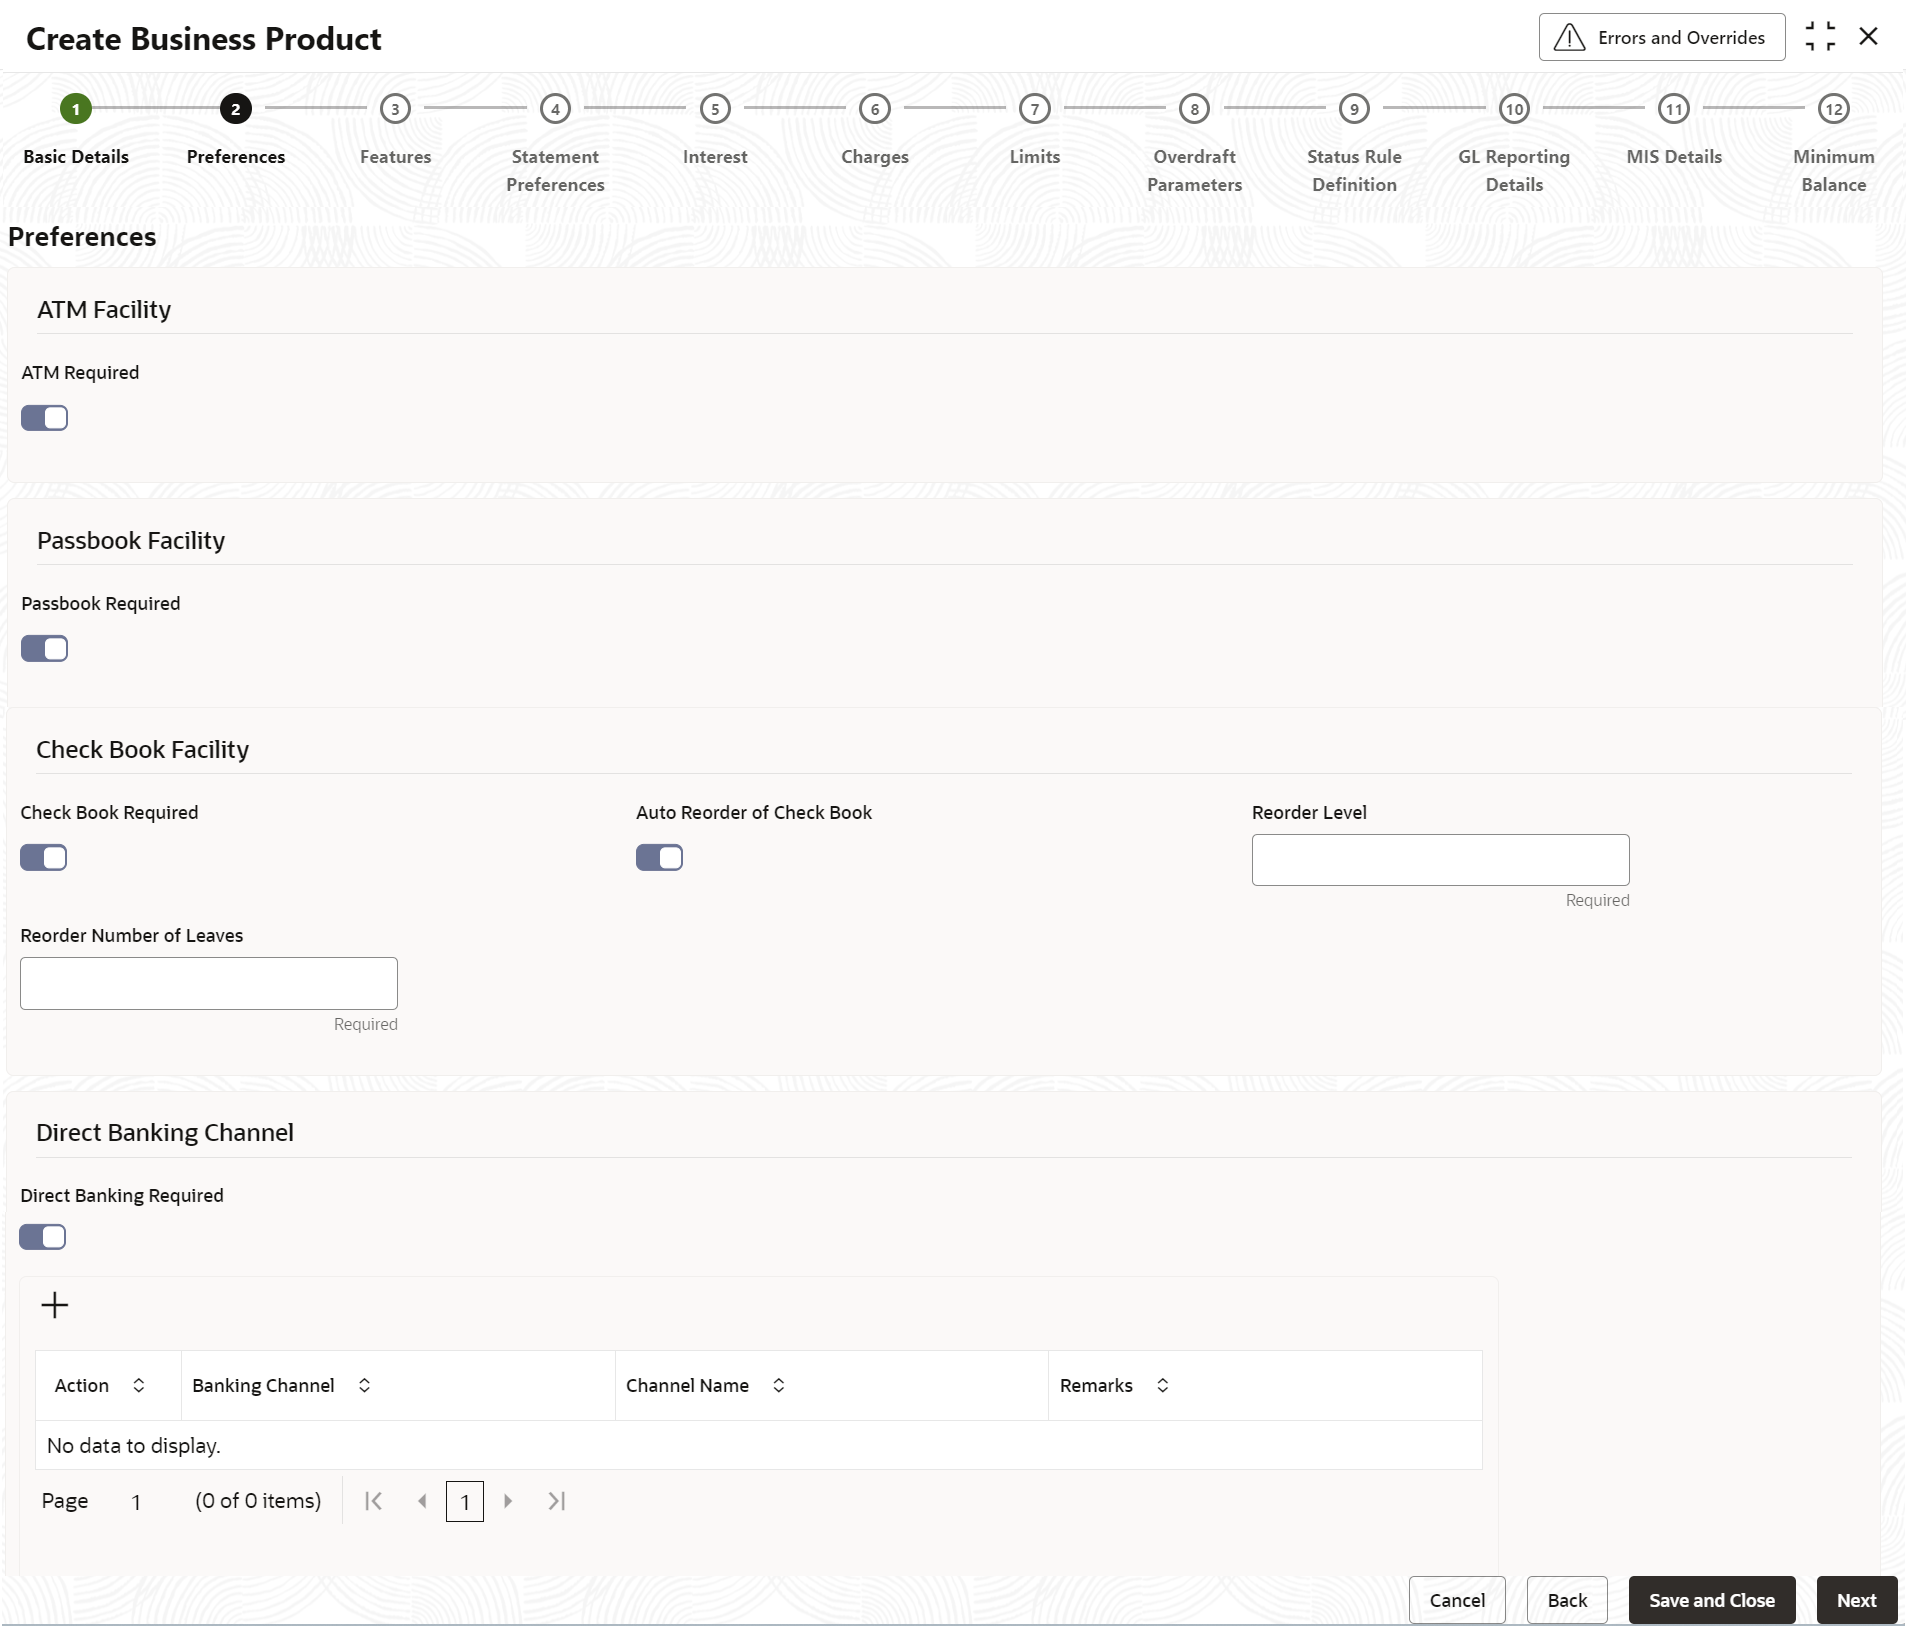
Figure 1-2 Create Business Product - Preferences
- Specify the fields on Preferences screen.
For more information on fields, refer to the field description table below.
Table 1-2 Preferences - Field Description
Field Description ATM Required Switch this toggle ON, if you need to avail the ATM facility for the accounts belonging to that business product. The default value is OFF.
Passbook Required Switch this toggle ON whether passbook is required or not for the account under the business product. The default value is OFF.
Check Book Required Switch this toggle ON whether check book is required or not for the account under the business product. When it is cleared, the preference is disabled for the account. The default value is OFF.
Auto Reorder of Check Book Switch this toggle ON whether check book should be replenished automatically when check leaves are getting exhausted. This option appears only if Check Book Required option is toggle ON.
Reorder Level Specify the threshold for auto reorder of check book. Reorder Number of Leaves Specify the number of leaves to be issued with the check book. Direct Banking Required Switch this toggle ON whether direct banking is required for accounts under the business product. The default value is OFF.
Once it is enabled, an Add icon and the related fields are displayed.
Click Add icon to add a direct banking channel details. A new row is added with the below fields.- Action - Click the Delete icon to delete the added details.
- Banking Channel - Banking channels maintained in Static Type Maintenance, are listed here as permissible channels for the business product. Channels include Internet Banking, Interactive Voice Response, Mobile, ATM, Credit Card and so on.
- Channel Name - This field indicates the name of the banking channel. For example, ATM is the banking channel name for Automated Teller Machine.
- Remarks - Capture if any remarks for the channel.
- After specifying the fields in the Preferences screen,
click Next.The Features screen displays.
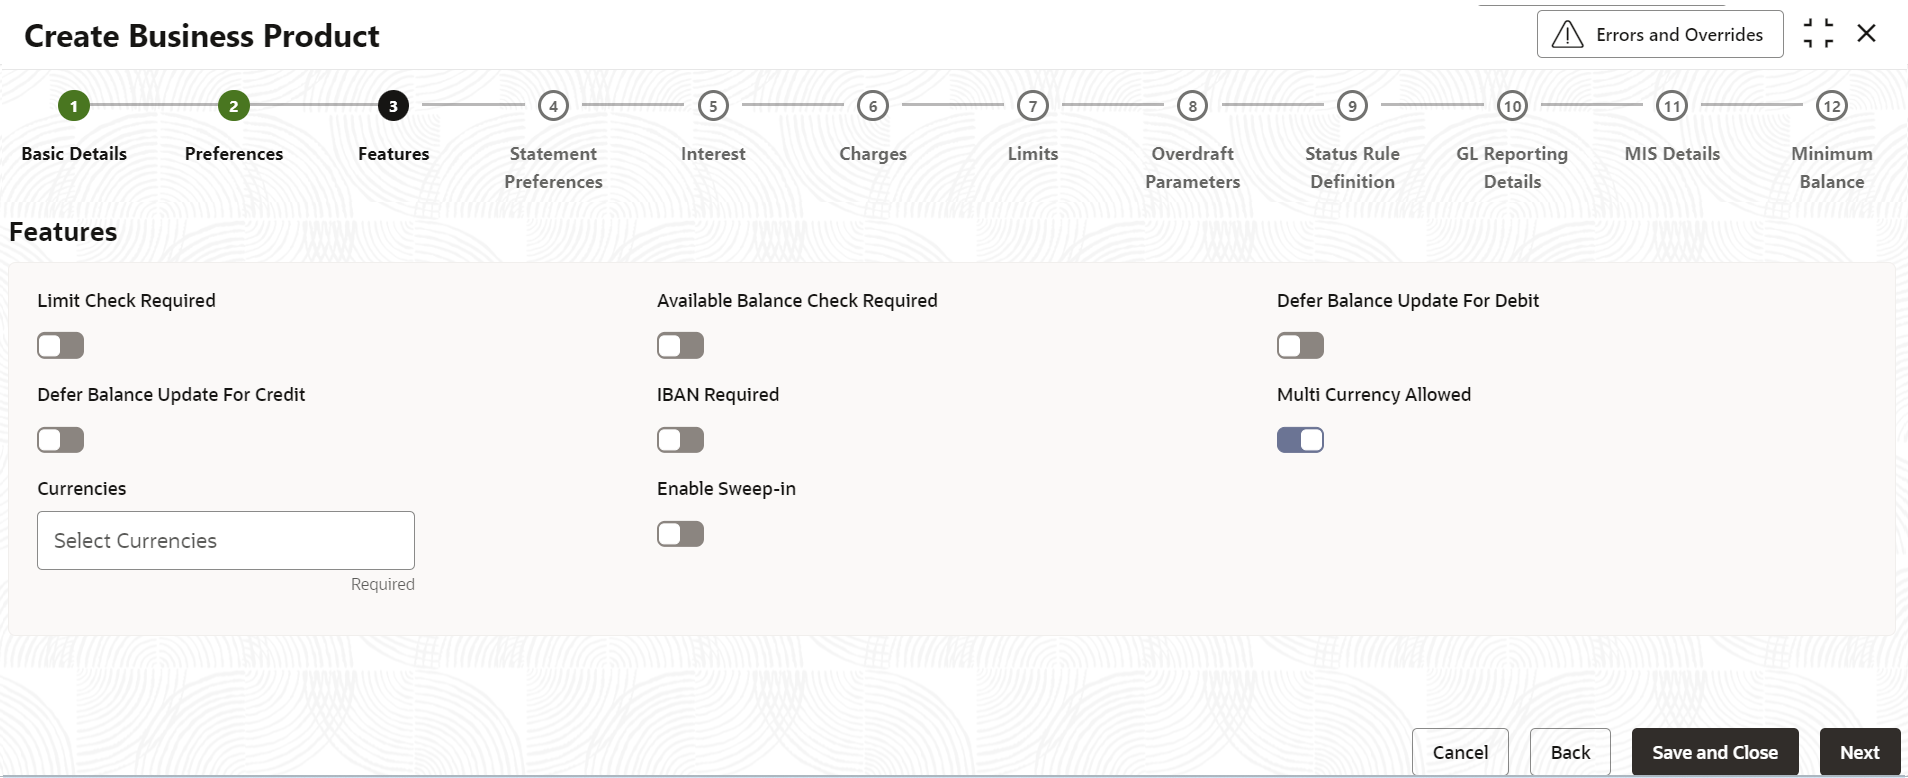
Figure 1-3 Create Business Product - Features
- Specify the fields on Features screen.
For more information on fields, refer to the field description table below.
Table 1-3 Features - Field Description
Field Description Limit Check Required Switch this toggle ON to indicate that the limit check for sufficient availability of funds are made for the accounts belonging to this business product. The default value is OFF.
Available Balance Check Required Switch this toggle ON to enable the system to check for the available funds before posting a debit entry to a customer account. The default value is OFF.
Defer Balance Update For Debit Switch this toggle ON to defer the balance update. If Defer Balance Update for Debit is selected, then the balance after debit transactions will be updated during EOD. The default value is OFF.
Defer Balance Update For Credit Switch this toggle ON to defer the balance update for credit transactions. If Defer Balance Update For Credit is selected, then the balance after credit transactions will be updated during EOD. The default value is OFF.
IBAN Required Switch this toggle ON, if IBAN is required for the business product. The default value is OFF.
Multi Currency Allowed Switch this toggle ON, to hold the different currencies under a single bank account. Currencies Select the Currencies from the list of values provided. This field is enabled only when the Multi Currency Allowed option is toggled ON.
Enable Sweep-in Switch this toggle ON, if overdraft protection/sweep-in is applicable for accounts under this business product. The default value is OFF.
Overdraft Protection/Sweep-in:
Banks offer Overdraft Protection/Sweep-in as a service, which safeguards customers from having their debit transactions dishonored or rejected due to insufficient funds in their Checking or Savings account. When such an instance occurs, the customer pulls an amount from another linked savings/checking account(s) to cover the shortfall.
The linked account(s) is called the provider account and the account for which the funds are being pulled is called the beneficiary account.
Multiple sweep provider accounts can be set up for a beneficiary account with a priority assigned to them.
- After specifying the fields in the Features screen,
click Next.The Statement Preferences screen displays.
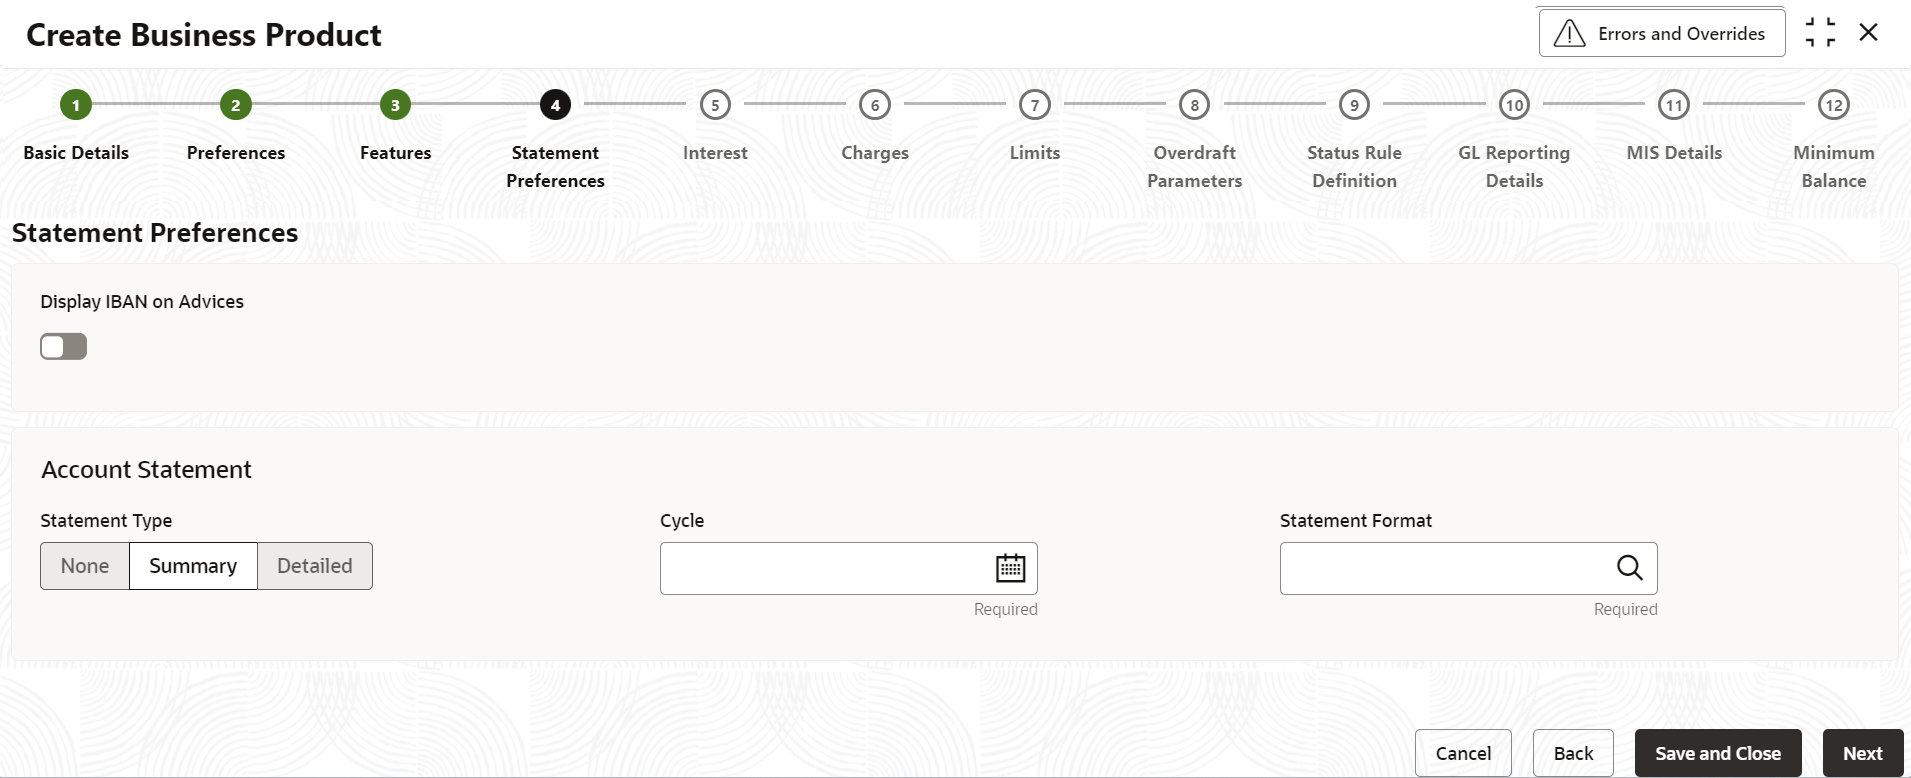
Figure 1-4 Create Business Product - Statement Preferences
- Specify the fields on the Statement Preferences
screen.
For more information on fields, refer to the field description table below.
Table 1-4 Statement Preferences - Field Description
Field Description Display IBAN on Advices Switch this toggle ON, the IBAN details will be displayed in the statement. The default value is OFF.
Statement Type Specify the type of account statement. The options are as follow: - None
- Summary
- Detailed
Cycle Specify the value for the cycle. The values are as follow: - Daily
- Weekly
- Fortnightly
- Monthly
- Quarterly
- Semi Annual
- Annual
This field is available only when the Statement Type is selected as Summary or Detailed.
Statement Format Specify the format in which the account statement should be generated. Click Search icon to view and select the required statement format. This field is available only when the Statement Type is selected as Summary or Detailed.
Validations
When the Cycle is selected as follows:
- Monthly - the list of value displays value from 1 to 31. This shows the day of the month for statement generation.
- Weekly - the list of value displays value from Sunday to Saturday.
- Fortnightly - the list of value displays value from Sunday to Saturday.
- Quarterly - the list of value displays value from January to December.
- Semi Annual - the list of value displays value from January to December.
- Annual - the list of value displays value from January to December.
- After specifying the fields in the Statement Preferences
screen, click Next.The Interest screen displays.
To calculate interest for an account, you must apply an interest product code on the account. To recall, every interest product code that you create is linked to an interest rule. The logic to calculate interest is built into an interest rule. When you apply an interest product code on the account, interest for the account will be calculated according to the interest rule definition.
For the account for which you are defining special conditions choose the product(s) that you wish to apply. To recall, you can define a Special Condition for an account only if the business product of the account has a general condition defined for the product. Thus, the pick-list from where you select the product for which you want to define a special condition will contain products that satisfy one of the following conditions:- a general condition has been defined for the product and business product combination.
- the product has been defined as a special conditions only product.
The interest rule that is linked to the product(s) will determine the interest that is applied on the account. You may want to apply more than one interest product code on an account. For example, you may want to pay credit interest on the credit balance maintained in a current account and levy a debit interest if the account lapses into a debit balance. In order to achieve this, you would have to apply two product codes (one defined for credit interest and another defined for debit interest). In this screen, you can choose the interest product codes that you want to apply on the account.
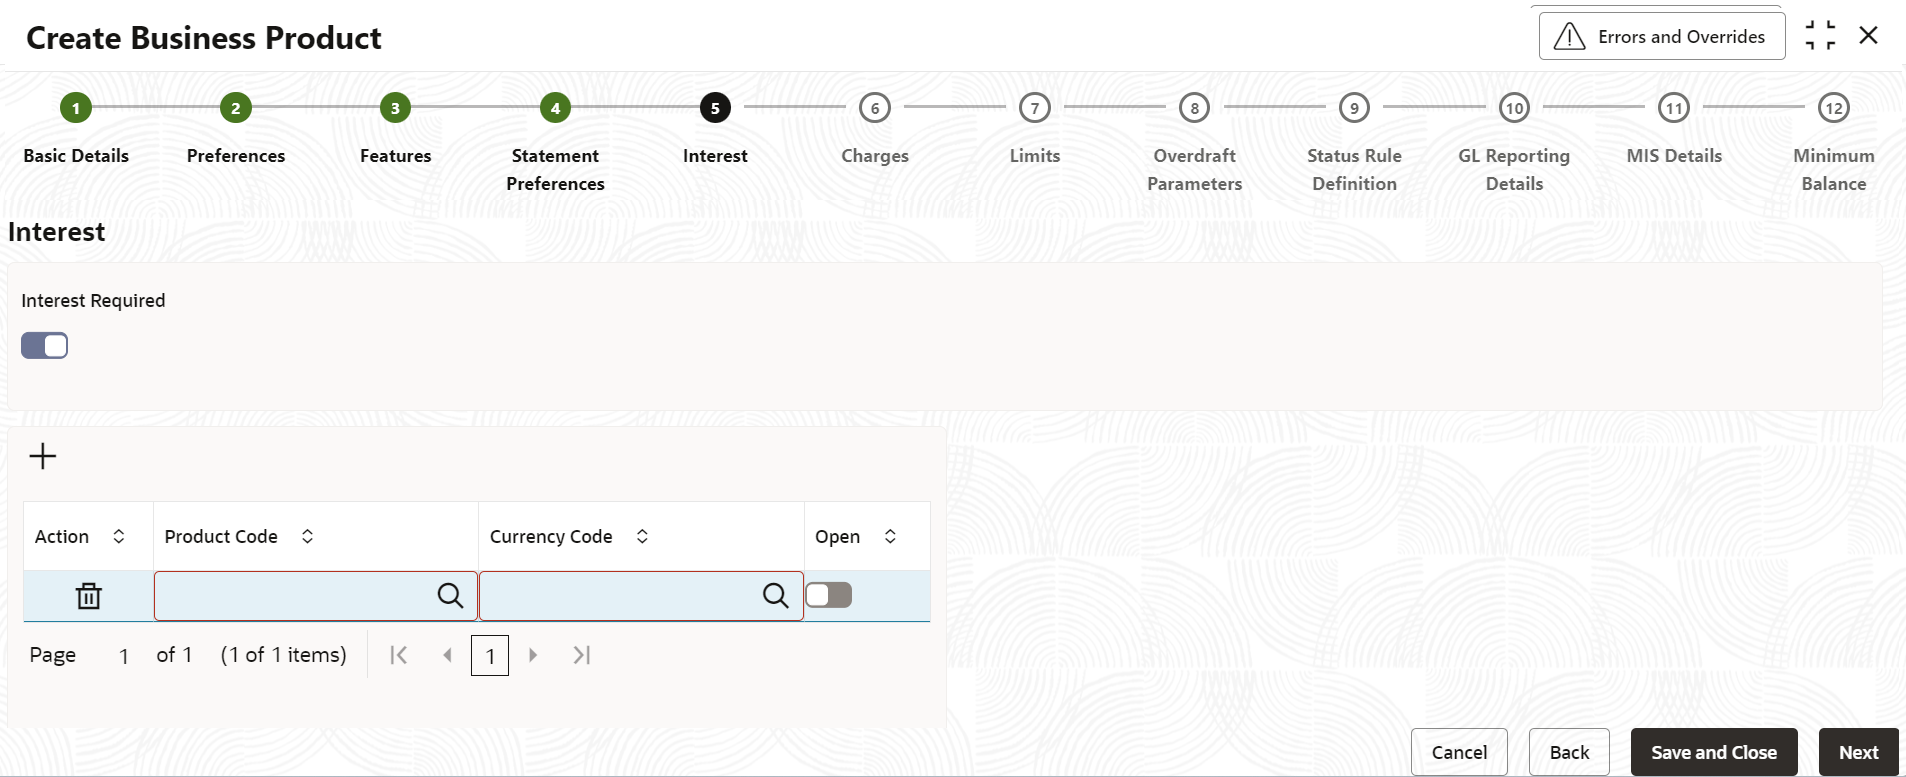
Figure 1-5 Create Business Product - Interest
- Specify the fields on Interest screen.
For more information on fields, refer to the field description table below.
Table 1-5 Interest - Field Description
Field Description Interest Required Switch this toggle ON to indicate that the interest is applicable for the accounts with this business product. The default value is ON.
Click the Add icon, a new row is added to update the details for the interest.
Action Click the Delete icon to delete the added row. Product Code Click Search icon to view and select the required product code. Currency Code Click Search icon to view and select the required currency code. Open Switch this toggle ON to change the status of the product code to open. The default value is OFF.
For more information about Interest, refer to Interest and Charges User Guide
- After specifying the fields in the Interest screen,
click Next.The Charges screen displays.
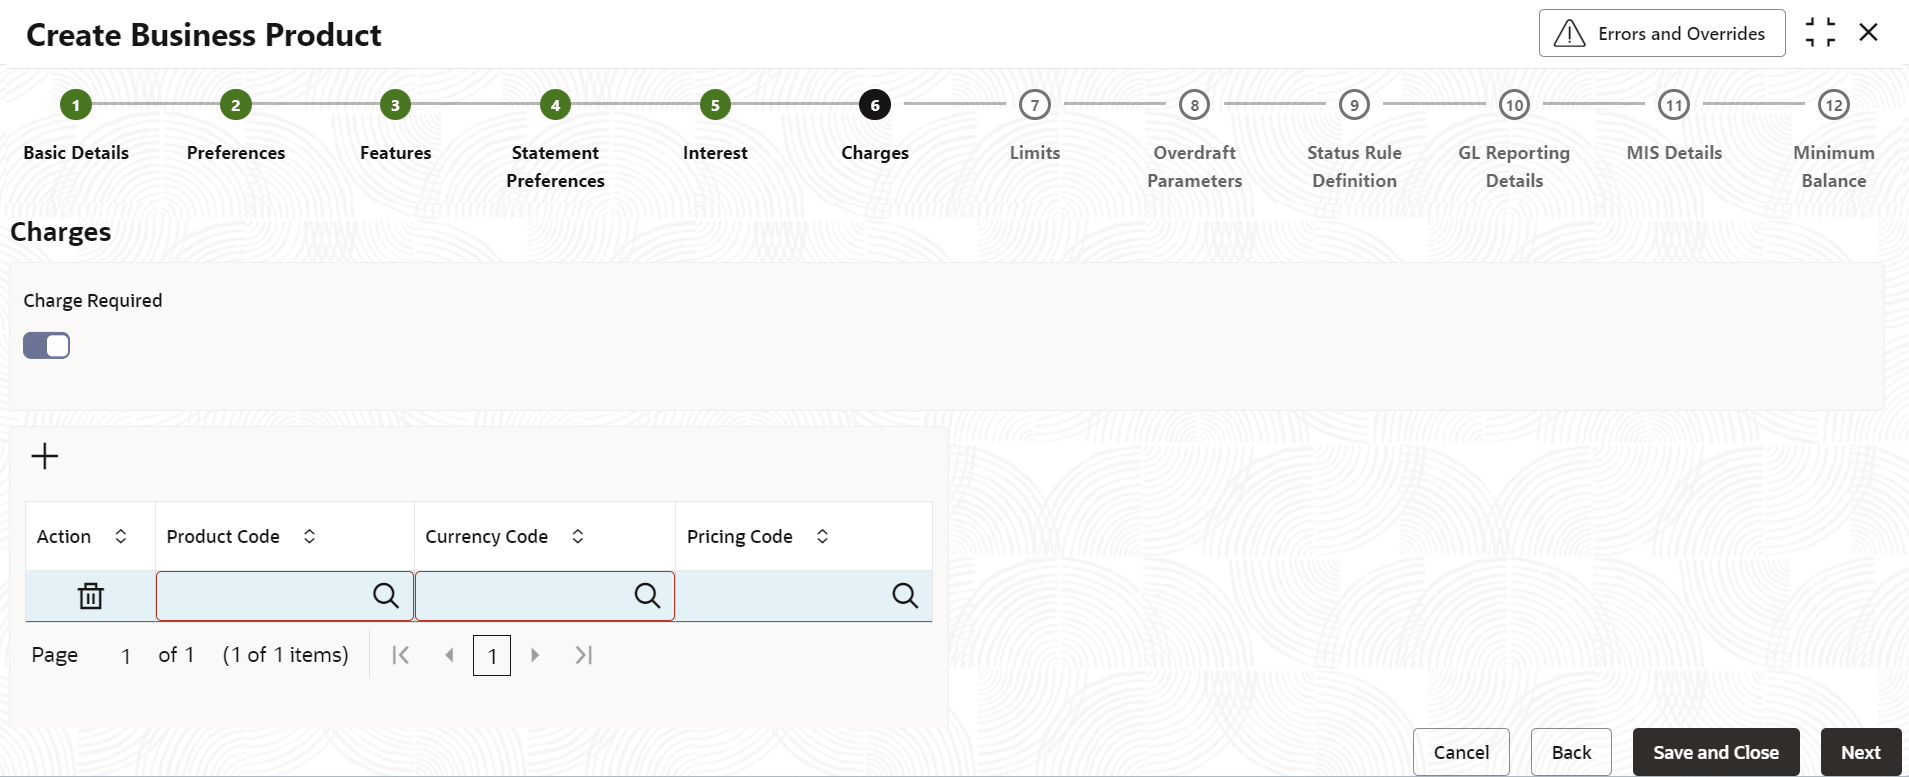
Figure 1-6 Create Business Product - Charges
- Specify the fields on Charges screen.
For more information on fields, refer to the field description table below.
Table 1-6 Charges - Field Description
Field Description Charges Required Switch this toggle ON to indicate that the charges are applicable for the accounts with this business product. The default value is OFF.
Click the Add icon, a new row is added to update the details for the charges.
Action Click the Delete icon to delete the added row. Product Code Specify the applicable charge product code or click Search icon to view and select the applicable product code. Charge product code is configured in the Interest and Charges module. Currency Code Specify the applicable currency code or click Search icon to view and select the applicable currency code. Pricing Code Specify the applicable charge pricing code or click Search icon to view and select the applicable pricing code. Pricing code is defined in Pricing and Decision System. For more information about Charges, refer to Interest and Charges User Guide
- After specifying the fields in the Charges screen, click
Next.The Limits screen displays.
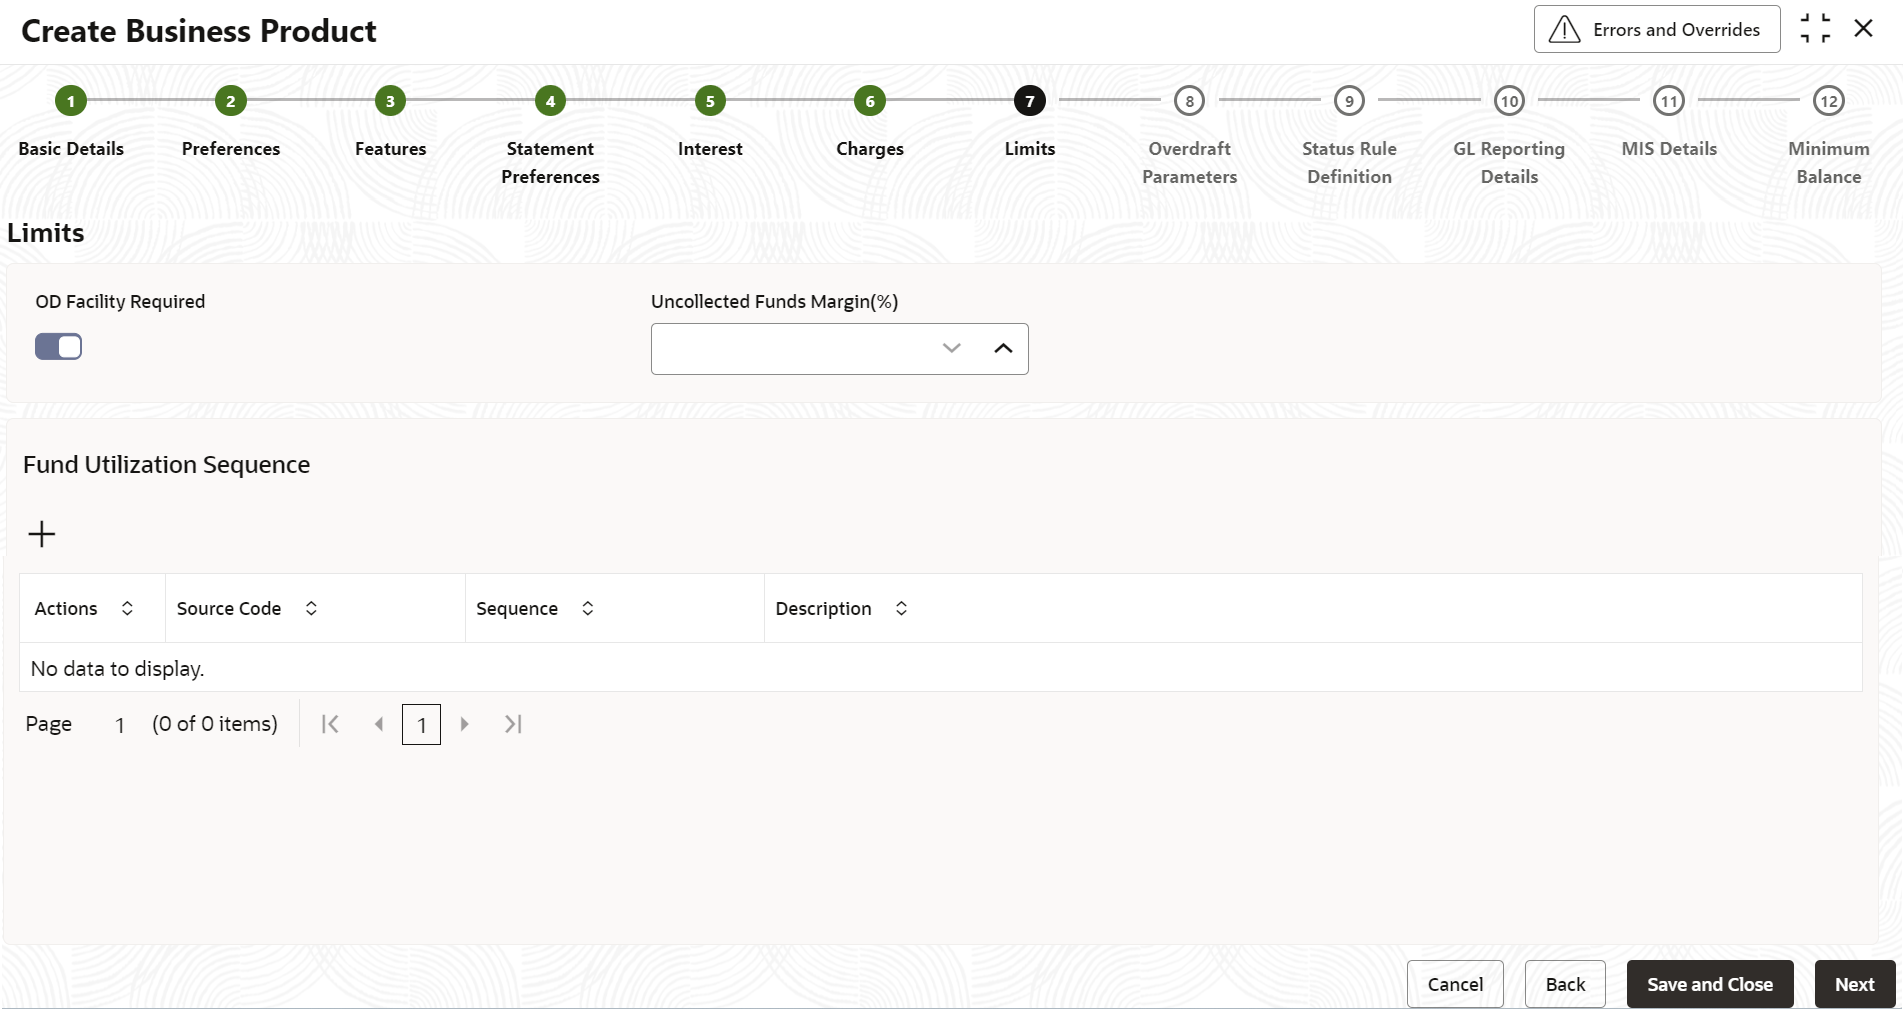
Figure 1-7 Create Business Product - Limits
- Specify the fields on Limits screen.
For more information on fields, refer to the field description table below.
Table 1-7 Limits - Field Description
Field Description OD Facility Required Switch this toggle ON to specify if Overdraft facility can be availed by accounts belonging to this business product. The default value is OFF.
If OD Facility Required option is toggle ON. It will display the related parameters to update the limits.
Uncollected Funds Margin(%) Specify the margin in percentage terms that will be held on the uncollected funds while offering AUF limit to an account. AUF margin must be between 0 to 100. This field is enabled only when the OD Facility Required is toggle ON.
Fund Utilization Sequence Users can select the fund utilization sequence for accounts. Click Add icon to add a sequence. A new row is added with the below fields.- Source Code – This field indicates the source through which the transaction can be sent for an account.
- Sequence –
Only two values are available,
BSOATL and
BSOATLV.
- B (Balance) - Balance refers to clear balance available for debits at account.
- S (Sweep in Funds) - Sweep-in refers to sweep-in of funds from linked provider accounts in case of transaction shortfall.
- O (Overdraft Limit) - OD Limit Applies to account level OD limits. Multiple limits of this category can be active simultaneously.
- A - AUF Limit granted against uncollected funds available in the account. Only one active limit allowed at any point of time.
- T (Temporary) - Temporary OD granted at the account.
- L (Limits) - Local Limit Facility refers to local facility. Limits captured under Line Linkage Details section under
- V - Overline refers to the utilization over and above the sanctioned limits.
- After specifying the fields in the Limits screen, click
Next.The Overdraft Parameters screen displays.
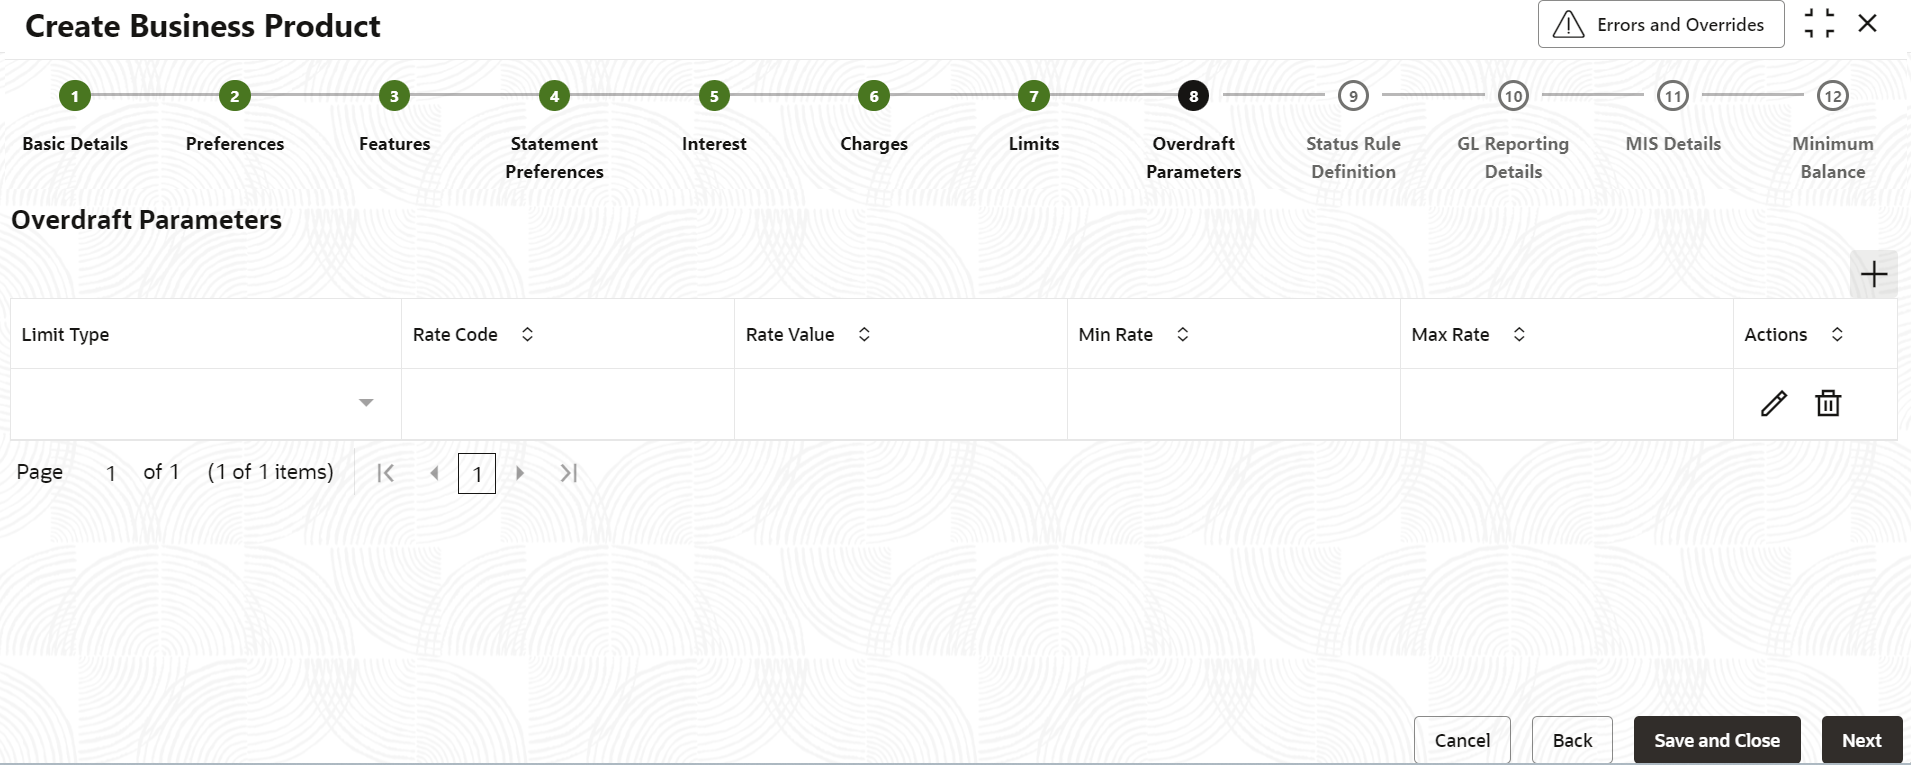
Figure 1-8 Create Business Product - Overdraft Parameters
- Click the Add icon, and Specify the fields on
Overdraft Parameters screen.
For more information on fields, refer to the field description table below.
Table 1-8 Overdraft Parameters - Field Description
Field Description Limit Type Select the applicable values from the drop-down list. The values are as follow. - Unsecured - Unsecured limit that are not backed by collateral.
- Term Deposit - Uses the TD collateral.
- Collateral - Any collateral apart from the TD.
Rate Code Specific the rate code for the limit type from the list of values. Any change to the rate code will reflect on the limit rate. Rate Value As an alternative to the rate code, a rate value can be provided for the limit rate. Minimum Rate and Maximum Rate The minimum and maximum rate can be defined for the limit type, a validation ensures that if the rate captured at account level is greater than the minimum rate and lesser than the maximum rate. Actions Click the Edit icon to edit the values, click the Save icon to save the record and click the Delete icon to delete the record. - After specifying the fields in the Overdraft Parameters
screen, click Next.The Status Rule Definition screen displays.
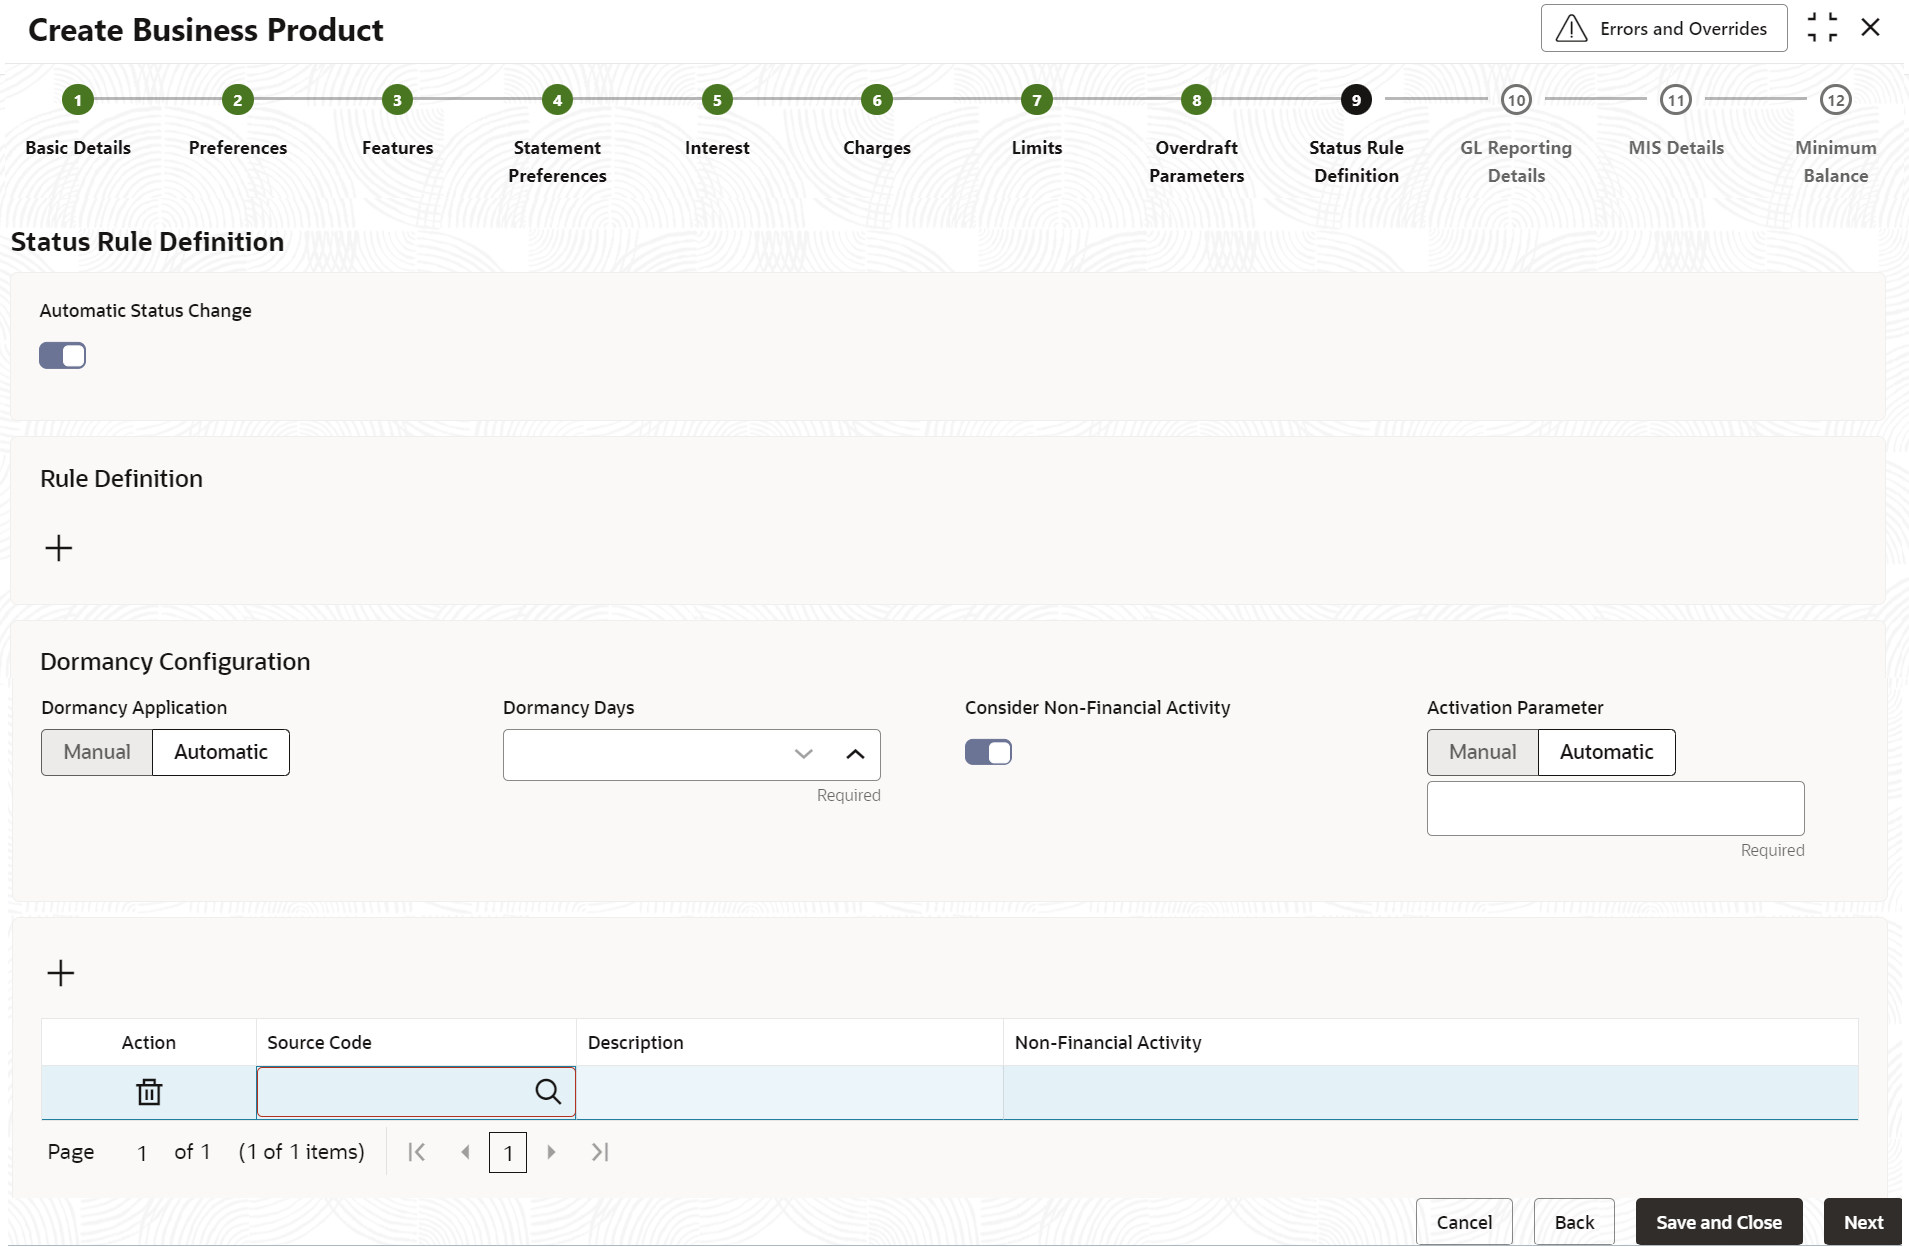
Figure 1-9 Create Business Product - Status Rule Definition
- Specify the fields on Status Rule Definition
screen.
For more information on fields, refer to the field description table below.
Table 1-9 Status Rule Definition - Field Description
Field Description Automatic Status Change Switch this toggle ON to indicate if the account status change must be performed automatically for accounts under this business product. The default value is OFF.
Dormancy Application This is used to identify the dormancy, if it is Automatic or Manual. Dormancy Days Specify the number of days post which the account has to be marked as dormant, in case there is no activity in the account. This field is available only when the Dormancy Application is in Automatic.
Consider Non-Financial Activity Switch this toggle ON, then the non financial activity is considered for dormancy marking. If it is in OFF, then it is not considered for dormancy marking. The default value is ON.
Activation Parameter If the activation parameter is Manual, the dormancy account can be activated only from the servicing application. If it is Automatic, any one or combination of the below tranactions will be activated. The transaction list as follows: - Debit Financial Transaction
- Credit Financial Transaction
- Non-Financial Activity
Source Code If Consider Non-Financial Activity is toggle ON, it is reqiured to capture the list of non financial activity for dormancy marking and activation. Description Based on the Source Code selected, the system displays the description. Non-Financial Activity It allows you to select non-financial activity based on the source code selected. Note:
By default, all non-financial activity codes maintained as part of non-financial activity code maintenance in common core and are applicable for inactive, dormancy, and escheatment marking.If the user wants to limit the set of non-financial activity codes that can be considered for inactive, dormancy, and escheament marking then the user can maintanined the list as part of this maintennce.
- Click the Add icon in Rule
Definition to update the rule definition parameters. This option
appears only if Automatic Status Change is toggle
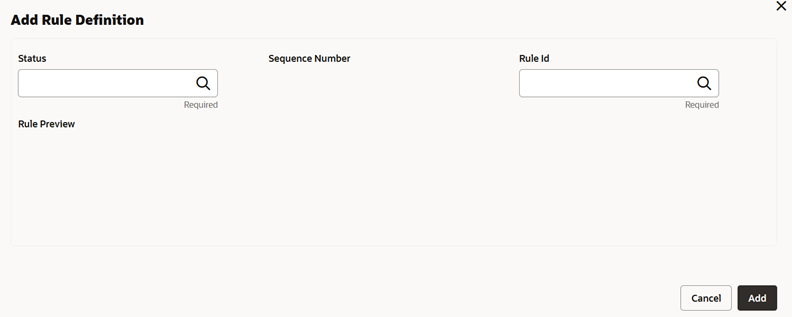
ON.The Add Rule Definition screen displays.
- Specify the fields on Add Rule Definition screen.
For more information on fields, refer to the field description table below.
Table 1-10 Status Rule Definition_Add Rule Definition - Field Description
Field Description Status Specify the status code for which the rule is defined. Click Search icon to view and select the required status.
Sequence Number Specify the status sequence number. This field is auto populated based on the status. Rule ID Specify the Rule ID to be associated for the status. Click Search icon to view and select the required rule ID.
Rule Preview Preview the defined rules in this field. This field is non-editable. - After specifying the details in the Add Rule Definition screen, click Add button, the widget is added in the Status Rule Definition screen.
- After specifying the fields in the Status Rule
Definition screen, click Next.The GL Reporting Details screen displays.
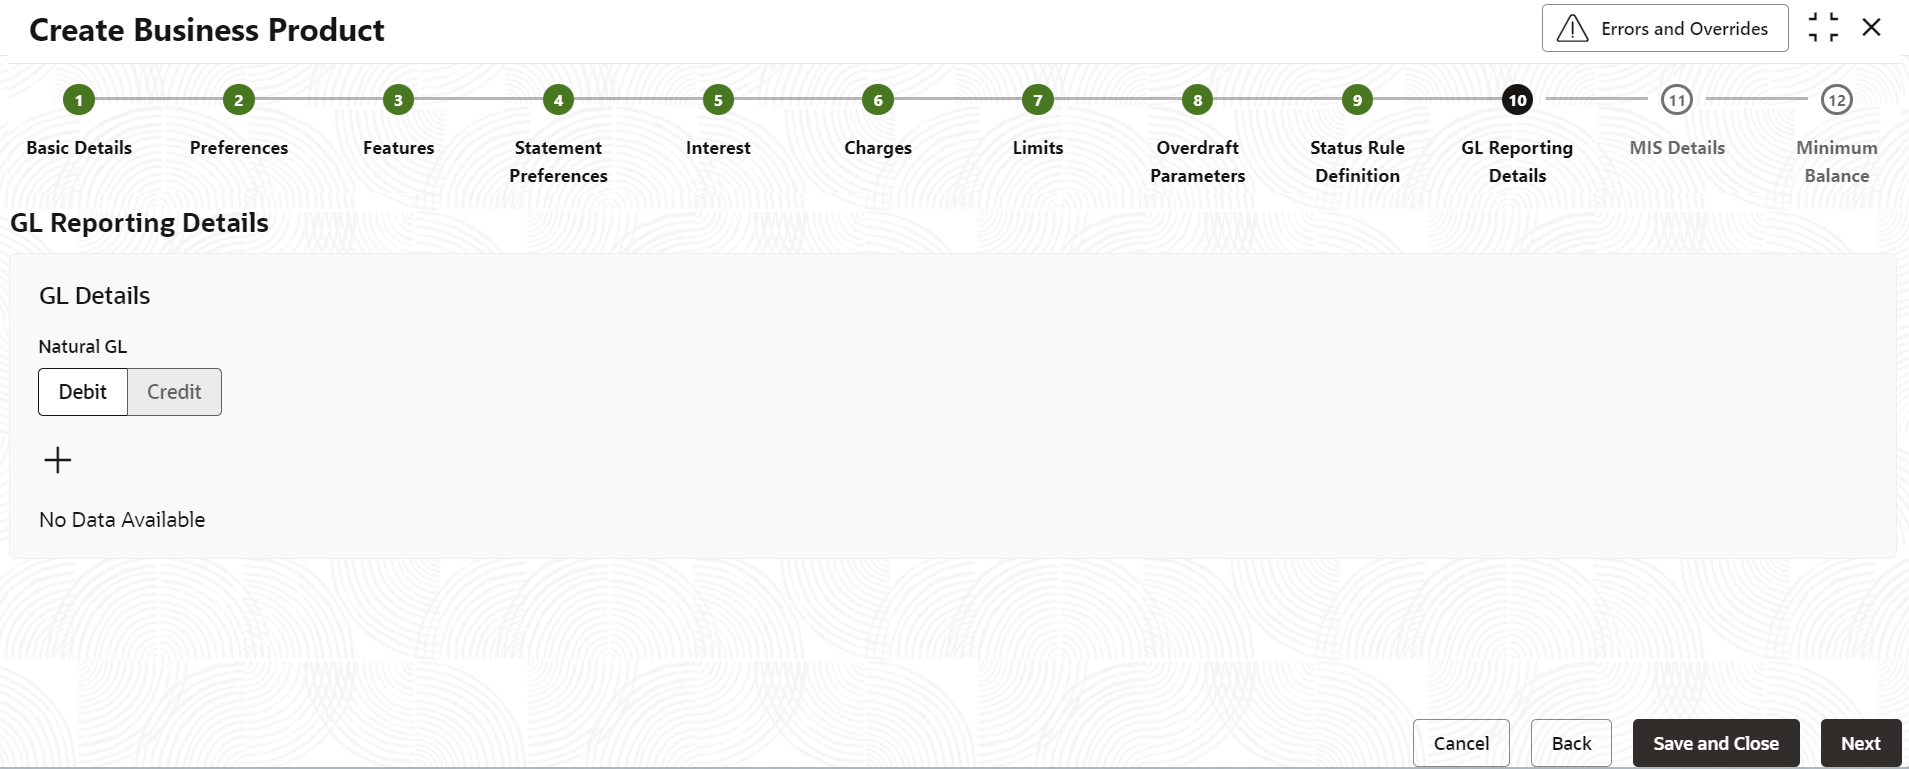
Figure 1-11 Create Business Product - GL Reporting Details
- Specify the fields on GL Reporting Details screen.
For more information on fields, refer to the field description table below.
Table 1-11 GL Reporting Details - Field Description
Field Description Natural GL The following values are available for natural GL as follows: - Credit
- Debit
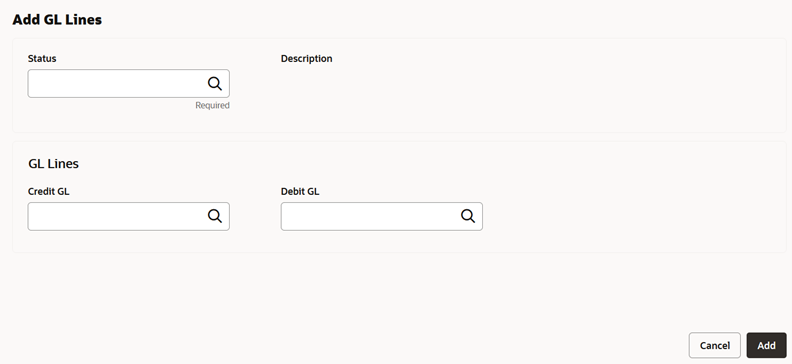
- Click the Add icon to add an entry for GL.The Add GL Lines screen displays.
- Specify the fields on Add GL Lines screen.
For more information on fields, refer to the field description table below.
Table 1-12 GL Reporting Details_Add GL Lines - Field Description
Field Description Status Specify the status. Click the search icon to open the Status list of values. Select the value to add the status. Description Based on the Status selected. The system displays the status description. Credit GL Specify the GL to which the account balance should belong. Click the Search icon to open the Credit GL list of values. Select the value to add the entry. Debit GL Specify the GL to which the account balance should belong. Click the Search icon to open the Debit GL list of values. Select the value to add the entry. - After specify the fields in the GL Reporting Details
screen, click Next.The MIS Details screen displays.
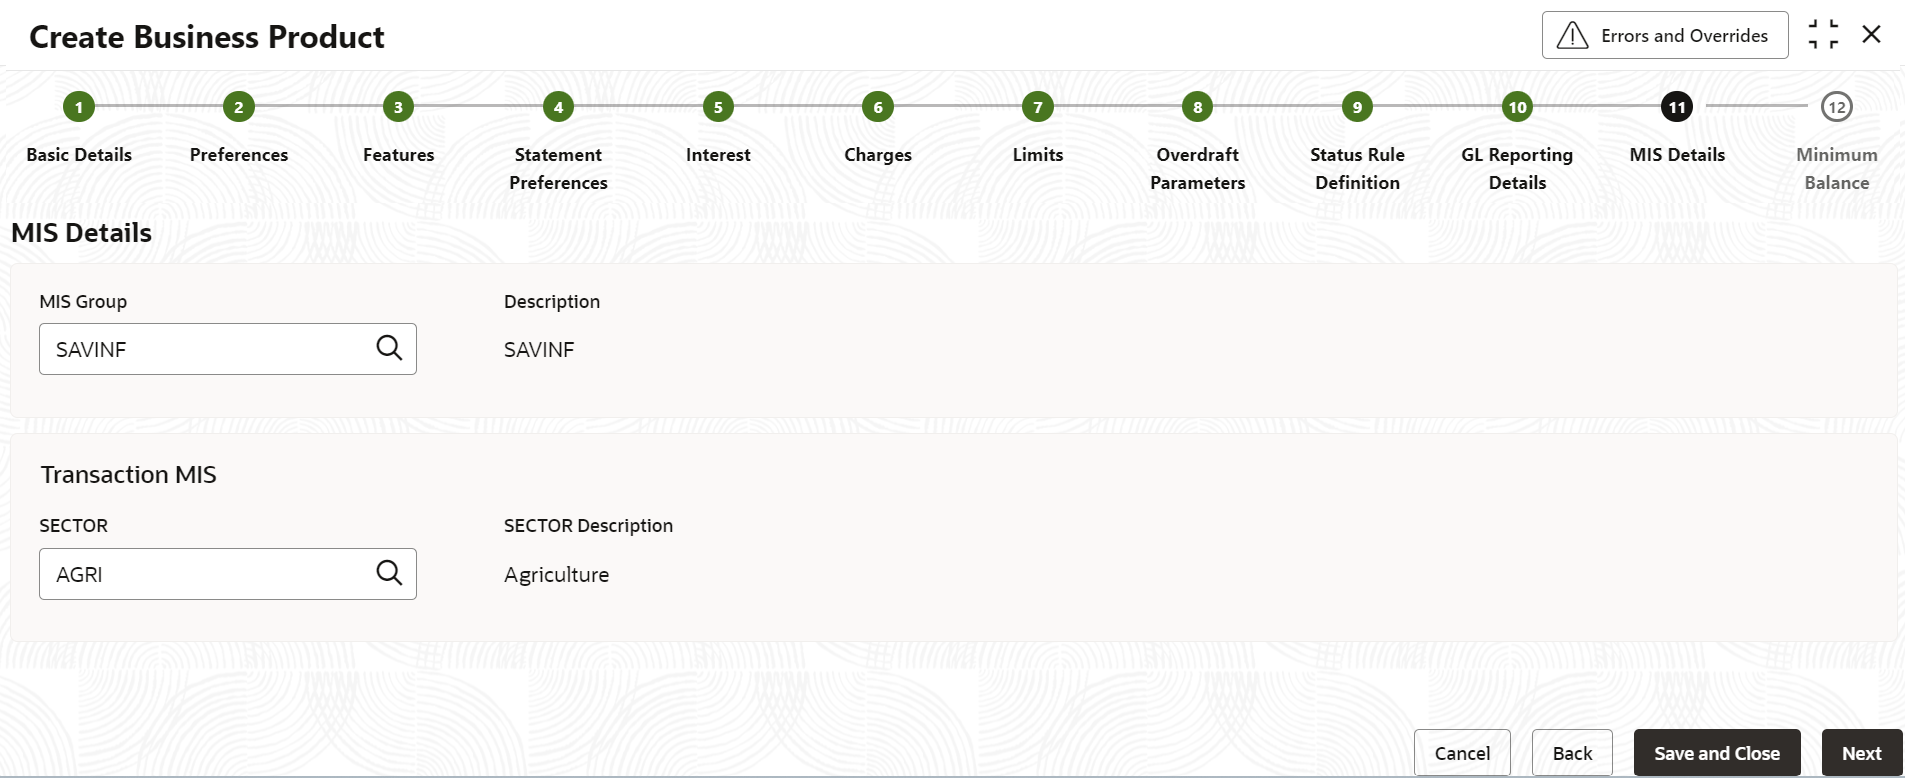
Figure 1-13 Create Business Product - MIS Details
- Specify the fields on MIS Details screen.
For more information on fields, refer to the field description table below.
Table 1-13 MIS Details - Field Description
Field Description MIS Group Specify the MIS group associated with the business product. Description Based on the MIS Group selected. The system displays the description. SECTOR Specify the sector to be associated. Click Search icon to view and select the required sector. SECTOR Description Based on the SECTOR selected. The description of the customer is displayed. - After specifying the fields in the MIS Details screen,
click Next.The Minimum Balance screen displays.
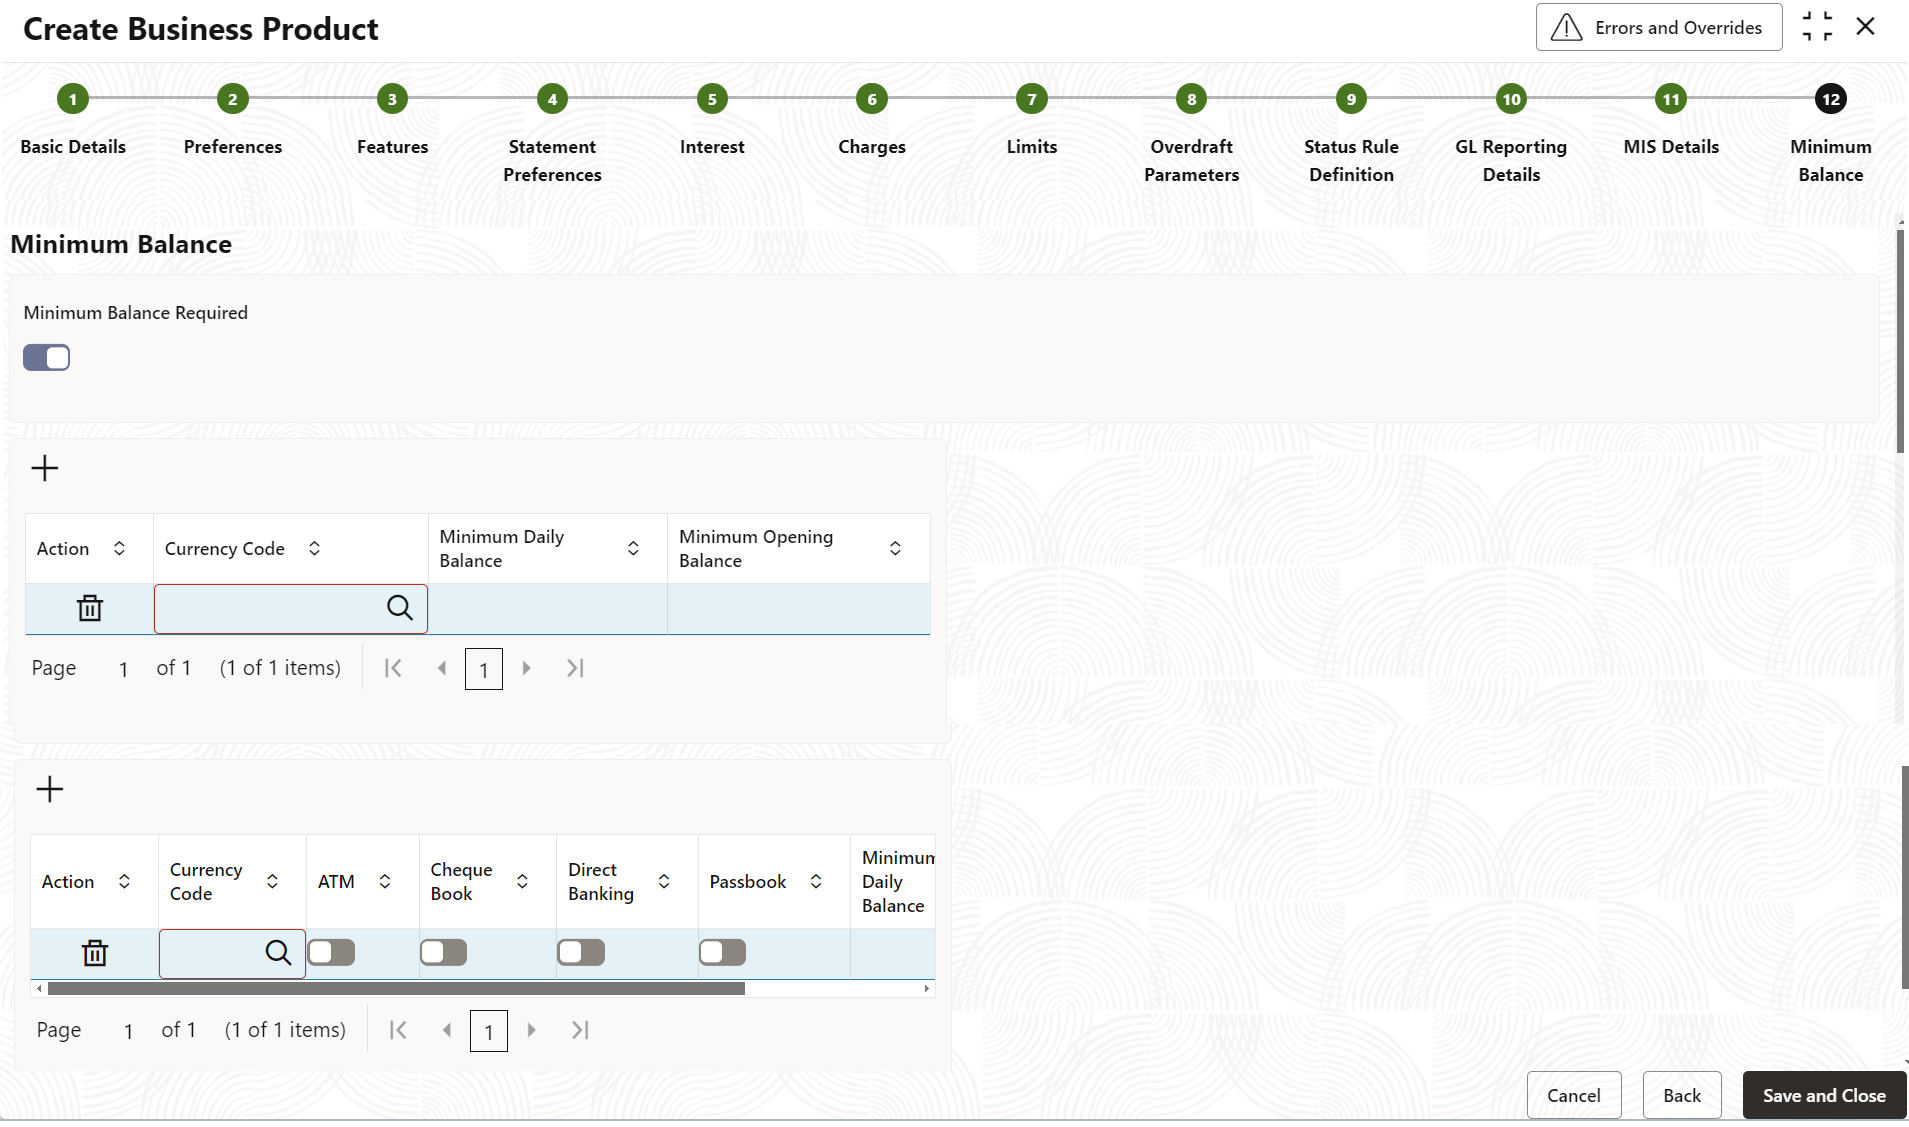
Figure 1-14 Create Business Product - Minimum Balance
- Specify the fields on Minimum Balance screen.
For more information on fields, refer to the field description table below.
Table 1-14 Minimum Balance - Field Description
Field Description Minimum Balance Required Switch this toggle ON, the user can able to define a currency-wise minimum and maximum opening amount. User can create the defined amounts as required by the financial institution. If this option is toggle ON, the below fileds are displayed.- Currency Code
- Minimum Daily Balance
- Minimum Opening Balance
The default value is OFF.
Click the Add icon, to add the details for the minimum balance.
Action Click the Delete icon to delete the added details. Currency Code Click Search icon to view and select the required currency code. Minimum Daily Balance Specify the minimum daily balance applicable for the selected currency code. Minimum Opening Balance Specify the minimum opening balance (initial funding) applicable for the selected currency code. Currency Code Specify the currency code of the account. Click Search icon to view and select the required currency code based on the channel preference opted for the product. ATM Switch this toggle ON, to define the minimum daily balance and minimum opening balance if ATM facility is availed for the account. Check Book Switch this toggle ON, to define the minimum daily balance and minimum opening balance if Check book facility is availed for the account. Direct Banking Switch this toggle ON, to define the minimum daily balance and minimum opening balance if direct banking facility (Internet banking, Mobile banking) is availed for the account. Passbook Switch this toggle ON, to define the minimum daily balance and minimum opening balance if passbook facility is availed for the account. Minimum Daily Balance Specify the minimum daily balance for facilities and currency combination. The user can maintain the minimum daily balance based on the multiple facilities and currency combinations. Minimum Opening Balance Specify the maximum opening balance for facilities and currency combination. The user can maintain the maximum opening balance based on the multiple facilities and currency combinations. - After specifying all the details, click Save and Close to complete the steps or click Cancel to exit without saving.
Parent topic: Business Product
