- Account Configurations User Guide
- Bank Parameters
- Configure Bank Parameters
1.1 Configure Bank Parameters
Configuring bank parameters is the process by which administrators associate cheque book and dormancy preferences of the bank accounts. This topic describes the systematic instructions to configure Bank Parameters.
- Click Account Configurations, and under Account Configurations, click Bank Parameters.
- Under Bank Parameters, click
Configure.The Configure page displays.
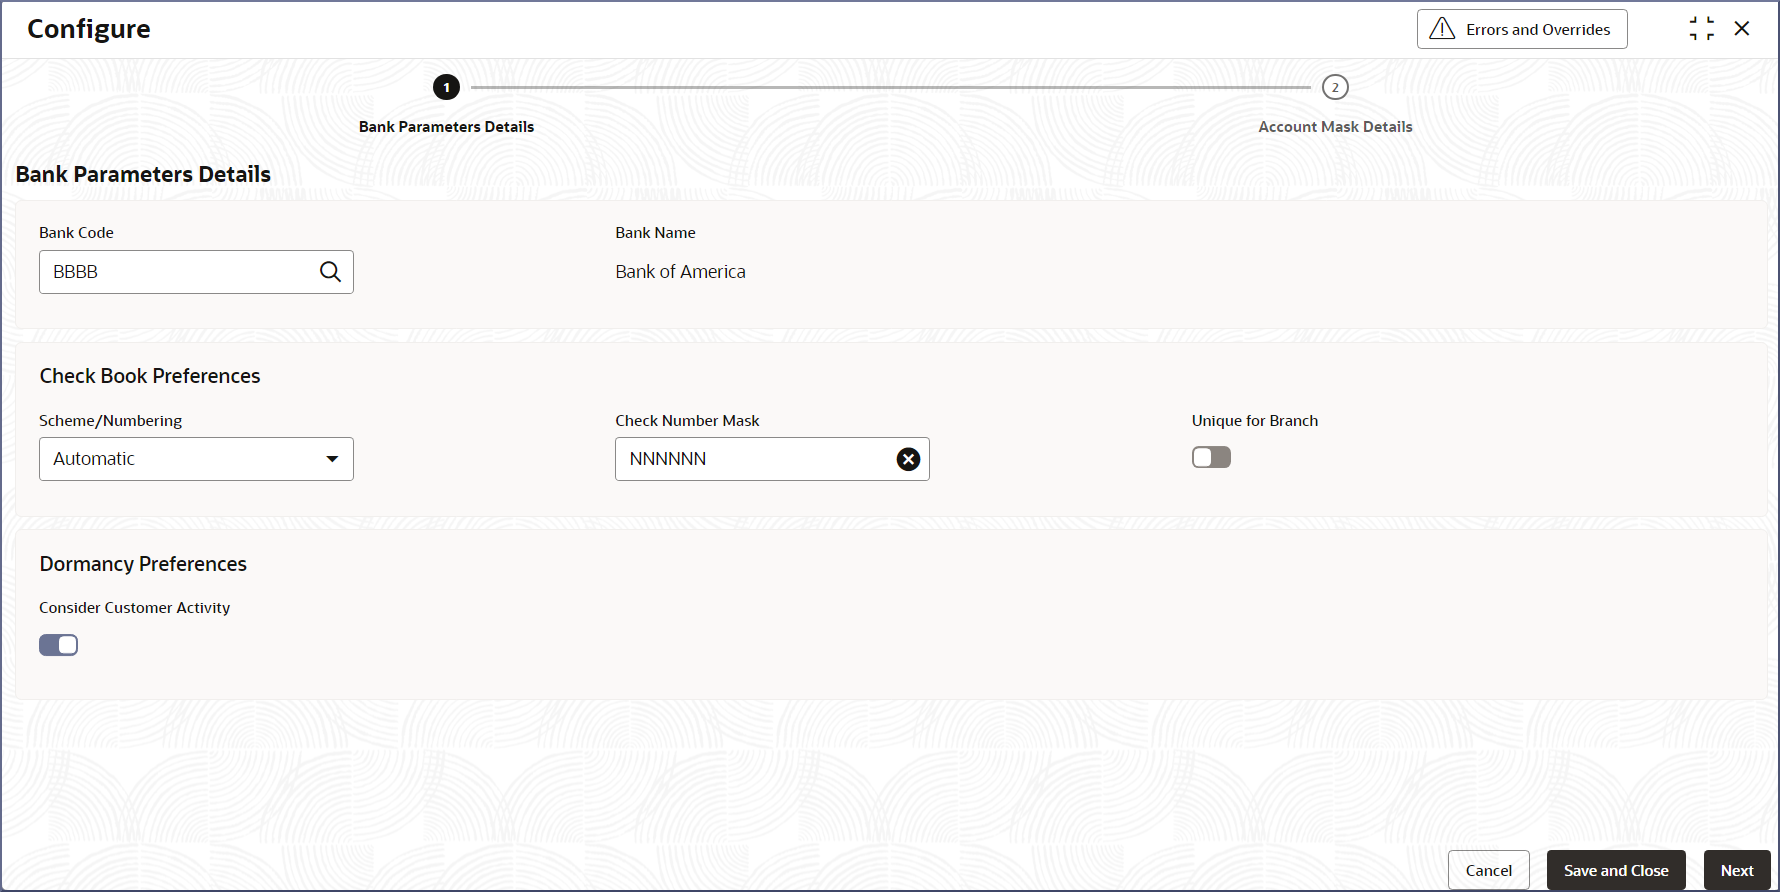
Figure 1-1 Configure Bank Parameters details
- Specify the details on the Bank Parameters Details
screen. They are described in the table below.
Table 1-1 Bank Parameters Details - Field Description
Field Description Bank Code Specify the bank code which uniquely identifies your bank from the list of bank codes. This field is mandatory. For more details on the Bank Code, see Create External Bank Parameters in the Oracle Banking Common Code User Guide.
Bank Name Displays a detailed bank name of the selected Bank Code. This field is auto-populated. Scheme/Numbering Select the check book numbering or scheme from the drop-down list. This field is mandatory. These values are factory shipped. Currently, only the Automatic numbering of cheque books is available. Check Number Mask Specify the check number mask to be used by the bank. This field is mandatory. You can define numeric check mask as a series of N or an alphanumeric mask containing alphabets A and numbers N. For example, a mask of NNNNNN can represent a cheque number 000324.
Note:
Alphanumeric Check Mask is issued to the account only when the check generation is manual.Click to open the Add Mask window. Select Check Mask Fields from the given list and click Add to add the Check Number Mask.
Unique for Branch Enable this option to ensure that check numbers are unique across the branches of your bank. This will ensure that more than one account cannot be issued the same check number. If not enabled, multiple accounts can have checks with the same numbers. By default, this option is disabled Consider Customer Activity Enable this option to consider the last contact date to determine the dormancy status of accounts. Activity in one account owned by the customer updates that last contact date in all accounts owned by the customer. By default, this option is disabled. The latest financial and non-financial activity date of an account determines the dormancy status of the account. If not enabled, the default logic to determine the dormancy status of an account is used.
Add the Check Number Mask.- Click Check Number Mask.The Add Mask dialog displays.
- Select Check Mask Fields from the given
list.The following elements are supported as part of the check mask.
Table 1-2 Check Mask
Field Mask Character Mask Length Alphabet A 2 Number N User defined Validation:
- While defining an alpha numeric check mask, the alphanumeric character should always precede the numeric characters. For example: AANNNN, where A is alpha numeric character and N is numeric character.
- When you enter the check mask field, the screen is refreshed with valid characters and options for the check.
- Click Add.The Check Number Mask is added.
- Click Check Number Mask.
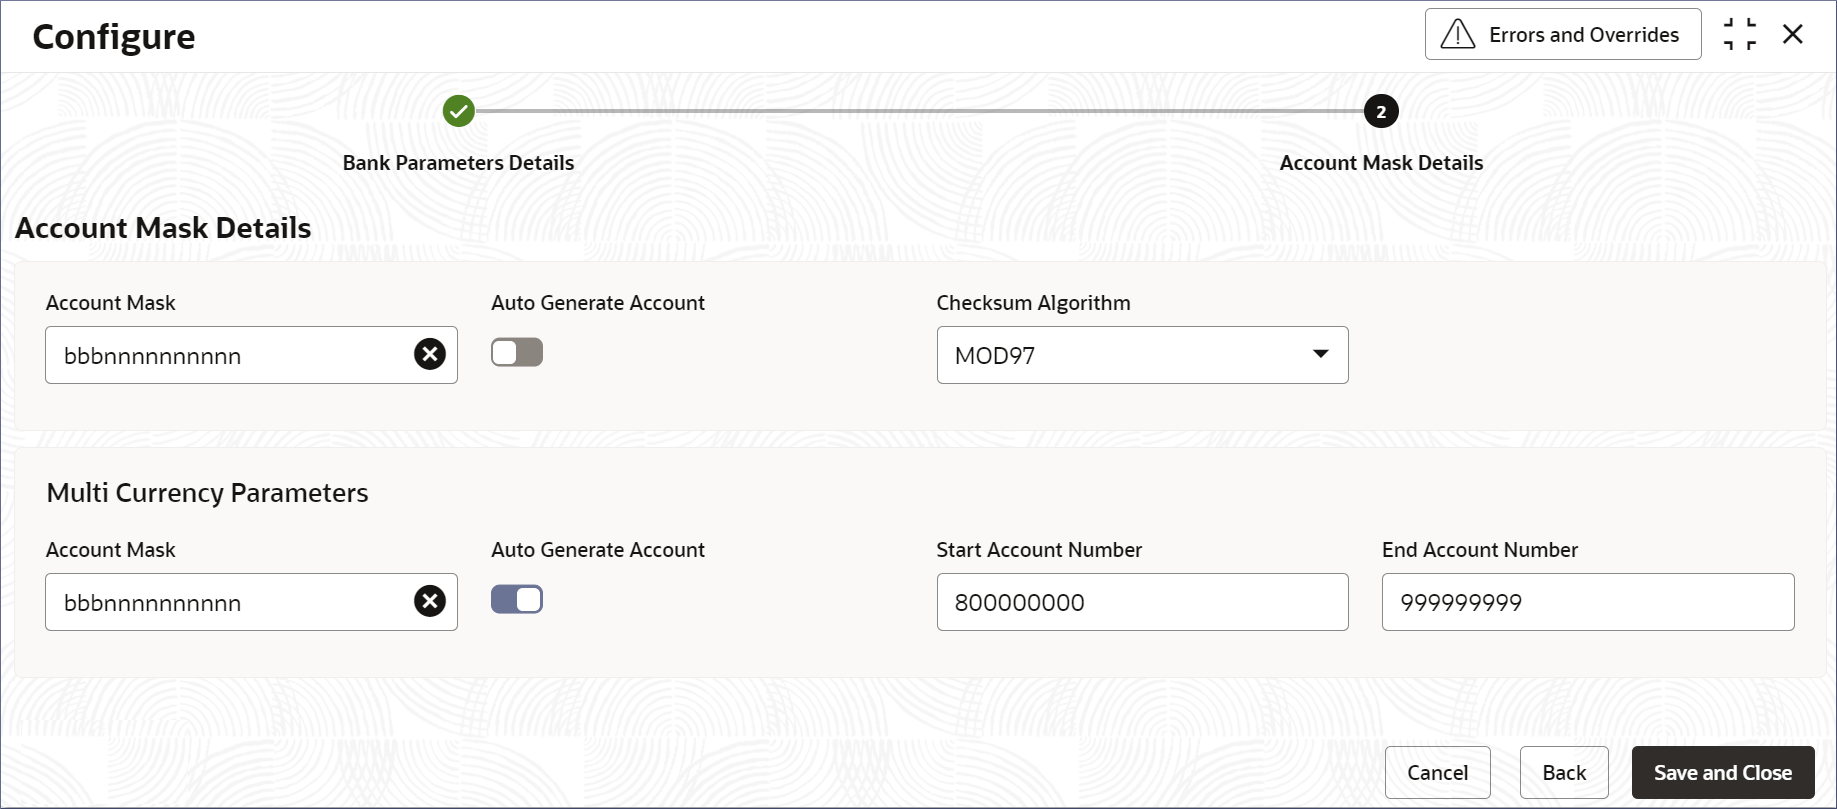
- Click Next.The Account Mask Details screen displays.
- Specify the fields on the Account Mask Details
screen.
Tip:
All the fields on this screen are mandatory.Table 1-3 Account Mask Details - Field Description
Field Description Account Mask Specify the structure and length of the account number. The drop-down list displays the account mask values. This field is mandatory. The mask values and their description are listed below: - L - Account class
- T - Account code
- a – Alphabet
- B - Branch code
- D – Check digit
- $ - Currency code
- C - Customer number
- n - Numeric value
For example, an account mask can be bbTTTTnnnnnn.
Auto Generate Account Enable this option to generate the account number automatically. If an account number is automatically generated, it can contain either numbers or a combination of branch code and numbers.
Checksum Algorithm Specify the checksum algorithm to be used for the account. These are factory shipped values. You can select from the following: - Modulo 10
- Modulo 11
- Modulo 97
Note:
Modulo 97 supports only Numeric mask.Start Account Number Specify the starting account number. The starting number should contain only numbers or a combination of branch code and numbers. This field appears if the Auto Generate Account option is enabled. End Account Number Specify the ending account number. The ending number should have the same format as the Starting Account Number. This field appears if the Auto Generate Account option is enabled. Note:
Some of the above fields are repeated for Multi-currency Parameters configuration.Account MaskWhen you open the Account Mask field, the left pane displays the list of elements that are part of the account mask. Click and select from the left pane to view the fields. Where 'n' characters or numbers are allowed, a text box appears where users can enter the number of times that value must repeat. Click Add to populate the values in the account mask screen.
The following characters are supported in Account Mask.
Table 1-4 Account Mask
Field Mask Character Mask Length Account Class L 6 Account Code T 4 Alphabet (User Input) a User defined Branch Code B 6 Check Digit D 2 Currency Code $ 3 Customer Number C 20 Numeric Value (User Input) n User defined Note:
There is no restriction on the number of characters unless maximum length is provided. However, the overall length cannot exceed a maximum of 34 characters including the check digit. - Click Save & Close to complete the steps or click
Cancel to exit without saving.The Bank Parameters are created.
Note:
At this point, the status of the Bank Parameters are Unauthorized. A user with a supervisor role has to approve the Bank Parameters. After approval, the status changes to Authorized, and the Bank Parameters are available for use by another process. - Approve the Bank Parameters.To approve or reject Bank Parameters, see View Bank Parameters.
Note:
As a maker of this configuration, you cannot approve it. It has to be approved by another user with a Supervisor role.
Parent topic: Bank Parameters

