Interacting with Events on the Map
Learn how to interact with events on the Oracle Communications Unified Assurance Vision map. You can interact with event markers on the Vision map in different ways depending on the number and type of markers you select. You can select single event markers, link events, multiple event markers, and cluster event markers.
Interacting with Single Event Markers and Link Events
Click an event marker for a single event or anywhere on a link event line to see the event information. For link events, hover over the blue triangle at either end of the line to display the name of the entity at that location.
You can only display one event information window at a time. Clicking another marker closes any open information and opens the information for the new marker. Clicking and dragging the map and zooming does not close the information window. When you open the information for an event, the map enters a paused state; event and custom layer data does not refresh during this state.
The information for an event contains the following headings:
You can click each heading to expand it and display the relevant information. For more information on what can be found in each section, click the headings in the list.
The following options are available when you right-click a single event marker:
-
Open Popup: Opens the event information
-
Event List: Opens the event list for the marker in a new window
-
Centre Map Here: Centers the map on the selected marker
General Tab
The General tab contains information relating to the entity associated with the event. The information displayed in the General tab differs depending on the type of Event.
The general tab for a single point event provides the following information:
-
Node: Name of the entity where the event is occurring
-
Layer: The layer in Vision where the event appears
-
IP: The IP address of the entity, if defined
-
Address: The address of the entity, if defined
-
Lat and Lng: Together these form the GPS coordinates of the entity
-
Meta Data: The metadata of the entity
A link event is an event on the relationship between two entities.
The General tab on this type of event provides the following information:
-
Link Details
-
Link: Name of the link
-
Layer: The layer that the link event appears on
-
-
Start Site Details
-
Start Site: The name of the start entity
-
Address: The address of the start entity, if defined
-
Start Meta Data: The metadata of the start entity
-
-
End Site Details
-
End Site: The name of the end entity
-
Address: The address of the end entity, if defined
-
End Meta Data: The metadata of the end entity
-
For dashboard links, the General tab contains the information relating to the selected link.
The tab on this type of event provides the following information:
-
Link Details
-
CID: Circuit ID of the link
-
Carrier: The carrier associated with the link
-
Bandwidth: The bandwidth of the link
-
-
Start Site Details
-
Device: The name of the device at one end of the link
-
Port: The name of the port at one end of the link
-
Site: The name of the entity at one end of the link
-
Start Meta Data: The metadata of the start entity
-
-
End Site Details
-
Device: The name of the device at one end of the link
-
Port: The name of the port at one end of the link
-
Site: The name of the entity at one end of the link
-
End Meta Data: The metadata of the end entity
-
Source Tab
The source tab provides information about the source(s) of the events for that entity, and any available dashboards in the source. The source tab always contains a link back to the source; however, where an Entity has a matching Device in Unified Assurance, links to Dashboards for that device will also be provided.
Events Tab
The events tab contains an event list with any events for that entity or link. Right-click an event to open a menu with a link to the full event list for the entity that is the source of the event. The following figure shows the menu for an event in the events tab:
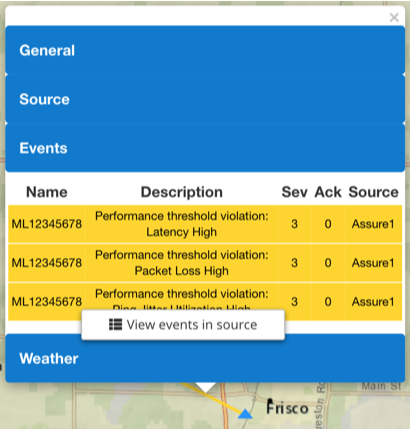
Description of illustration link-event-popup-event-tab-context-menu.png
Weather Tab
The weather tab contains the weather data from the nearest weather station to the location of the event. This data is useful in diagnosing the causes of an event. For example, if the Weather tab is showing a thunderstorm then this could indicate the cause of events in the area.
For dashboard links, the Weather tab contains the weather data from the nearest weather station to the locations of the entities at either end of the link.
The following figure gives you an overview of the symbols used to show wind speed.
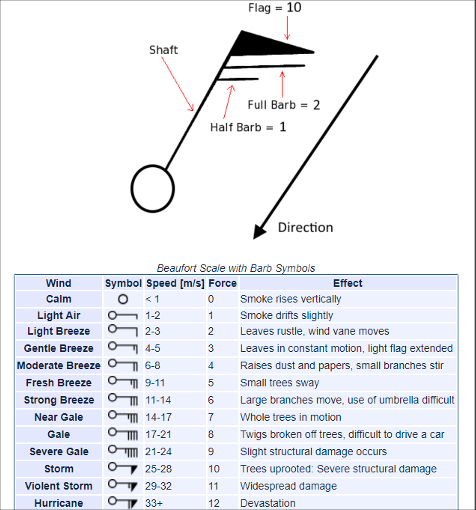
Description of illustration weather-speed.png
The following figure gives you an overview of the images of the weather symbols that are used.
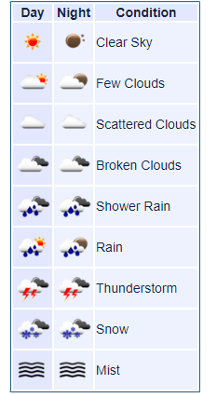
Description of illustration weather-symbols.png
Interacting with Multiple Events
You can select multiple markers at the same time by drawing a rectangular boundary or a free-from boundary. You can also hold Ctrl and click on markers to select and deselect them.
When you have selected multiple markers, you can access any custom tools configured for Vision by right-clicking one of the selected markers. The tools that are visible depend on the permissions for your user group. See Menus for information about setting permissions and customizing the menu, and Tools for information about creating custom tools.
Selecting Multiple Markers in a Rectangular Boundary
To draw a rectangular boundary to select multiple markers at the same time:
-
Right-click in the map at one corner of the desired rectangular boundary and select Rectangular selection.
Two crosshairs appear at the same position.
-
Drag the two crosshairs to form a rectangular boundary.
All markers within the boundary are selected.
-
Turn off rectangular selection in one of the following ways:
-
Click the map.
-
Right-click the map and select End Rectangular Selection.
-
Selecting Multiple Markers in a Free-Form Boundary
To draw a free-form boundary to select multiple markers at the same time:
-
Right-click in the map at one corner of the desired free form boundary and select Free Form Selection.
The Draw Free Form
 button appears below the zoom controls.
 -
Add at least three boundary points by clicking the map.
Boundary points appear as crosshairs.
-
Connect your boundary points by clicking Draw Free Form.
A free-form boundary is created and all markers within it are selected.
-
Turn off free-form selection in one of the following ways:
-
Click the map.
-
Right-click the map and select End Free Form Selection.
-
Seeing Severity for Events within a Geographic Zone
You can select multiple events in a single geographic zone to view charts showing the distribution of event severity.
To see event severity charts for a geographic zone:
-
Right-click the map and select Geofencing.
A crosshair is created at the location and the End Geofencing
button appears below the zoom controls. -
Drag this crosshair around the area where you want data.
The Geofencing Mode window shows the severity distribution information for the events in the area you selected.
-
Drag one of the two corner markers to adjust the geofence area.
The data in the Geofencing Mode window is updated for the new area.
-
Turn off geofencing mode in one of the following ways:
-
Click the End Geofencing button.
-
Right-click the map and select End Geofencing.
-
Interacting with Cluster Markers
To interact with a Cluster Marker, you can click it to expand the cluster. This will automatically zoom the map to the highest level it can while displaying all of the markers in the cluster. If it reaches the max zoom level for the current basemap and there are still clustered markers, you can click the cluster to expand and view the markers. See the images below for examples:

Description of illustration clustered-event-markers.png

Description of illustration expanded-event-markers.png