Updating Unified Assurance
Learn about how to update Oracle Communications Unified Assurance packages to the latest version.
About Updating Unified Assurance
The Unified Assurance package system allows for near seamless installation of new packages and updates to installed packages. Installing updates is first done on the primary presentation server, then other servers can be updated as well.
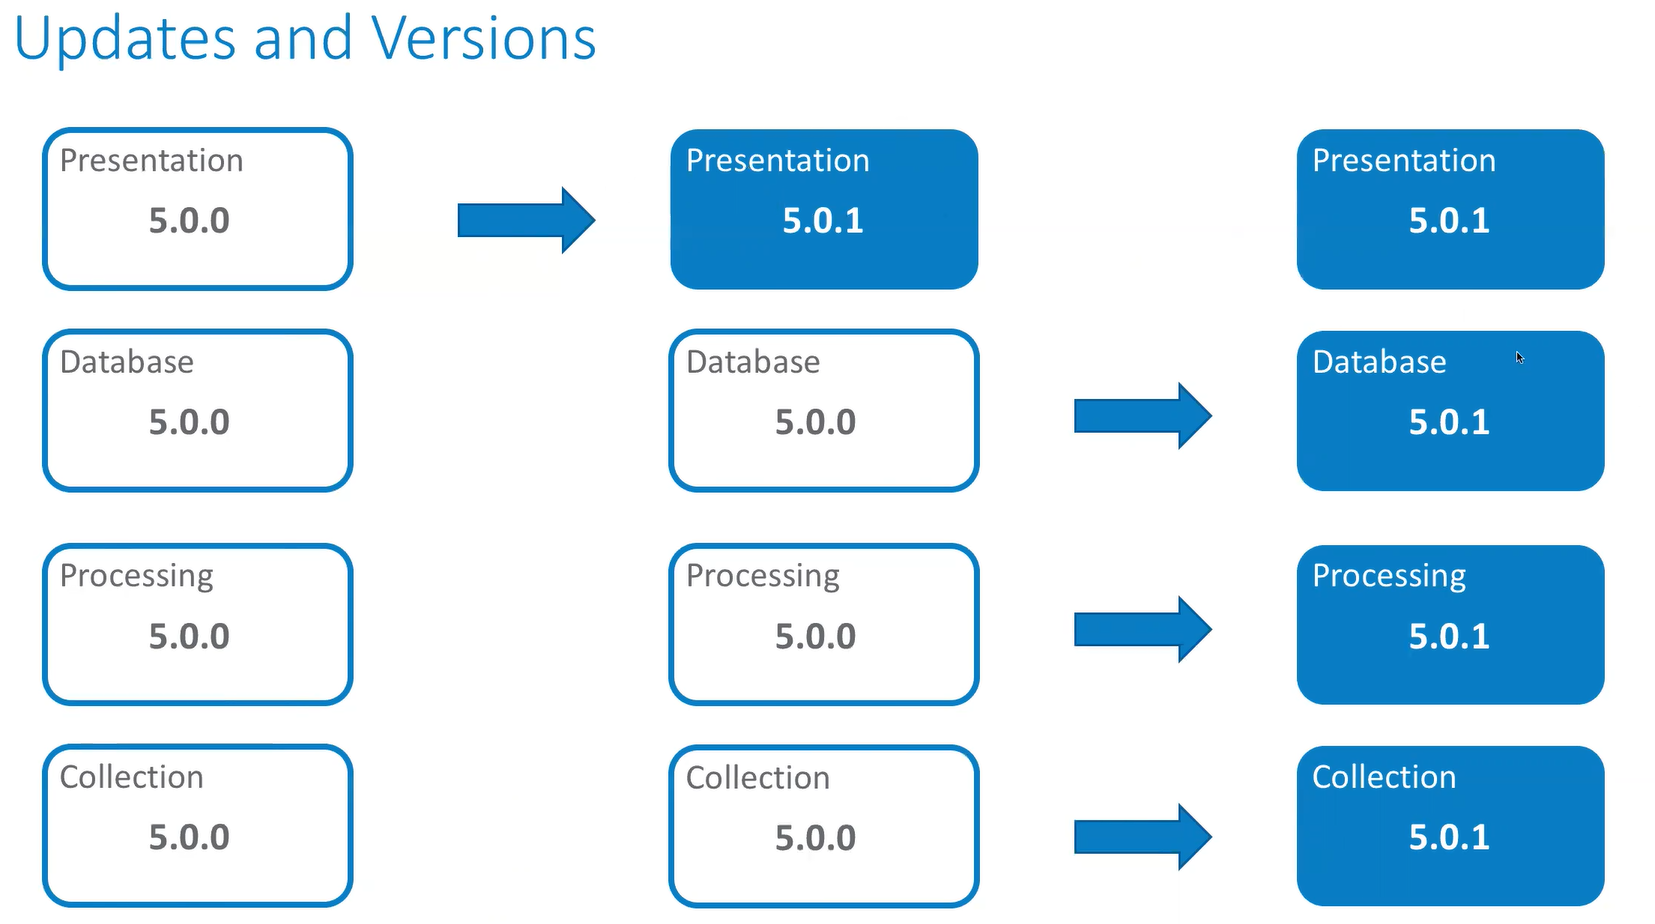
The image shows the update process for four individual servers running Unified Assurance: a presentation server, a database server, a processing server, and a collection server. For simplicity, the example shows a non-redundant setup. You perform an update in the following order:
-
First, update the primary presentation server, as shown in the second column.
-
Next, update all the other servers at the same time, as shown in the third column.
-
When the update is being installed, the database, processing, and collection servers check the primary presentation server's version and update to the same version.
Description of illustration update-path.png
Updating Unified Assurance
To update Unified Assurance:
-
On all servers in the environment:
-
Install RPM packages required by the Unified Assurance installation RPM by running one of the following commands:
-
For Linux 7:
yum install selinux-policy-targeted policycoreutils policycoreutils-python -
For Linux 8:
yum install selinux-policy-targeted policycoreutils policycoreutils-python-utils
Although these packages are required to support SELinux, you must install them regardless of whether you are enabling SELinux or not.
-
-
If you are planning to enable SELinux in an environment where it was previously disabled, perform all prerequisite steps described in Configuring SELinux.
-
-
On the primary presentation server, download the latest Unified Assurance release package for your operating system version from Oracle Software Delivery Cloud:
The package contains the Oracle-Communications-Unified-Assurance-6.X.X.X.X-el8.zip collection file for installation.
-
Extract the collection file to the location on where the packages were placed during the initial Unified Assurance installation, typically /opt/install/:
unzip -d <installation_file_directory> Oracle-Communications-Unified-Assurance-6.X.X.X.X-el8.zip -
In the Unified Assurance UI, from the Configuration menu, select Broker Control, then Servers.
-
In the grid, select the primary presentation server.
-
From the Version menu, select the version you want to install.
-
Click Update Server(s) and wait for the Status column to show Complete.
Updated packages are copied from the directory where they were extracted into the internal package location on the primary presentation server. After the package files are copied, packages that have updates on the primary presentation server are installed.
-
Select all other servers by holding Ctrl or Shift and clicking the servers.
-
Click Update Server(s).
Packages that have updates available are downloaded from the primary presentation server to the other servers. After the packages are downloaded, packages that have updates on the server are installed.
When all servers show Complete, the package update process is complete.
Proceed to Post Update Tasks.
Post Update Tasks
After updating to version 6.0.5:
-
Perform the tasks in Post Update Tasks for Microservices.
-
If you want to enable SELinux, perform the tasks in Enabling SELinux After Updating.
If you updated Unified Assurance from version 6.0.3 or earlier to version 6.0.4 or later, perform the tasks in Post Update Tasks for Version 6.0.4.
Post Update Tasks for Microservices
After updating to version 6.0.5, perform these tasks to update your microservices on every server that has a cluster:
-
As the assure1 user, update the Helm repository:
a1helm repo update -
As the root user, upgrade the cluster:
clusterctl upgrade -
As the assure1 user, undeploy the Pulsar microservice:
a1helm delete pulsar -n a1-messagingNote:
Any Pulsar backlog is also deleted.
-
Redeploy the Pulsar microservice as appropriate for your environment. See Pulsar for information about the different deployment commands and options.
-
For each other microservice that you have deployed:
-
(Optional) Review the existing Helm chart and make note of any specific configuration settings:
a1helm show values assure1/<helm-chart-name>where <helm-chart-name> is the name of the Helm chart for the microservice. For example, event-sink.
Tip:
You can run a1k get pods -A or a1k get deployments -A to see what pods and microservices are running in all namespaces.
-
Undeploy the microservice:
a1helm delete <microservice-release-name> -n <namespace>where:
-
<microservice-release-name> is the release name for the microservice deployment. For example, event-sink.
In most cases, this is the same name as the microservice and Helm chart, but you may have used different values if you deployed multiple instances of the microservice in the same cluster, such as with the Netapp Poller microservice.
-
<namespace> is the namespace where you deployed the microservice.
The default zoned namespace is a1-zone1-pri, but you may have used other zones or secondary namespaces. Supporting microservices are deployed to non-zoned namespaces, such as a1-monitoring for Prometheus and a1-cache for Redis.
-
-
Redeploy the microservice, remembering to specify any configuration settings that you had previously used.
See Deploying a Microservice in Unified Assurance Implementation Guide for information about deploying a microservice using the command line or the UI. The documentation for each microservice also provides specific commands and configuration details.
-
Enabling SELinux After Updating
Unified Assurance version 6.0.5 is supported on systems where SELinux is enabled and set to enforcing.
To enable SELinux after updating to version 6.0.5, do the following on all servers in the environment:
-
Update the servers as described in Updating Unified Assurance, which includes perform the prerequisite steps described in Configuring SELinux and Installing Required Package Dependencies.
-
Open the /etc/selinux/config file.
Note:
This is the core Linux etc directory, not the Unified Assurance $A1BASEDIR/etc directory.
-
Change the SELINUX= line to SELINUX=enforcing.
-
Save and close the file.
-
Reboot the server.
-
Run the ConfigSELinuxDocker application:
$A1BASEDIR/bin/ConfigSELinuxDocker enableConfigSELinuxDocker confirms that the required dependencies are met and sets up SELinux for the Unified Assurance instance of Docker.
Post Update Tasks for Version 6.0.4
After updating from version 6.0.3 or earlier to version 6.0.4 or later, perform these tasks:
-
The Device picker combo box has been updated. Check the configuration of all Event List and Device Availability Pie dashboard panels to ensure that the correct device is selected.
-
The Elasticsearch database index templates have been updated. Rerun the Event Analytics Setup Wizard with the Update-Templates flag:
$A1BASEDIR/bin/historical/AnalyticsWizard --Update-Templates -
If you are using custom foreach loops in your rules files, you may receive an error similar to the following:
experimental keys on scalar is now forbiddenTo resolve this issue, check your rules files for proper keys.
For example, the following lines are invalid:
foreach my $id ($hash_ref) {my @variants = keys $hash{$word}{variants};To fix them, dereference hash_ref and hash:
foreach my $id (%{$hash_ref}) {my @variants = keys %{ $hash{$word}{variants} }; -
A UI has been added to help add, remove, and make certain changes to fields in the Event.Events table, and a new column RootCauseKey has been added to the initial table layout. Run the ApplyEventSchema application to apply the changes to the table.
-
Optionally, run ApplyEventSchema with the --Dry-Run option for a preview of changes:
-
Log the queries that will be run to change the database:
$A1BASEDIR/bin/ApplyEventSchema --Dry-Run -
Review the queries in the log file:
lnav $A1BASEDIR/logs/ApplyEventSchema.log
-
-
Run ApplyEventSchema:
-
For non-sharded environments, run the following command:
$A1BASEDIR/bin/ApplyEventSchema -
For environments with multiple event shards, do one of the following:
-
On any of the database servers, run ApplyEventSchema with the --EventShard 0 flag:
$A1BASEDIR/bin/ApplyEventSchema --EventShard 0 -
On the primary instance of the database server, run ApplyEventSchema with the -EventShard flag, replacing <N> with the relevant shard number:
$A1BASEDIR/bin/ApplyEventSchema --EventShard <N>
-
-
-