6 Register Oracle BI Publisher

Register BI Publisher in HTTPS Mode

Oracle recommends you register BI Publisher in HTTPS mode to encrypt any communication between Oracle Communications Session Delivery Manager and BI Publisher. BI Publisher can be run in both HTTP and HTTPS modes. If you decide to run BI Publisher in HTTP mode, then you can skip this section and go to the Register BI Publisher in Session Delivery Manager section.

Enable HTTPS on the WebLogic Server

To encrypt the communication between BIP and SDM, first enable HTTPS on the WebLogic server.

  1. Login to the administrative console of your WebLogic server. Use the username and password you created when installing BI Publisher.

    In the default installation, the administrative console can be reached at http://<IP address>:9500/console.

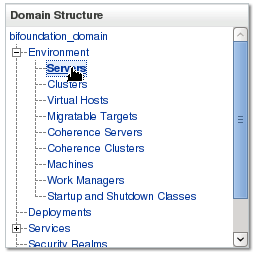
  2. Under Domain Structure in the left panel, click Environment, and then Servers.

    Refer to the preceding text for a description of this figure.

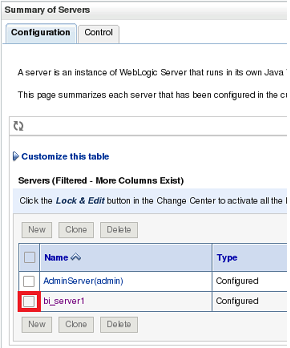
  3. In the main tab under Summary of Servers on the Configuration tab, click bi_server1.

    Refer to the preceding text for a description of this figure.

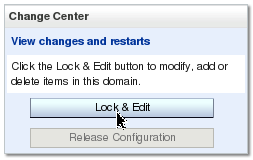
  4. In the Change Center, click Lock & Edit.

    Refer to the preceding text for a description of this figure.

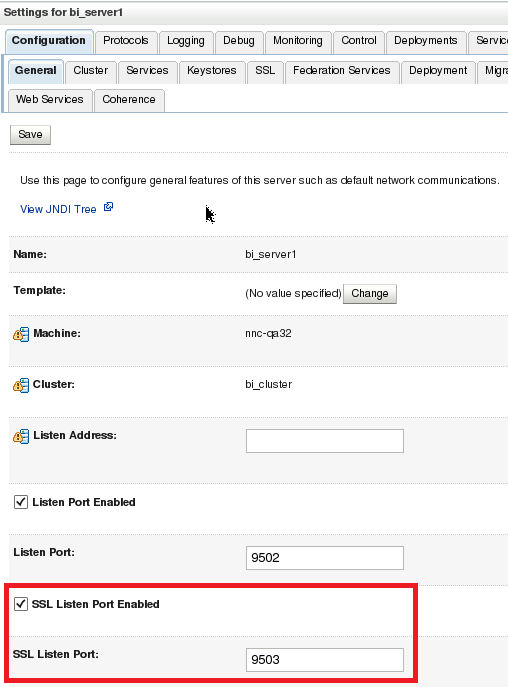
  5. In the Configurations, General tab, check the SSL Listen Port Enabled check box (SSL Listen port number 9503).

    Refer to the preceding text for a description of this figure.

  6. Click Save.
  7. In the Change Center, click Activate Changes.

In a cluster setup, repeat this task for each BIP server.

Save and Transfer the BI Publisher Certificate to Session Delivery Manager

  1. Open your web browser and connect to BI Publisher. For example:

    Note:

    You must use secure HTTPS.
    https://<myhostname>:9503/xmlpserver
  2. Confirm that you understand the risks.
  3. View and add the server certificate.
  4. Select the server certificate you that you added and click Export.
  5. Save the file with the .cer extension in one of the following formats:
    • X.509 PEM (Linux)
    • Base-64 (Windows)
  6. Use the secure file transport protocol (SFTP) to send the saved BI Publisher certificate to a directory on your Oracle Communications Session Delivery Manager server.

Add the BI Publisher Certificate to the Session Delivery Manager Keystore

After transferring BI Publisher Certificate to your Oracle Communications Session Delivery manager server, you must add your BI Publisher certificate to the Oracle Communications Session Delivery Manager keystore.

You can either add the BI Publisher certificate through the SDM setup program (setup.sh) or upload it through the SDM GUI:

Note:

If you are using the SDM setup program to upload a BI Publisher certificate, you must run the setup program on each SDM server cluster node to upload the BI Publisher certificate on each node. If you perform this task through the SDM GUI, the BI Publisher certificate is replicated to all SDM cluster nodes.
  • See the Configure Southbound Interface Transport Layer Security section in the Custom Installation chapter of the Oracle Communications Session Delivery Manager Installation Guide for more information about loading the BI Publisher certificate through the SDM setup program.
  • See the Manage Certificates for Southbound Authentication chapter in the Oracle Communications Session Delivery Manager Administration Guide for more information about loading the BI Publisher certificate through the SDM GUI.

Register BI Publisher in Session Delivery Manager

After the Oracle Communications Session Delivery Manager installation, Oracle BI Publisher must be registered from within the SDM GUI application.

  1. Start the Oracle Communications Session Delivery Manager server as the nncentral user:
    cd /opt/AcmePacket/NNC<version>/bin/
    ./startnnc.sh
  2. Navigate to your Oracle Communications Session Delivery Manager server IP address on port 8080.
  3. Ensure that you have your product plugin installed.
  4. Select Report Manager, Register BI Publisher.
  5. (Use this step to re-register BI Publisher in SDM only) In the Register BI Publisher pane, click Configure Registration.
  6. In the Register BI Publisher Step 1 of 2 pane, complete the following installation details fields to register a BI Publisher server:
  7. Click Next.

The available configuration parameters for Step 2 of 2 depend on your selections in Step 1 of 2.

Register a Local Standalone Mode of BI Publisher for Report Manager

If you entered local standalone in the previous section, use this additional task to register a local standalone installation of Oracle BI Publisher for Report Manager:
  1. In the Register BI Publisher Step 2 of 2 pane, complete the following installation details fields to register a local standalone installation of Oracle BI Publisher for Report Manager:
  2. Click Apply.

Registering a Remote Standalone BI Publisher

Use this task if you entered remote standalone in the previous step:
  1. In the Register BI Publisher Step 2 of 2 pane, complete the following fields:
  2. Click Apply.

Register a Local BI Publisher Cluster

If you entered the local and cluster options in the Register BI Publisher Step 1 of 2 pane, complete the following task:
  1. Select the local cluster node and click Edit.
  2. In the BI Publisher Cluster Member window, enter the protocol, IP address, port, FTP user name, FTP password, BI Publisher home folder, repository location, and Oracle database information for each node in the cluster.

    Note:

    If setting up a local cluster, the BI Publisher server information is pre-populated.
  3. Click Apply to save and close the BI Publisher Cluster Member window.
  4. Click Apply.