Import and Export the Configuration
You can import and export the ESBC configuration to and from a Comma Separated Value (CSV) file with the Import Export SPL plug-in. The Import Export SPL plug-in is enabled by default. No configuration is required.
Import and Export Restrictions
- Import and export occurs to and from the editing configuration.
- The system displays all error messages on the screen where the command was issued and provides line numbers with the error, when possible.
- The system does not allow you to set objects and attributes to inappropriate values. For example, you cannot set an IP address to "enabled". Parsing continues as normal after this error.
- If the system cannot write an object, for example, when the key field is missing, the system discards the object and parsing continues as normal.
- The import is additive. Each object that is imported is expected to be new to the configuration. If there is already an object with the same key present, the system generates the 409 error and discards the object. Parsing continues as normal after the error.
/code/configcsv directory,
which does not exist by default on a new installation. Create the
/code/configcsv directory in one of two ways:
- As the admin user, SFTP to the ESBC and use the
mkdircommand.$ sftp admin@10.0.0.3 Connected to admin@10.0.0.3. sftp> cd /code/ sftp> mkdir configcsv sftp> exit - Create a backup of the current
configuration.
ORACLE# spl save acli config-csv backupConfig.csv
File written to /code//configcsv/backupConfig.csv
Configuration CSV Files
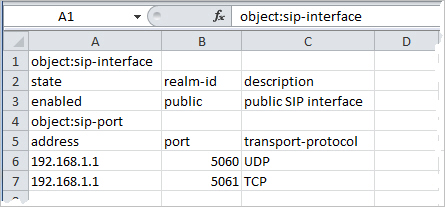
The ESBC import feature uses the import and export SPL plug-in. You must use a spreadsheet application, such as MS-Excel, that supports .csv files.
- Empty lines are ignored
- The first non-empty line must be the keyword
“object:”, followed by the configuration object name that is being configured
(shown below as sip-interface).
object:sip-interface - The second non-empty line must be the parameter
names of the objects to be configured, each parameter name in its own column.
This row defines the labels for each column for the subsequent rows. Only the
attributes that you want defined need to be present. You can specify the
parameter names in any order, but the data in subsequent rows must be consistent
with the labels that you define in this row.
state,realm-id,description - The third non-empty rows define values for the
configuration object, each instance in its own column. In the following example,
the third line defines a new sip-interface with state “enabled”, realm-id
“public”, and description “public SIP interface”. These values are based on the
labels defined in the second row.
enabled,public,public SIP interfaceNote:
The Description field displays all text as one continuous line, unless you insert line breaks. When you want to insert line breaks in the Description field, for example between sentences that you want displayed on separate lines, do the following:- From the GUI, in the Description field of a Configuration object, add Line1 to the end of the line where you want the first break to occur. Add Line2 to the end of the next line where you want a break to occur, and so on.
- In a .csv configuration file, add \010 to the end of the line where you want the first break to occur. Add \010 to the end of the next line where you want a break to occur.
- On all subsequent rows, you can define any number of instances.
- The next row with an “object” keyword selects a new
configuration object that is based on the previous object. You continue to input
the data for this object according to the rules stated above. The following
example shows a “sip-port” object added that is related to the sip-interface
object.
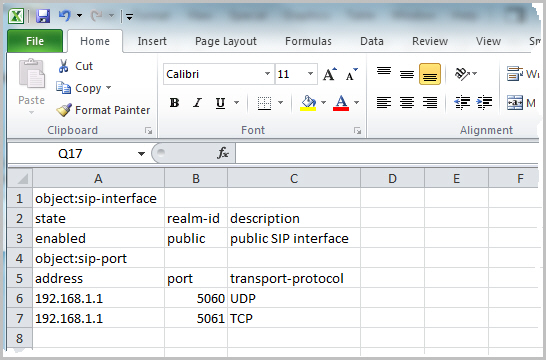
In this example, “sip-port” is a sub-object of “sip-interface” and would create new sip-ports off of the last sip-interface instance (of realm-id public).object:sip-port address,port,transport-protocol 192.168.1.1,5060,UDP 192.168.1.1,5061,TCP
Create a CSV File
To create a Oracle® Enterprise Session Border Controller (ESBC) configuration using a CSV file:
Enter Configuration Data Using a Text File
You can create a configuration by entering the required data into a text file and then use an application, such as Excel, to open and save the file as a CSV file. You must enter the information in the text file in the exact format as shown in the following example so that the labels to go to the correct columns in the Excel application.

Import a CSV Configuration File
After you create a CSV file that contains the ESBC configuration, you can import the file into the ESBC using the spl load acli config-csv command.
/code/configcsv directory into the editing configuration of
the ESBC.
spl load acli config-csv <filename>Note:
If you need to undo the import, you can restore the editing configuration with the following command:restore-backup-config backupEditingConfig.gz