Ground and Power Cable Installation

The Acme Packet 4900 must be properly grounded to ensure efficient performance. Grounding your Acme Packet 4900 chassis is an extremely important part of the installation and maintenance procedures. Physical harm or problems with system functionality may occur on the Acme Packet 4900 if it is not properly grounded. If your Acme Packet 4900 chassis is not properly grounded, the unit can exhibit unpredictable problems such as:
  • Garbled output
  • Sudden crashes
  • Physical damage to the Acme Packet chassis and its hardware components

Caution:

Failure to ground the chassis properly can result in permanent damage to the Acme Packet 4900 and its components. Bodily harm may also result under some circumstances.

Caution:

The Acme Packet 4900 does not support mixing AC and DC power supplies in the same chassis. A mixed power configuration is prohibited.

Your equipment rack location must have a local earth ground. This ground can be either an unpainted spot on the grounded equipment rack frame, or a grounded bus bar in the equipment room.

Grounding Cable Installation

The chassis grounding terminals are located on the rear of the Acme Packet 4900 chassis, to the left of the Serial Management port. The Acme Packet 4900 ships with 2 kep nuts screwed onto the ground terminals. Use an 11/32” nut driver to remove and install these kep nuts.

Grounding terminal

This section shows you how to install the grounding cable on your Acme Packet 4900.

Important:

Acme Packet 4900 equipment is suitable for installation as part of a Common Bonding Network (CBN).

Note:

The Common Bonding Network (CBN) is a term used for the connection of building steel, water pipes, cable racks, vertical and horizontal equalizer conductors, bonding conductors and electrical metallic raceways within a building, when they are bonded together by either deliberate or incidental connections. The CBN is also connected to the building’s grounding electrode system. Connections to the CBN are usually made from equipment frames to reduce voltage differences to acceptable levels when current flows through these frames, either during fault occurrences in the AC or DC power systems, or when lightning strikes.
To install the grounding cable on the Acme Packet 4900:
  1. Using an 11/32” nut driver, unscrew and remove the two kep nuts from the grounding posts located on the rear of the Acme Packet 4900. Place them aside.
  2. Place the lug on the end of the grounding cable onto the grounding terminals.
  3. Using an 11/32” nut driver, tighten the two kep nuts onto the grounding post, securing the grounding lug in place. When attached correctly, the grounding lug fits snugly between the chassis’s rear panel and the kep nuts.
  4. Connect the other end of the grounding wire to a suitable grounding point at your site.

    Note:

    Always make the ground connection first and disconnect it last when installing or removing the system from an equipment rack.

AC Power Cord Installation

This section explains you how to install an AC power cord.

Note:

Use a 15 Amp fused circuit for each AC power supply.

Note:

This equipment is intended for installation in locations where National Electrical Code (NEC) applies.
To install the AC power cords in the Acme Packet 4900:
  1. Locate the two AC power cords shipped with your Acme Packet 4900. Choose one power supply to work on first.
  2. Connect one power cord to the power supply by inserting the 3-lead IEC-60320 plug into the IEC connector located on the power supply.
  3. Connect the other power cord to the power supply by inserting the 3-lead IEC-60320 C13 plug into the IEC-60320 C14 IEC connector located on the power supply.
  4. Route the AC power cords through your rack and cabling system to the power outlets.
  5. Plug the supply end of each power cord into its own circuit.

    The Acme Packet 4900 will start to boot.

    Note:

    To remove AC power cables from the Acme Packet 4900, reverse the previous steps in this procedure.

DC Power Cord Installation

This section explains how to install a DC power cord on the Acme Packet 3950 or Acme Packet 4900.

Important:

This equipment is intended for installation in network telecommunication facilities.

Caution:

Use a 10 Amp fused circuit for each DC power supply.

Caution:

Refer to the power supply’s polarity label when connecting it to a power source. Failure to do so can result in equipment damage or serious injury.
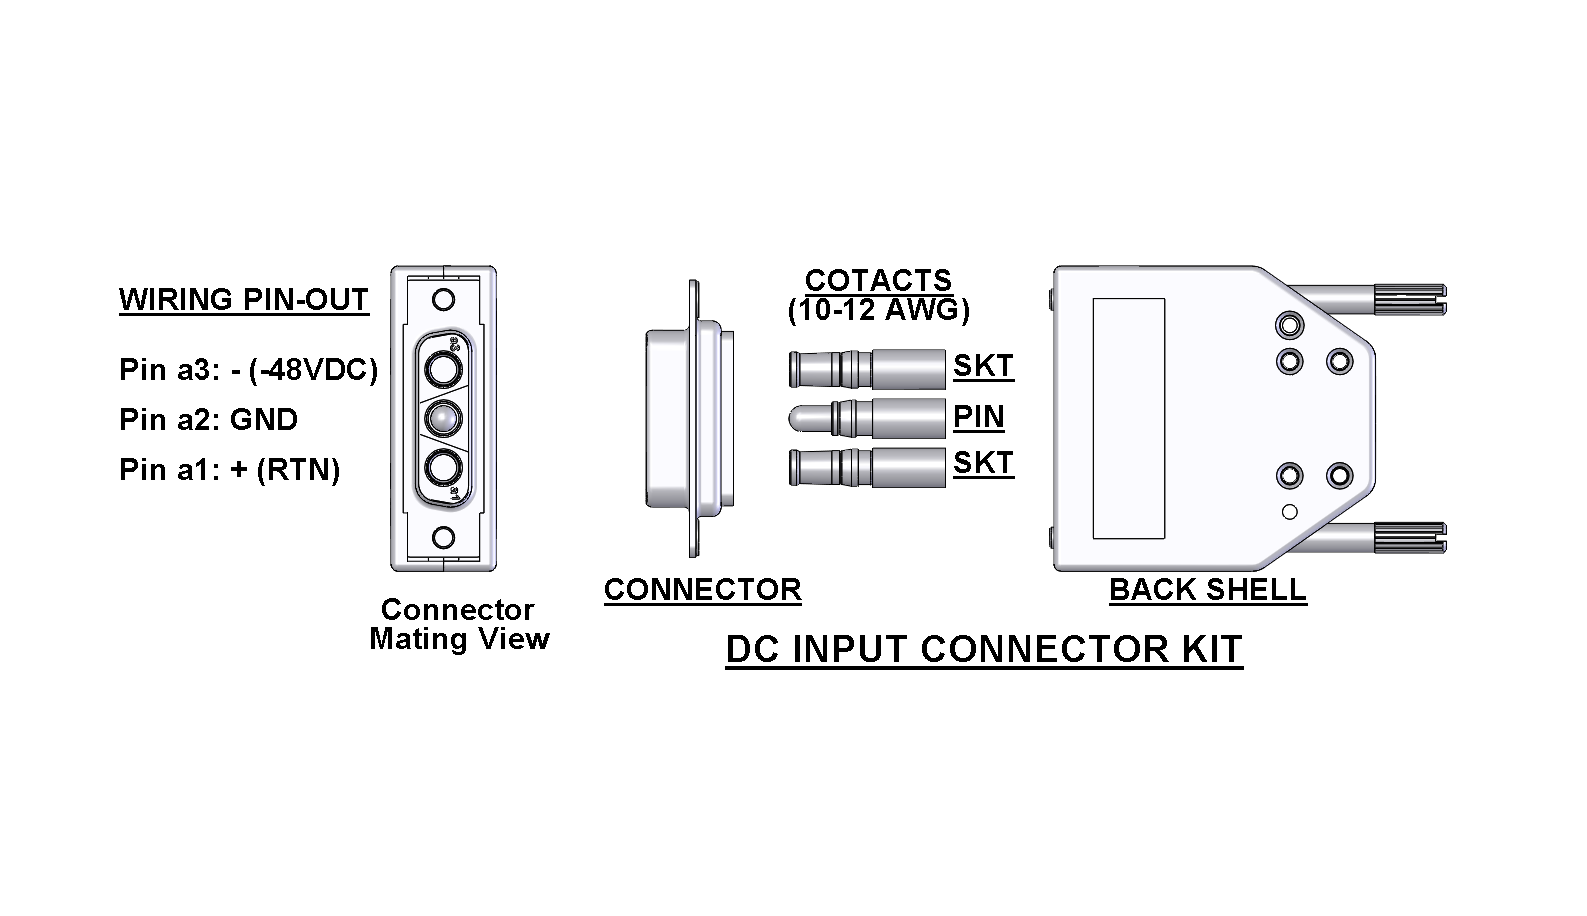
  1. Locate the DC connector kits shipped with your Acme Packet 4900. Use this connector to fabricate a power cord that meets your requirements. Choose one power supply to work on first.

    The mating connector kit includes components to create your own customized cable. You must supply both the wire and the supply side terminations.

  2. Strip the end of the wire, insert the wire into the barrel end, and apply enough pressure with the crimping tool to indent the barrel. Gently tug the wire to confirm the barrel is adequately crimped.
    Your crimping tool should accommodate an 8AWG wire. The contact crimp barrel diameter is 0.216 inch or 5.50mm.

    Crimp tool

    Because the crimp may expand the width of the contact barrel, you may want to use a protective sleeve over the last ¾" (or 19mm) of the wire to protect against shorts.

    connector with terminators

  3. Slide the crimped terminals into the back side of the connector until the contact clicks into place.

    Use the following diagram to construct your DC power supply.

    DC connections
    Connector Pin Lead Designation Suggested Wire Color (10AWG)
    A3 - (-48VDC) Black
    A2 Chassis Ground Green or Green/Yellow
    A1 + (RTN) Red
  4. Connect the plug from a 3-conductor power cord into the connector located on one of the DC power supplies.
  5. Connect the plug from another 3-conductor power cord to the power connector located on the other DC power supply.
  6. Route the DC power cords through your rack and cabling system to the power outlets.
  7. Plug the supply end of each power cord into its own circuit.

    Note:

    To remove DC power cables from the Acme Packet 4900, reverse the previous steps in this procedure.