Planning an Administrative Group
As with any management decision, the key to effective implementation is planning and preparation. The same holds true for administration groups.
Step 1: Plan Your Group Hierarchy
You can only have one administration group hierarchy in your Enterprise Manager deployment, thus ensuring that administration group member targets can only directly belong to one administration group. This prevents monitoring conflicts from occurring as a result of having a target join multiple administration groups with different associated monitoring settings.
To define the hierarchy, you want to think about the highest (root) level as consisting of all targets that have been added to Enterprise Manager. Next, think about how you want to divide your targets along the lines of how they are monitored, where targets that are monitored in one way are in one group, and targets that are monitored in another way are part of another group. For example, Production targets might be monitored one way and Test targets might be monitored in another way. You can further divide individual groups if there are further differences in monitoring. For example, your Production targets might be further divided based on the line of business they support because they might have additional metrics that need to be monitored for that line of business. Eventually, you will end up with a hierarchy of groups under a root node.
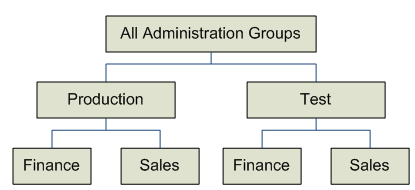
The attributes used to define each level of grouping and thus the administration group membership criteria are based on global target properties as well as user-defined target properties. These target properties are attributes of every target and specify operational information within the organization. For example, location, line of business to which it belongs, and lifecycle status. The global target properties that can be used in the definition of administration groups are:
-
Lifecycle Status
Note:
Lifecycle Status target property is of particular importance because it denotes a target's operational status. Lifecycle Status can be any of the following: Mission Critical, Production, Staging, Test, or Development.
-
Location
-
Line of Business
-
Department
-
Cost Center
-
Contact
-
Platform
-
Operating System
-
Target Version
-
Customer Support Identifier
-
High Availability Role
-
Target Type (Allowed but not a global target property.)
You can create custom user-defined target properties using the EM CLI verbs add_target_property and set_target_property_value. See Verb Reference in the Oracle Enterprise Manager Command Line Interface Guide for more information.
Enterprise Manager (EM) 13.5 Release Update 13 and later supports a user-defined ‘High Availability Role’ target property. This property can be used to distinguish a database's role: if it is a primary or a standby database. When a database role change occurs, Enterprise Manager automatically updates this user-defined target property value, if defined, with the new database role (primary or standby). This property can then be applied towards your Dynamic Groups or Administration Groups.
For example, you may have an Administration Group strictly for primary databases and a separate Administration Group strictly for standby databases. This is to ensure that you can send separate notifications for each of these groups to respective database administrators. Once a database role change occurs, if the ‘High Availability Role’ target property is included in the Administration Group hierarchy definition then EM automatically updates the value of this property to the new database role. Hence the respective database will automatically become a new member of the respective Administration Group matching the new criteria. The administrators of the respective Administration Group will thus be notified of any new corresponding alerts.
How to Use ‘High Availability Role’ Target Property:
1. Create a user-defined target property and label it ‘High Availability Role’.
2. Set the OMS property ‘oracle.sysman.db.utilizeHARoleTargetProperty’ to ‘true’ to enable the feature.
3. Update your master list of values for this property to explicitly include the values 'Primary' and 'Standby'.
4. Assign target property values, ‘Primary’ or ‘Standby’, to your desired database targets.
5. Create or update your Administration Group hierarchy definition to include the ‘High Availability Role’."
Example:
-
The user-defined target property, ‘High Availability Role’ has been created.
-
It has the target property values of 'Primary' and 'Standby'.
-
-
There are two databases: DB1 (primary database) and DB2 (standby database) that are assigned the target property value that corresponds to their current role.
-
DB1 (primary) ==> ‘High Availability Role = Primary’
-
DB2 (standby) ==> ‘High Availability Role = Standby’
-
-
Database role change occurs (automatic)
-
EM updates the target property values of the databases if they are now Primary or Standby
-
DB1 (formerly primary, now standby) ==> 'High Availability Role' property changes from ‘Primary' to ‘Standby’
-
DB2 (formerly standby, now primary) ==> 'High Availability Role' property changes from ‘Standby' to ‘Primary’
-
-
-
EM automatically puts the new primary and new standby database in the appropriate groups
You cannot manually add targets to an administration group. Instead, you set the target properties of the target (prospective group member) to match the membership criteria defined for the administration group. Once the target properties are set, Enterprise Manager automatically adds the target to the appropriate administration group.
Target Properties Master List
To be used with administration group (and dynamic groups), target properties must be specified in a uniformly consistent way by all users in your managed environment. In addition, you may want to limit the list of target property values that can be defined for a given target property value. To accomplish this, Enterprise Manager lets you define a target properties master list. When a master list is defined for a specific target type, a drop-down menu containing the predefined property values appears in place of a text entry field on a target's target properties page. You use the following EM CLI verbs to manage the master properties list:
-
use_master_list: Enable or disable a master list used for a specified target a property.
-
add_to_property_master_list: Add target property values to the master list for a specified property.
-
delete_from_property_master_list: Delete values from the master list for specified property.
-
list_property_values: List the values for a property's master list
-
list_targets_having_property_value: Lists all targets with the specified property value for this specified property name.
-
rename_targets_property_value: Changes the value of a property for all targets.
For more information about the master list verbs, see the Verb Reference in the Oracle Enterprise Manager Command Line Interface Guide for more information.
Note:
You must have Super Administrator privileges in order to define/maintain the target properties master list.Enterprise Manager Administrators and Target Properties
When creating an Enterprise Manager administrator, you can associate properties such as Contact, Location, and Description. However, there are additional resource allocation properties that can be associated with their profile. These properties are:
-
Department
-
Cost Center
-
Line of Business
It is important to note that these properties are persistent--when associated with an administrator, the properties (which mirror, in part, the target properties listed above) are automatically passed to any targets that are discovered or created by the administrator.
Example
In the following administration group hierarchy, two administration groups are created under the node Root Administration Group, Production and Test, because monitoring settings for production targets will differ from the monitoring settings for test targets.
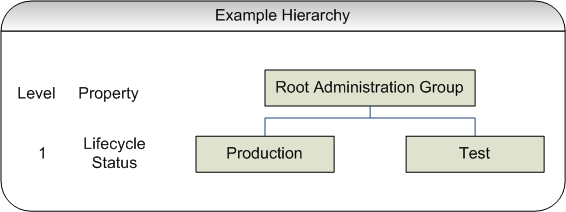
In this example, the group membership criteria are based on the Lifecycle Status target property. Targets whose Lifecycle Status is 'Production' join the Production group and targets whose Lifecycle Status is 'Test' join the Test group. For this reason, Lifecycle Status is the target property that determines the first level in the administration group hierarchy. The values of Lifecycle Status property determine the membership criteria of the administration groups in the first level: Production group has membership criteria of "Lifecycle Status = Production" and Test group has membership criteria of "Lifecycle Status = Test' membership criteria.
Additional levels in the administration group hierarchy can be added based on other target properties. Typically, additional levels are added if there are additional monitoring (or management) settings that need to be applied and these could be different for different subsets of targets in the administration group. For example, in the Production group, there could be additional monitoring settings for targets in Finance line of business that are different from targets in Sales line of business. In this case, an additional level based on Line of Business target property level would be added.
The end result of this hierarchy planning exercise is summarized in the following table.
| Root Level (First Row) | Level 1 target property (second row)Lifecycle Status | Level 2 target property (third row)Line of Business |
|---|---|---|
| Root Administration Group | Production or Mission Critical | Finance |
|
_ |
_ |
Sales |
|
_ |
Staging or Test or Development | Finance |
|
_ |
_ |
Sales |
Each cell of the table represents a group. The values in each cell represent the values of the target property that define membership criteria for the group.
It is possible to have the group membership criteria be based on more than one target property value. In that case, any target whose target property matches any of the values will be added to the group. For example, in the case of the Production group, if the Lifecycle Status of a target is either Production or Mission Critical, then it will be added to the Production group.
It is also important to remember that group membership criteria is cumulative. For example, for the Finance group under Production or Mission Critical group, a target must have its Lifecycle Status set to Production or Mission Critical AND its Line of Business set to Finance before it can join the group. If the target has its Lifecycle Status set to Production but does not have its Line of Business set to Finance or Sales, then it does not join any administration group.
For this planning example, the resulting administration group hierarchy would appear as shown in the following graphic.
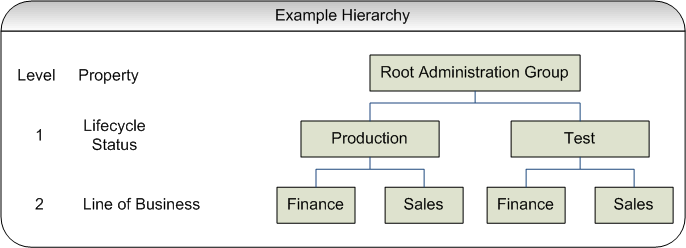
It is important to note that a target can become part of hierarchy if and only if its property values match criteria at both the levels. A target possessing matching values for lifecycle status cannot become member of the administration group at the first level. Also, all targets in the administration group hierarchy will belong to the lowest level groups.
Step 2: Assign Target Properties
After establishing the desired administration group hierarchy, you must make sure properties are set correctly for each target to ensure they join the correct administration group. Using target properties, Enterprise Manager automatically places targets into the appropriate administration group without user intervention. For targets that have already been added to Enterprise Manager, you can also set the target properties via the console or using the EM CLI verb set_target_property_value, See the Oracle Enterprise Manager Command Line Interface Guide for more information. Note that when running set_target_property_value, any prior values of the target property are overwritten. If you set target properties before hierarchy creation, it will join the group after it is created. The targets whose properties are set using EM CLI will automatically join their appropriate administration groups. Target properties can, however, be set after the administration group hierarchy is created.
For small numbers of targets, you can change target properties directly from the Enterprise Manager console.
-
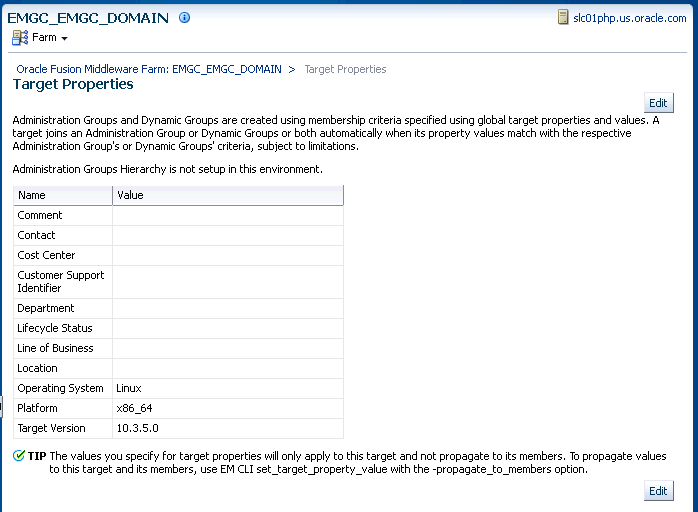
From an Enterprise Manager target's option menu, select Target Setup, then select Properties.
-
On the Target Properties page, click Edit to change the property values.

To help you specify the appropriate target property values used as administration group criteria, pay attention to the instructional verbiage at the top of the page.
-
Once you have set the target properties, click OK.
For large numbers of targets, it is best to use the Enterprise Manager Command Line Interface (EM CLI) set_target_property_value verb to perform a mass update. For more information about this EM CLI verb, see the Enterprise Manager Command Line Interface guide.
Administration groups are privilege-propagating: Any privilege that you grant on the administration group to a user (or role) automatically applies to all members of the administration group. For example, if you grant Operator privilege on the Production administration group to a user or role, then the user or role automatically has Operator privileges on all targets in the administration group. Because administration groups are always privilege propagating, any aggregate target that is added to an administration group must also be privilege propagating.
Note:
An aggregate target is a target containing other member targets. For example, a Cluster Database (RAC) is an aggregate target has RAC instances.
A good example of aggregate target is the Privilege Propagating Group. See "Managing Groups" for more information.
At any time, you can use the All Targets page to view properties across all targets. To view target properties:
-
From the Targets menu, select All Targets to display the All Targets page.
-
From the View menu, select Columns, then select Show All.
-
Alternatively, if you are interested in specific target properties, choose Columns and then select Show More Columns.
Step 3: Prepare for Creating Template Collections
Template collections contain the monitoring settings and other management settings that are meant to be applied to targets as they join the administration group. Monitoring settings for targets are defined in monitoring templates. Monitoring templates are defined on a per target type basis, so you will need to create monitoring templates for each of the different target types in your administration group. You will most likely create multiple monitoring templates to define the appropriate monitoring settings for an administration group. For example, you might create a database Monitoring template containing the metric settings for your production databases and a separate monitoring template containing the settings for your non-production databases. Other management settings that can be added to a template collection include Compliance Standards and Enterprise Manager Policies. Ensure all of these entities that you want to add to your template collection are correctly defined in Enterprise Manager before adding them to template collections.
If you have an administration group hierarchy defined with more than two levels, such as the hierarchy shown in the following figure, it is important to understand how management settings are applied to the targets in the administration group.
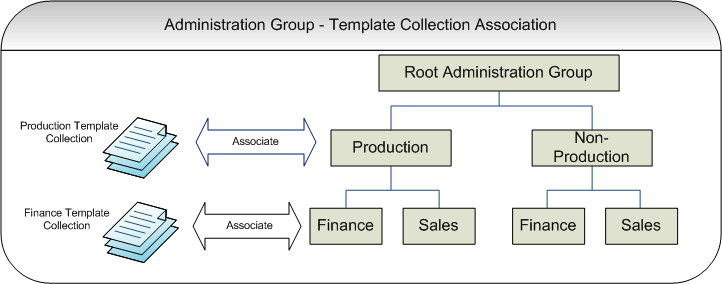
Each group in the administration group hierarchy can be associated with a template collection (containing monitoring templates, compliance standards, and Enterprise Manager policies). If you associate a template collection containing monitoring settings with the Production group, then the monitoring settings will apply to the Finance and Sales subgroup under Production. If the Finance group under Production has additional monitoring settings, then you can create a monitoring template with only those additional monitoring settings. (Later, this monitoring template should be added to another template collection and associated with the Finance group). The monitoring settings from the Finance Template Collection will be logically combined with the monitoring settings from the Production Template Collection. In case there are duplicate metric settings in both template collections, then the metric settings from the Finance Template Collection takes precedence and will be applied to the targets in the Finance group. This precedence rule only applies to the case of metric settings. In the case of compliance standard rules and Enterprise Manager policies, even if there are duplicate compliance standard rules and Enterprise Manager policies in both template collections, they will be all applied to the targets in the Finance group.
Once you have completed all the planning and preparation steps, you are ready to begin creating an administration group.