- Exadata Server X11M Service Manual
- Servicing Storage Drives
- Remove a Storage Drive
Remove a Storage Drive
-
Prepare the system for the drive removal.
Refer to Take Antistatic Measures.
-
Identify the location of the drive that you want to remove.
For storage drive locations, see either NVMe Storage Drives or SAS Storage Drives.
If NVMe storage drives are installed in the server front panel, they are labeled NVMe0 through NVMe3. Server operating systems may assign these storage drives different names.
The following table shows sample corresponding names assigned by the operating systems. Example drive names provided in the table assume that the NVMe cabling between the motherboard and the NVMe disk backplane is correct.
Storage Drive Labels Example Names Assigned by Server Operating Systems NVMe0
PCIe Slot 100
NVMe1
PCIe Slot 101
NVMe2
PCIe Slot 102
NVMe3
PCIe Slot 103
-
Remove the storage drive.
-
If you are removing an HDD or SSD storage drive, type the required operating system commands to stop the server from using the drive; otherwise, proceed to the next step.
The exact commands required depend on the configuration of your drives. Unmount file systems or issue RAID commands, as needed.
Note:
The blue OK to Remove status indicator LED on the drive might not light, as support for this varies depending on the operating system in use. For information on storage drive status indicators (LEDs), see Storage Drive Status Indicators. -
If you are removing an NVMe storage drive, see the procedures for your operating system.
Note:
NVMe storage drives are supported only on servers that are running Oracle Linux, Oracle Solaris, or Microsoft Windows Server.
-
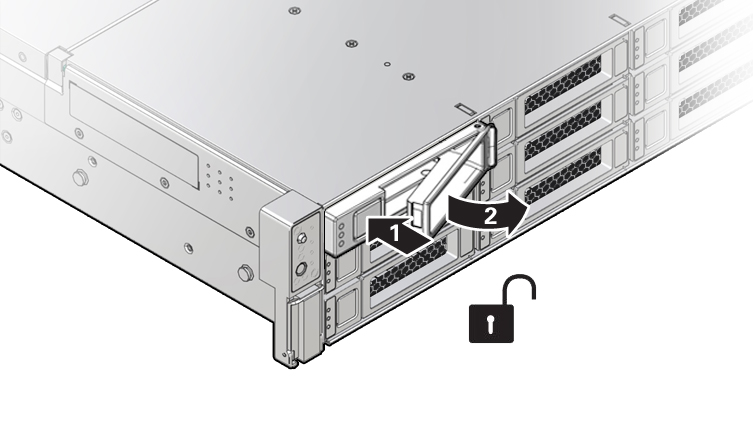
- Push the latch release button to open the drive latch [1, 2].

Callout Description 1
Pressing the latch release button.
2
Opening the latch.
Caution:
The latch is not an ejector. Do not open the latch too far to the right. Doing so can damage the latch. -
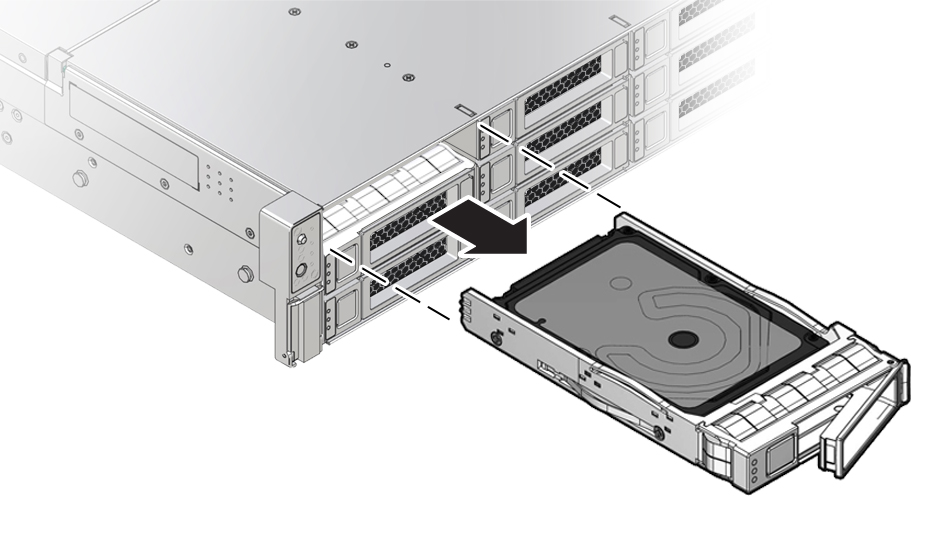
Grasp the latch and pull the drive out of the drive slot.

-
Consider your next steps:
-
If you are replacing the drive, continue to Install a Storage Drive.
-
If you are not replacing the drive, install a filler in the empty drive slot to maintain proper airflow and perform administrative tasks to configure the server to operate without the drive. See Remove and Install Filler Panels.
-
Locate the vacant storage drive module slot in the server, and then ensure that the release lever on the filler panel is fully opened.
-
Slide the filler panel into the vacant slot by pressing the middle of the filler panel faceplate with your thumb or finger.
The release lever will close as it makes contact with the chassis. Do not slide the filler panel in all the way. Leave the filler panel out approximately 0.25 to 0.50 inch (6 to 12 mm) from the opening.
-
Using your thumb or finger, press on the middle of the filler panel faceplate until the release lever engages with the chassis.
-
Close the release lever until it clicks into place and is flush with the front of the server
-
-