Create a Connection for Federated Partitions
Define a connection between Essbase and Autonomous Data Warehouse Serverless, to work with federated partitions.
Federated partitions are supported only for Essbase deployment on Oracle Cloud Infrastructure.
Before you start defining the required connection, review the Federated Partitions Workflow to ensure you have completed all required preliminary tasks.
Considerations for Implementing Federated Partition Connections
Review how you created the necessary schema(s) for federated partitions. If you have one Autonomous Data Warehouse schema designated for multiple Essbase federated partition applications, it makes sense to create one global connection that all the applications can share. If you one or more schemas but only one Essbase application per schema, an application-level connection to each schema is a good approach.
- To create a global connection, you need to have the service administrator role.
- To create an application level connection, you need to have user role, and at least application manager permission on the application.
To create the required connection for federated partitions,
-
In the Essbase web interface, click Sources, then Connections.
To define the connection and Datasource at application level instead of globally, start on the Applications page instead of the Sources page. Click an application name, and then click Sources.
-
Click Create Connection, and for the connection type, select Oracle Database.
-
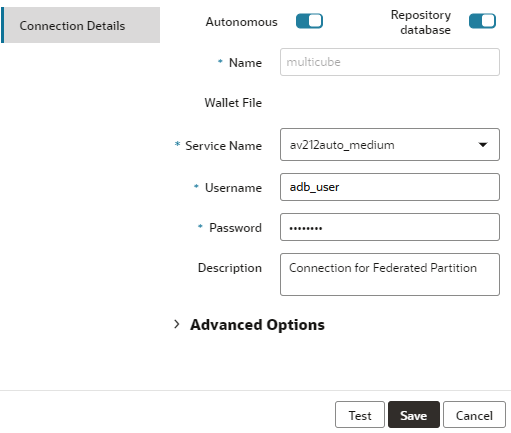
Enable the Autonomous switch.

-
Enter a connection name.
If you are recreating an Autonomous Data Warehouse connection for a federated partition after migrating the application using the lcmimport CLI command (or an Import LCM job), it is recommended to use a new connection name to avoid encountering errors.
-
Select a service name.
-
Enable the Repository Database switch. This is required for federated partition connections.
You do not need to upload a wallet, because Essbase will use the wallet associated with the repository database.
-
Enter your Autonomous Data Warehouse username, password, and optionally, a description.
-
Click Test to validate the connection, and if successful, click Create.
If you get connection errors, you may need to expand Advanced Options to adjust the minimum and maximum connection pool sizes.

Refer to About Controlling the Pool Size in UCP in Universal Connection Pool Developer's Guide.
-
Verify that the connection was created successfully and appears in the list of connections.
-
In the Essbase web interface, on the Sources page, click Connections.
To define the connection and Datasource at application level, instead of globally, start on the Applications page instead of the Sources page. From the Actions menu to the right of an application name, launch the inspector and click Sources.
-
Click Create Connection and select Oracle Database.
-
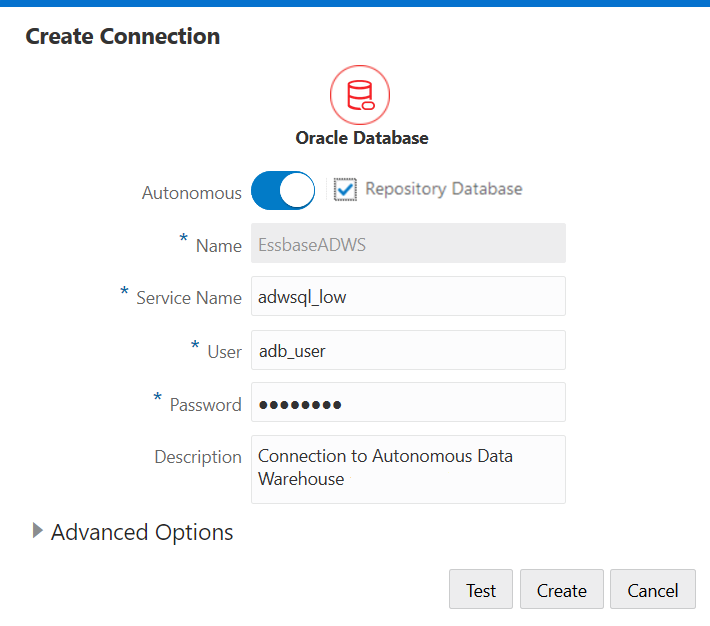
Select Autonomous using the toggle switch.

-
Enter a connection name.
If you are recreating an Autonomous Data Warehouse connection for a federated partition after migrating the application using the lcmimport CLI command (or an Import LCM job), it is recommended to use a new connection name to avoid encountering errors.
-
Select a service name.
-
Select the Repository Database option. This option is required to be selected for federated partition connections.

You do not need to upload a wallet, because Essbase will use the wallet associated with the repository database.
-
Enter your Autonomous Data Warehouse username, password, and optionally, a description.
-
Click Test to validate the connection, and if successful, click Create.
If you get connection errors, you may need to expand Advanced Options to adjust the minimum and maximum connection pool sizes.

Refer to About Controlling the Pool Size in UCP in Universal Connection Pool Developer's Guide.
-
Verify that the connection was created successfully and appears in the list of connections.