3.4 Prepare a Kubernetes Cluster
In Kubernetes, you can install MicroTx within a service mesh or without it.
The installation bundle provides example Helm charts with sample values which you can use as a reference to install MicroTx. This section provides instructions to install MicroTx on a Kubernetes cluster with and without using the Istio service mesh.
You can create a similar configuration to install MicroTx in other supported environments. If you are using another service mesh in a Kubernetes cluster, create your own Helm charts.
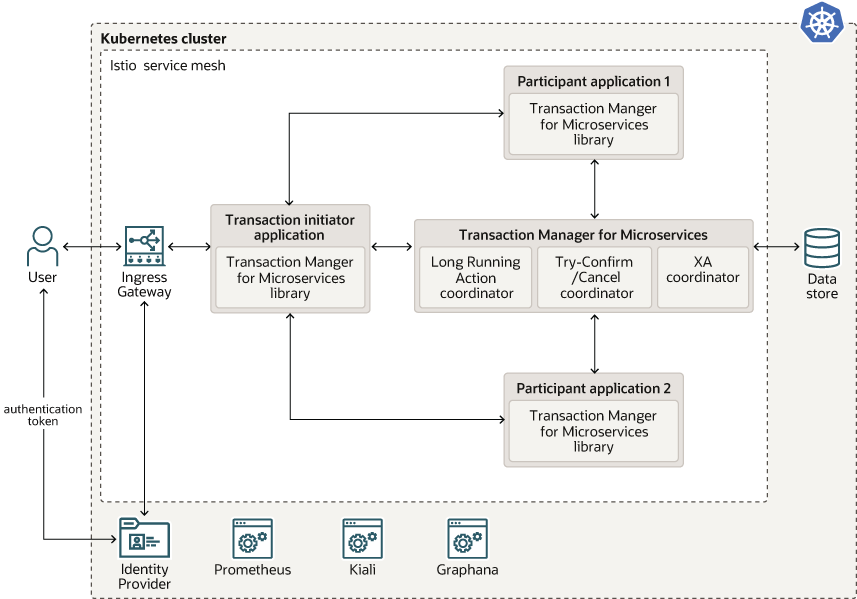
The following image shows a sample deployment where MicroTx is installed in a Kubernetes cluster within an Istio service mesh along with other microservices.

Istio is a service mesh that provides a separate infrastructure layer to handle inter-service communication. Network communication is abstracted from the services themselves and is handled by proxies. Istio uses a sidecar design, which means that the communication proxies run in their own containers beside every service container. Envoy is the proxy that is deployed as a sidecar inside the microservices container. All communication inside the service mesh is done through the Envoy proxies.
Topics:
- Considerations for Deployment on Kubernetes
Consider the following factors while deploying MicroTx on Kubernetes. - Create a Kubernetes Cluster
Create a Kubernetes cluster or use an existing one. You will install MicroTx onto this cluster. - Install the Required Software for Kubernetes
Before installing MicroTx in Kubernetes, you must install and configure the required software on your local machine. - Install and Configure Istio
Install Istio, 1.12.1 or later versions, onto the Kubernetes cluster with the default Istio profile. - Create a Kubernetes Secret with SSL Details for Istio
To enable access to Istio using the HTTPS protocol, you must create a Kubernetes secret that contains details of an SSL key and certificate. MicroTx uses this information to access Istio using HTTPS. - Create a Kubernetes Secret to Access Docker Registry
When you install the application using Helm, use a Kubernetes secret to provide the authentication details to pull an image from the remote repository. - Authenticate and Authorize
Authentication ensures that only authorized individuals get access to the system and data. Authorization provides access control to system privileges and data. This builds on authentication to ensure that individuals get appropriate access.
Parent topic: Prepare