Example Distributed Database Deployment

This example explains how to deploy a typical system-managed Oracle Globally Distributed Database with multiple replicas, using Oracle Data Guard for high availability.

To deploy a system-managed distributed database you create shardgroups and shards, create and configure the databases to be used as shards, run the DEPLOY command, and create role-based global services.

You are not required to map data to shards in the system-managed data distribution method, because the data is automatically distributed across shards using partitioning by consistent hash. The partitioning algorithm evenly and randomly distributes data across shards. For more conceptual information about the system-managed distribution method, see System-Managed Data Distribution.

Example Oracle Globally Distributed Database Topology

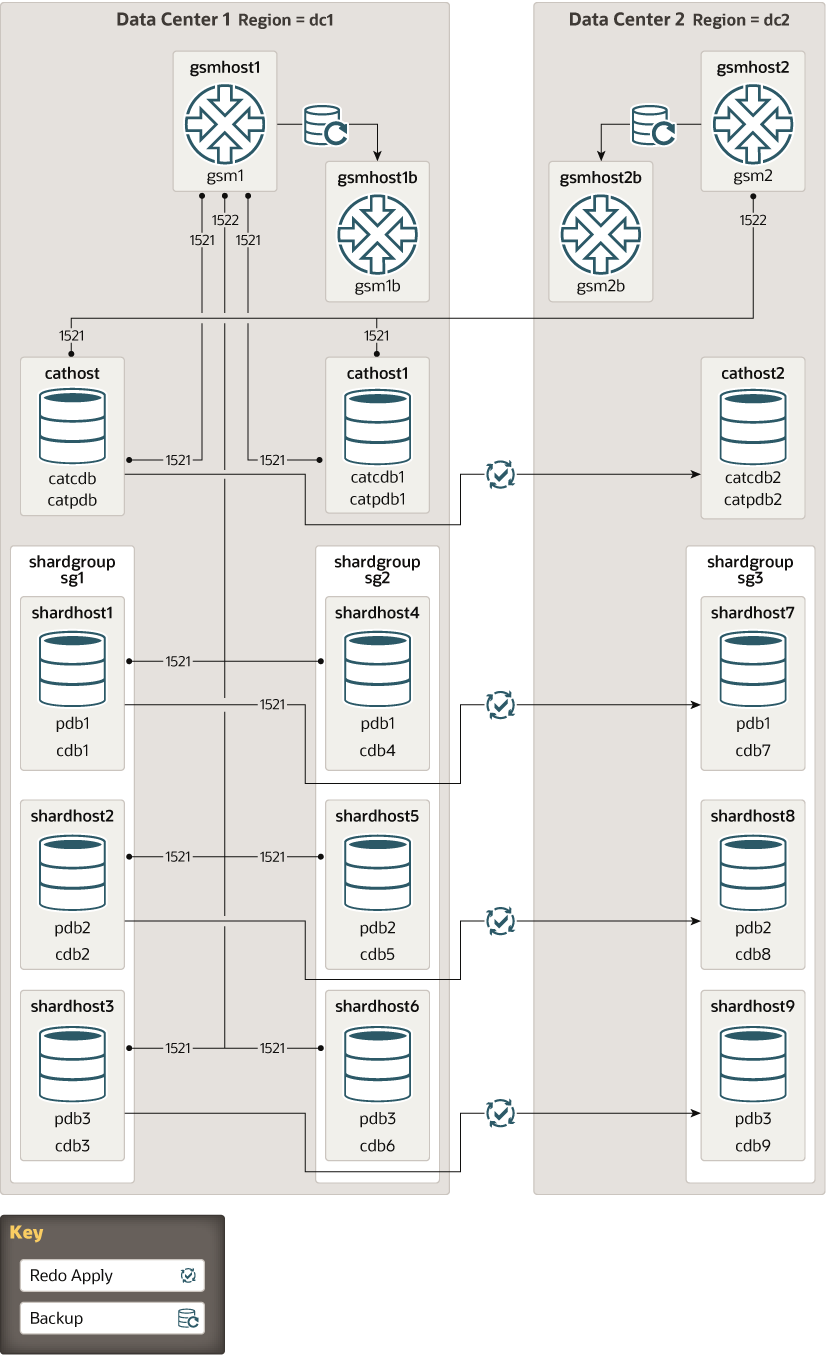
Consider the following system-managed Oracle Globally Distributed Database configuration, where shardgroup sg1 contains the primary shards, while shardgroups sg2 and sg3 contain standby replicas.

In addition, let’s assume that the replicas in shardgroup sg2 are Oracle Active Data Guard standbys (that is, databases open for read-only access), while the replicas in shardgroup sg3 are mounted databases that have not been opened.


Table 3-1 Example System-Managed Topology Host Names

Topology Object Description
Shard Catalog Database

Every distributed database topology requires a shard catalog. In our example, the shard catalog database has 2 standbys, one in each data center.

Primary

  • Data center = 1
  • Host name = cathost
  • DB_UNIQUE_NAME = catcdb
  • PDB name = catpdb
  • Connect service name = catpdb

Active Standby

  • Data center = 1
  • Host name = cathost1

Standby

  • Data center = 2
  • Host name = cathost2
Regions

Because there are two data centers involved in this configuration, there are two corresponding regions created in the shard catalog database.

Data center 1

  • Region name = dc1

Data center 2

  • Region name = dc2
Shard Directors (global service managers)

Each region requires a shard director running on a host within that data center.

Data center 1

  • Shard director host name = gsmhost1
  • Shard director name = gsm1

Data center 2

  • Shard director hast name = gsmhost2
  • Shard director name = gsm2
Shardgroups

Data center 1

  • sg1
  • sg2

Data center 2

  • sg3
Shards
  • Host names = shardhost1, …, shardhost9
  • DB_UNIQUE_NAME = cdb1, …, cdb9
  • PDB names = pdb1, pdb2, pdb3

    PDB names on standby replicas are the same as the PDB names on their corresponding primaries

Deploy the Example Distributed Database

Do the following steps to deploy the example system-managed distributed database with multiple replicas, using Oracle Data Guard for high availability.

  1. Provision and configure the following hosts: cathost, cathost1, cathost2, gsmhost1, gsmhost2, and hosts shardhost1 through shardhost9.
  2. Install the Oracle Database software on the following hosts: cathost, cathost1, cathost2, and shardhost1 through shardhost9.
  3. Install the shard director software on hosts gsmhost1 and gsmhost2.
  4. Create the shard catalog database and start an Oracle TNS Listener on cathost.

    Additionally, create standby replicas of the catalog on cathost1 and cathost2, and verify that changes made to the primary catalog are applied on these standbys.

    See Create the Shard Catalog Database for details.

  5. Create the 3 primary databases that will contain the sharded data on hosts shardhost1, shardhost2 and shardhost3.

    Create the corresponding replicas, located and named as listed here.

    • shardhost1 (cdb1/pdb1) replicas on shardhost4 (cdb4) and shardhost7 (cdb7)
    • shardhost2 (cdb2/pdb2) replicas on shardhost5 (cdb5) and shardhost8 (cdb8)
    • shardhost3 (cdb3/pdb3) replicas on shardhost6 (cdb6) and shardhost9 (cdb9)

    The db_unique_name of the 9 container databases (CDB) should be cdb1 through cdb9, in which the PDB names should be pdb1, pdb2 and pdb3 on the three primaries and their replicas.

    The service names for the CDBs should be cdb1 through cdb9, which the service names for the PDB shards are pdb1, pdb2, and pdb3.

    See Create the Shard Databases for details.

  6. Assuming that all port numbers are the defaults, to configure the distributed database topology, issue the following GDSCTL commands, replacing domains and passwords with the appropriate values.
    1. On host gsmhost1, run the following commands in GDSCTL.

      create shardcatalog -database cathost.example.com:1521/catpdb.example.com -user mydbsadmin/mydbsadmin_password -region dc1,dc2
      add gsm -gsm gsm1 -region dc1 -catalog cathost.example.com:1521/catpdb.example.com -pwd gsmcatuser_password
      start gsm -gsm gsm1

      See Create the Shard Catalog and Add and Start Shard Directors for details.

    2. On host gsmhost2, run the following commands in GDSCTL.

      connect mydbsadmin/mydbsadmin_password@cathost.example.com:1521/catpdb.example.com
      add gsm -gsm gsm2 -region dc2 -catalog cathost.example.com:1521/catpdb.example.com -pwd gsmcatuser_password
      start gsm -gsm gsm2
      

      See Add and Start Shard Directors for details.

    3. Back on host gsmhost1, run the following from GDSCTL to complete the distributed database setup.

      add shardgroup -shardgroup sg1 -deploy_as primary -region dc1
      add shardgroup -shardgroup sg2 -deploy_as active_standby -region dc1
      add shardgroup -shardgroup sg3 -deploy_as standby -region dc2
      add cdb -connect shardhost1.example.com:1521/cdb1.example.com -pwd gsmrootuser_password
      add cdb -connect shardhost2.example.com:1521/cdb2.example.com -pwd gsmrootuser_password

      Repeat the ADD CDB command for shardhost3 through shardhost9 and cdb3 through cdb9, then run the following commands.

      add shard -connect shardhost1.example.com:1521/pdb1.example.com -pwd gsmuser_password -shardgroup sg1 -cdb cdb1
      add shard -connect shardhost2.example.com:1521/pdb2.example.com -pwd gsmuser_password -shardgroup sg1 -cdb cdb2
      add shard -connect shardhost3.example.com:1521/pdb3.example.com -pwd gsmuser_password -shardgroup sg1 -cdb cdb3
      add shard -connect shardhost4.example.com:1521/pdb1.example.com -pwd gsmuser_password -shardgroup sg2 -cdb cdb4
      add shard -connect shardhost5.example.com:1521/pdb2.example.com -pwd gsmuser_password -shardgroup sg2 -cdb cdb5
      add shard -connect shardhost6.example.com:1521/pdb3.example.com -pwd gsmuser_password -shardgroup sg2 -cdb cdb6
      add shard -connect shardhost7.example.com:1521/pdb1.example.com -pwd gsmuser_password -shardgroup sg3 -cdb cdb7
      add shard -connect shardhost8.example.com:1521/pdb2.example.com -pwd gsmuser_password -shardgroup sg3 -cdb cdb8
      add shard -connect shardhost9.example.com:1521/pdb3.example.com -pwd gsmuser_password -shardgroup sg3 -cdb cdb9

      See Add Shardgroups If Needed, Add the Shard CDBs, and Add the Shard PDBs for details.

    4. Use the CONFIG VNCR and ADD INVITEDNODE commands to validate that all of the VNCR entries are valid and sufficient for a successful deployment.

      See Add Host Metadata for details.

    5. Run DEPLOY from GDSCTL to complete the configuration of the distributed database.

      See Deploy the Configuration for details.

    6. Add and start services for read-write and read-only access to the distributed database.

      add service -service oltp_rw_srvc -role primary
      start service -service oltp_rw_srvc
      add service -service oltp_ro_srvc -role physical_standby
      start service -service oltp_ro_srvc
      

      See Create and Start Global Database Services for details.

  7. You can use the GDSCL CONFIG, CONFIG SHARD, and CONFIG SERVICE commands to validate that all of the shards and services are online and running.

    See Verify Shard Status for details.