Linkly (PC-EFTPOS)
NetSuite Point of Sale (NSPOS) includes support for the Australian payment gateway Linkly (PC-EFTPOS). For information about PC-EFTPOS, visit their site at www.linkly.com.au . They will provide installation instructions for setting up their gateway and extension on your registers.
Then you must configure your RA-Workstation records in NetSuite ERP and set up the number sequence and tender in NSPOS.
NetSuite ERP - Configure the Payment Provider
Follow these steps in NetSuite ERP and then in NSPOS to set up the Linkly (PC-EFTPOS) payment gateway.
To configure Linkly (PC-EFTPOS) as the Payment Provider:
-
Log in to NetSuite as an administrator.
-
Go to Customization > Lists, Records, & Fields > Record Types.
-
Locate the RA-Workstation row and click List.
-
Click Edit for the first workstation to update.
-
For Payment Provider, select EFTPOS.
No further setup is required for this record.
-
Click Save.
-
Repeat for the next workstation.
Important:During register staging, you may need to install the EFTPOS extension. See Extension Synchronization Selection for NSPOS 2020.1.X.
The next steps ensure that sequence numbers are continuous, and do not reset on the next business day.

NSPOS - Install the EFTPOS Extension
The Linkly (PC-EFTPOS) gateway setup includes installation of the EFTPOS extension on your NSPOS registers/workstations. Your contact with Linkly should help you locate and download the extension. Follow the next steps when you are ready to install the extension.
NSPOS - Configure the Continuous Sequence Flag
These steps configure the payment sequence numbers to continue from the previous number used. It prevents the sequence numbers from resetting on the next business day.
To configure the Continuous Sequence Flag for Linkly (PC-EFTPOS)
-
Sign in to any NSPOS register as an administrator (9090 level operator).
-
Press Ctrl+F10 to open the Universal Settings window.
-
If you will use Linkly (PC-EFTPOS) for all workstations at all locations/subsidiaries, go to the next step.
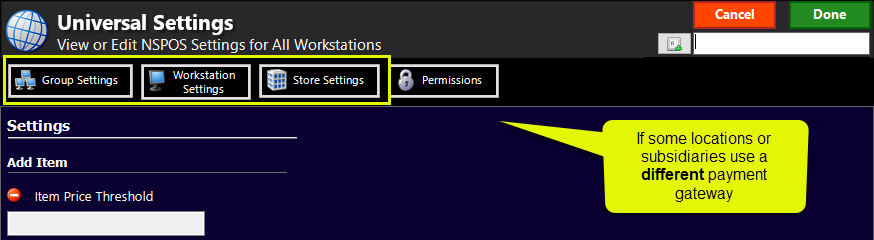
If you'll use a different payment gateway for other locations or workstations, tap a Settings type to limit where this Linkly (PC-EFTPOS) setup will apply:
-
Group Settings - If this workstation is assigned to a group, use this setting to only apply Linkly (PC-EFTPOS) to workstations in that group.
-
Workstation Settings - Use this setting to only apply Linkly (PC-EFTPOS) to this workstation.
-
Store Settings - Use this setting to only apply Linkly (PC-EFTPOS) to workstations assigned to this workstation's location.
Important:If you're using a payment gateway different from Linkly (PC-EFTPOS) at other locations or subsidiaries, tap the appropriate Settings option to limit where the Linkly (PC-EFTPOS) setup will apply.
Tip:If you limited Linkly (PC-EFTPOS) to a group, workstation, or store, you must repeat these NSPOS steps for other groups, workstations, or stores that will use Linkly (PC-EFTPOS).
-
-
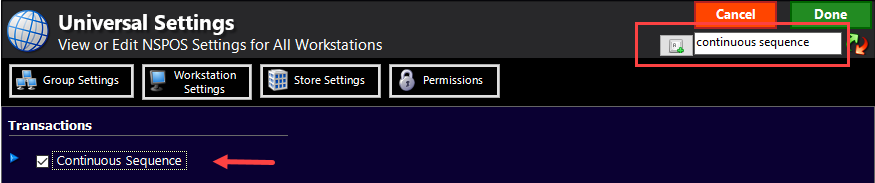
Search for
Continuous Sequence. -
Check the Continuous Sequence box.
-
Tap Done.
-
Tap Sign Off and then tap Exit.
-
Restart the NSPOS application on the register.
-
Review the following topic to determine if you need to create a new tender for your setup.
NSPOS - Create a New Tender for Linkly (PC-EFTPOS)
(Optional) If you already have an EMV credit card tender configured in NSPOS, you should use that setup up for Linkly (PC-EFTPOS). The current limits and payment method used for your NSPOS/NetSuite ERP integration will apply. You can skip the setup described in this topic.
However, if you need a new tender so that transactions will synchronize to a different payment method in NetSuite ERP, or you need to set different limits for Linkly (PC-EFTPOS), use the following steps.
To create a new tender for Linkly (PC-EFTPOS):
-
Sign in to any NSPOS register as an administrator (9090 level operator).
-
Press Ctrl+F12 to open the Functional List window.
-
Search for
Edit Tenders. -
Tap Edit Tenders.
-
If you will set up new tender for Linkly (PC-EFTPOS), tap Create Tender.
If you will adjust an existing tender, tap that tender name.

-
Complete these fields and select the options:
Tip:To use an inactive option, tap the red-dashed icon
 to turn it into a blue arrow
  .
.-
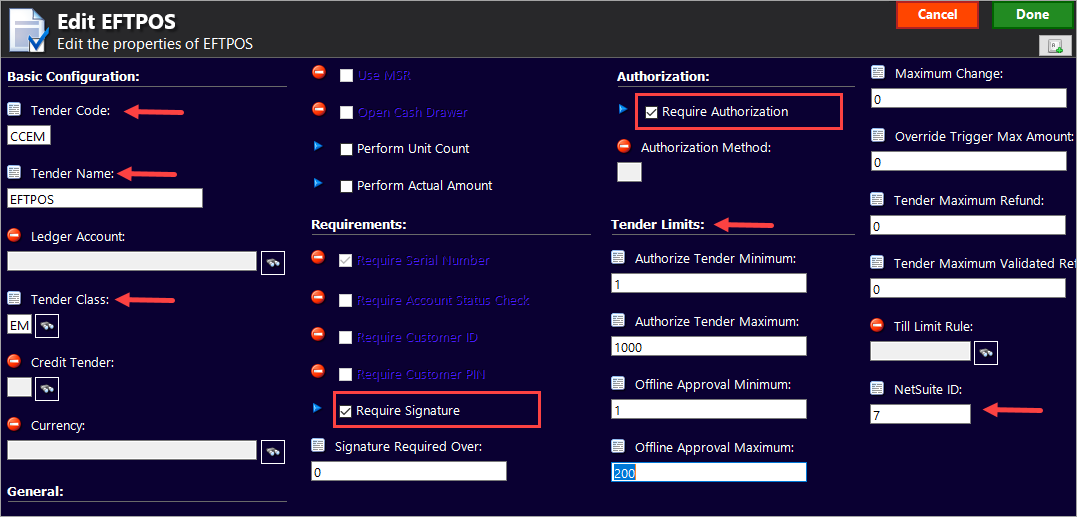
Tender Code - Use the credit card EMV code CCEM.
Note:If you use a different code, you may need to ask NetSuite Professional Services to adjust your receipts.
-
Tender Name - Enter a name for the tender, such as EFTPOS.
-
Tender Class - Tap the find icon and then tap EMV Card to use the code EM.
-
Require Signature - Check this box. The option does not require your shoppers to sign for the payment. Instead, it causes NSPOS to print two receipts.
-
Require Authorization - Check this box.
-
Tender Limits - Enter your preferred minimum and maximum tender amounts for Linkly (PC-EFTPOS).
-
NetSuite ID - To integrate the tender with NetSuite ERP, enter the Internal ID from the payment method to be used with this tender.
To locate the internal ID, see "Tenders and Payment Methods, Step 1. Set up a Payment Method in NetSuite ERP."
-
-
Tap Done to complete the tender setup.
-
Review the following topic to determine if you need to assign a button to the new tender.
NSPOS - Assign a Button to the Linkly (PC-EFTPOS) Tender
After you create a tender, you must assign it to an NSPOS button. This button is used by your cashiers to accept the tender type as payment. Buttons are shared by all other workstations within the same workstation group. If you do not use workstation groups, the button will be available on all workstations.
For additional options when assigning a tender to a button, see Configure Button Bars.
To assign a button to the Linkly (PC-EFTPOS) tender:
-
Sign in to any NSPOS register as an administrator (9090 level operator).
-
Press Ctrl+F12 to open the Functional List window.
-
Search for Button Edit.
-
Tap Button Edit.
-
Under Button Bar, tap Side and then tap Pages.
-
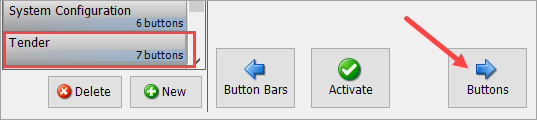
Under Button Page, scroll to find and tap Tender.
-
Tap Buttons.
-
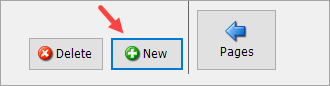
Tap New.
-
Choose your next steps based on the Tender Code you entered when creating the tender.
-
If for Tender Code you used CCEM:
-
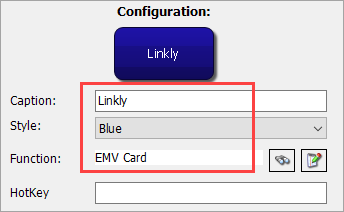
Function - Tap EMV Card CCEM on the left. The field shows EMV Card.
-
Caption - If preferred, change the button name. For example, enter Linkly.
-
-
If you entered a different Tender Code in the previous steps:
-
Tap New.
-
Tap Create Function and then Yes.

-
Complete these required fields:
-
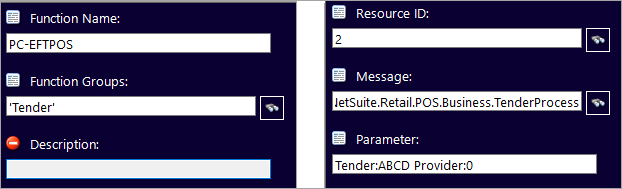
Function Name - Enter a name, such as EFTPOS.
-
Function Groups - Tap the search icon, choose Tender, and then tap Done.
-
Resource ID - Determines which roles can use the function/button. Enter 2 to enable all employees with an NSPOS role.
-
Message - Tap the search icon, enter the word tender, and then choose #NetSuite.Retail.POS.Business.TenderProcess.
-
Parameter - Enter Tender:ABCD Provider:0 where ABCD is the Tender Code you entered when creating the tender.
All other fields are optional.
-
-
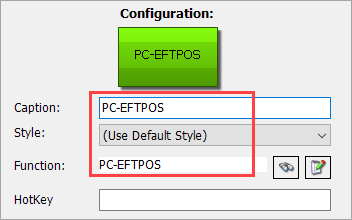
Tap Done. Confirm that your function appears in the tender Button list and in the Function Name field
-
Caption - If preferred, change the button name.
-
-
-
Adjust the Style and other options as appropriate.
-
Click the X in the top-right to save your setup and close the form.
Make sure the new Linkly (PC-EFTPOS) button appears in your tender sidebar.
Be sure to test the new tender in your sandbox before using it in production. If you have questions about any step, contact your NSPOS Professional Services or ACS team representative.
NSPOS (Optional) - zipPay Integration through Linkly (PC-EFTPOS)
(Optional) The NSPOS integration with Linkly (PC-EFTPOS) supports zipPay tender transactions. zipPay adds a shopper-authentication step as a requirement for completing a credit card payment. zipPay sends a code to the shopper's mobile device. The shopper enters that code on the PIN pad to authorize the payment.
The NSPOS integration supports zipPay for sales and return transactions. To use the feature, shoppers must have a zipPay account and have the application installed and ready on their mobile device. With the exception of a prompt for the shopper to enter the code, the transaction flow is similar to other payment methods.

Retailers choosing to include zipPay as a tender option must update each register's RA-Workstation record in NetSuite ERP to set EFTPOS as the Payment Provider. EFTPOS is an abbreviation for PC-EFTPOS.
zipPay is only available through the PC-EFTPOS payment gateway. You can't have more than one payment gateway per register.
Refunds for zipPay Transactions
Refunds for returned items purchased through zipPay transactions are handled similarly to other refunds. The following restrictions apply:
-
The cashier must locate the zipPay transaction ID to process a refund. The ID can be found in the NSPOS transaction history or on the customer's receipt.
-
Refunds for zipPay transactions can be applied to the customer's zipPay account or refunded as cash.
-
Refunds from items purchased using other tenders, such as credit cards, cannot be applied to a zipPay account.
-
Refunds for zipPay transactions cannot exceed the original sale total.
Setting up zipPay for your Registers
Follow these steps to set up zipPay in your tender list. The NSPOS zipPay function and button setup only needs to be applied to one register in each workstation group. These steps assume you have already configured the PC-EFTPOS gateway in NetSuite ERP and set the Continuous Sequence flag.
-
Add the zipPay function and button on your registers.
-
Install the zipPay extension in NSPOS. (Contact your zipPay representative.)
Function and button changes for one register appear on all registers in its workstation group.
To add the zipPay function and button on your registers:
-
Sign on to an NSPOS register as an administrator.
-
Tap Manager Functions > System Configuration > Button Edit.
Or, press Ctrl+F12, search for and tap Button Edit.
-
Tap the Side button bar option and tap Pages.
-
Tap the Tender row in the Button Page list.
-
Tap Activate so that you can see the changes immediately.
-
Tap Buttons.
-
Tap New and then Create Function.
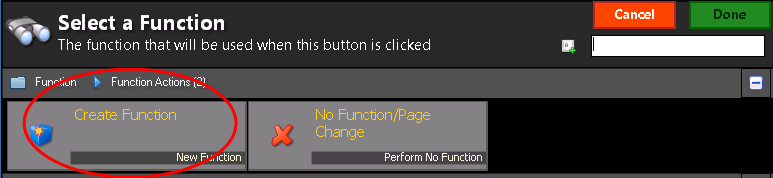
-
Tap Yes.
-
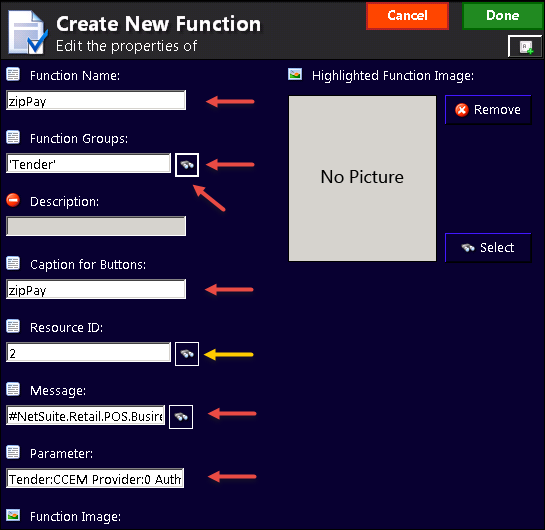
For Function Name, enter
zipPay. -
For Function Group, click the search icon
 and tap Tender.
 -
Tap Done.
-
For Caption for Buttons, enter
zipPay. -
As necessary, adjust the Resource ID.
The Resource ID sets the permission level required to use the button. The default is 2 for sales associates and cashiers. Manager-level access is 9070.
-
For Message, enter
#NetSuite.Retail.POS.Business.TenderProcess -
For Parameter, enter
Tender:CCEM Provider:0 AuthorizationOption:ZIPPAYTip:You can copy and paste these values from the PDF or Help Center topic.
-
Tap Done.
-
Choose a color from the Style list.
-
Set the placement for your button by changing the Column and Row fields.
-
If you want to make your button smaller or larger, adjust the Width and Height.
Tip:Because you tapped Activate earlier, you can see the changes behind the edit form.
-
Close the Button Edit form when your setup is complete.
Repeat all steps for one register in each Workstation Group.
Contact Your zipPay Representative
Your zipPay representative can help you get and install the zipPay extension.