Setting up an Item Record for Demand Planning
The NetSuite Supply Planning (MRP) solution replaces Time-Phased Planning and offers more features and better performance.
New customers should use the Supply Planning (MRP) solution. Existing customers should plan to move from Time-Phased Planning to MRP.
Follow this procedure to set up an item record for demand planning.
To set up an item record for demand planning:
-
Go to Lists > Accounting > Items.
-
Next to the item record you want to set up, click Edit.
-
Click the Purchasing/Inventory subtab.
-
In the Lead Time field, enter the average number of days between ordering and receiving this item from the vendor. For example, if it usually takes ten days to arrive from the vendor, enter 10.
Accurate lead times help create better supply plans and item orders.
If you leave this field blank, NetSuire uses the default value from the Set Up Inventory Management page.
-
Optionally, enter a Safety Stock quantity. This value is extra stock to account for changes in demand.
For example, if you enter 5, after NetSuite calculates demand projections, it adds 5 units to the amount needed on supply plans.
If you use Multiple Units of Measure, safety stock is always planned in stock units.
-
In the Expected Demand Change field, enter a percentage to augment the forecasted amount.
For example, demand is projected at 100 units for upcoming July based on last July's sales. But you know that sales for this item have been trending up the last two months, and you want calculations to reflect this. You can enter a percentage to increase the expected demand beyond the calculated amount.
This setting is used only when the forecast method for a plan is set to Seasonal Average.
-
Choose one of the following options in the Lot Sizing Method field:
-
Lot For Lot - This option suggests orders for procurement based on the exact projections for each day. The suggested order quantity can vary from day to day based on demand calculations.
-
Fixed Lot Size - There are two ways fixed lot size works when you need more than the set lot size to balance supply and demand.
-
Fixed Lot Size - Select this option when you need multiple separate work orders of the specified lot size. This parameter uses the item's stock unit.
-
Fixed Lot Multiple - Select this option when you need one work order that is equal to a multiple of the specified quantity. This parameter uses the item's stock unit.
-
-
Periods of Supply - This option creates aggregated purchase orders or work orders based on the total demand requirements for a set period. For example, weekly.
For example, instead of creating separate purchase orders for each demand, you can combine demand into one order. The demand planning process does this for all items needed over the next two weeks. By sending a consolidated purchase order to a vendor, the vendor can ship all items at one time, which can help lower shipping costs.
Important:Be aware of costs from vendor holding charges. You can consolidate orders for a set period, but after consolidation, NetSuite uses the Bill of Materials (BOM) for that specific work order on that specific level on later levels.
If you use Multi-Location inventory, this field appears on the Locations subtab.
-
-
Follow these steps according to the Lot Sizing Method you selected:
-
If you selected Fixed Lot Size, enter a quantity in the Fixed Lot Size field. Procurement always uses this amount, no matter what demand projections show.
-
If you selected Periods of Supply, make a selection in the Periods of Supply Type field:
-
Interval - (Default) Order aggregation starts when a requirement is established and continues for a fixed period defined in the Interval field.
-
Monthly - Order aggregation starts on first day of each month, which is always the requirement date.
-
Weekly - Order aggregation starts on the first day of the week as set in Company Settings. This is also the requirement date.
-
-
In the Period of Supply Increment field, enter a number from 1 to 90. The default setting is 1.
The increment starts on the first day an order is needed. From the first day, NetSuite combines all orders in the increment and places the orders on the first day of the period.
The Period of Supply Increment field is enabled only when you select Interval in the Periodic Lot Size Type field.
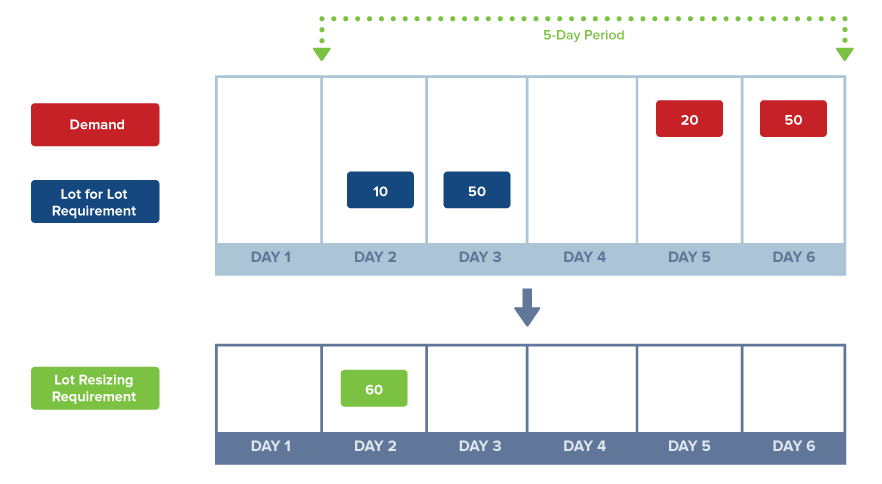
For an Interval setting, NetSuite calculates orders as shown in this diagram:
-
Lead Time is 2 Days
-
Interval period is 3 days
-
Day 5 demand is 20
-
Day 6 demand is 50
-
Day 2 on hand quantity is 10
-
Day 3 on hand quantity is 50
Orders are grouped into 5-day periods. So on day 2, NetSuite looks ahead 5 days and sees a total demand of 70. On day 2, you have 10 on hand, so NetSuite calculates 60 are needed. The work order uses this need for 60 units to plan the next levels of work.
-
-
The Supply Type field shows how you get more stock, either Purchase or Assembly. For assembly items, if you've enabled the Allow Purchase of Assembly Items preference, you can choose to build more supply or buy it.
For details about using this preference, see Setting Up Demand Planning.
-
The Demand Source field sets where demand data comes from for an item.
-
Forecast from Demand Plan - Source only the item's demand plan record.
Note:When you choose this setting, a sales order with a related work order generates a supply plan for the sales order. In addition, the Mass Create Work Orders page suggests a supply for the sales order.
-
Entered and Planned Orders - Uses open orders and the expected ship date as the demand date. If the item is a part of an assembly, demand for the assembly is included in the item's demand calculations.
-
Order and Forecast - Calculates demand for an item by adding both the forecast amount and quantity on existing orders.
Forecast demand for an item is calculated by combining the following:
(Quantity forecast over time) + (quantity on sales orders and invoices entered)
For example, Item #AB1001 is forecast to sell 100 units in January. Sales orders are already entered for 20 units. Using this method, demand is calculated as 120 units.
The total forecast includes the forecast demand and the demand order quantities from transfer orders, work orders, and sales orders.
-
Forecast Consumption - Calculates demand for an item by subtracting the quantity on existing orders from the forecast. This helps avoid double-counting if an order's already part of a forecast.
Demand for an item is calculated as follows:
(Quantity forecast over time) - (quantity on sales orders and invoices entered)
For example, Item #AB1001 is forecast to sell 100 units in January. Sales orders are already entered for 20 units. Using this method, demand is calculated as 80 units.
For example, forecasts are for 20 units on days 1, 5, and 9, and actual orders for 5 units on days 2, 7, 8, and 10.

For planning purposes, indicate that the order for 5 units on day 2 counts towards the forecasted 20 units for day 1. You would account for this by reducing the day 1 forecast quantity to 15 units.

The bottom row shows the adjusted total amounts.
When you use the Forecast Consumption demand source method, set the following on the Location subtab of the item record:
-
Forward Consumption - Number of days after the order date to consider.
-
Backward Consumption - Number of days prior to the order date to consider.
Backward and forward consumption days determine the time frame considered for each sales order when a forecast amount is consumed to calculate demand. If an order is in the consumption time period, its quantity is calculated as being consumed, and the forecast is adjusted.
Note:NetSuite always checks backward consumption first.
-
The forecast closest to the order in the backward time period is consumed first.
-
If quantities remain, NetSuite uses the forecast closest to the order in the forward time period.
-
Note:Only sales order and invoice quantities consume forecast quantities. Demand from transfer orders and work orders don't consume forecast quantities.
For additional details, see Forecast Consumption Examples.
-
-
Demand Time Fence - This field defaults to the value in the Default Demand Time Fence field. Verify the default or enter a number between zero and 365 for this item.
-
Planning Time Fence - This field defaults to the value in the Default Planning Time Fence field. Verify the default or enter a number between zero and 365 for this item.
-
Reschedule In Days - Enter a number from 1 and 90. This sets the maximum number of days that the order can be advanced from the current day. the order can be moved up 10 days, but not more. This field is blank by default.
Note:If you leave this field blank, NetSuite won't recommend rescheduling orders for this item to an earlier date.
-
Reschedule Out Days - Enter a number from 1 and 180. This sets the maximum number of days that the order can be delayed from the current day. For example, if you enter 10, the order can only be moved to 10 days later, but not more. This field is blank by default.
Note:If you leave this field blank, NetSuite won't recommend rescheduling orders for this item to an earlier date.
-
Click Save.
Now you can use this item on demand and supply plans.