Managing API Integration Applications
Integration applications using OAuth 2.0 to obtain access to your SuiteProjects Pro data must be registered and enabled by an account administrator. To register and manage your integration applications, go to Administration > Global Settings > Account > API Integration Applications.
API Access must be enabled in your account to connect tools and services to SuiteProjects Pro using the API. The Business Intelligence (BI) Connector feature must be enabled in your account to connect tools and services to your published reports using the REST API. The API Integration Application page is not available unless API Access or BI Connector is enabled. To enable API Access or BI Connector in your account, contact SuiteProjects Pro Support or your SuiteProjects Pro account manager.
-
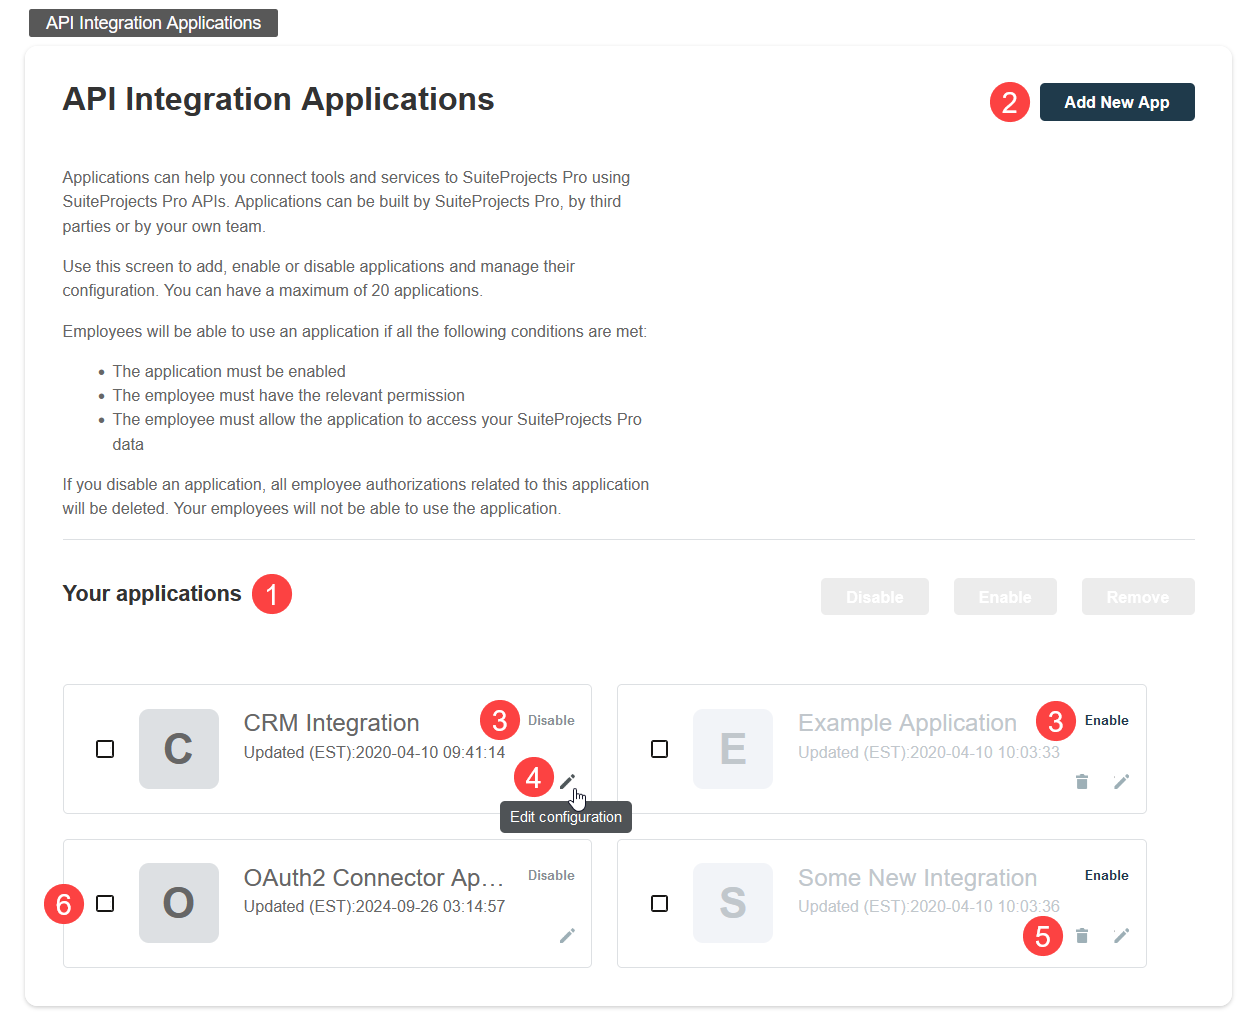
All your registered applications are listed in a grid. Details include the name of the application and the date and time when it was last updated.
-
To register a new application, click ADD NEW APP. This button is disabled if you reach the limit of 20 registered applications. See Adding a New Application.
-
To enable or disable an application, click ENABLE or DISABLE in the top right corner of the corresponding box. See Enabling, Disabling, or Removing Registered Applications
-
To edit an application configuration, click the edit icon
 in the bottom right corner of the corresponding box. See Application Configuration.
 -
To remove an application configuration from the list of registered applications, click the delete icon
 in the bottom right corner of the corresponding box. See Enabling, Disabling, or Removing Registered Applications.
 -
To select one or more applications, check the box next to each application you want to select. You can only select multiple applications if they are either all enabled, or all disabled. You can then enable, disable or remove the selected applications. See Enabling, Disabling, or Removing Registered Applications.
All times are given as Eastern Standard Time (EST).
Adding a New Application
You can register up to 20 applications. Each application needs a Client ID and Client Secret to obtain access to SuiteProjects Pro using OAuth 2.0. The Client ID and Client Secret are generated by SuiteProjects Pro as part of the registration process and are unique to each application.
The Client Secret is a private key the application uses to request an authorization code from SuiteProjects Pro. It should not be shared or stored in public code repositories.
The Client Secret is displayed only one time. You will not be able to retrieve it after you close the Application Credentials dialog.
If you misplace the Client Secret, you can edit the application configuration and generate a new Client Secret for the application.
To register a new application with SuiteProjects Pro:
-
Do one of the following:
-
Go to Administration > Global settings > Account > API Integration Applications, and click ADD NEW APP.
-
From any page in SuiteProjects Pro, click the Create button and click API integration application.
The Add New Application popup window appears.
-
-
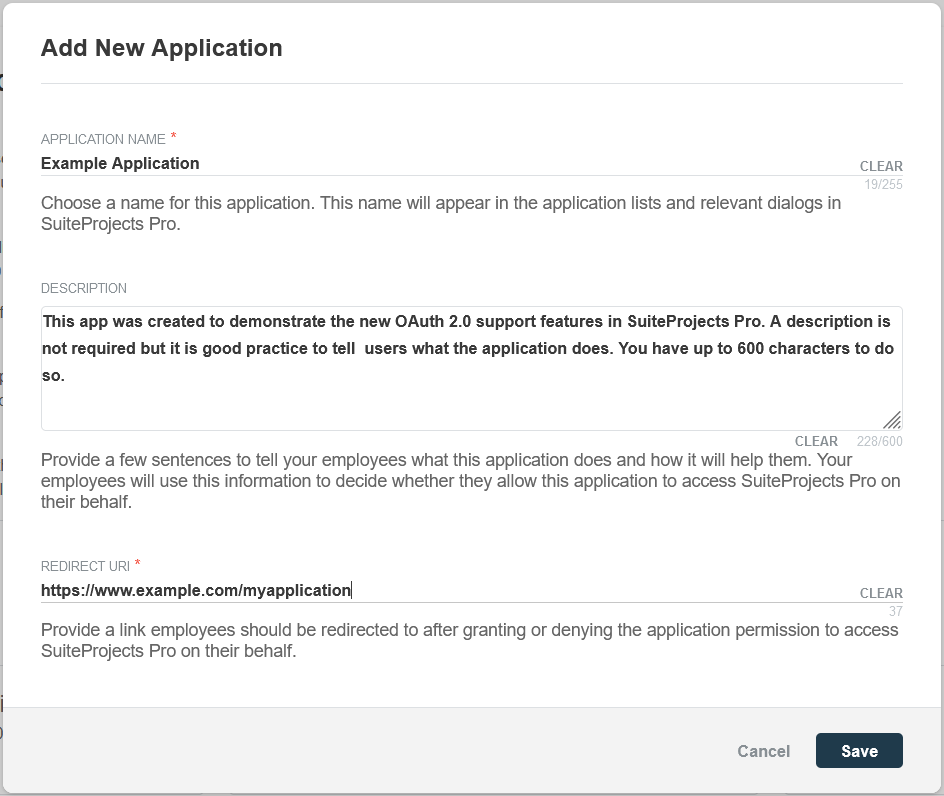
Enter the following information:
-
Application name (Required) - Enter a display name for your application in SuiteProjects Pro. The name must be unique to the application. You will not be able to use a name already used by another registered application.
-
Description - Enter a few sentences to tell your employees what the application and how it will help them. Your employees will use this information to decide whether they allow this application to access SuiteProjects Pro on their behalf.
-
Redirect URI (Required) - Enter a link users should be redirected to after granting or denying the application permission to access SuiteProjects Pro on their behalf.
Important:Client applications use the redirect URI when requesting access to SuiteProjects Pro. Ensure you enter the redirect URI supplied by the application developers.
-
-
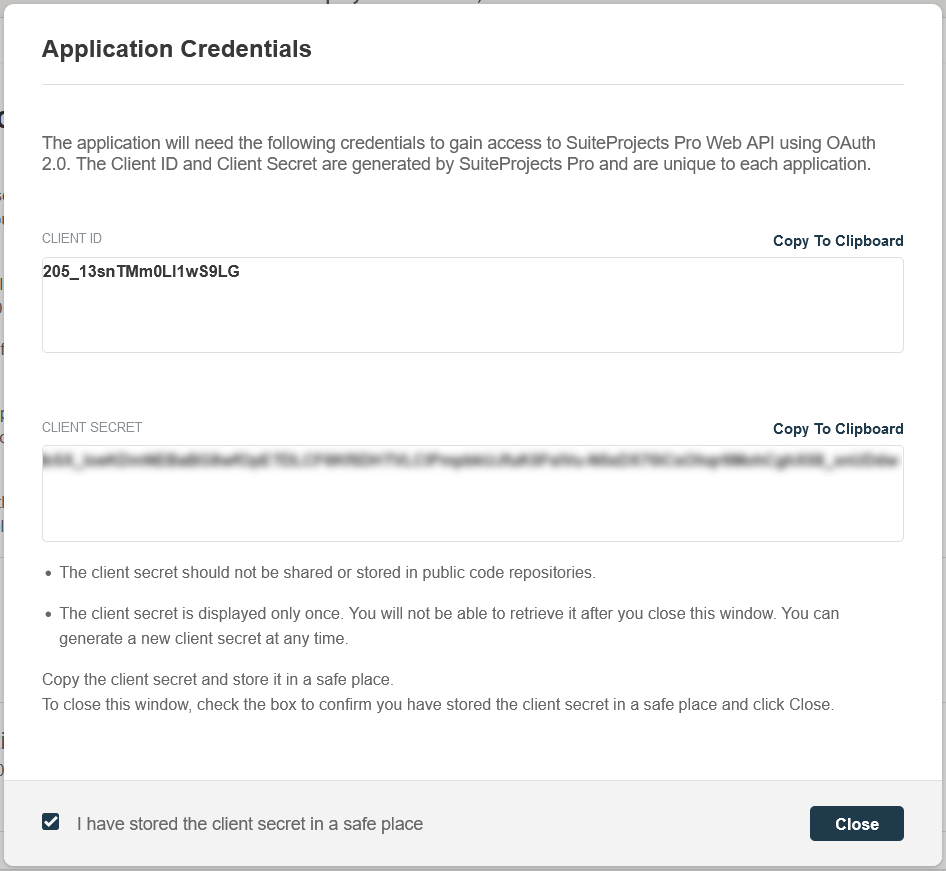
Click Save. The Application Credentials popup window appears.
-
Copy the Client Secret and store it in a safe place. The Client Secret is displayed only one time. You will not be able to retrieve it after you close this window.
-
Check the box to confirm you have copied and stored the Client Secret in a safe place then Click Close.
Enabling, Disabling, or Removing Registered Applications
You must enable an application to allow this application to obtain access to SuiteProjects Pro using OAuth 2.0.
You can disable an application to prevent this application from obtaining access to SuiteProjects Pro using OAuth 2.0. If you disable an application, SuiteProjects Pro automatically revokes all permissions given by users for the application to access SuiteProjects Pro on their behalf. Employees will not be able to use the disabled application.
You can remove a disabled application from the list of registered applications. All permissions, authorizations and application credentials associated with the application configuration will be deleted. This action cannot be undone.
To enable or disable a registered application:
-
Go to Administration > Global settings > Account > API Integration Applications.
-
Click ENABLE or DISABLE in the top right corner of the corresponding box. A confirmation popup window appears.
-
Click ENABLE or DISABLE to enable or disable the application. Click Cancel to cancel the operation and return to the API Integration Applications page.
To remove a registered application:
-
Go to Administration > Global settings > Account > API Integration Applications.
-
Click the delete icon
 in the bottom right corner of the corresponding box. A confirmation popup window appears.
 -
Click REMOVE to remove the application. Click Cancel to cancel the operation and return to the API Integration Applications page.
To enable, disable, or remove multiple applications at the same time:
-
Go to Administration > Global settings > Account > API Integration Applications.
-
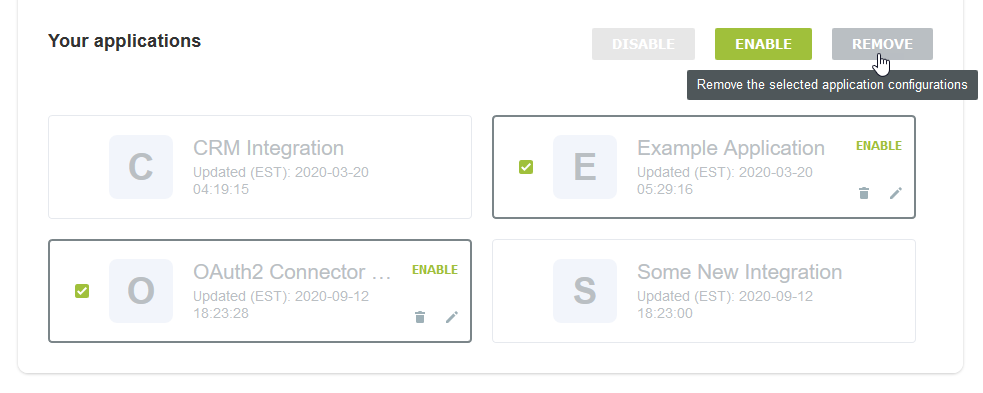
Check the box for each application you want to enable, disable, or remove. Notice that you can only select multiple applications if they are either all enabled, or all disabled. After you select the first application, the application that are not available for selection appear in light gray color. Notice also that some of the buttons in the top right corner of the list of registered applications become available and change from light gray color to dark gray or green.
-
Click ENABLE, DISABLE, or REMOVE to perform the corresponding action on all selected applications. A confirmation popup window appears. Click ENABLE, DISABLE, or REMOVE to confirm. Click Cancel to cancel the operation and return to the API Integration Applications page.
Application Configuration
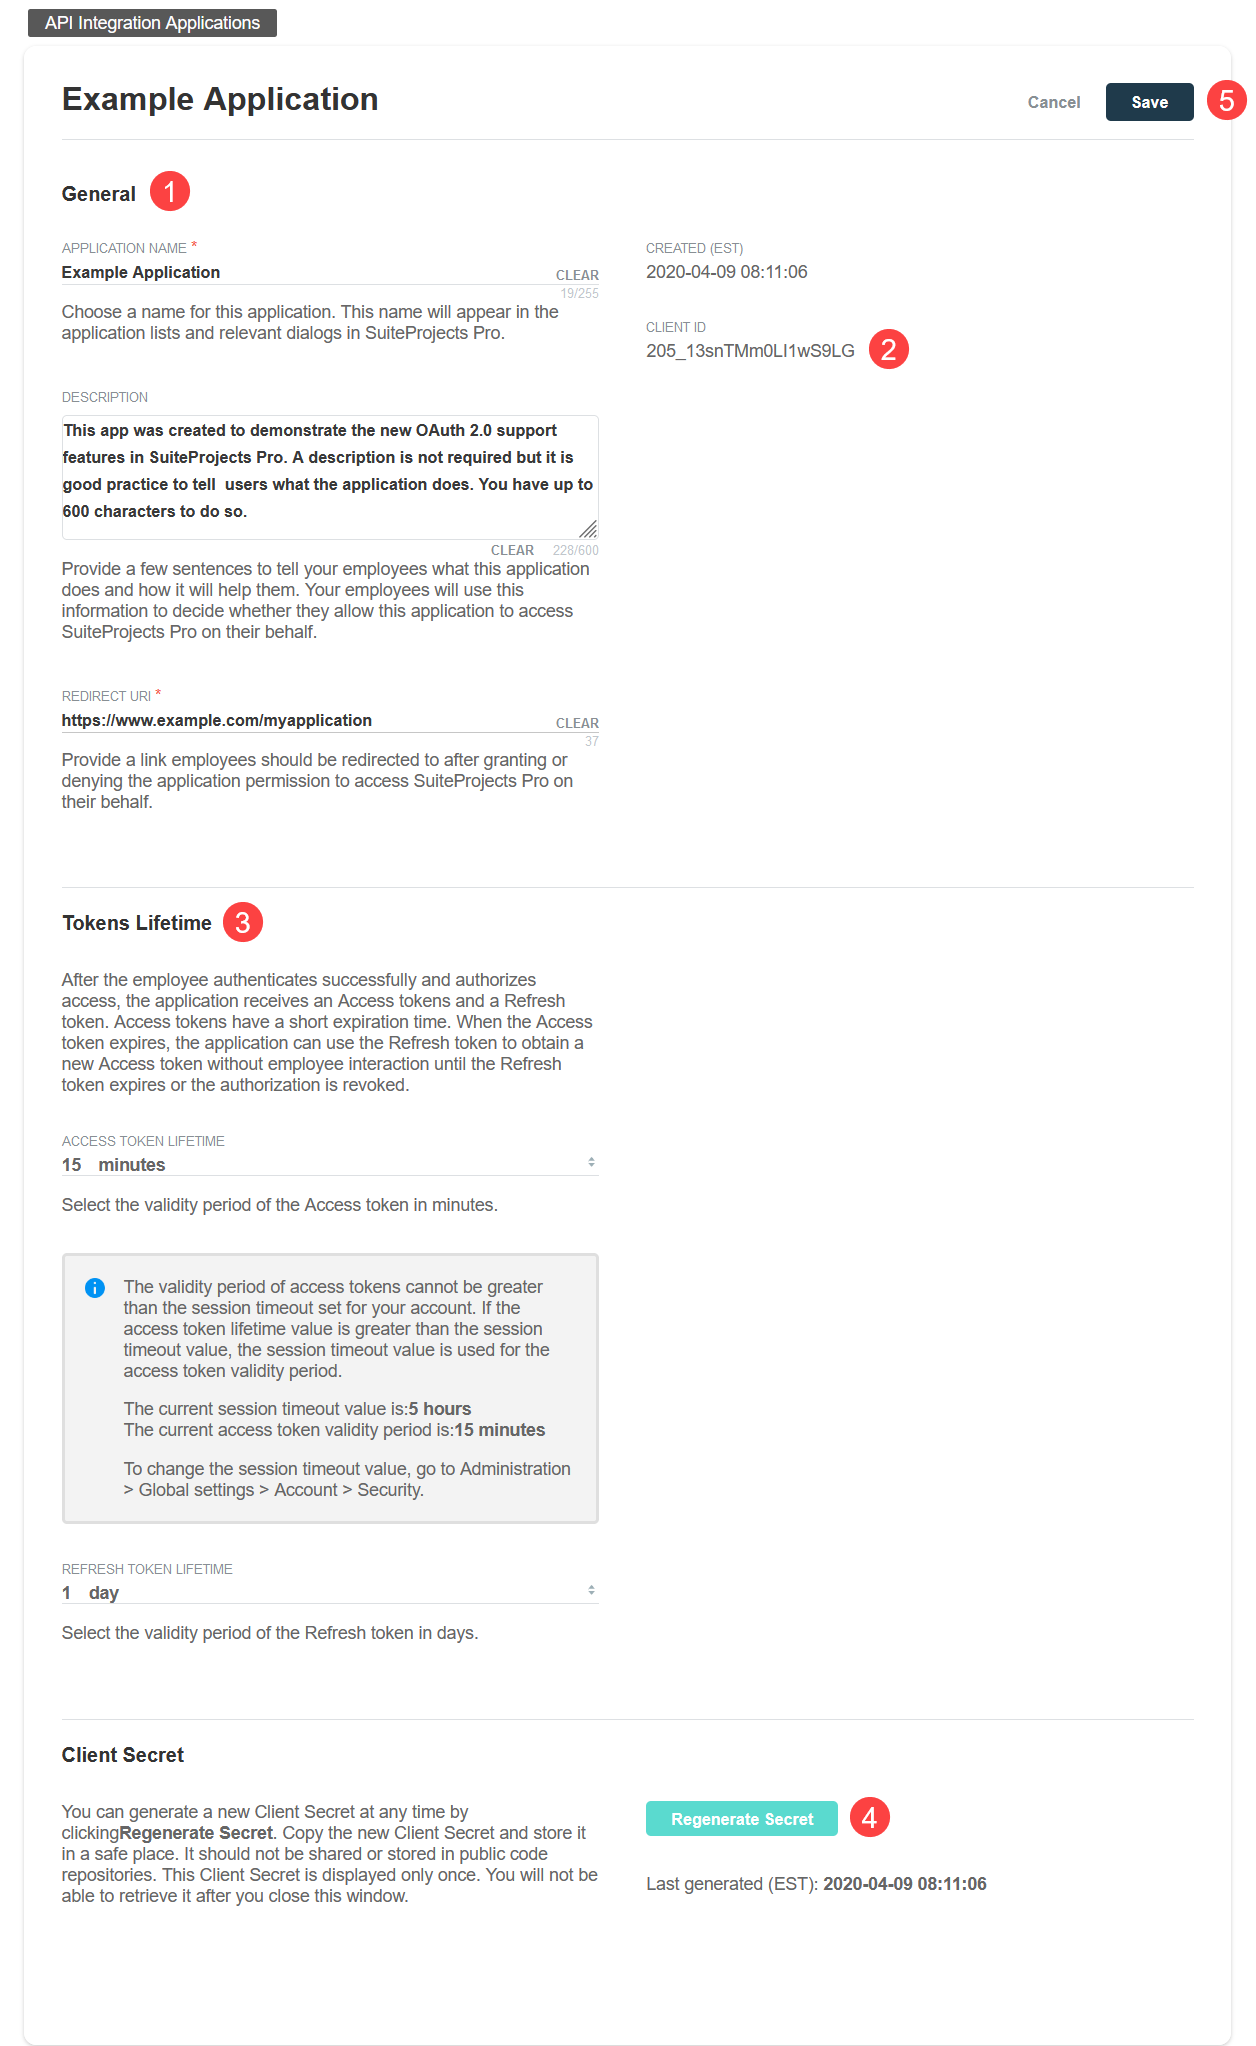
You can view the configuration details of your registered applications, including their unique Client ID from the Application Configuration form. You can change the application name, description or Redirect URI or generate a new Client Secret for the application.
To open the Application Configuration page for a registered application, go to Administration > Global Settings > Account > API Integration Applications and click the edit icon ![]() in the bottom right corner of the corresponding box.
in the bottom right corner of the corresponding box.
-
The General section of the form lists the main application detail:
-
You can change the Application name, Description and Redirect URI.
Important:Client applications use the redirect URI when requesting access to SuiteProjects Pro. Ensure you enter the redirect URI supplied by the application developers. If you need to change the redirect URI, disable the application, change the redirect URI and enable the application again.
-
You can view when the application was registered under Created.
Note:All times are given as Eastern Standard Time (EST).
-
-
You can view the Client ID - the unique identifier a client application needs to send to SuiteProjects Pro along with a client secret as part of the OAuth 2.0 authorization code flow.
-
Use the Tokens Lifetime section to configure the validity period of the access and refresh tokens:
-
Access token lifetime - Select the expiration time of access tokens. Available values go from 5 to 60 minutes in 5-minute increments. The default access token lifetime is 15 minutes.
Note:The validity period of access tokens cannot be greater than the session timeout set for your account. If the Access token lifetime value is greater than the session timeout value, the session timeout value is used for the access token validity period. The application configuration form shows the current values for the session timeout and access token validity period for reference.
To change the session timeout value , go to Administration > Global settings > Account > Security.
-
Refresh token lifetime - Select the expiration time of refresh tokens. Available values go from 1 to 31 days in one-day increments. The default access token lifetime is 1 day.
Note:Before the SuiteProjects Pro 2021.2 release, you could set the refresh token lifetime to values from 1 to 24 hours in one-hour increments. Values for the refresh token lifetime set before the SuiteProjects Pro 2021.2 release show in days (decimal values) instead of hours
As part of the OAuth 2.0 authorization code flow, authorized applications need to exchange an authorization code for an access token and refresh token to obtain access to SuiteProjects Pro. The access token has a short expiration time. When the access token expires, the client application can use the refresh token to obtain a new access token without user interaction until the refresh token expires or the authorization is revoked.
Note:Access tokens normally remain valid for their entire lifetime. However, the access token becomes invalid before it is due to expire if any of the SuiteProjects Pro business rules have changed and the access token is refreshed. Business rule changes may include any changes to your company's SuiteProjects Pro account configuration, or to the access privileges or role permissions of the employee who authorized the client application.
Each refresh token can be used one time only. Refresh in an access token generates a new access token and a new refresh token.
-
-
To generate a new Client Secret, click Regenerate Secret - You may need to generate a new client secret if you misplace or delete the client secret accidentally or if your client secret becomes compromised.
The new client secret will be valid immediately. The old client secret will continue to be valid for 24 hours after you generate a new one. This allows time to update any enabled application with the new client secret.
-
If you made any changes to the configuration details in the General section, the Save button is enabled. Click Save to save changes and return to the API Integration Applications page or click Cancel to close the configuration form without saving.
