Load Data from Oracle Object Storage into NetSuite Analytics Warehouse
As a service administrator, you can use the NetSuite Analytics Warehouse extract service to acquire data from Oracle Object Storage Service and use it to create data augmentations.
The recommended approach is to create one augmentation from one source table after acquiring data from Oracle Object Storage Service. After completion of augmentation, NetSuite Analytics Warehouse renames the source table in this case and if you create more than one augmentation from the same source, all other augmentations may fail with a message that the source file wasn't found.
- Store the following details in a text file to use while creating the connection
to Oracle Object Storage Service in NetSuite Analytics
Warehouse:
- In Oracle Object Storage Service, create the Remote Host Extract Files directory as the base folder in which you must place all your data files. Note down the name of this directory. See the "To create a folder or subfolder" section in Using the Console.
- Obtain the URL of the Oracle Object Storage Service by signing into the
Oracle Cloud
Infrastructure Console and navigating to the bucket to get the details of the
region, namespace, and bucket name. For example, the URL must be in the
https://objectstorage.<region>.oraclecloud.com/n/<namespace>/b/<name
                                of the bucket>
format. See the "To view bucket details" section in Using the Console. - Obtain a user’s OCID by navigating in the Oracle Cloud Infrastructure Console to Identity & Security, and then Users. On the Users page, search for a user who has access to the bucket used in the connector and copy the OCID. Obtain the tenancy ID by clicking your profile icon and then Tenancy in the Oracle Cloud Infrastructure Console. Under Tenancy information, copy the OCID. See Where to Get the Tenancy's OCID and User's OCID.
- Obtain the fingerprint for a user from the Oracle Cloud
Infrastructure Console. Navigate to API Keys under
Resources on the user page, and then click
Add API Keys. In the Add API Keys dialog,
ensure that Generate API Key Pair is selected.
Download the private and public keys using the Download
Private Key and Download Public
Key options. You must copy the entire text of the
private key along with the comments before and after the actual key.
These comments could be as simple as: “---------------Begin RSA Private
Key --------” and “-----------End of RSA Private Key----------“. Don’t
copy only the alphanumeric key without the header and footer comments.
In the Add API Keys dialog, select Choose Public Key
File to upload your file, or Paste Public
Key, if you prefer to paste it into a text box and then
click Add. Copy the fingerprint that you see
after you upload the public key in the Console. It looks something like
this:
12:34:56:78:90:ab:cd:ef:12:34:56:78:90:ab:cd:ef.
- In NetSuite Analytics
Warehouse, create the Oracle Object
Storage connection using these instructions:
- In NetSuite Analytics Warehouse Console, click Data Configuration under Application Administration.
- On the Data Configuration page, click Manage Connections.
- On the Manage Connections page, click Create and then click Connection.
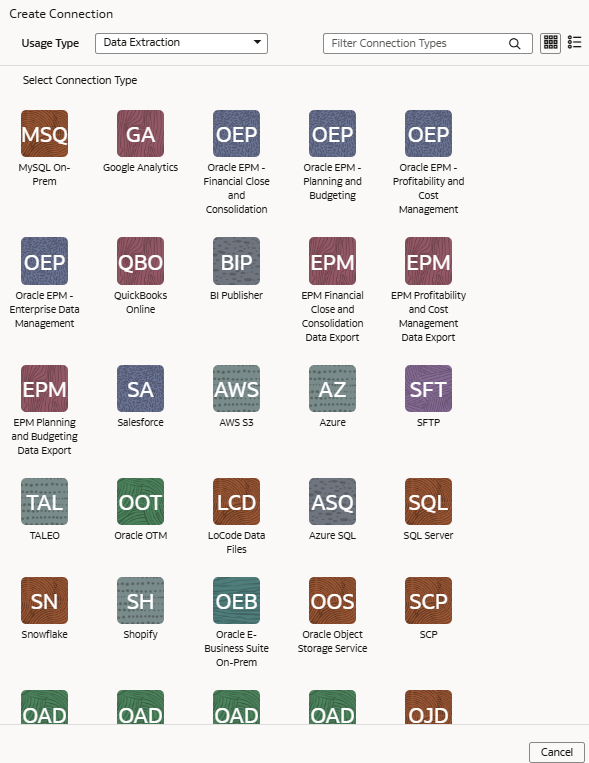
- In Create Connection, select Data Extraction in
Usage Type, and then select Oracle
Object Storage Service as the connection type.

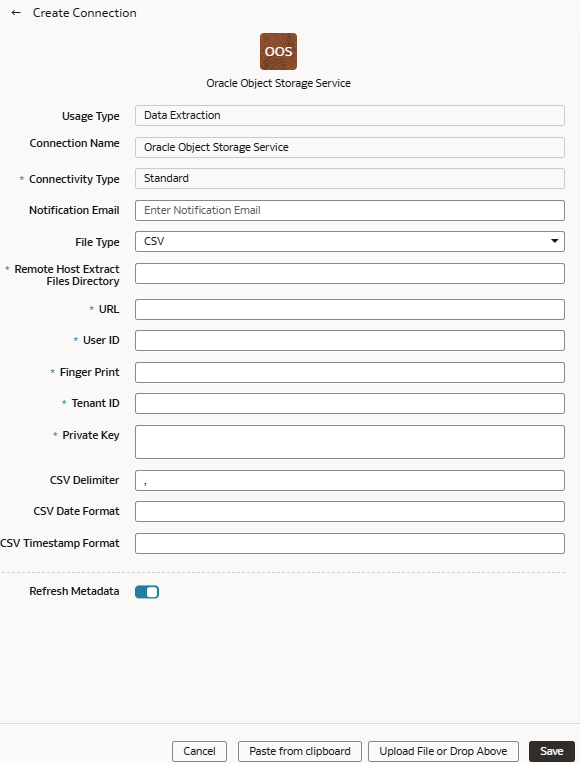
- In the dialog for the Oracle Object Storage Service connection, select
Standard in Connectivity
Type and enter these details:
- Connection Name: Object Storage
- Connection Type: Standard
- Notification Email: An email address to receive notifications
- Remote Host Extract Files Directory: Name of the base folder in which you must place all your data files in Oracle Object Storage Service
- URL: URL of the Oracle Object Storage Service that you noted down in a text file
- User ID: OCID of a user that has access to the applicable bucket in Oracle Object Storage Service
- Finger Print: The
fingerprint that you saw and copied after you uploaded the
public key in the Console. It looks something like this:
12:34:56:78:90:ab:cd:ef:12:34:56:78:90:ab:cd:ef - Tenant ID: Tenancy in the Oracle Infrastructure Cloud Console that you noted down in the text file
- Private Key: Paste the private key contents that you previously downloaded
- File Type: csv
- CSV Delimiter: Delimiter for the data files
- Date format for the data files must match the date format in your Oracle Object Storage Service source; for example, if you've used MM/dd/yyyy (01/23/1998) in your source, then you must specify the same format in CSV Date Format. See About Date and Timestamp Formatting for CSV File-based Extractors.
- Timestamp format for the data files must match the timestamp format in your Oracle Object Storage Service source; for example, if you've used MM/dd/yyyy hh:mm:ss (01/23/1998 12:00:20) in your source, then you must specify the same format in CSV Timestamp Format

- Verify that the Refresh Metadata toggle is
enabled to ensure that the metadata is refreshed when you save the
connection. You can later refresh the metadata from the Actions menu on the Manage Connections page, if required.
Note:
You can’t create augmentations for the Oracle Object Storage Service unless you perform a metadata extract. - Click Save.
- In Oracle Object Storage Service:
- Create the folder structure in the Bucket using these guidelines:

- The base folder in the bucket must match with the details provided in the connection.
- Inside the base folder, ensure to place each file in its own folder.
- Ensure that the Prefix of Data_Store_Name (same as Folder name) and Files in the target folder match exactly.
See the "To create a folder or subfolder" section in Using the Console.
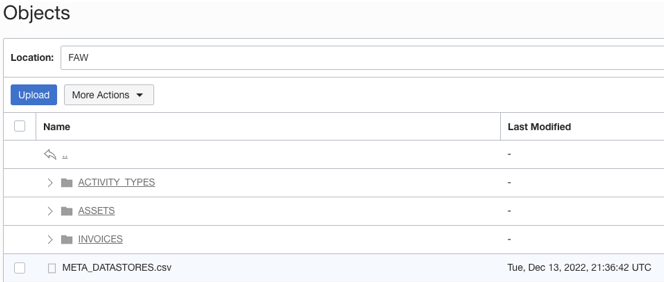
- Inside the base folder, create the metadata file for the Data Store
List. This file lists the supported data stores. Each data store is a
folder that has the actual file used in data augmentation, for example,
ASSETS. Ensure that the file name and folder name match and there aren’t
any special characters (including space) in the datastore, folder or
file names.

- Create the metadata file for each data file under the data store folder
using these guidelines:
The META_DATASTORES.csv must have these columns:
- DATA_STORE_NAME - A mandatory column to identify the data store name.
- DATA_STORE_LABEL - A non-mandatory column that identifies the description of the data store.
Each folder must have:
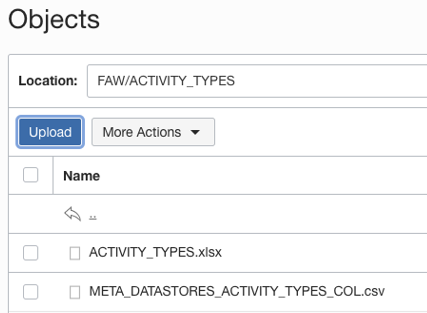
- A data file that has the actual data that gets loaded into NetSuite Analytics Warehouse. This file must have a prefix with the DATA STORE NAME.
- A metadata file for the list of columns contains all
the column information on the data. This file must have a Prefix
with META_DATASTORES_<DATA_STORE_NAME>_COL.
- For the columns in this metadata, ensure the following:
- If column name is ABC, then metadata can be ABC or “ABC” - the double quotes are ignored.
- If column name is “ABC”, then metadata must be “”ABC”” – the first double quotes are ignored.
Example
In the image, the folder name is ACTIVITY_TYPES. Hence, the data store name is ACTIVITY_TYPES. You can confirm this from the META_DATASTORES.csv file. In this example, the file is named ACTIVITY_TYPES.xlsx or ACTIVITY_TYPES.csv. The metadata file must be META_DATASTORES_ACTIVITY_TYPES_COL.csv.
 The META_DATASTORES_ACTIVITY_TYPES_COL.csv has these columns:
- DATA_STORE_NAME - This is a mandatory column.
- COLUMN_NAME - This is a mandatory column.
- COLUMN_LABEL - This is a non-mandatory column.
- DATA_TYPE – This is a mandatory column.
- WIDTH – This column identifies the string length.
- PRECISION - This column value must be Numeric data type.
- SCALE - This column value must be Numeric data type.
- KEY_SEQUENCE - This is a mandatory column that identifies the Primary Key definition. If you’re using the composite primary key, then use column order numbers as values.
- Create the folder structure in the Bucket using these guidelines:
- In NetSuite Analytics Warehouse, on the Manage Connections page, select Actions for the Oracle Object Storage Service connection and then select Test Connection.
- To delete a connection, on the Manage Connections page, click
Actions for the applicable connection and select
Delete.
Note:
Ensure that you delete the functional areas, data augmentations, and custom data configurations related to the data connection before deleting it. You can't update or load data from deleted data connections to the warehouse. - After the connections are successfully established, navigate to the Data Configuration page, select the connection in Data Source, then click the Data Augmentation tile, and create a data augmentation using the data from the Oracle Object Storage Service. Select the applicable source tables from the Oracle Object Storage Service data. See Augment Your Data.