Add an Attachment (Image or File) to a Merge Request Comment
You can use the Attachments tab on the Merge Request page to add an uploaded screen shot, image, or file to a merge request comment:
- Open the merge request.
- Go to the Conversation tab.
- In the Write tab, use the toolbar and add some text and
images to a comment in the Conversation tab. The toolbar provides several frequently-used features (add headings, boldface, italics, or strikethrough text; add quotes, code, links, or lists; or add a file or image) that reduce or eliminate the need to use markdown to implement the same features. See Use the Toolbar to Work with Comments.
- Click the Attach a file or image icon
 in the toolbar or go directly to the Attachments
tab.
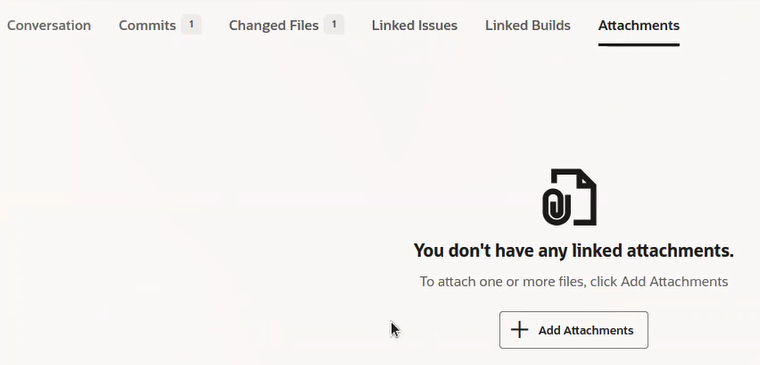
 If you have no attachments, this is what you'll see:
- To attach one or more files, click + Add
Attachments.
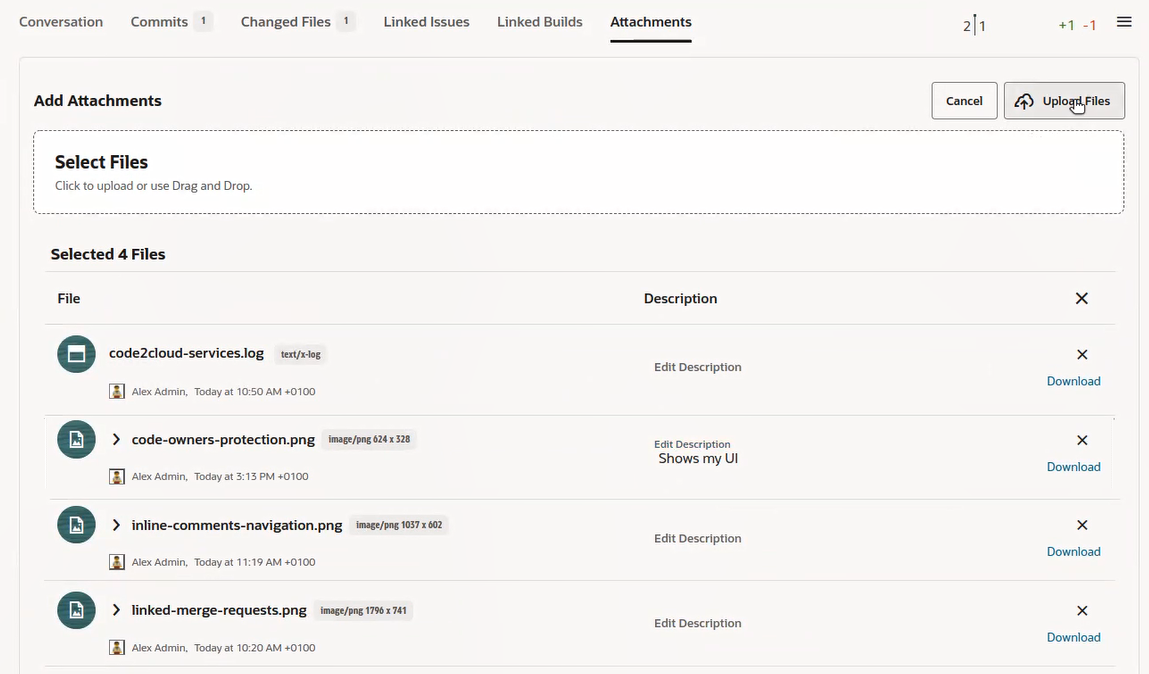
The Add Attachments page is displayed.

Description of the illustration mr-add-attachments-no-files-selected.png
- Click in the Select Files area and use the file selector
or drag and drop the files to the area.
If you're using the file selector, choose the files to upload and click <uicontrol>Open</uicontrol>. You can attach files that are smaller than 100MB. The page displays a list of the selected files below the Select Files area.

Description of the illustration mr-add-attachments-files-selected.png
Tip:
From this list, you can:- View statistics about the file (date created, owner, file type, and the DPI if it is an image file).
- Click > to preview the file, add or edit the description, which can be up to 80 characters long.
- Download the file.
- Delete the file from the list.
- Click Upload Files
 .
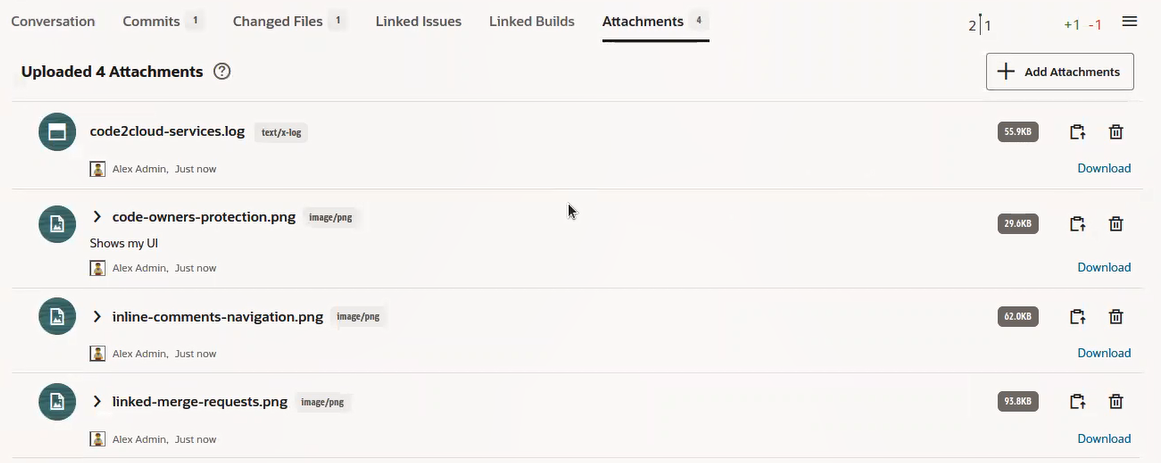
.The uploaded attachments are listed in the tab.

Description of the illustration mr-attachments-uploaded.png
Tip:
From this list, you can:- View statistics about the uploaded files, including owner, upload date/time, file size, and file type.
- Click
 to preview the file.
- Click Delete
 to remove it from the list of uploaded
attachments.
- Click Copy URL
 to copy its URL to use later if you plan to add the
attachment to a comment using markdown directly. You don't need
to copy the URL if you are using the toolbar. It will insert the
URL in the markdown it generates for you.
- Download the attachment.
- Add the screen shots, images or files you just uploaded in the
Attachments tab to the comment.
- (Recommended) With the toolbar:
- If you are creating a new comment, click the
Attach a file or image icon
 in the Write tab's toolbar.
The Insert Attachments dialog box is displayed.
- Select the image or file to add to the comment.
- Add the screen shots, images or files you just uploaded in the Attachments tab to the comment.
- Click Insert Attachments.
The Write tab shows the markdown that was inserted for you.
- (Optional) Select the Preview tab to see what the image or file looks like in the comment.
- Click Add Comment.
- If you are creating a new comment, click the
Attach a file or image icon
- To work directly with wiki markup in comments, instead of using the
toolbar, for adding screen shots, images, and files:
- Click the Help
 icon and open the link for the project's wiki markup
reference, where you'll find the syntax you need to use for adding
the attachment.
If, for example, you're using markdown, the default wiki markup language for VB Studio projects, according to the reference, you'll need to use this syntax to add an attachment to the comment:
 - Go to the Attachments tab and click
Copy URL
 to get the URL you'll use for
image_url. - Append
images/myImage.pngto it, replacingimageswith the folder name where the image file is located andmyImage.pngwith the name of your image file.
- Click the Help
- (Recommended) With the toolbar:
- If you are editing an existing comment, go to the
Conversation tab, locate your comment in which you
want to add the image as an attachment, click Edit
 [icon], and either use the toolbar to add the image to the comment or
drop in the markup with the URL you copied from the
Attachments tab.
 - (Optional) Click the Preview tab and make sure that what you added looks correct.
- Click Save.
