Export and Import Application Resources

You can import and export a visual application's resources to share source files and to move applications between instances.

Export Application Resources

You might want to export an application’s resources when you want to import them into another application or share them with a team member. Exporting an application downloads its resources as a ZIP archive to your local file system.

To export an application’s resources:

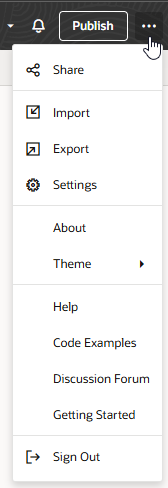
  1. Click Menu in the upper right corner and select Export.
    Description of vbs-visual-app-ws-settings.png follows
    Description of the illustration vbs-visual-app-ws-settings.png
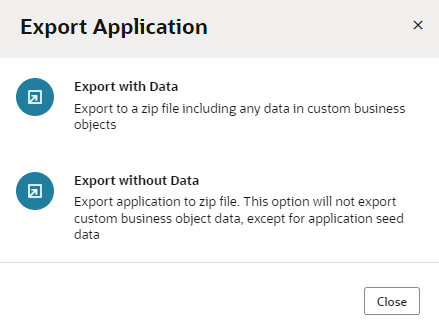
  2. If your application contains business objects, you can choose to include the data stored in the objects when exporting the application:
An archive that includes the application's resources is downloaded to your local file system, in the location specified for your browser’s downloads.

If you exported the application with data, the archive will include a JSON file (entity.json) and a spreadsheet (entity-data.csv) for each business object. The JSON file describes the business object and the spreadsheet contains the business object data. If you chose to export the application without data, the archive will only contain the JSON file describing the business objects.

The archive will always include the data for any business objects that are identified as containing Application Setup Data.

If user roles are defined for the application, the role-mapping definition (which maps user roles to IDCS groups) will be copied to a JSON file (role-mapping.json) and included in the exported application archive.
Import Application Resources

You can import resources to replace your visual application's source files with those from another visual application.

To import resources from one application to another:

  1. Click Menu in the upper right corner and select Import.
  2. In the Import Resources dialog box, drag and drop the ZIP archive of a visual application that you've previously exported, or click the drop area to locate the archive on your local system.
  3. To replace all existing files (and prevent duplication), select Delete existing files and resources.
  4. Click Import.
    The resources are imported to your visual application's root directory.

Upgrade Imported Resources

Sometimes when resources are imported, you might see a message that the app's resources are using an older set of runtime dependencies and need to be migrated.

To migrate these resources:
  1. Click Upgrade in the banner.

    Note:

    If your workspace has changes that are yet to be committed to your Git repo, you'll need to commit, stash, or revert them before you can migrate resources. Click Show changes to go to the Git panel and take action, then click Upgrade in the banner.
  2. In the Upgrade Imported Files dialog, click Upgrade to make your app's resources compatible with its current runtime version.
  3. Click Commit Changes to commit the changes to your Git repo.