Deploy a Visual Application
Deploying a visual application requires you to commit and push the changes in your workspace to a Git repository branch. Once you’ve pushed your changes from the workspace to the branch, a build pipeline that packages the content in the branch and deploys it to your environment's Visual Builder instance is triggered.
During the early stages of development, you can run a pipeline manually when you want to deploy the content of your working branch to the Visual Builder instance for review. Before you run the pipeline manually, you’ll need to verify that your working Git repository branch is specified in the pipeline job that packages your visual application (see Access Project Git Repositories). Once you've verified that the package job in your build pipeline is configured to use your branch, you can run the pipeline (see Run the Pipeline).
main, for example) and runs a pipeline that deploys the content of the main branch to the Visual Builder instance, this option is probably something you’ll use when you’ve tested your visual application and are ready to make your changes public. Keep in mind that you'll need a production instance of Visual Builder to deploy your changes to production.
Note:
- If the deployment job uses Basic authentication, credentials of a user who can connect and deploy to the Visual Builder instance must be provided. If your project owner hasn't provided these credentials, you'll be prompted to provide them when you click Publish the first time. If your credentials don't allow you to deploy to the Visual Builder instance, talk to your project owner or an administrator to get credentials that you can use. Your administrator can choose to enter the credentials directly in the build job, so you aren't prompted for them when you try to deploy your app.
- If the deployment job is set up for OAuth, authorization must be provided for OAuth tokens to be created with the credentials of a user who has permissions to connect and deploy to the Visual Builder instance. You won't be able to publish without this authorization. It is recommended that you authorize your connection during initial job configuration—though you'll be prompted to authorize missing or expired OAuth tokens when you click Publish.
See Configure the Deployment Job in Administering Visual Builder Studio for details.
- Click Publish in the header.
Note:
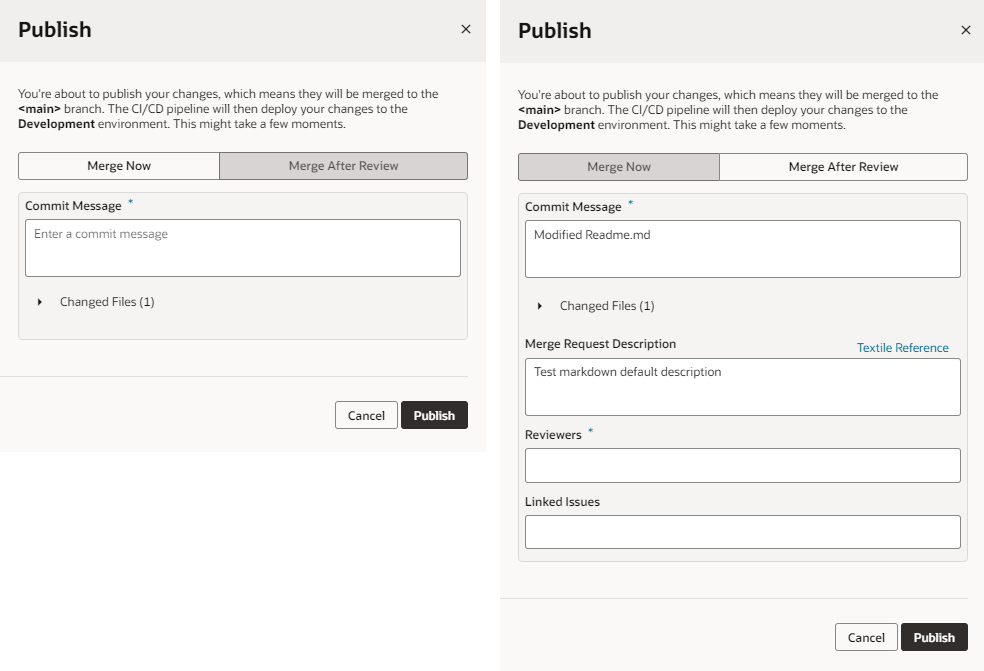
If the Publish option is not enabled, you're likely using a scratch repository instead of a real Git repo. If that's the case, and you do want to publish your work, create a new repo, as described in Push a Scratch Repository to a Remote Repository. - If you land on the Merge Now tab, it means you have permission to push your changes directly to the
mainbranch without getting it approved by other project team members. Simply enter a Commit Message describing your changes.As a best practice, you can request someone to review your changes by creating a Merge Request. Switch to the Merge After Review tab, enter a comment summarizing your changes, add at least one reviewer, and specify the issue you were working on. Optionally, enter a description of all your changes (not just this commit) in the Merge Request Description field, using the convention established for the template (Markdown, Confluence, or Textile). If you need help, use the link to the associated reference.
If you only see the option to commit and merge your changes, that means the project owner or an administrator has set things up so that all changes must be reviewed and approved via a Merge Request before they can be merged to the
mainbranch. In this case, summarize your changes, add at least one reviewer (if no one is specified), and specify the related issue in order to create a merge request. You can also enter a merge request description, if you wish. (Once the request is created, you can look for it on the Merge Requests page. For details on how to work with merge requests, see Review Source Code with Merge Requests in Using Visual Builder Studio.) - Click Publish.
Tip:
Use the details in the Publish dialog to take note of the environment that your changes will be published to, which is typically the deployment target specified in the pipeline that's enabled for themainbranch. - If the deployment job in your CI/CD pipeline is missing the credentials required to connect and deploy to your environment's Visual Builder instance, you'll be prompted to complete some additional steps:
- If you see a message about missing deployment credentials, it means the deployment job uses Basic authentication and requires the credentials of a user who has permissions to access the target instance. Enter valid credentials and click Add Credentials and Continue.
- If you see a message that authorization is required, it means the deployment job is set up for OAuth and requires authentication for the OAuth connection to the target instance:
- Click OK.
-
If prompted, enter the credentials of a user who can access the target Visual Builder instance.
If you land on the Authorize Jobs page, your Deployment job may have missing or expired OAuth tokens. Click Authorize, enter the credentials of a user who can access the target instance, and click Authorize.
- Once authorization is complete, click Publish again in your workspace's Publish dialog.
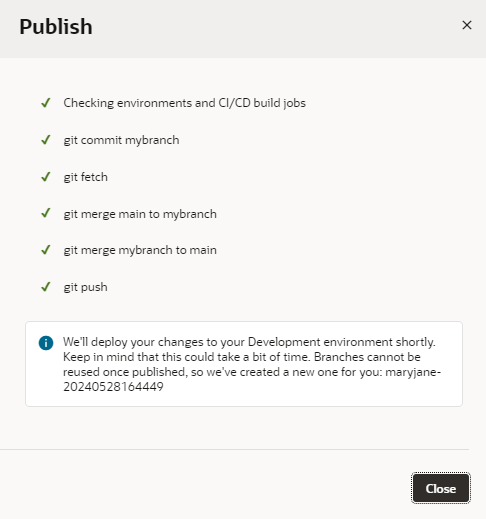
After VB Studio performs the Git actions necessary (commit, fetch, merge, push) to merge the changes in your local repository to the main branch (as shown here), it starts the pipeline to package and deploy the changes to your Visual Builder instance: 
Description of the illustration vbs-publish-git-actions-complete.png
Once you merge a branch into the main branch, you can no longer use it (or your local copy of it). A new branch is created automatically for you when you publish your changes, which you can use to make additional changes. Or you can create your own branch, if you prefer.
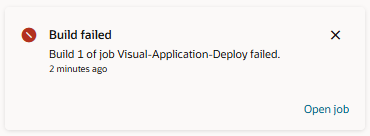
You should now see notifications in the bottom right corner of your workspace, which indicate the progress of your application's package and deploy jobs. (If you miss these notifications, look for them under Notifications in the header). If a build job fails, you'll see something similar to this message and will need to resolve the issue:
Description of the illustration build-notifications.png
Click Open job to view the job's details and take action.
After the deployment job has successfully run, you can view your changes deployed to the Visual Builder instance in your environment. See View Deployed Visual Applications.
