Cherry-Pick Commits Between Branches

You can cherry-pick commits when you want to apply a commit from one branch to another in your workspace. Typically, you'd cherry-pick commits from a remote branch to the working branch in your workspace.

Cherry-picking is useful when you work with multiple Git branches in a repository, either on your own or in a team environment. When you only need a specific commit from another branch, it's easier to cherry-pick that commit, instead of merging that entire branch to a remote repository. You can cherry-pick commits only between branches in the same repo.

Get the Revision ID of a Commit

Before you can cherry-pick a commit, you'll need the ID of the revision you want to include in your branch.

  • If the commit is local to your workspace, follow these steps:
    1. Click the Git History panel in your workspace.
    2. Select Commit from the action filters and click Apply Filter.
    3. Select the commit you want, then copy the revision ID in the details pane:
  • If you or one of your teammates already pushed the commit to a remote repository, follow these steps:
    1. Click Go to project page icon at the top left of the header to get to the VB Studio navigator.
    2. In the VB Studio left navigator, click Git Git in the main navigation for your project..
    3. If required, select the branch with the commit you're looking for.
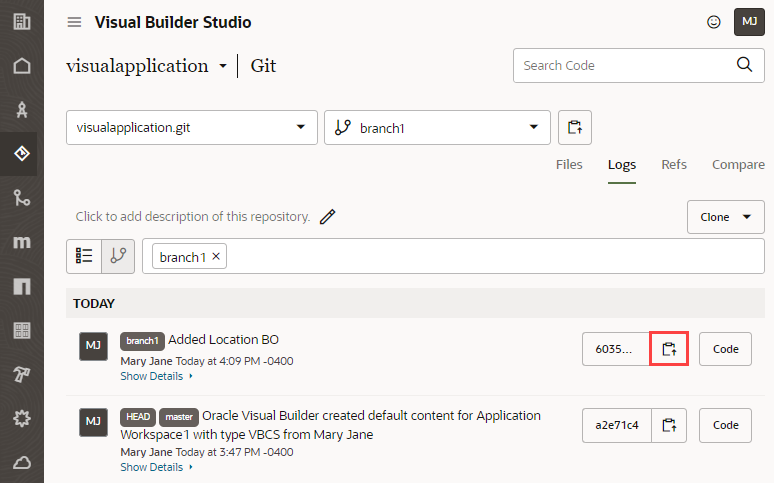
    4. Click the Logs tab and find the commit.
    5. Click Copy revision to clipboard (Copy revision to clipboard icon) to copy the revision ID.

Cherry-Pick a Commit From Another Branch

Once you have a commit's revision ID, you can cherry-pick it to your working branch. Make sure you select the correct branch to cherry-pick the commit.

A cherry-pick applies the changes from a commit to your working branch, but it does not commit the changes automatically. You'll need to review the cherry-picked changes and explicitly commit them to your branch. This new commit will have a different revision ID, even if its changes are just those from the original cherry-picked commit.

To cherry-pick a commit to your working branch:

  1. Click the Git menu in the header or in the Git panel, and select Cherry-Pick.
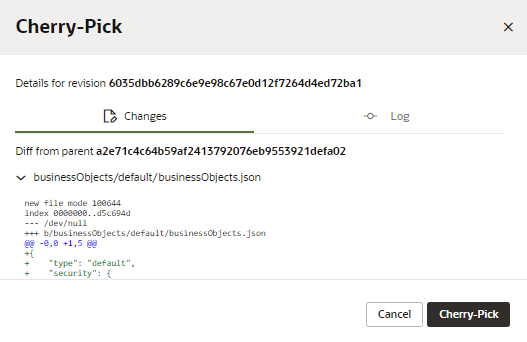
  2. In the Cherry-Pick dialog, enter the ID of the revision you want to cherry-pick and click Fetch Revision (Fetch revision icon).

    Use the Changes and Log tabs to view the changes associated with the commit you're cherry-picking:
    Description of cherrypick.png follows
    Description of the illustration cherrypick.png

    If your branch has uncommitted changes, you'll be prompted to commit your changes.

  3. Click Cherry-Pick. Alternatively, click Commit All and Cherry-Pick to first commit your unsaved changes, then do the cherry-pick. (You'll still need to explicitly commit the cherry-picked changes afterward.)

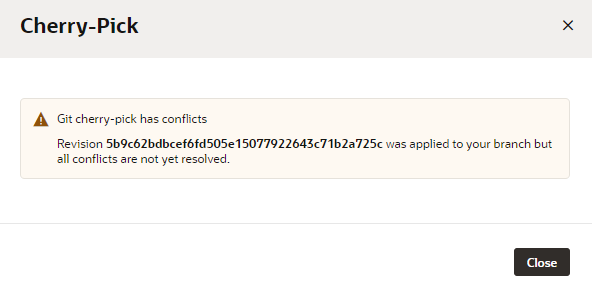
    If you run into conflicts (say, because a file has been modified on two different branches), you'll see a message similar to this image:
    Description of cherrypick-conflict.png follows
    Description of the illustration cherrypick-conflict.png

    To resolve the conflict, click Close, then go to the Git Panel to resolve the issue in the conflict editor.

  4. Once the commit is successfully applied (and any conflicts resolved), commit the cherry-picked changes to your branch, either from the Git Panel or the Commit option in the header's Git menu.