Create a Form-over-Table Layout in an Excel Workbook
You can create a Form-over-Table layout in an Excel worksheet when a parent-child relationship exists in the chosen service.
A Form-over-Table layout can only be created for the top-level business object in a business object hierarchy. Suppose you have a hierarchy with three levels: purchaseOrders, lines, and schedules. In this hierarchy, purchaseOrders is a collection of top-level purchase orders each with one or more lines for managing the details of each order. Each of these lines may include one or more schedules for tracking shipping details.
In this scenario, you can only create a Form-over-Table layout for the purchaseOrders and lines business objects. You can't use lines for the form and schedules for the table in a Form-over-Table layout. See Use Multiple Layouts for Multi-level Business Objects.
Note:
You can create a layout that references polymorphic business objects and includes descriptive flexfields. If the business object includes descriptive flexfields, they are appended with "DFF" (for example, "EmployeesDFF") and included in the list of descendant business objects. See Use Polymorphic Business Objects and Fields.A parent-child relationship at the service level requires:
- A parent service path, for example,
fscmRestApi/resources/1.0/purchaseOrders - A child service path with a parameter, for example,
fscmRestApi/resources/1.0/purchaseOrders/{purchaseOrder-id}/child/lines
In your workbook, both business objects must be declared in the same catalog. Continuing our example, lines must appear as a child of purchaseOrders. To allow for data retrieval, updates, creation, deletion, and action invocation with the parent and child business objects using this layout, the service must support the corresponding GET, PUT/PATCH, POST, and DELETE operations on these paths. For more information on how business objects are identified, see Business Objects Harvested from OpenAPI Metadata.
When you create a Form-over-Table layout, you may be prompted to point to the service metadata document. The service metadata document can be stored on your local drive or accessed remotely using a URL.
You'll also have the option to provide authentication details for accessing your REST service. Consult with your REST service owner for access requirements.
Before you begin, review these support topics for your REST service:
- For Oracle REST Data Services (ORDS), see the notes on ORDS support in Requirements for Dependent Layouts.
- For NetSuite SuiteTalk REST web services, see Configure a NetSuite Catalog for Parent-Child Business Objects.
To create a Form-over-Table layout:
- Create a blank Excel workbook using the standard
.XLSXfile format or the macro-enabled.XLSMformat. Other Excel formats (.XLSand so on) are not supported. - Click the cell where you want to locate the form and table.
- Open the Oracle Visual Builder tab from the Excel ribbon.
- Click Designer to launch the New Layout Setup wizard.
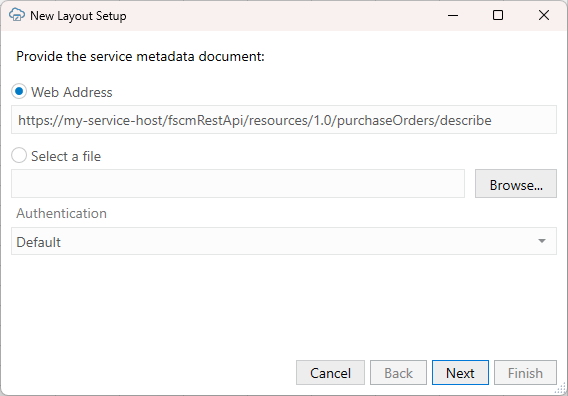
Description of the illustration excel-apiinput.png - From the first screen, provide the service metadata document using one of these options:
- Web Address option (the default) if you access the service metadata from a URL. Note that you can't provide a data URL (a URL that returns data) as the starting point to creating a layout.
- Select a file option if the service metadata document is a local file on your computer.
Tip:
If you are working with ADF REST services, the URL for the service metadata usually ends with/describe, for example,https://my-service-host/fscmRestApi/resources/1.0/purchaseOrders/describe. - Select the authentication method for your service from the Authentication list and click Next.
See Authentication Options for more information.
- If you selected OAuth 2.0 Authorization Code, enter the required properties and click Next.
Required fields are outlined in red. Refer to OAuth 2.0 Authorization Code Flow with PKCE for descriptions of the fields.
- If the service includes five or more business objects, select the business objects you want to include in the catalog, then click Next.
The wizard displays details of the newly-created catalog, such as the catalog name, service host and base path, and number of business objects.
- Review the new catalog details.
Note:
If there are any errors in the service metadata document, click Save Report to save the report to your local drive. Share this report with the service owner. - Click Next to proceed.
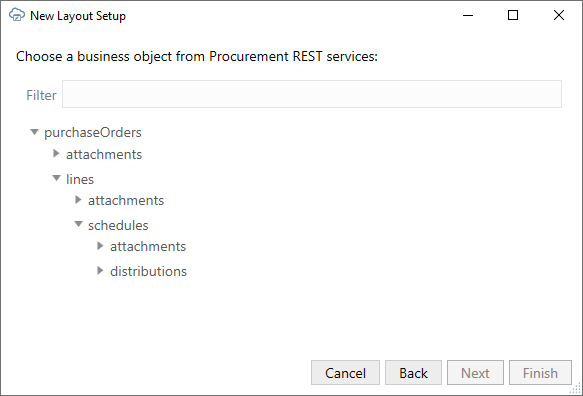
- Choose the top-level business object for the form (in this case,
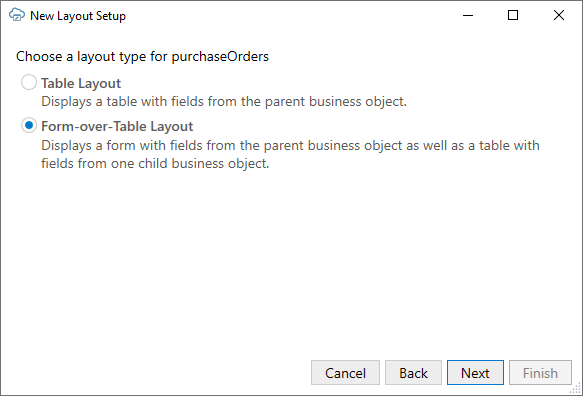
purchaseOrders), and click Next. - Choose Form-over-Table Layout, and click Next.
The Form-over-Table layout option is unavailable if you didn't select the top-level business object or there is no available child business object.
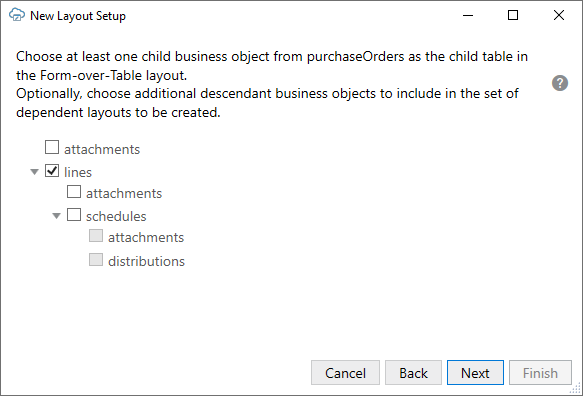
- Choose a child business object for the table part of your Form-over-Table layout (in this case,
lines), and click Next.If there are any available descriptive flexfields, these are displayed in the list and display a "DFF" ending.
If you select this business object, the descriptive flexfield segments are added as fields to the parent layout. See Create a Layout Using Descriptive Flexfields.
Note:
You can select additional child business objects if you want to create a set of dependent layouts. If you select more than one, you'll be prompted to select the business object you want to show in the table of the root layout. See Create a Set of Dependent Layouts. - Confirm the details of your Form-over-Table layout, and click Finish.
The add-in creates a Form-over-Table in the Excel worksheet and opens the Layout Designer that you use to modify the newly-inserted form and table, as shown here:
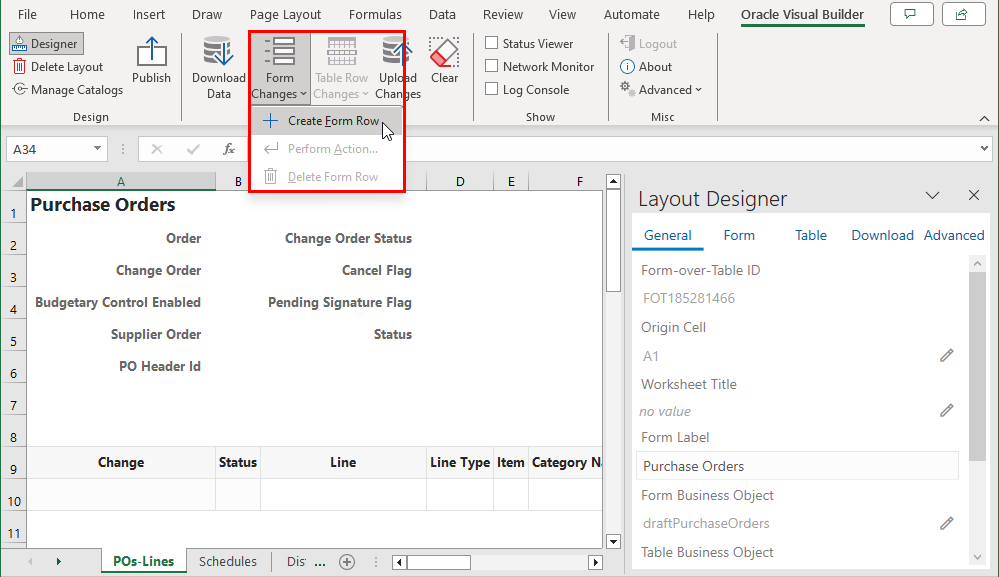
Description of the illustration fot-result.pngIf the form business object (in this case,
purchaseOrders) supports a create action, a Create Form Row option appears in the Form Changes menu, as shown in the image. Use this option to create a new form row during your next upload (see Create a Parent Row in a Form-over-Table Layout in Managing Data Using Oracle Visual Builder Add-in for Excel).
Before you proceed to publishing your workbook, you may want to configure the workbook in various ways to make it easier for your business users to use. For example, you might consider:
- Configuring a search for the workbook to allow your business users to specify an item for the form, as described in Configure Search Options for Download. If you do not specify a value for the Search field or Row Finder property, the add-in downloads the first parent item it encounters in the REST service to the form, and the child items, if any, to the table.
- Adding, removing, or reordering form fields or columns in your layout. See Manage Fields in a Form or Table.
- Modifying a field associated with a column to, for example, show help text or display a list of input values for your business users. See Configure Business Object Fields and Configure a List of Values with a Business Object.
Before you publish, it's a good idea to test the workbook before you publish and distribute it to users. For information on managing data in a Form-over-Table layout, see Manage Data in Form-over-Table Layouts in Managing Data Using Oracle Visual Builder Add-in for Excel.

