Create Relations

You can use a relation notation as convenient shorthand to represent multiple contexts.

A relation is a vertical list of similar contexts arranged horizontally. In other words, each row of a relation table is a context and each column consists of context entries, where the column name is the common key attribute for all cell entries under it that act as value attributes of respective contexts (rows). For details about contexts and key-value pairs, see Using Contexts. In a relation, each cell entry is an independent logical notation.

In the output of a relation notation, outputs of all contexts within it are clearly distinguished. You can also invoke the output of a particular context or context entry from another decision.

To create a decision with the Relation notation:
  1. Add a new decision element to the model.
    1. In graph view, click Expand Expand/Collapse icon next to Decision on the diagram palette. Select Relation and drag it onto the canvas. Double-click the element to edit its logic. You can also edit the relation's logic from the properties pane; select the element, then select Open Properties Open Properties icon, and in the properties pane click Edit Edit icon next to the Name field.
      Click Close Close icon to return to the canvas.
    2. In list view, click Add new decision Add New Decision icon in the Decisions bar and select Relation from the Create Decision window.
    An empty Relation table is created.
  2. Use row/column controls available within the decision to add additional rows or columns and use Expand Table Expand Table icon to view and edit the relation on an expanded dialog. All cells have expression notation selected by default.
  3. Enter a name for each column.
  4. Select a cell and click Change logic Change logic icon to change the logical notation for the cell. Select a different notation from the available options. Note that you cannot insert a decision table within a relation.
  5. Within cells, configure the logic for selected notations. You can use input variables or built-in functions to define the logic.
  6. Click Save to save and validate changes manually. Changes you make within the decision model are also automatically saved and validated from time to time. Errors, if any, are displayed within the decision.

The following relation contains the stock information for a particular brand of phone in the form of multiple contexts:
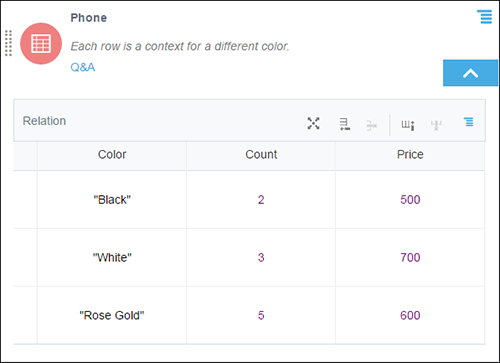
Description of dmn-relation.png follows
Description of the illustration dmn-relation.png

Similar to list notations, use either Phone[1] or Phone[-3] to access the entire context related to black-colored phones. To access all cell entries of a particular column, use the relation name in combination with the column name, for example, Phone.Price returns all entries of the Price column in a list. To access a particular context entry (for example, “Rose Gold”), use Phone.Color[3] or Phone.Color[-1].

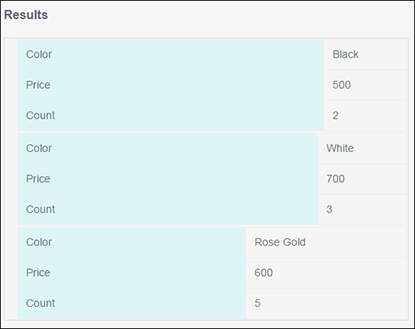
The following image is the result of the entire relation, which has results of each context listed separately:

Description of dmn_rel_result-png.png follows
Description of the illustration dmn_rel_result-png.png

Note:

If you add a function as one of the cell entries, then the relation as a whole doesn’t return a result. However, you will still be able to invoke results of other cell entries or contexts throughout the decision model.