Start the Robot Agent Automatically
If you want the robot agent to automatically start and stop with the operating system, configure the robot agent as a service. This task is optional.
Linux Machines
If you're running the robot agent on a Linux machine, simply run the command to start the robot agent. Going forward, the robot agent automatically starts and stops with the operating system.
Windows Machines
Caution:
If you don't configure the robot agent as a Windows service, you must manually start the robot agent every time the computer or VM restarts.You use an open-source application called NSSM to configure the robot agent as a Windows service.
- Download NSSM to the computer.
- Download NSSM from the NSSM
website.
Download the file to the computer that hosts the robot agent, or to a location that you can access from that computer.
- Unzip the NSSM file.
- Place the NSSM files in a location of your choice on the computer.
- Download NSSM from the NSSM
website.
- Locate the
nssm.exefile in the NSSM files, and copy the path to its location. - Update the robot agent's configuration file, and start the robot agent.
The first time you start a robot agent, Oracle Integration removes the values of several properties for security purposes. The values must be in the file when you start the robot agent as a service.
- If the robot agent is running, stop it.
- Open the ZIP file that you downloaded when you downloaded the robot
agent.
If you deleted the ZIP file, you can download it again at any time. See Download the Robot Agent.
- In the ZIP file, open the
InstallerProfile.cfgfile in a text editor, such as Notepad. - Copy the values of the following properties:
-
IDCS_CLIENT_ID= -
IDCS_CLIENT_SECRET=
-
- Navigate to the location where you installed the robot agent, and open
the
InstallerProfile.cfgfile. - Paste in the properties you copied, and remove their empty values.
- Start the robot agent.
- Add the path for the NSSM service to your Windows environment variables.
- Open the Settings dialog in Windows.
For example, open the Windows menu, and type settings.
- Next to Related links, select
Advanced system settings.
The System Properties dialog opens.
- Select Environment Variables.
The Environment Variables dialog opens.
- In the User variables list, select the
Pathvariable, and select Edit.The Edit environment variable dialog opens.
- Click New.
A new row becomes editable in the Edit environment variable dialog.
- Paste the path that you copied in a previous step into the row.
The path shouldn't include
nssm.exefile name. - Click OK, and then click OK again.
- Open the Settings dialog in Windows.
- Install the robot agent as a Windows service.
- Open a command prompt as an administrator.
- Enter the following command:
nssm installThe NSSM service installer dialog box appears. - Fill in the fields.
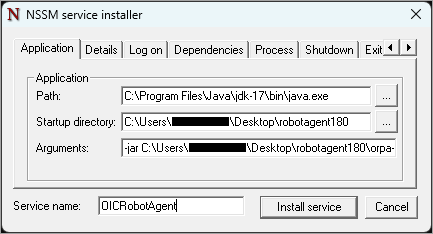
Tab Fields to enter Application
-
Path: Enter the directory of the java.exe file, including the
java.exefile name. -
Startup directory: Enter the directory of the robot agent.
-
Arguments: Enter the command that starts the robot agent, without java at the beginning. If you're not sure, see Install and Start the Robot Agent.
-
Service name: Enter the name of the service as you want it to appear in the list of Windows services. Do not include spaces in the name.
Details
-
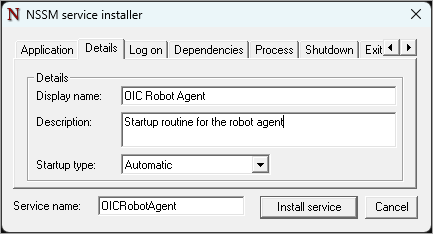
Display name: Enter the display name for the service.
-
Description: Enter a description for the service.
-
Startup type: Select Automatic.
I/O
-
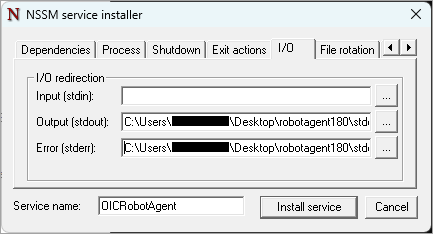
Output (stdout): Select the location for the output files for the service, including the name of the output file.
-
Error (stderr): Select the location for the error files for the service, including the name of the error file.
File rotation
-
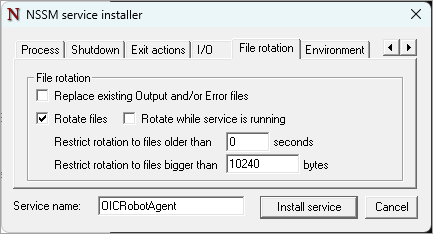
Select only Rotate files.
-
For Restrict rotation to files bigger than __ bytes, enter 10240 or an appropriate value for your organization.
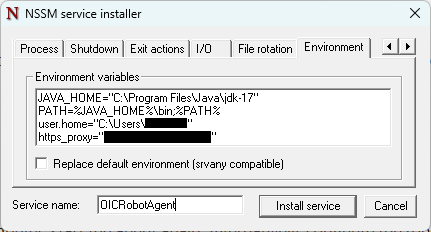
Environment
Environment variables: Enter the following values:
-
Location of the Java home, such as:
JAVA_HOME="C:\Program
                                                  Files\Java\jdk-17"
PATH=%JAVA_HOME%\bin;%PATH% -
(Required only if the robot agent is running behind a firewall and is unable to connect to the public internet) Location of the user home, such as:
user.home="C:\Program Files\<user_name>" -
Definition of the
https_proxyparameter.
-
- Click Install service.
In the command prompt, a message informs you that the service was installed successfully.
- Start the service.
- Open the Services dialog in Windows.
For example, open the Windows menu, and type services.
- Find the service you just created. Its name is the Display name that you specified.
- Start the service.
- Open the Services dialog in Windows.
- To verify that the service started as expected, check the output and error files for any errors.
- Repeat the previous steps as needed for other Windows computers or virtual machines for which the robot agent must start automatically.