Create and Update Parameters in Schedule Integrations
You can create and update scalar-type scheduled parameters in schedule integrations that determine how to batch and read data received from a source location. You then use these parameter values downstream in the integration.
You create and assign values to these parameters in the Schedule parameters page that is available in schedule integrations. You can also assign values to these parameters in assign actions. Up to five parameters are supported in the Configure schedule parameters panel.
Create Parameters
You can also create and assign scheduled parameters as business identifiers that enable you to track fields in messages during runtime. See Assign Business Identifiers.
Scheduled parameters are available across all scheduled runs of an integration and can facilitate processing of data from one run to the next. For example, when performing batch processing, a scheduled parameter can track the current position of batch data between runs. This value is available across scheduled runs and cannot exceed 256 characters.
- In the navigation pane, click Design, then Integrations.
- Click Create.
- Select the Schedule pattern.
- Complete the fields of the dialog, and click
Create.
The integration canvas is displayed.
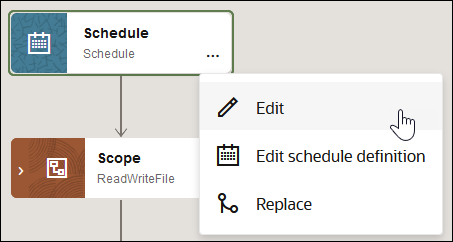
- For Schedule, click
 , then select Edit.

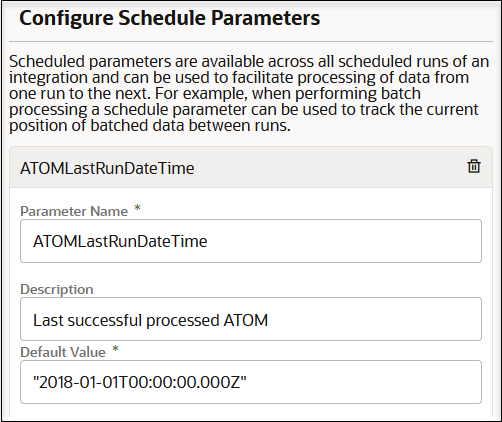
- Click the field to open fields for entering a parameter name, description, and default value.
- Enter values. For this example, a parameter of
ATOMLastRunDateTimeand a value of"2018-01-01T00:00:00.000Z"are entered.
- Click Save.
If you enter a parameter without a value, a red warning icon is displayed after the Default Value field.
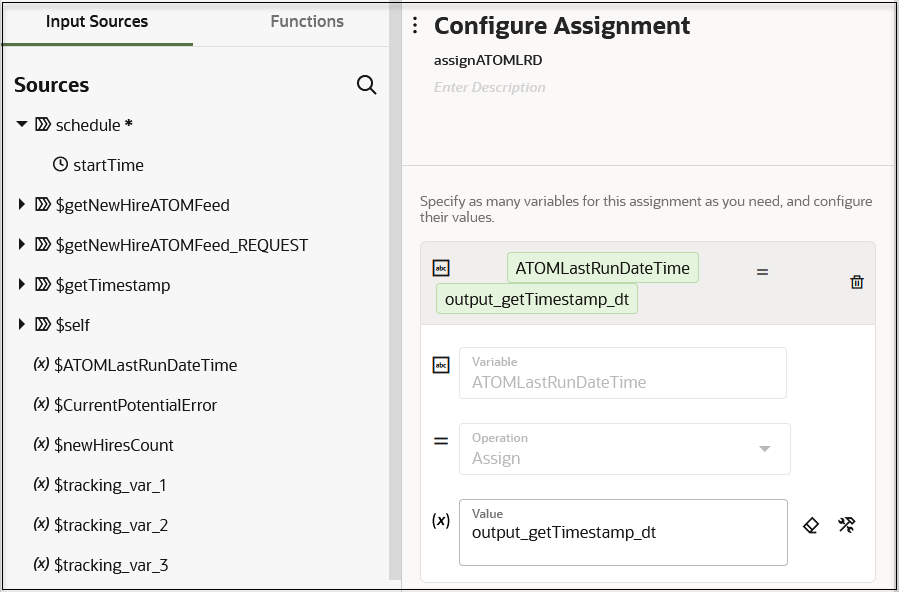
- Drag an Assign action into the integration.
- Drag the parameter you created in the Configure schedule parameters
panel into the Variable field and specify a value.

- Click Save.
Note:
If you create a for-each action without selecting the Process items in parallel option and then add an assign action within the for-each loop, parameters defined in schedule integrations are visible for selection in the assign action. If you later edit the for-each action and select the Process items in parallel option, a red fault icon is displayed on the impacted assign action indicating that a scheduled parameter is being used. You must correct this error for your integration to be valid. You can disable the Process items in parallel option or use the cut and paste options to move the assign action outside of the for-each loop.
Update Parameters
- In the navigation pane, click Design, then Integrations.
- Hover over the integration on which the scheduled run is defined.
- Click Actions
 , then select Schedule.
The Schedule and future runs page is displayed.
- Click Actions
 and select Update schedule parameters.
- Edit the parameter value in the New value
column, and click Update. The value in the New
value field replaces the currently stored value and is used for
the next run. The value in the Current value field
indicates the currently stored value.

Override Schedule Parameter Values
You can override schedule parameter values set at design-time when submitting an ad-hoc schedule request or starting a schedule in an activated integration. This feature enables you to provide parameter values while invoking an integration without deactivating it.
-
Access the dialog to override parameter values in either of two ways. If the schedule integration has defined parameters, the Configure schedule parameters panel is displayed. Otherwise, the open is not displayed and the schedule integration starts.
-
If submitting an ad-hoc schedule integration, select Run from one of the following locations:
-
Click Actions
 , then Run on the Schedule
and future runs page.
-
Click Actions
 , then Run on the Monitor
integrations page.
Both options invoke the Configure and run page, from which you can select Ad hoc request and click Run.
-
-
If scheduling an integration, select Start schedule
 on the Schedule and future runs page.
The Schedule parameters page is displayed.
-
-
Make updates to any necessary parameters.
The following fields are displayed:
-
Parameter name: Displays the parameter name you provided during design-time.
-
Default value: Displays the parameter value you assigned during design-time.
-
Current value: Displays the value most recently used at runtime.
-
New value: Optionally enter new values for the schedule parameters. These values override the current and default values. If these fields remain empty, the current values are used. If there are no new or current values, the default values defined during design-time are used.
-
-
In the New value row for the specific parameter, enter a value.
If the integration updates these schedule parameter values using an assign action, the updated values are saved and become the current values for the next schedule run.
-
Save your updates.
-
If starting a schedule, click Start schedule.
-
If submitting an ad-hoc schedule integration, click Run.
The values you entered are used during processing of the schedule integration.
-
