Define a REST Transport
Once you have collected REST transport details, you can completely define a REST transport in Oracle Integration.
- To define a REST transport in a project.
- In the navigation pane, click Projects.
- Click the project in which to define a REST transport.
- Click B2B
 .
.
- In the Trading partners section, click the trading partner in which to define a REST transport.
- To define a REST transport in a standalone environment.
- In the navigation pane, click B2B, then Trading partners.
- In the row of the trading partner for which to define a REST
transport, click Edit
 .
.
- Click Transports & agreements.
Define Transports to Create Integrations
- In the Transports section, click
Add
 to define how a message is delivered to or received from this trading
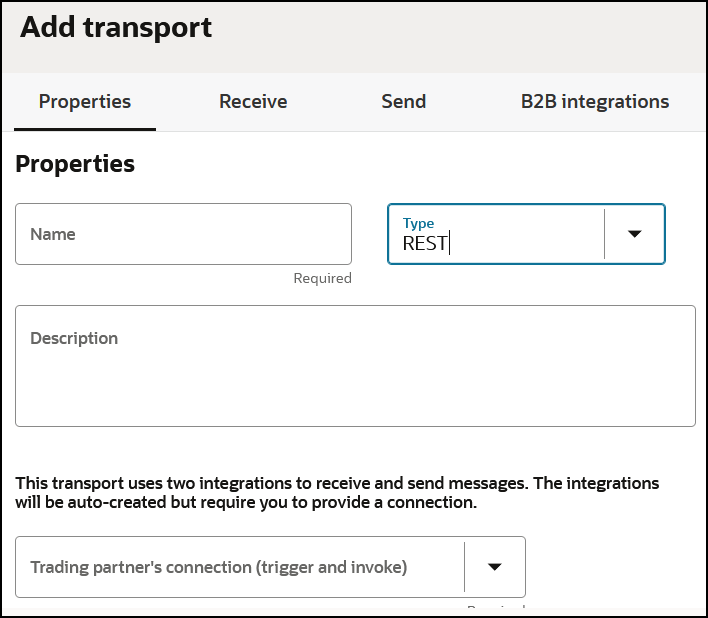
partner. The configuration panel is opened:

- Define the following details.
Section Description Properties section - Name
Enter a name for the transport. The name is used for display purposes only.
- Type
Select REST from the drop-down list. This represents the communication protocol you use to exchange messages with your trading partner.
Based on selecting REST, the appropriate configuration settings for the REST transport are displayed.
- Description
Enter an optional description of the transport. The description is used for display purposes only.
- Trading partner's connection (trigger and invoke)
Select an existing REST Adapter connection configured for connectivity to your trading partner. If you are outside of a project, you can click Add
 to create a new REST Adapter trigger or invoke connection on the
Connections page.
Note: Only XML documents are currently tested and certified.
See Create a REST Connection in Using the RosettaNet Adapter with Oracle Integration 3.
If you want to select another connection, you can do so when this transport is not deployed. Once you deploy the transport, the connection selection cannot be changed.
You can modify the configuration properties inside the connection at any time. However, if you modify the connection settings after this transport is deployed, you must undeploy and then redeploy the transport for the changes to take effect.
- Character encoding
Select the character encoding to apply to all payloads processed through this transport.
The character encoding is used at the EDI parsing (inbound) or EDI generation (outbound) step.
Receive section - REST transport URL for receiving
This is a display-only field. After the transport is deployed, indicating it is ready to receive and send messages, your REST endpoint URL is displayed. You may share this URL with your trading partner. This REST URL is not common across all trading partners. It is specific to the current trading partner that you are viewing or editing.
Send section - Enter Send URI
Enter the send URI. This value is appended to the REST Adapter connection URL. B2B Integrations section - Integration name prefix
Enter a short prefix that is used to form the complete integration names for receiving messages and sending messages. For the REST transport, it forms the integration names: your_prefix REST Receive and your_prefix REST Send.
Details about these integrations are provided. See Create B2B Integrations for Receiving and Sending.
- Integration identifier prefix
Enter a short prefix that is used to form complete integration identifiers for receiving messages and sending messages. For the REST transport, it forms the integration identifiers: your_prefix_REST_Receive and your_prefix_REST_Send.
The final integration identifier must be unique across all integrations. Therefore, ensure that you enter a prefix that is unique.
If the uniqueness check fails, you get the opportunity to try with a different prefix.
- Click Add.
The new transport is displayed.
- Select Actions
 , then select Deploy.
- Select Deploy again when prompted.
If successful, the following message is displayed.
The transport status is changed to Active.Transport transport_name was deployed successfully. - Go to the Integrations page and note that both integrations are created and activated.
- If you need to undeploy the transport, select
Actions
 , then select Undeploy. Undeploying the transport
also undeploys the integrations.