Create an AI-Generated FHIR Search Query

You can enter search queries in natural language format and generate a FHIR-equivalent search query against FHIR-compliant servers such as HAPI FHIR and others. You can then edit the generated query parameters and regenerate the query, as needed. FHIR-generated search queries give you a head start on building queries that meet your business requirements.

This section provides an overview of creating and editing several search queries (one simple and one more complex).
Ensure that you have first satisfied the prerequisites. See AI-Generated Search Query.
  1. Configure a FHIR Adapter invoke connection.
  2. Drag the FHIR Adapter invoke connection into the integration canvas.
  3. On the Basic Info page, enter a name, enter an optional description, and select Search FHIR Resource using OIC for Healthcare Copilot.
  4. On the Configure OIC for Healthcare Copilot page, perform the following:
    1. From the Select AI Engine list, select your licensed AI engine.
    2. Enter the search query in English that you want to execute against the FHIR server, then click Submit Query. For this example:
      Search all patients named Marcus from the city of Houston
      The generated FHIR query is displayed:
      https://hapi.fhir.org/baseR4/Patient?name=Marcus&address-city=Houston
  5. Click Test Query to validate the query.
    If successful, the following message is displayed.
    Valid FHIR URL. Click here to see the results.

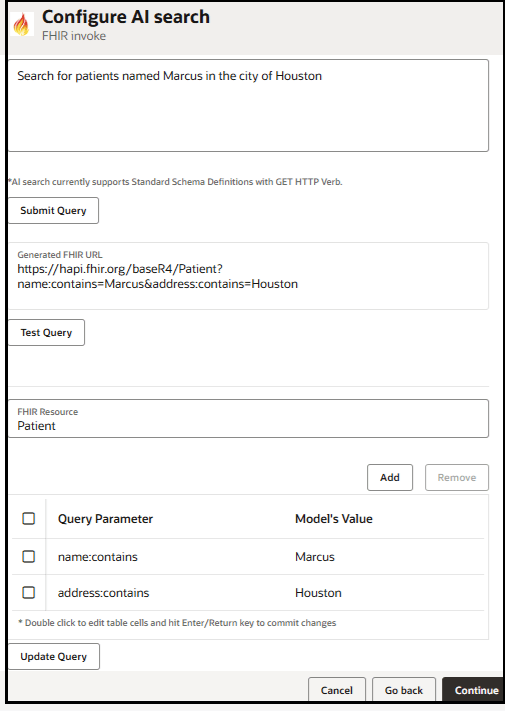
    The Configure OIC for Healthcare Copilot page looks as follows:


    This image shows the Configure OIC for Healthcare Copilot page. The Select AI Engine list appears at the top. Below this is the text description box where you enter queries, the Submit Query button, the Generated FHIR URL field, the Test Query button, the clickable message result of the query, the FHIR Resource field, the generated query parameters and their model values, and the Add and Remove buttons for editing the parameters. Below this are the Cancel, Go back, and Continue buttons.

  6. Click the Valid FHIR URL. Click here to see the results message to scroll through details about the FHIR search query response.


    The code output of the generated search query is shown.

  7. View the automatically generated query parameters and model values.
  8. If necessary, add, update, or delete query parameters, then click Update Query to regenerate the query in the FHIR Generated URL field.
    Let's now generate a second, more complex query.
  9. Enter a query, then click Submit Query. For this example:
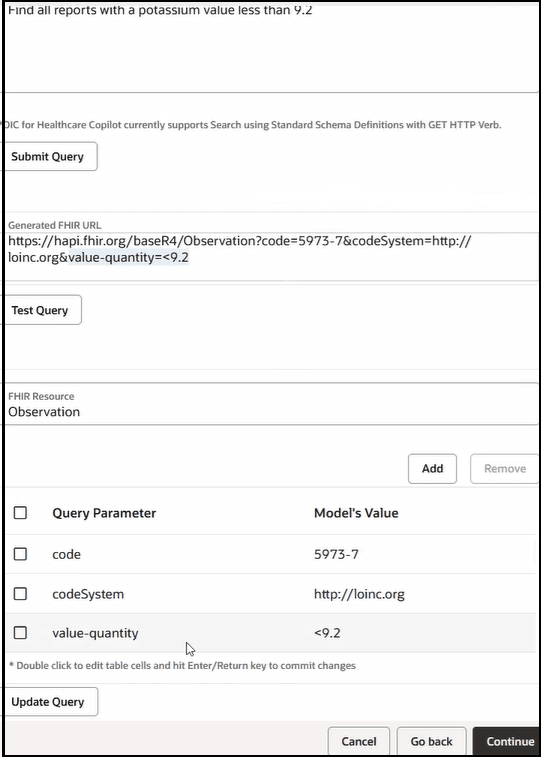
    Find all reports with a potassium value less than 9.2
    The generated FHIR query is displayed with a resource of Observation.
    https://hapi.fhir.org/baseR4/Observation?code=5973-7&codeSystem=http://loinc.org&value-quantity=<9.2

    The query parameters are also generated. For this example, the search query was able to automatically generate several complex query parameters and values.


    This image shows part of the Configure OIC for Healthcare Copilot page. Below this is the text description box where you enter queries, the Submit Query button, the Generated FHIR URL field, the Test Query button, the clickable message result of the query, the FHIR Resource field, the generated query parameters and their model values, and the Add and Remove buttons for editing the parameters. Below this are the Cancel, Go back, and Continue buttons.

  10. Review the query parameters closely in case updates are required. Generated search queries are not always 100% correct. For example:
    Change:
    value-quantity       <9.2

    to:

    value-quantity:exact 9.2
  11. Click Update Query.

    The generated query is also updated. This functionality provides you with the flexibility to delete, modify, or add new query parameters, update the query, and also test the query as needed.

    
    https://hapi.fhir.org/baseR4/Observation?code=5973-7&codeSystem=http://loinc.org&value-quantity:exact=9.2
  12. When complete, click Continue.
  13. Click Finish.
  14. Open the mapper. The query parameters and their values are visible in the target elements.
  15. Right-click an element (for this example, code) and select Node info.
    Note that the default model value of 5973-7 generated by the FHIR search query is displayed.


    The Schema info popup message is shown. This message shows the Data Type, Required, Repeating, XPath, and Default Value fields. The FHIR named object label also appears.

  16. Right-click the same element again (code) and select Add default value.
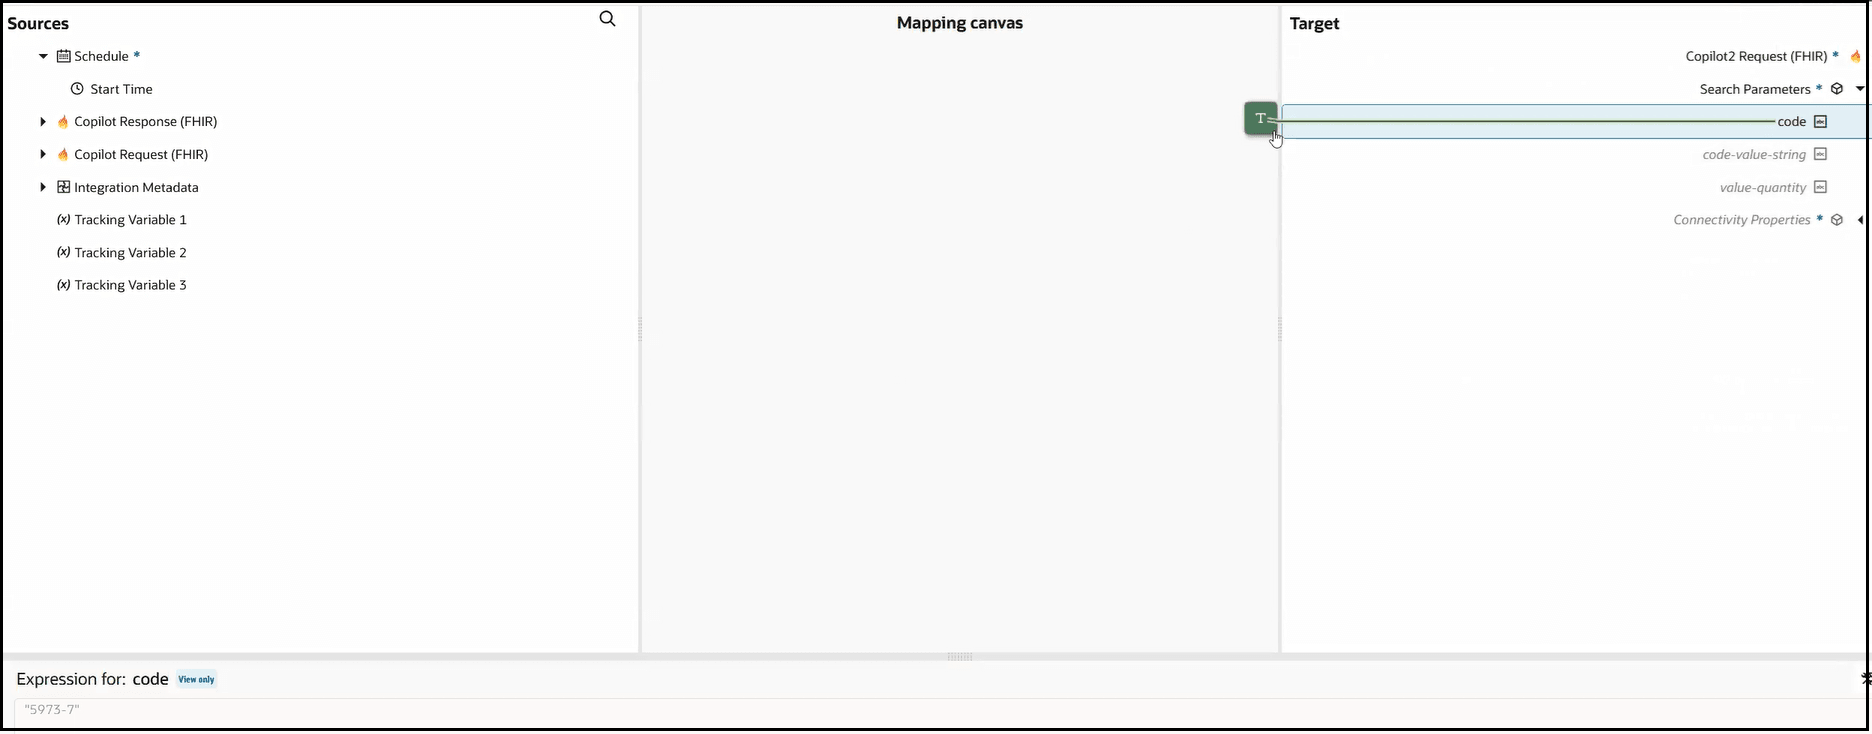
    Note that the default model value of 5973-7 generated by the FHIR search query is also automatically mapped and displayed in the Expression Builder.


    This image shows the Sources, Mapping canvas, and Target sections of the mapper. The target code element is selected. A "T" icon is shown. At the bottom, the Expression Builder shows the assigned default value for this element.

    You can also map appropriate source elements to the target query parameter elements, as needed.