Defining Rate-Based Drivers
To define rate-based drivers:
- From Oracle Hyperion Enterprise Performance Management Workspace, select Navigate, then Applications, then Profitability, and then select the application for which you want to create the driver.
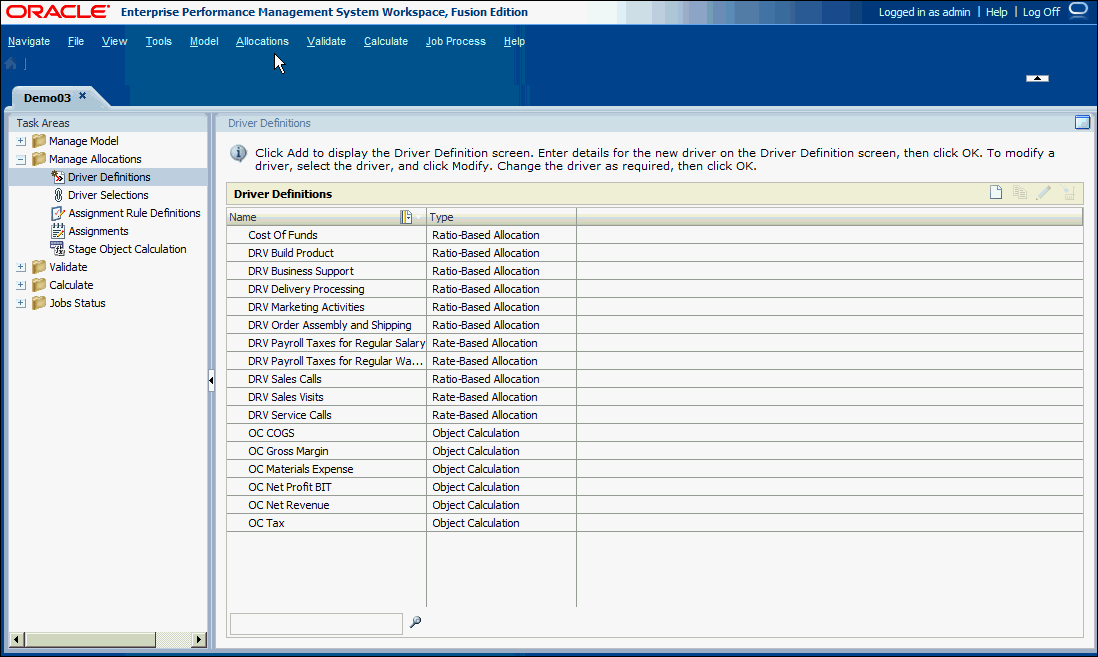
- From Task Areas, select Manage Allocations, and then Driver Definitions.
The Driver Definitions window is displayed.

- In Driver Definitions, click Add New Driver
 .
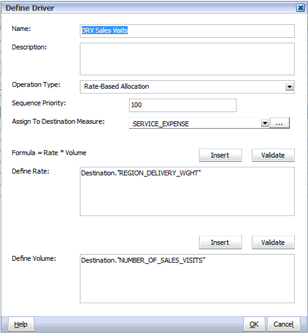
.The Define Driver dialog box is displayed.

- For Operation Type, select Rate-Based Allocation.
- For Name, enter a unique name for the new driver.
Caution:
Do not use special or restricted characters in the driver name, such as /,+, or @ signs, because doing so may cause import operations to fail. See the Oracle Essbase Database Administrator's Guide to view the latest restrictions.
- Optional: In Description, enter a brief description of the purpose of the driver.
- In Sequence Priority, enter the calculation priority as a positive integer. By default, 100 is displayed. The highest priority is 1. For more information, see Driver Priority Sequence.
- Under Assign to Destination Member, click the Browse button
 to select the Destination measure to which the driver will write the allocated values, and then click OK.
Note:
If Lookup measures is selected for Assign to Destination Measure, then appropriate validation error will appear on Drivers tab in Model Validation.
- Under Define Rate, enter the rate to be applied in the formula
(Rate * Volume).You can enter the actual rate, or you can create a formula using both the keyboard and the Insert button.
To use the Insert Selector:
- Click Insert to display the Insert selector for the available measures for the driver.
- From the drop-down list, select the stage within the model to which the measures apply: Source or Destination.
The list of Available Measures changes to reflect the choice made from the location list. For example, if Source is selected, only source measures are displayed.
- From the dimension members list, select the measure for the formula.
Use the Context Menu
 to filter or modify the display of members.
Note:
Filter and sort are available only when Grid View is selected.
- Click OK.
- Enter the formula, and then click Validate.
The SQL driver formula is validated, and a success message is displayed. Address errors before proceeding.
- Under Define Volume, enter the volume to be applied in the formula
(Rate * Volume).You may enter a specific volume, or you can create a formula using both the keyboard and the Insert button.
To use the Insert Selector:
- Click Insert to display the Insert selector for the available measures for the driver.
- From the list, select the stage within the model to which the measures apply: Source or Destination.
The list of Available Measures changes to reflect the choice made from the location drop-down list. For example, if Source is selected, only source measures are displayed.
- From the dimension members list, select the measure for the formula.
Use the Context Menu
 to filter or modify the display of members.
Note:
Filter and sort are available only when Grid View is selected.
- Click OK.
- Enter the formula, and then click Validate.
The SQL driver formula is validated, and a success message is displayed. Address any errors before proceeding.
- Click OK to save the new driver.
- Associate the driver with one or more dimension members. See Working with Detailed Profitability Drivers.