Setting up ODI to Integrate with JD Edwards
To set up ODI to integrate with JD Edwards:
-
Download the JD Edwards EnterpriseOne Data Access Driver (DAD) driver:
-
Display My Support by clicking My Oracle Support.
-
Select the Patches and Updates tab, and then select JD Edwards Patches.
-
From JDEdwards, enter:
EnterpriseOne Tools Releases. -
In Release, select All Releases.
-
In Platform, select Multiplatform.
-
In Description (*text*), enter: *Data Access Driver*.
Include asterisks as it is a wildcard search.
-
Select the License Agreement check box.
-
Click Search.
-
Click the plus sign (+) to add Tools 9.2,* Data Access Driver to the Download Basket.
Note:
Oracle Hyperion Financial Data Quality Management, Enterprise Edition supports JD Edwards Tools 9.2.5 or higher. If you use JDE Tools 9.2.x.x, then use the 9.2.x.x DAD Driver. -
Click the Item(s) hyperlink and download the tools release specific item.
-
-
To copy the DAD driver:
The DAD driver has a
.parextension, but it can be unzipped.-
Unzip the archive file to a temporary directory.
-
Extract (or unzip) the JAR file
DADriver_EAR.jar. -
Copy the extracted contents of the
DADriver_EAR.jarto theEPM_MIDDLEWARE_HOME\odi\sdk\libdirectory.
-
-
Request that the JD Edwards system administrator provide you with the following files:
-
jdbj.ini -
jas.ini -
jdelog.properties
These files are generated when you register the JD Edwards EnterpriseOne Data Access Driver using the JD Edwards Server Manager.
-
-
Copy the
jas.ini,jdbj.ini, andjdelog.propertiesfiles from the JDE Application Server to theEPM_MIDDLEWARE_HOME\odi\sdk\libdirectory. -
Ensure that the security server of the
jas.inifile is set up correctly. -
Review and edit the
jdbj.inifile as follows:-
If the JD Edwards application database is Oracle, update the location in the
tnsnames.orafile:For example, modify
tns=EPM_MIDDLEWARE_HOME\user_projects\config\dbclient/tnsnames.orain thejdbj.inifile.Forward or backward slashes can be used.
-
Encrypt the
{JDBj-BOOTSTRAP SESSION]stanza, and then the password value.If the stanza has not changed, no update is required.
-
Modifications to the
.INIfile password encryption can be accomplished using the Server Manager. -
Set the value of the following parameters under
[JDBj-RUNTIME PROPERTIES]stanza to:resultSetTimeout=-1transactionTimeout=-1usageExecutionThreshold=20000usageResultSetOpenThreshold=120000usageTracking=falsemsSQLQueryTimeout=1800000 -
Edit the
tnsnames.orafile.If the
tnsnames.oraentry exists, copy and rename it.The
tnsnames.orafile must include the reference to the JDE server, for example,jdeprod =(DESCRIPTION = (ADDRESS = (PROTOCOL = TCP)(HOST = example.domain.com)(PORT = 1521))(CONNECT_DATA =(SERVER = DEDICATED)(SERVICE_NAME = jdeprod)))The
tnsnames.orafile is located inEPM_MIDDLEWARE_HOME\user_projects\config\dbclient/tnsnames.ora.
-
-
Edit the
jdelog.propertiesfile, and set the log level as needed in all references in the file.-
In a production environment, set the log level to
SEVEREso that only severe errors are reported in the log file. -
Change the file path in
jdelog.propertiesforlogtoEPM_MIDDLEWARE_HOME\user_projects\domains\EPMSystem\serever\ErpIntgegrator0\logs.For example, specify:
FILE=EPM_MIDDLEWARE_HOME\user_projects\domains\EPMSystem\serever\ErpIntgegrator0\logs\e1driver.login all instances found in the file.
-
-
Ensure that you can access the server specified in the
jdbj.inifile from the ODI Server.You can do so from the command line by issuing a ping to the server.
-
Make sure that environmental variables
JAVA_HOMEandTEMPare set up correctly.JAVA_HOMEis an environmental variable and points tojava.exeunderEPM_MIDDLEWARE_HOME\jdk160_35\binTEMPis a user variable and points to%USERPROFILE%\AppData\Local\Temp.Setting environmental variables might require restarting the machine.
-
If JD Edwards uses Microsoft SQL Server or IBM databases, then download the JDBC driver and copy it to the DOMAIN HOME/lib directory.
Typically, this is the
EPM_MIDDLEWARE_HOME\user_projects\domains\EPMSystem\libdirectory.Refer to the JD Edwards Tools documentation for the supported versions of the JDBC driver for the database platform.
-
Search for "environment" in the
jdbj.inifile and note the environment values:[JDBj-BOOTSTRAP SESSION]user=JDEpassword=ACHCJKEBHCJKBKEEGLDDFKBCLBCDBCGBDCMJMBPGKLNOrole=*ALLenvironment=JDV920 -
From ODI Studio, then Topology, then Technologies, and then Oracle, select JDE_DATA_SERVER.

-
In the Definition section, specify the following values:
-
In User, specify: JDE_USER.
-
In Password, specify: JDE_USER.
-
-
In the JDBC section, values should be:
-
JDBC Drivercom.jdedwards.jdbc.driver.JDBCDriver
-
JDBC URL jdbc:oracle:enterpriseone://JDV920;RMNEQN=1;enterpriseone.role=*ALL
-
-
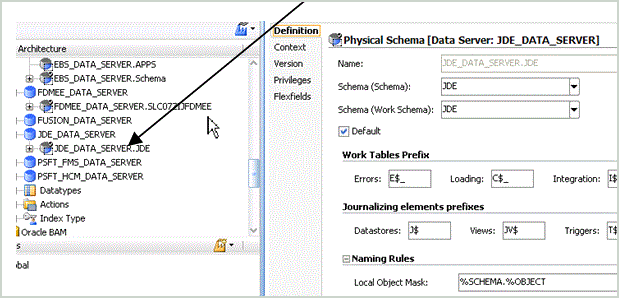
From Physical Schema, select JDE for the user.
Select the second (indented) JDE server which is the Physical Schema.
-
-
Restart FDMEE services
-
In Oracle Data Integrator, perform a JDE Test Connection with the ODI Agent.
-
From the ODI Studio, launch the Oracle Data Integrator.
-
From Physical Architecture, then Technologies, and then Oracle, select JDE_Data_Server.
Test the JDE Test Connection with the ODIAgent and not the local Agent.
-
Click Test Connection.
-
From Test Connection for, select OracleDIAgent, and then click Test.
-
From Physical Architecture, then Agents, then OracleDIAgent, right click, and select Test.
An information window displays when the test is successful.
-
-
Copy the following files from the FDMEE server location EPM_MIDDLEWARE_HOME\EPMSystem11R1\products\FinancialDataQuality\odi\11.2.0.0\workrep to the server where ODI Studio is installed:
-
MFOL_JDE_Adapter_Model.xml
-
MFOL_JDE_Adapter_Project.xml
-
PROJ_JDE_Adapter_Project.xml
Next:
-
From ODI Studio, then Designer, complete the following:
-
Select Project.
-
Select Import Project.
-
Select Import Type INSERT_UPDATE.
-
From File Import Directory, select the directory where the files were copied.
-
-
From ODI Studio, then Designer, then Model, select Import Model Folder and then complete the following:
-
Select Model.
-
Select Import Model Folder.
-
Select Import Type INSERT_UPDATE.
-
Select Select File Import Directory.
-
From File Import Directory, select the directory where the files were copied.
-
-
-
Restart FDMEE services.
-
Copy the JDE_Adapter.xml file from the FDMEE server location EPM_MIDDLEWARE_HOME\EPMSystem11R1\products\FinancialDataQuality\odi\11.2.0.0\adapters to the FDMEE application inbox.
Next complete the following:
-
Login to the Workspace.
-
Navigate to FDMEE, and then from Setup, select Source Adapter.
-
Select Import and import the JDE_Adapter from the inbox.
You are ready to define an integration to load data from JDE Source System.
-