Configure a Build Job to Undeploy a Visual Application

To undeploy a visual application deployed to the production instance, or another identity domain's Visual Builder instance, configure a build job. Before you configure the job, get the access credentials of a user who can access the Visual Builder instance where the visual application is deployed.
  1. In the left navigator, click Builds Builds.
  2. In the Jobs tab, click + Create Job.
  3. In the New Job dialog box, in Name, enter a unique name.
  4. In Description, enter the job's description.
  5. In Template, select the System Default OL7 for Visual Builder template.
  6. Click Create.
  7. Click Configure Builds.
  8. Click the Steps tab.
  9. From Add Step, select Visual Application, and then select Undeploy.
  10. In Instance, select the Visual Builder instance where the application is deployed.
  11. In the Authorization section, specify the authorization type to run this build step. With Use OAuth selected by default, you'll see the Authorization is required message, indicating that this build step needs a one-time authorization to handle OAuth requests to your environment's Visual Builder instance. Click Authorize and enter credentials to access your Visual Builder instance; you can also run the job manually and enter the credentials when prompted.

    Either way, it is recommended that you authorize your OAuth connection during initial configuration. If you skip this step, you will need to complete the required authorization before attempting to undeploy changes again.

    Once authorized, the Authorization has been provided message shows.

    Note

    OAuth is the recommended authorization type. Use Basic authentication only if you run into issues with setting up an OAuth connection. To use Basic authentication, select Use Basic, then enter the credentials of a user who can access the Visual Builder instance in Username and Password.

    OAuth tokens (access and refresh) are cycled during regular use. A refresh token is used to obtain an access token whenever a user accesses the target instance. This refresh token is typically valid for seven days. (The token expiration time is set in the IDCS resource app and may be different based on your security requirements.) If the user authenticates with the target instance within the seven-day period, the active refresh token generates a new access token and a new refresh token. This cycle continues indefinitely as long as the refresh token stays valid. If the refresh token expires during extended periods of inactivity (say, when you're away on vacation), click Renew Authorization (or run the job manually, so you're prompted to authorize any expired OAuth tokens).

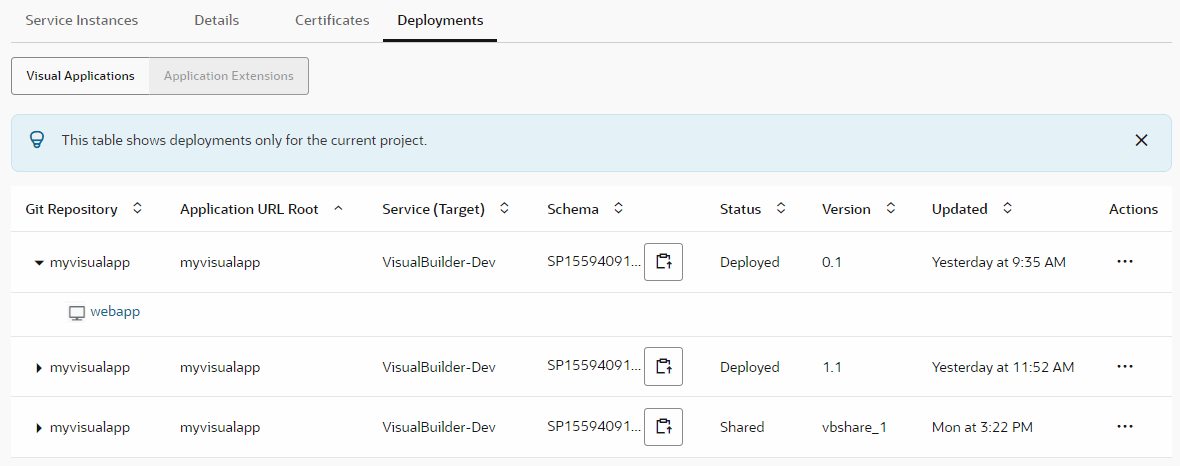
  12. In Application URL Root and Application Version, enter the visual application's root URL and its version.
    You can find the application's root URL and its version from the Deployments tab of the environment where the visual application is deployed. Here's an example:
  13. Click Save.
  14. To run a build, click Build Now.
After the build is successful, open the build's log. You'll see a similar message:
[2020-01-01 12:00:00] === Begin VB App Ops Undeploy Application===
[2020-01-01 12:00:00] Application employee-manager-visual-web-app/0.1 has been undeployed
[2020-01-01 12:00:00] === End VB App Ops Undeploy Application ===
Executor log size 364 B (364)
[2020-01-01 12:00:02] 
[2020-01-01 12:00:02] Build completed.
[2020-01-01 12:00:02] Status: DONE Result: SUCCESSFUL Duration: 7.0 sec