Quickstart
Overview
Follow this two-step guide to provision, set up, and run an agent.
Step 1: Provision an agent with an endpoint in the OCI Console
In this step, in the OCI Console, create an agent instance and an endpoint for the agent. You don't need to add any tools to this agent. This step is about infrastructure setup and you use the OCI Console to do it. You can also create an agent instance and its endpoint through OCI SDK or with Terraform.
Note: Configuration instructions or tools for the agent instance are covered in Step 2.
Step 2: Configuring and running agent using the ADK
In this step, use the ADK to set up and run your agent. For setting up your agent, you can iterate with your instructions and tools locally. After your agent is set up locally, push the agent information to the remote agent instance by running the agent.setup() method. For a running agent, run the agent.run() method to fulfill requests, without having to write code for handling the low-level
client-server interactions such as managing sessions, finding and invoking functions, and so on.
Prerequisites
-
Permissions: Ensure you have an OCI account and your identity has access to OCI Generative AI Agents service. You might need to ask your OCI administrator to set up the necessary policies and grant you access.
-
Region: Ensure that you're using a region that supports OCI Generative AI Agents service, such as
us-chicago-1,eu-frankfurt-1, andap-osaka-1. You need to use the same region in both steps below.
Step 1: Provisioning the agent endpoint
Follow this guide to create an agent instance and agent endpoint using the OCI Console with the following specifics:
-
Don't add any tools through the OCI Console.
-
Keep the Automatically create an endpoint for this agent checkbox selected to get an agent endpoint.
-
After the agent is created, copy the id (OCID) of the agent endpoint paste it in a notepad for the next step.
For each agent that you're developing, you only need to perform this step once.
Note: You don't add any tools through the OCI Console in this step.
Instead, in the next step, you use the ADK to set up the tools locally. Then you use the ADK to automatically synchronize your local tools with the remote agent instance. The goal is that by using the ADK, you can have a single source of truth for the tools that includes the function schema and the actual callable that handles the function call.
In this step, you're provisioning an agent instance and an agent endpoint in the cloud. Think of this agent endpoint like an LLM API endpoint that the ADK connects to but is enhanced with agentic behaviors, your pre-registered tools, and is dedicated to your application. In step 2, connect the ADK agent object to this agent endpoint.
Step 2: Configuring and running the agent
Python
Create a project with a virtual environment:
# Create a project folder with name of your choice
mkdir <your-project-name>
cd <your-project-name>

# Create and activate a virtual environment under `<myenv>` subfolder
python -m venv <myenv>
source <myenv>/bin/activate
Python ADK requires Python 3.10 or later. Ensure you have the correct version of Python installed in your environment.
Installing the ADK
After you create a project and a virtual environment, install the latest version of ADK:
pip install "oci[adk]"
Tip: Got "connection to pypi.org timed out" error?
If you get the above error when running the pip install command, it's likely due to a network issue.
Try disconnecting from your VPN and run the command again.
Java
To include ADK in your Java project, add the following Maven dependency to your pom.xml:
    <dependency>
        <groupId>com.oracle.oci.sdk</groupId>
        <artifactId>oci-java-sdk-addons-adk</artifactId>
        <version>{latest-version}</version>
    </dependency>
Install it to your local Maven repo
mvn clean install
Authenticating your ADK app to OCI
The ADK provides an AgentClient class to simplify handling authentication and management of agent resources. Four authentication types are supported:
Python
API Key Authentication (Default)
API key authentication is the default and most common method for authenticating with OCI services.
from oci.addons.adk import AgentClient

client = AgentClient(
    auth_type="api_key",
    profile="DEFAULT",
    region="<your-region>"  # OCI region such as "us-chicago-1" or airport code such as "ORD"
)
To set up API key authentication, follow the OCI API key setup guide.
Security Token Authentication
Security token authentication creates a temporary session token which can be used to authenticate ADK to use OCI services. This method is commonly used in local testing.
from oci.addons.adk import AgentClient

client = AgentClient(
    auth_type="security_token",
    profile="DEFAULT",
    region="<your-region>" # OCI region such as "us-chicago-1" or airport code such as "ORD"
)
To authenticate a CLI session, run the following command in your terminal. Replace the profile name and region with the your values.
oci session authenticate --auth security_token --profile-name DEFAULT --region <your-region>
If the authentication is successful, your ADK app that's running from the same terminal is also authenticated.
Instance Principal Authentication
Instance principal authentication is recommended for OCI compute instances.
from oci.addons.adk import AgentClient

client = AgentClient(
    auth_type="instance_principal",
    region="<your-region>" # OCI region such as "us-chicago-1" or airport code such as "ORD"
)
Resource Principal Authentication
Resource principal authentication is recommended for OCI resources like Functions.
from oci.addons.adk import AgentClient

client = AgentClient(
    auth_type="resource_principal",
    region="<your-region>" # OCI region such as "us-chicago-1" or airport code such as "ORD"
)
Java
API Key Authentication (Default)
API key authentication is the default and most common method for authenticating with OCI services.
import com.oracle.bmc.ConfigFileReader;
import com.oracle.bmc.auth.BasicAuthenticationDetailsProvider;
import com.oracle.bmc.auth.ConfigFileAuthenticationDetailsProvider;
import com.oracle.bmc.adk.client.AgentClient;

BasicAuthenticationDetailsProvider authProvider =
        new ConfigFileAuthenticationDetailsProvider(
                ConfigFileReader.parse("~/.oci/config", "DEFAULT"));

AgentClient agentClient = AgentClient.builder()
    .authProvider(authProvider)
    .region("us-chicago-1")
    .build();
To set up API key authentication, follow the OCI API key setup guide.
Security Token Authentication
Security token authentication creates a temporary session token which can be used to authenticate ADK to use OCI services. This approach is commonly used in local testing.
import com.oracle.bmc.ConfigFileReader;
import com.oracle.bmc.auth.BasicAuthenticationDetailsProvider;
import com.oracle.bmc.auth.SessionTokenAuthenticationDetailsProvider;
import com.oracle.bmc.adk.client.AgentClient;

BasicAuthenticationDetailsProvider authProvider =
        new SessionTokenAuthenticationDetailsProvider(
                ConfigFileReader.parse("~/.oci/config", "DEFAULT"));

AgentClient agentClient = AgentClient.builder()
    .authProvider(authProvider)
    .region("us-chicago-1")
    .build();
To authenticate a CLI session, run this in your terminal. Replace the profile name and region with the your values.
oci session authenticate --auth security_token --profile-name DEFAULT --region us-chicago-1
After successful authentication, your ADK app running from same terminal should be authenticated.
Instance Principal Authentication
Instance principal authentication is recommended for OCI compute instances.
import com.oracle.bmc.auth.BasicAuthenticationDetailsProvider;
import com.oracle.bmc.auth.InstancePrincipalsAuthenticationDetailsProvider;
import com.oracle.bmc.adk.client.AgentClient;

BasicAuthenticationDetailsProvider authProvider =
        new InstancePrincipalsAuthenticationDetailsProvider();

AgentClient agentClient = AgentClient.builder()
    .authProvider(authProvider)
    .region("us-chicago-1")
    .build();
Resource Principal Authentication
Resource principal authentication is recommended for OCI resources like Functions.
import com.oracle.bmc.auth.BasicAuthenticationDetailsProvider;
import com.oracle.bmc.auth.ResourcePrincipalAuthenticationDetailsProvider;
import com.oracle.bmc.adk.client.AgentClient;

BasicAuthenticationDetailsProvider authProvider =
        new ResourcePrincipalAuthenticationDetailsProvider();

AgentClient agentClient = AgentClient.builder()
    .authProvider(authProvider)
    .region("us-chicago-1")
    .build();
Note: Ensure the user being authenticated has permissions to use OCI Generative AI Agents service.
Configuring and running an agent
After your agent endpoint is active, you can set up and run the following simple weather agent example using the ADK.
Python
Create a file named quickstart.py in the project root and copy the following code into the file:
quickstart.py
from typing import Dict
from oci.addons.adk import Agent, AgentClient, tool
# Use @tool to signal that this Python function is a function tool.
# Apply standard docstring to provide function and parameter descriptions.
@tool
def get_weather(location: str) -> Dict[str, str]:
"""
Get the weather for a given location.
Args:
location(str): The location for which weather is queried
"""
return {"location": location, "temperature": 72, "unit": "F"}
def main():
# Create an agent client with your authentication and region details
# Replace the auth_type with your desired authentication method.
client = AgentClient(
auth_type="api_key",
profile="DEFAULT",
region="us-chicago-1",
)
# Create a local agent object with the client, instructions, and tools.
# You also need the agent endpoint id. To obtain the OCID, follow Step 1.
agent = Agent(
client=client,
agent_endpoint_id="<your-agent-endpoint-OCID>",
instructions="You perform weather queries using tools.",
tools=[get_weather]
)
# Sync local instructions and tools to the remote agent resource
# You only need to invoke setup() when you change instructions and tools
agent.setup()
# Run the agent. You can embed this method in your webapp, slack bot, etc.
# You invoke the run() when you need to handle your user's request.
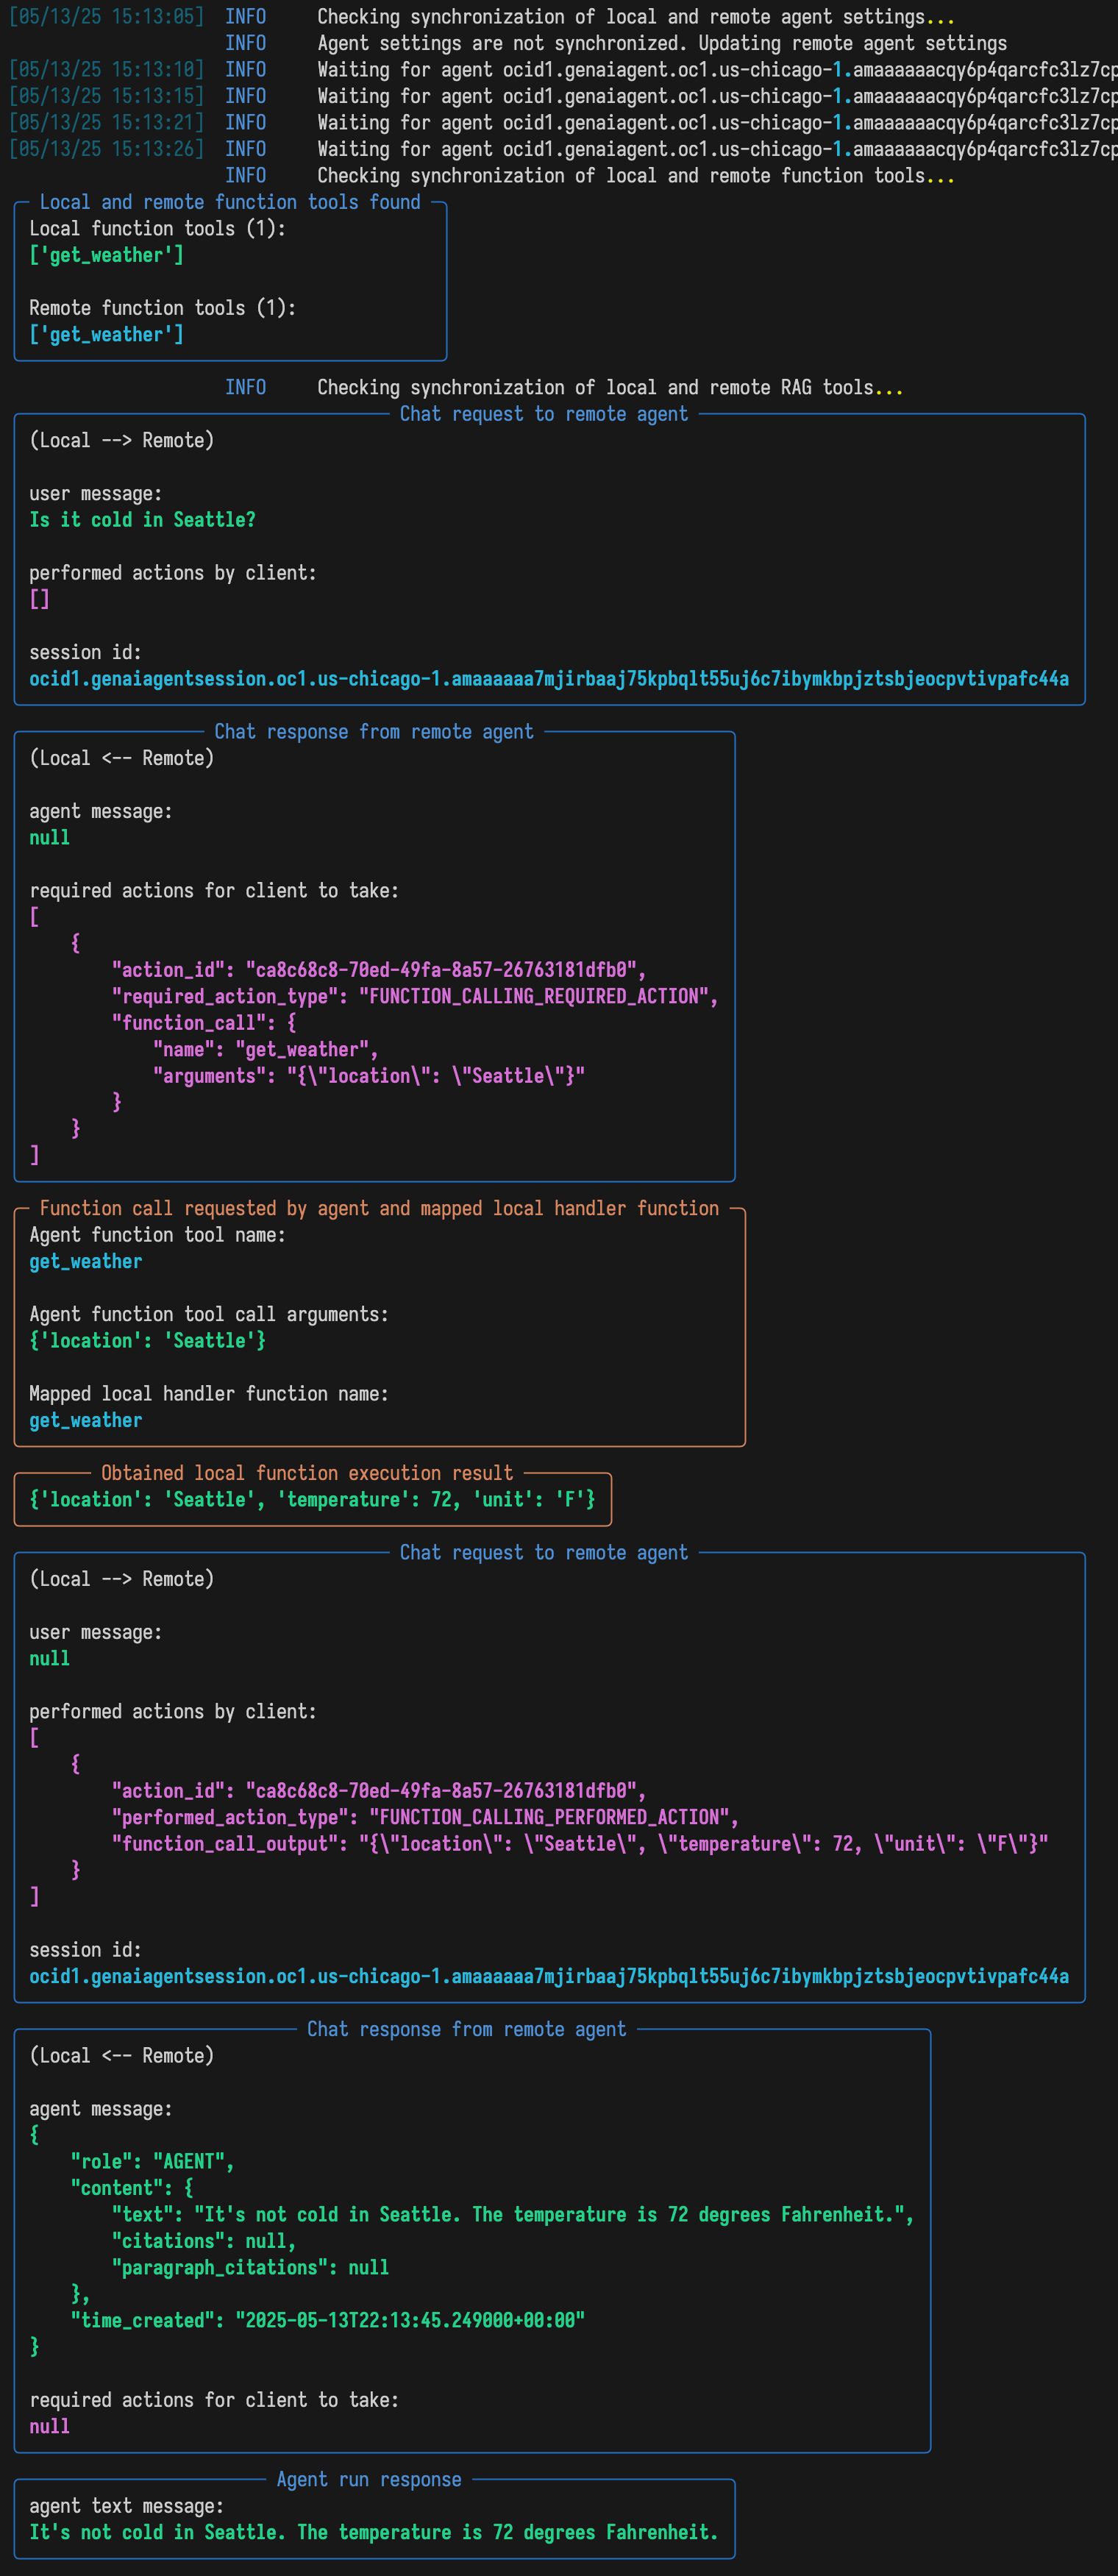
input = "Is it cold in Seattle?"
response = agent.run(input)
# Print the response
response.pretty_print()
if __name__ == "__main__":
main()
Run the script
Then run the quickstart.py script, and you should see the output like this:
Java
Create a file named QuickStart.java in the project root and copy the following code into it.
QuickStart.java
package demos;
import com.oracle.bmc.ConfigFileReader;
import com.oracle.bmc.adk.agent.Agent;
import com.oracle.bmc.adk.client.AgentClient;
import com.oracle.bmc.adk.tools.FunctionTool;
import com.oracle.bmc.adk.tools.Param;
import com.oracle.bmc.adk.tools.Tool;
import com.oracle.bmc.adk.run.RunResponse;
import com.oracle.bmc.auth.BasicAuthenticationDetailsProvider;
import com.oracle.bmc.auth.SessionTokenAuthenticationDetailsProvider;
import java.util.Arrays;
import java.util.HashMap;
import java.util.Map;
public class QuickStart {
@Tool(name = "getWeather", description = "Get weather of a given location")
public static Map<String, String> getWeather(
@Param(description = "The location") String location) {
Map<String, String> weather = new HashMap<>();
weather.put("location", location);
weather.put("temperature", "72");
weather.put("unit", "F");
return weather;
}
public static void main(String[] args) throws Exception {
final String configLocation = "~/.oci/config";
final String configProfile = "DEFAULT";
BasicAuthenticationDetailsProvider authProvider =
new SessionTokenAuthenticationDetailsProvider(
ConfigFileReader.parse(configLocation, configProfile));
AgentClient agentClient = AgentClient.builder()
.authProvider(authProvider)
.region("us-chicago-1")
.build();
FunctionTool getWeatherTool =
FunctionTool.fromMethod(QuickStart.class, "getWeather", String.class);
Agent agent = Agent.builder()
.client(agentClient)
.agentEndpointId("YOUR_AGENT_ENDPOINT_ID")
.instructions("Perform weather queries using the given tools.")
.tools(Arrays.asList(getWeatherTool))
.build();
agent.setup();
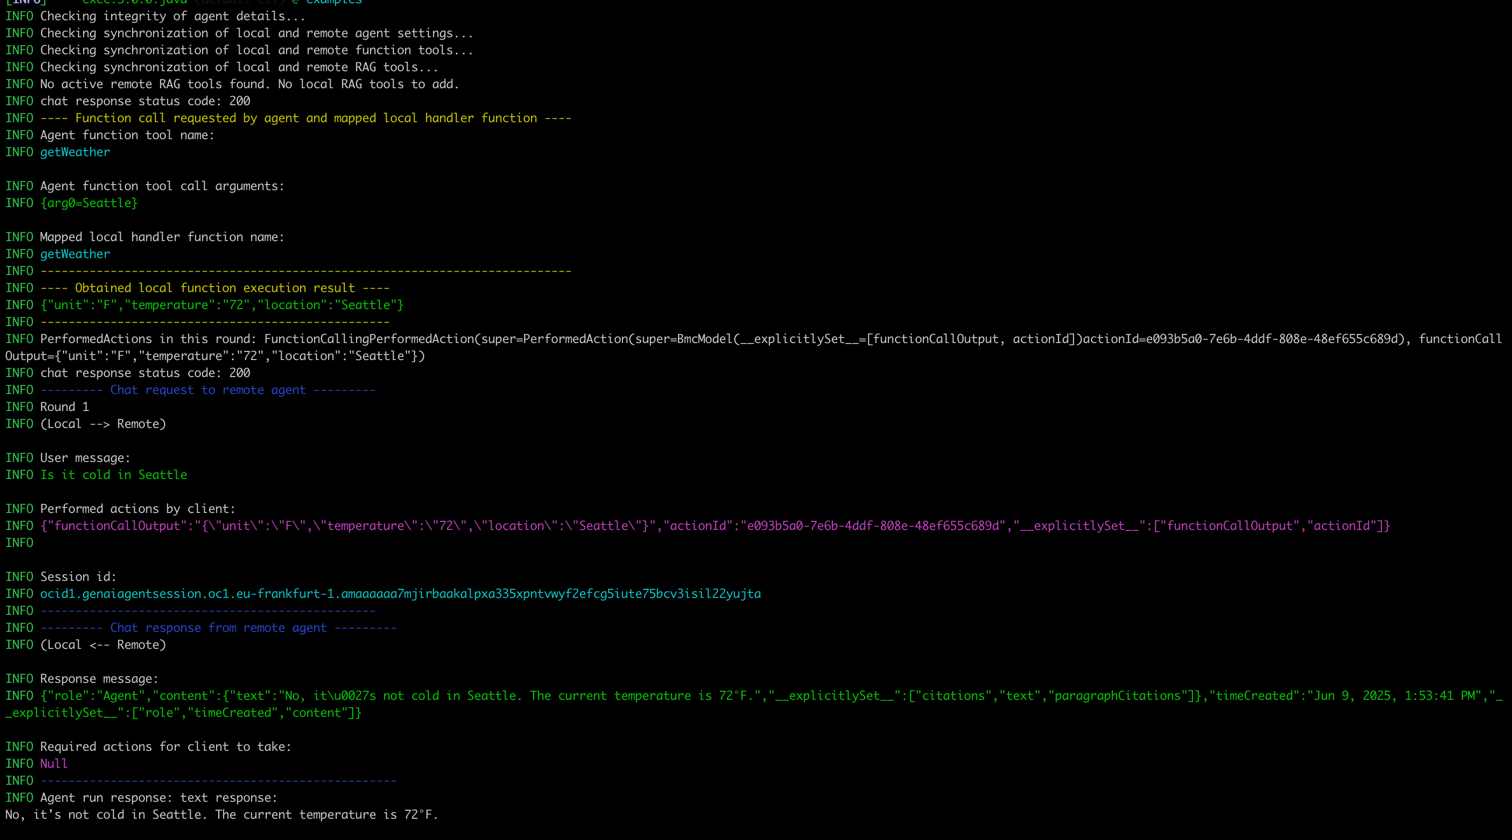
String input = "Is it cold in Seattle";
RunResponse response = agent.run(input);
response.prettyPrint();
}
}
IntelliJ IDEA
If you're using IntelliJ, select the run configuration named QuickStart, then click Run ▶️ or press Shift + F10 to start the program.
Terminal
If you're using the terminal:
mvn compile exec:java \
  -Dexec.mainClass="demos.QuickStart" \
  -Dexec.workingdir=java/examples
Make sure you're running this from the root of the project (where your pom.xml is located).
You should see the output like this:
Summary
Now you have a simple weather agent using ADK running locally, with outbound connection to your agent endpoint on OCI.
Note: Why do you need an agent endpoint? Can you use ADK locally without a remote agent endpoint?
ADK requires an agent endpoint to function much like a client-side agent framework needs an LLM endpoint. Think of the agent endpoint as an enhanced LLM endpoint, offering advanced agentic features such as optimized reasoning prompts and server-side tools from OCI. ADK doesn't support direct connections to raw LLM endpoints.
This agent is equipped with a local custom function tool get_weather that you implemented.
The agent is ready to handle your user's request expressed in natural language.
Behind the scenes, the ADK handles the low-level client-server orchestration, while the agent endpoint handles running the core agent loop, talking to an LLM, and potentially invoking other hosted tools such as a RAG tool (not implemented in this quickstart).
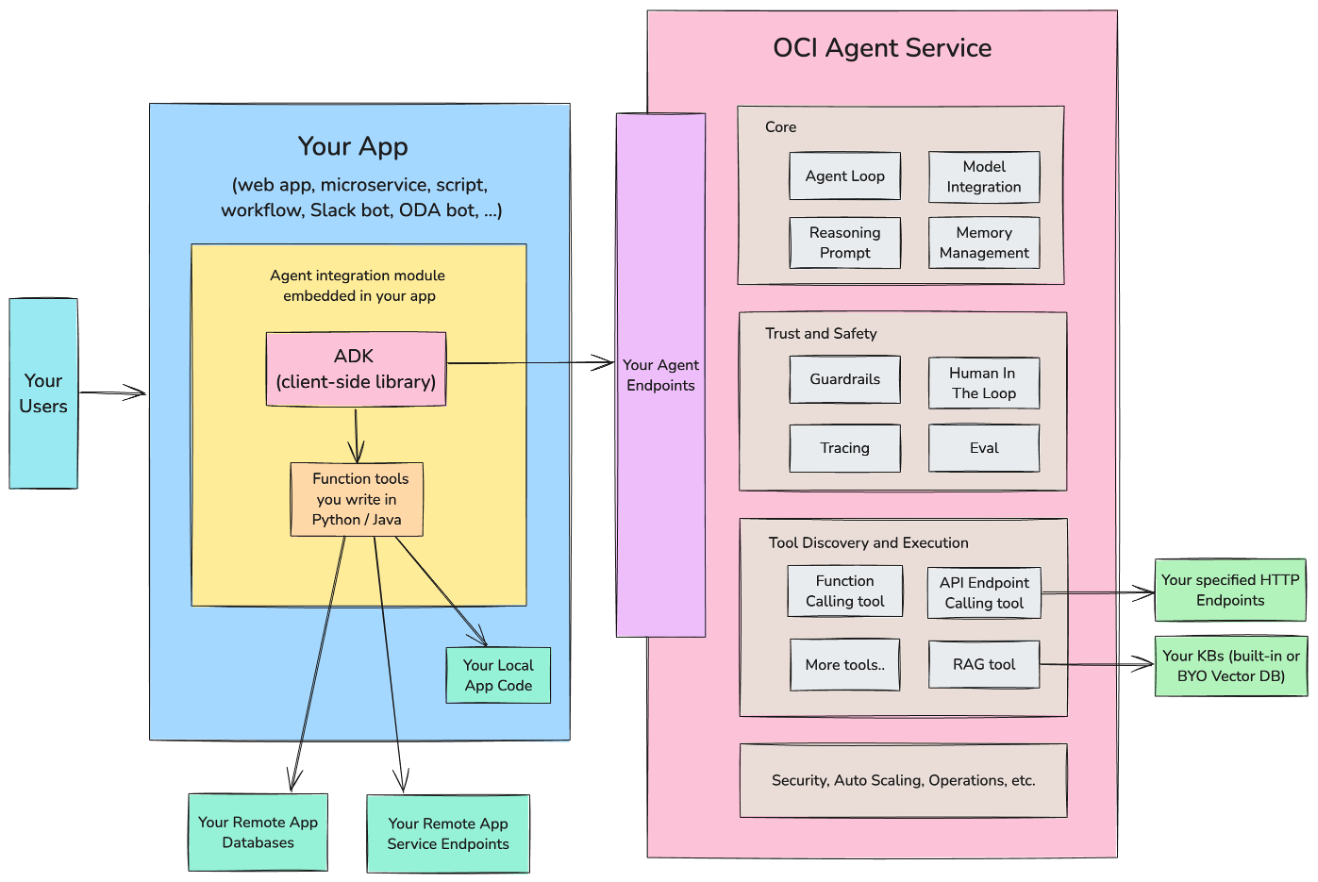
How it Works
Typically your ADK code is embedded in a larger app and is deployed in your environment. Your larger app might be a web app, a Slackbot, a service, or a a script.
Through ADK function tools, you can integrate an agent with your local codebase, your remote databases, remote microservices, and so on using the authentication that's native to your environment.
The ADK calls the agent endpoint, exposed by OCI Generative AI Agents service, which runs the agent loop remotely to your environment.
When the agent loop decides to call a hosted tool (like a RAG tool), that calls happens without going back to ADK.
When the agent loop decides to call the local function tools, the control is returned back to the ADK. The ADK calls your local function tools, and submits the function tool output back to Generative AI Agents, which then continues the next iteration of the agent loop.