Task 8: Set Up Identity Federation (Optional)
Learn how to set up identity federation for Oracle Database@Azure.
Setting up identity federation for Oracle Database@Azure is optional. Federation lets users sign in to the OCI tenancy associated with the service using Azure Entra ID credentials. While most day-to-day database operations are performed in the Azure environment and don't require the use of the OCI Console, some database management tasks do require signing in to OCI.
Use the following instructions to make Azure Entra ID the identify provider for your OCI tenancy.
-
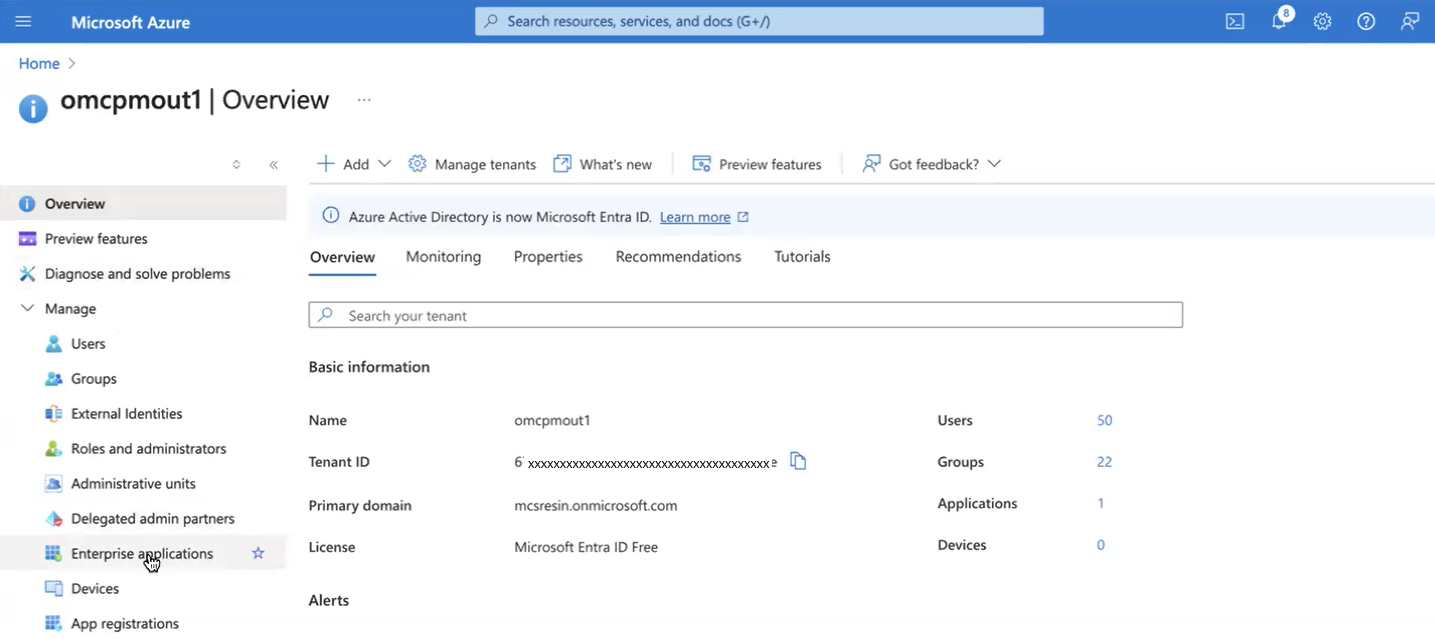
Search for "Microsoft Entra ID" and select Microsoft Entra ID in the search results to navigate to the Entra ID Overview page.
-
Under Manage, select Enterprise applications.
-
On the All applications page, select New application.
-
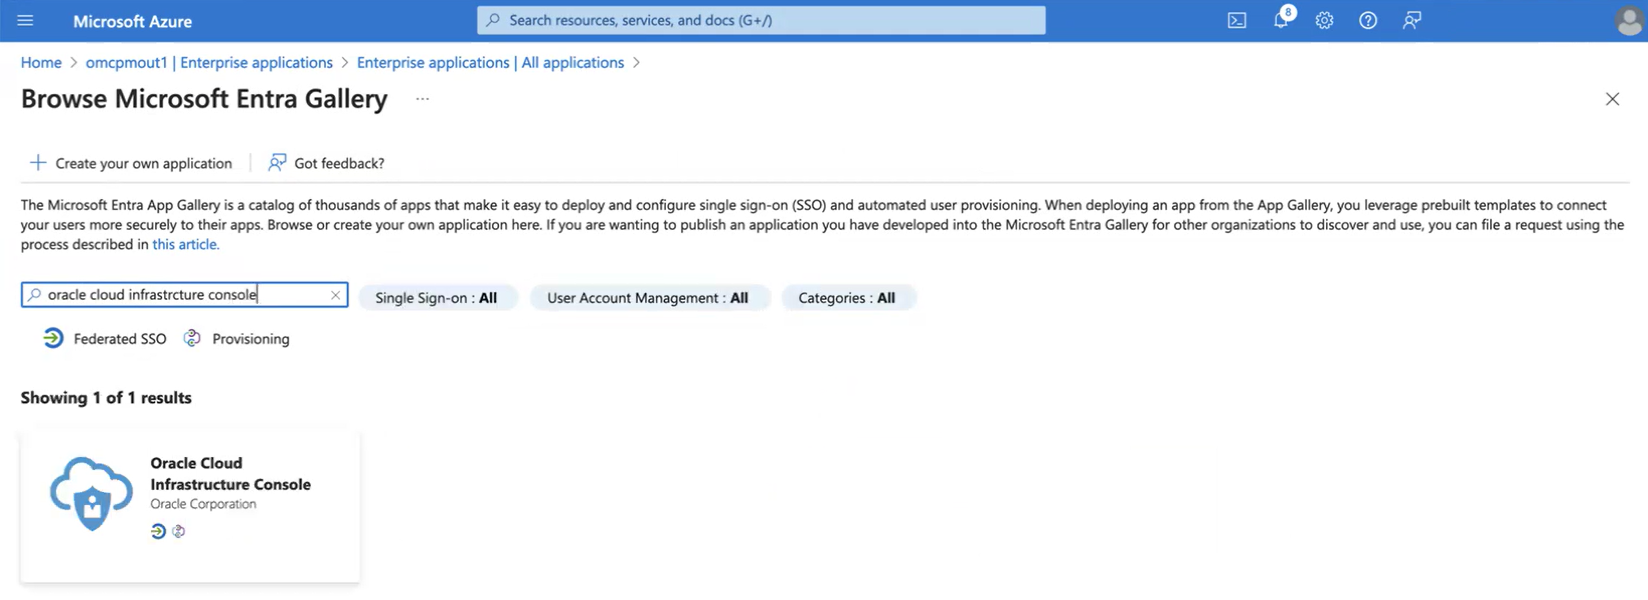
Search for "Oracle Cloud Infrastructure Console" and select the search result to navigate to the page for the application.
-
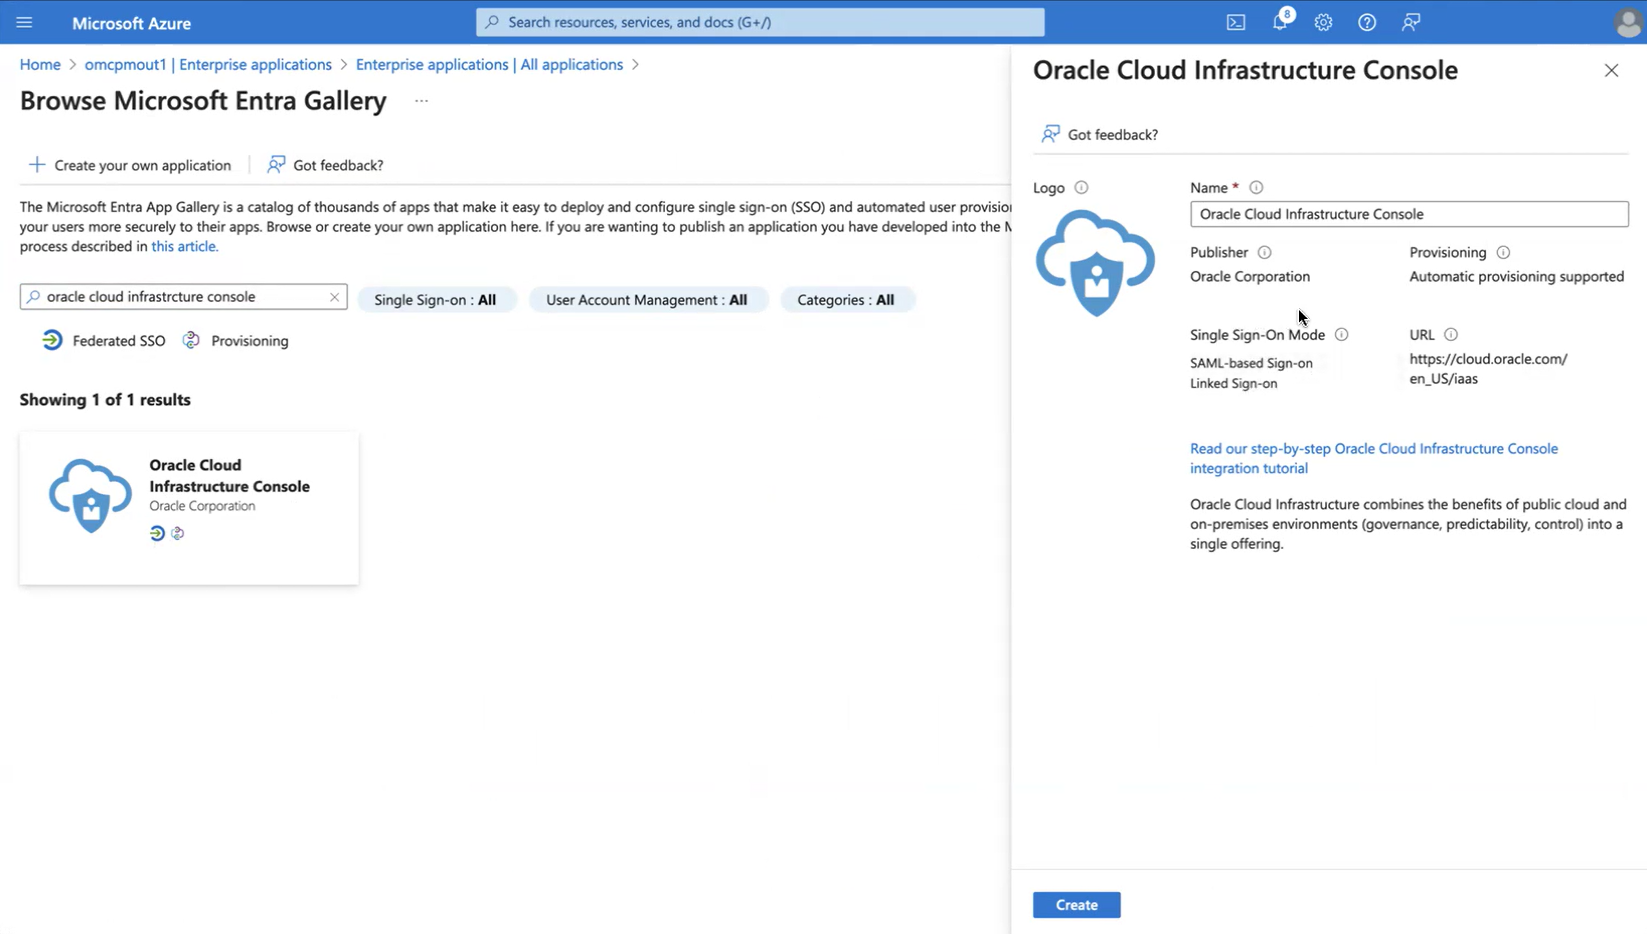
On the Oracle Cloud Infrastructure Console panel, enter a Name for the display name of the application in your Azure environment. For example: "Oracle Cloud Infrastructure Console", "OCI Console", or "OCI Console Contoso Sales". Then select Create to continue.
-
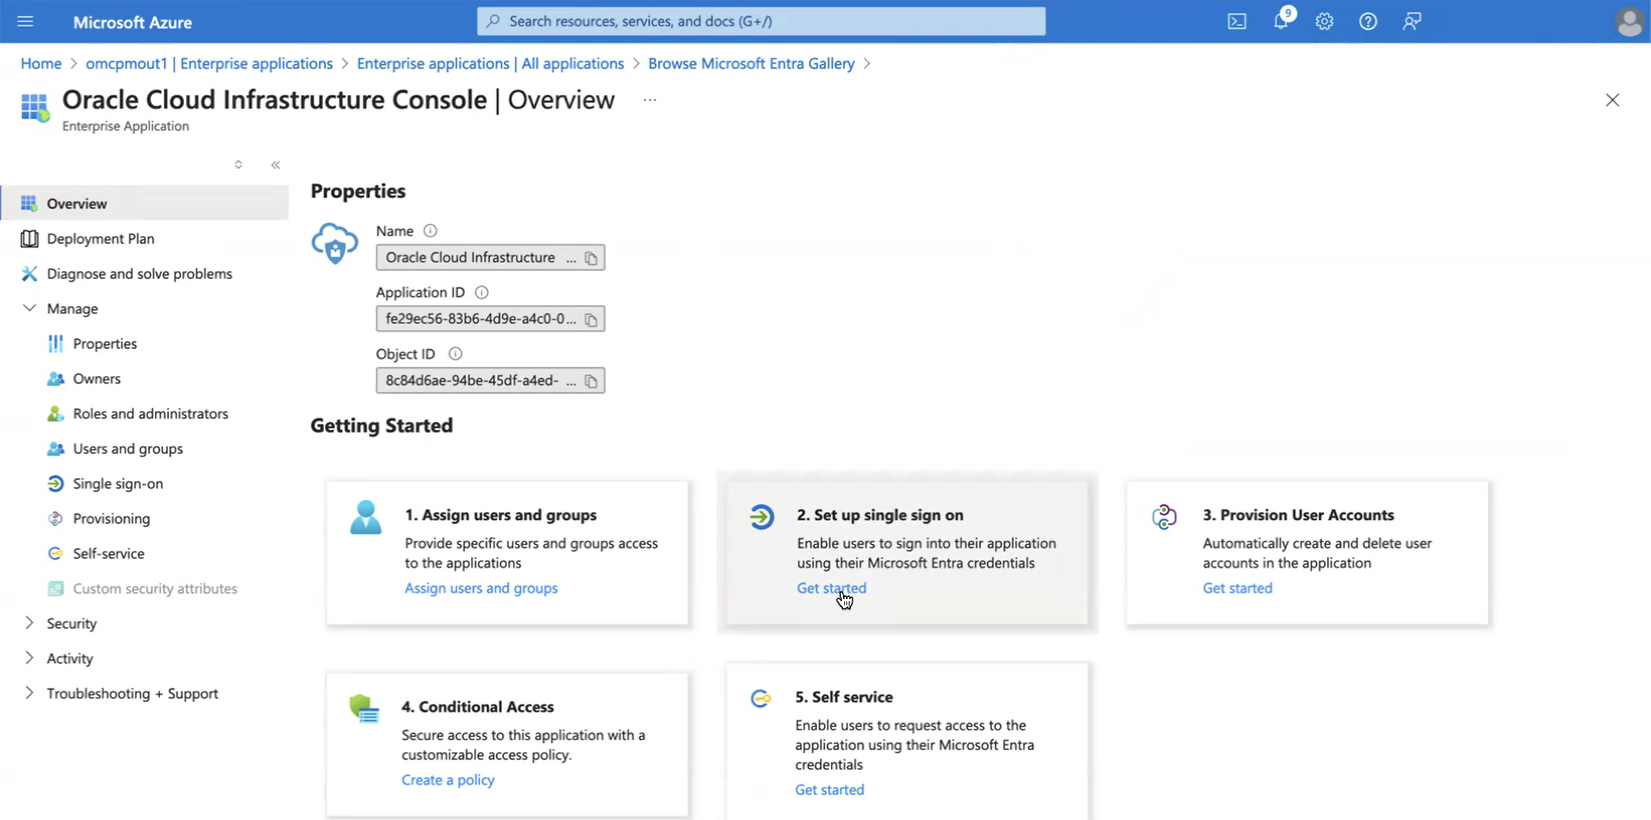
On Overview page for the new application, select Set up single sign-on.
-
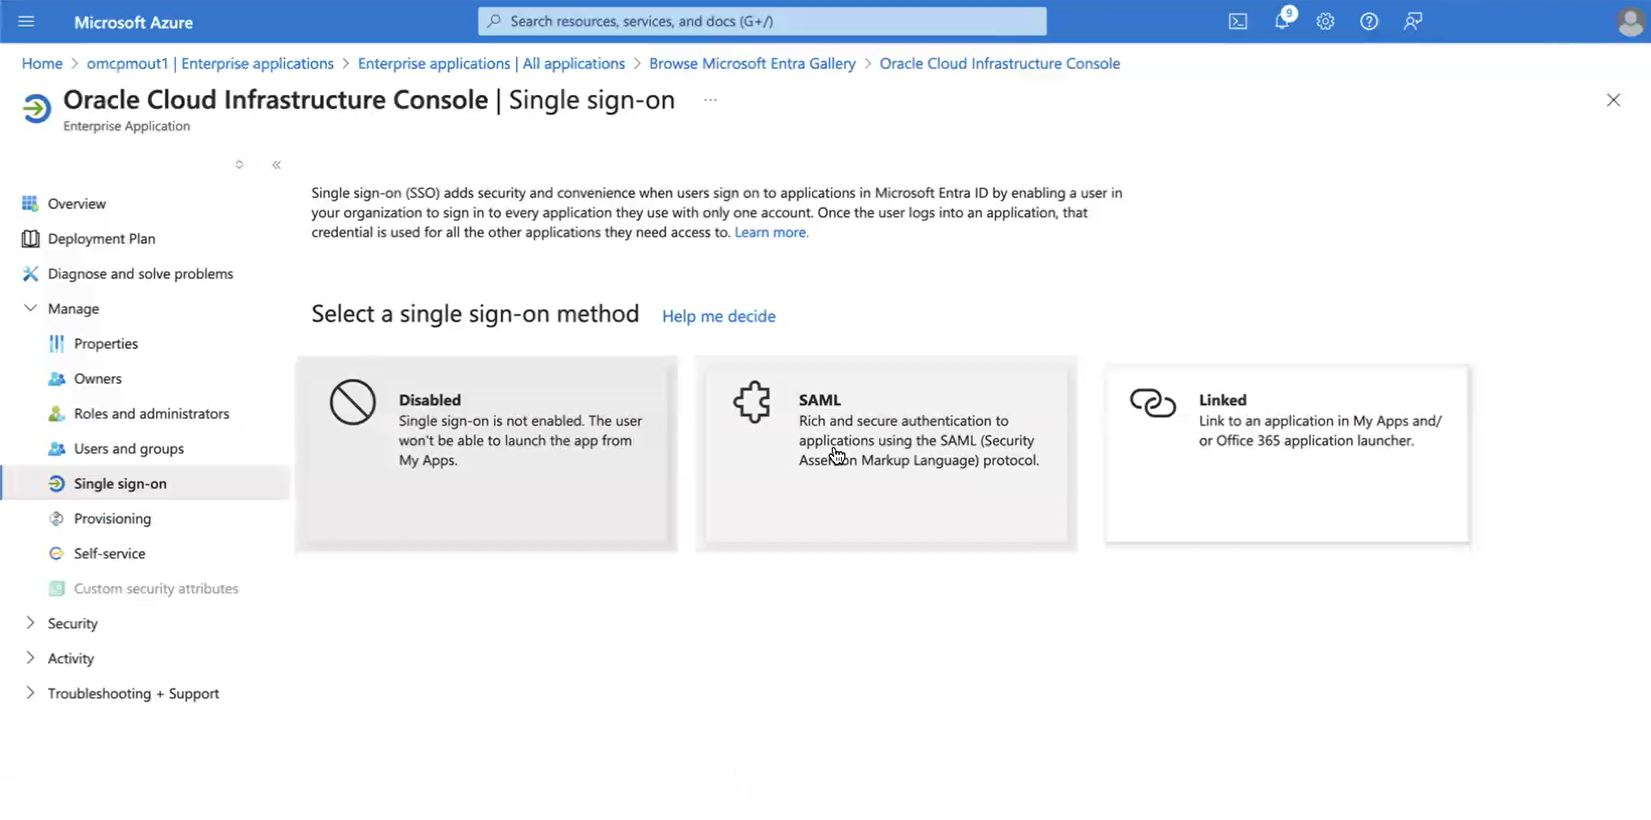
On the Single sign-on page, select SAML to select the Security Assertion Markup Language (SAML) protocol.
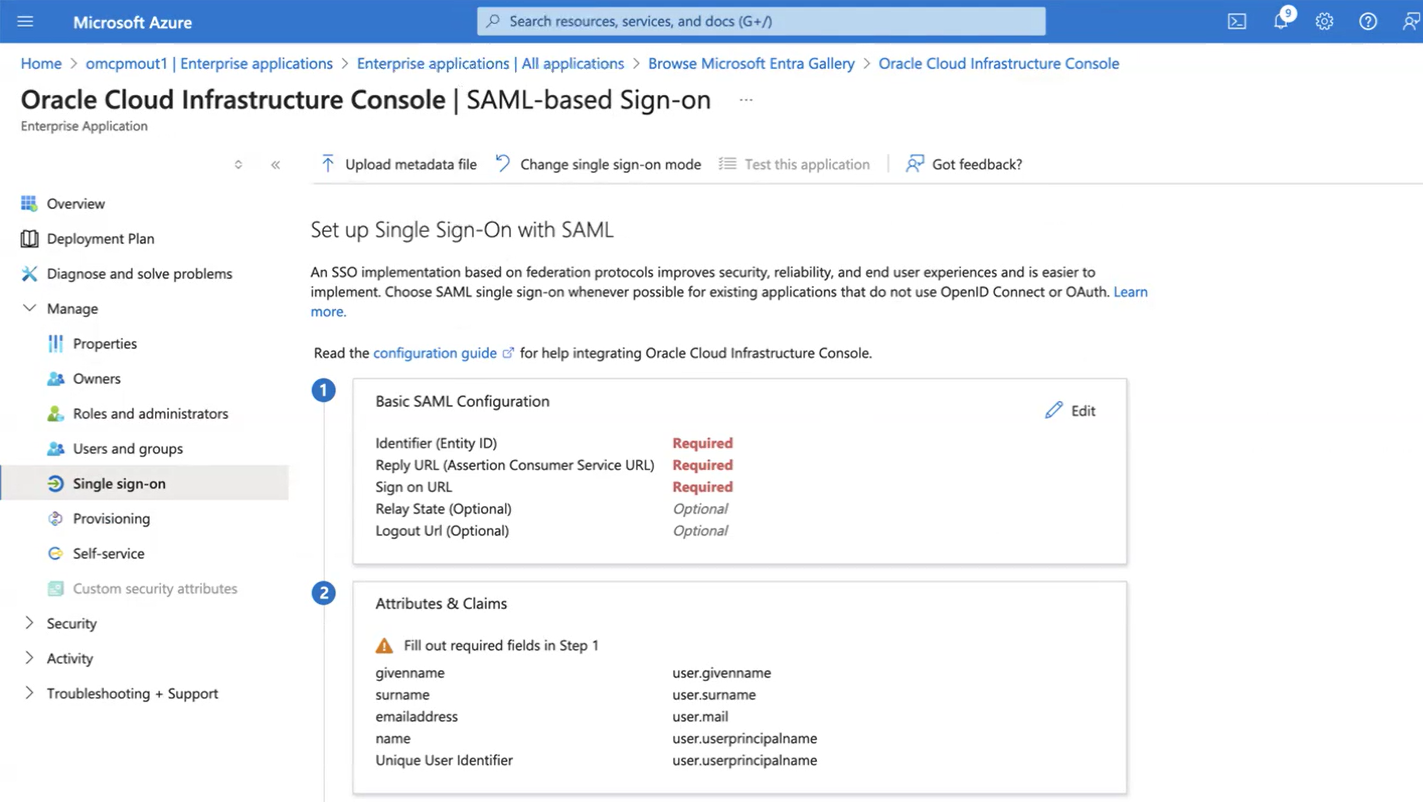
The portal redirects to the the SAML-based Sign-on page. Leave this browser window open on your computer while you do the next series of steps in the OCI Console. In the OCI Console, you will export a SAML metadata XML file. You will return to Azure to upload the XML file and continue with the Single Sign-on configuration.
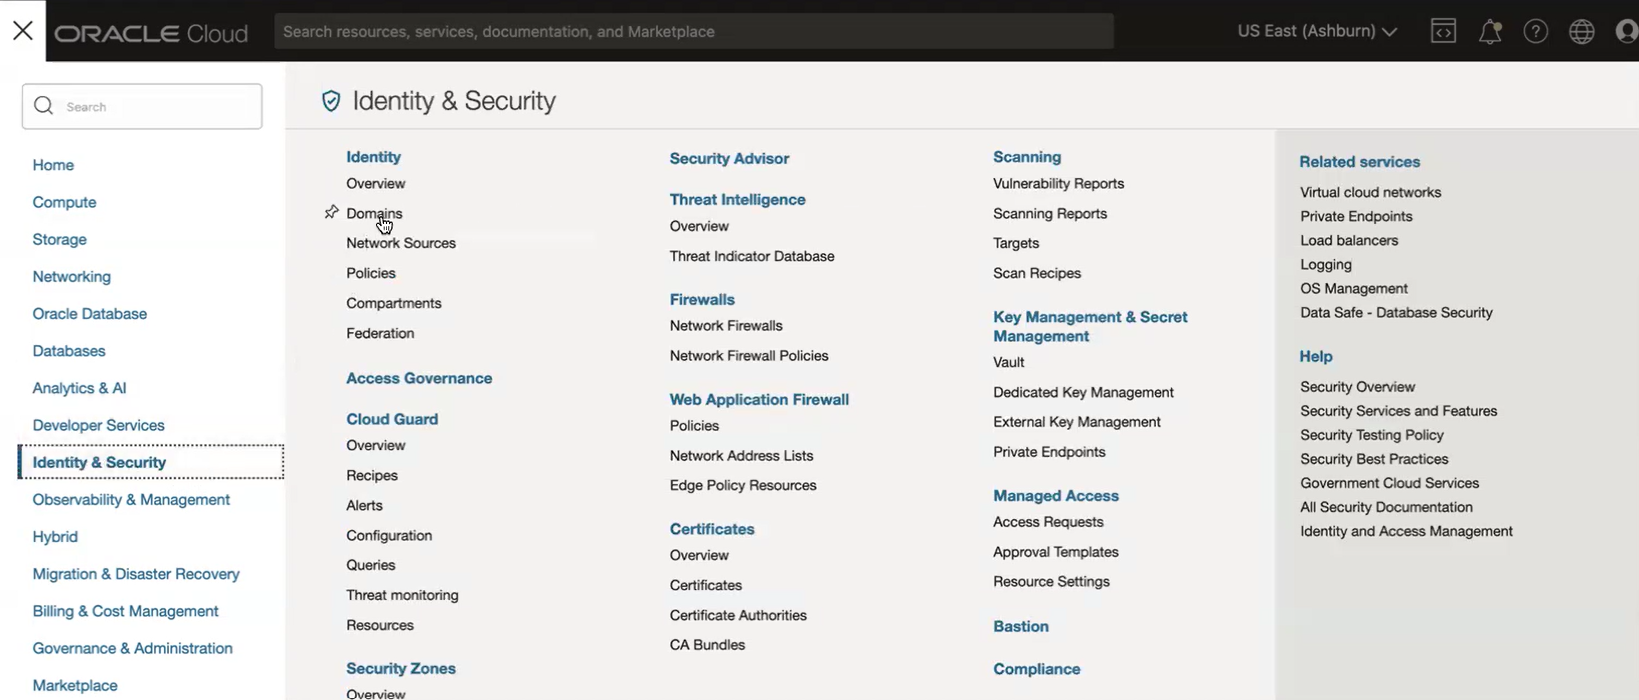
In the OCI Console, navigate to Identity & Security, then select Domains.
-
In the Domains list view, select the name of the "Default" domain to open the domain details page. Optionally, you can select another domain to configure single sign-on (SSO) for that domain.
-
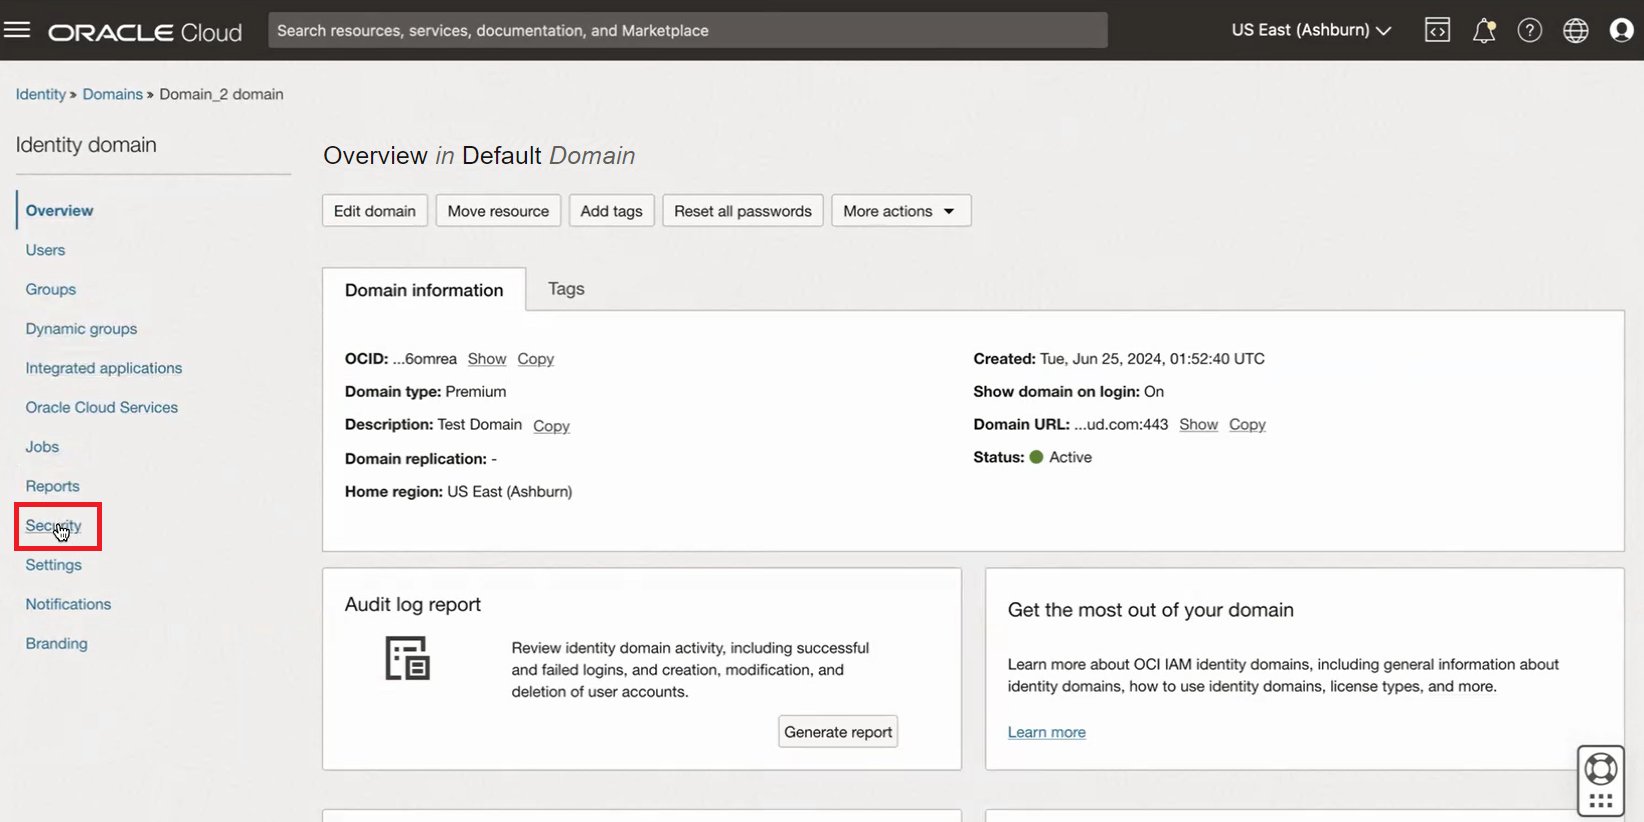
Select Security in the Identity domain Overview page's navigation menu.
-
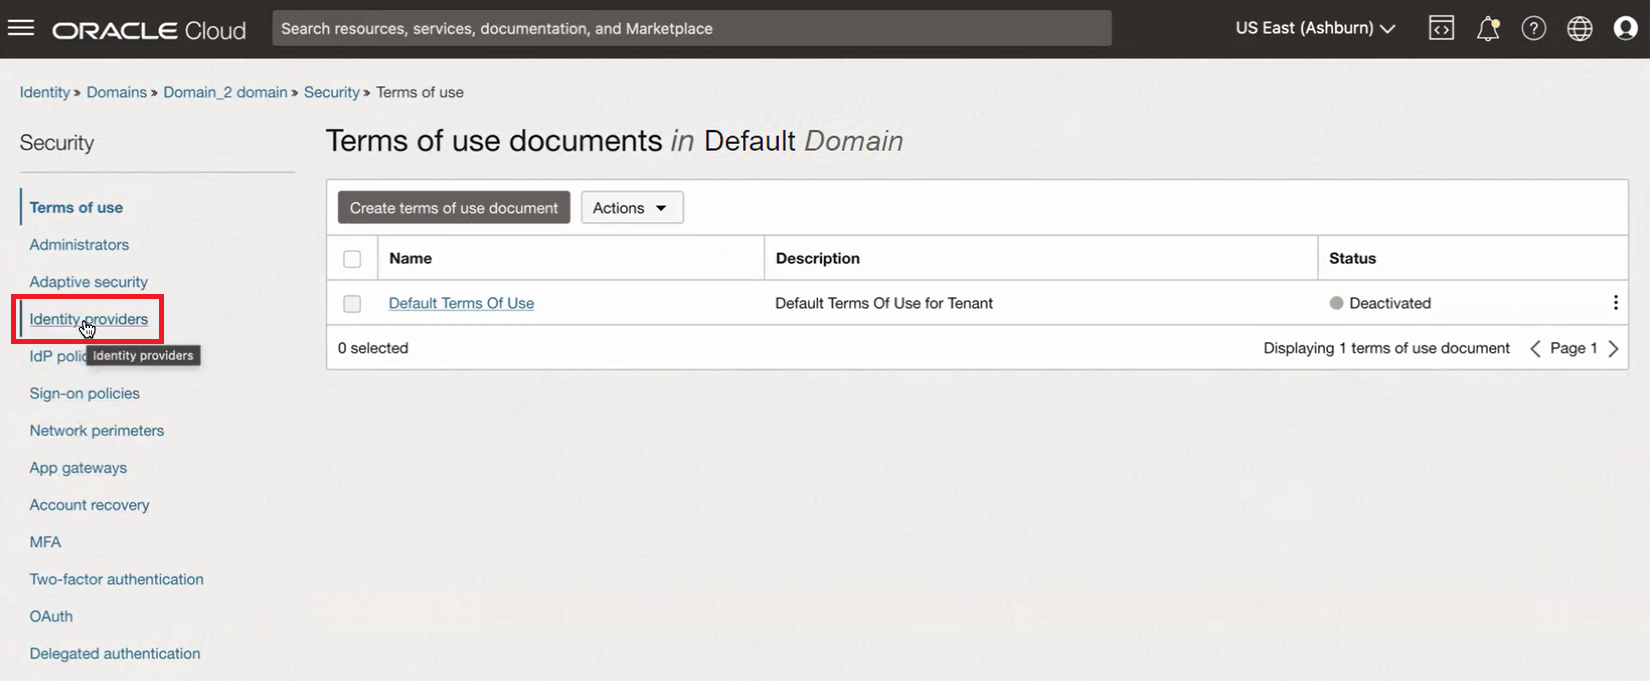
On the Security page for the domain, select Identity providers in the navigation menu.
-
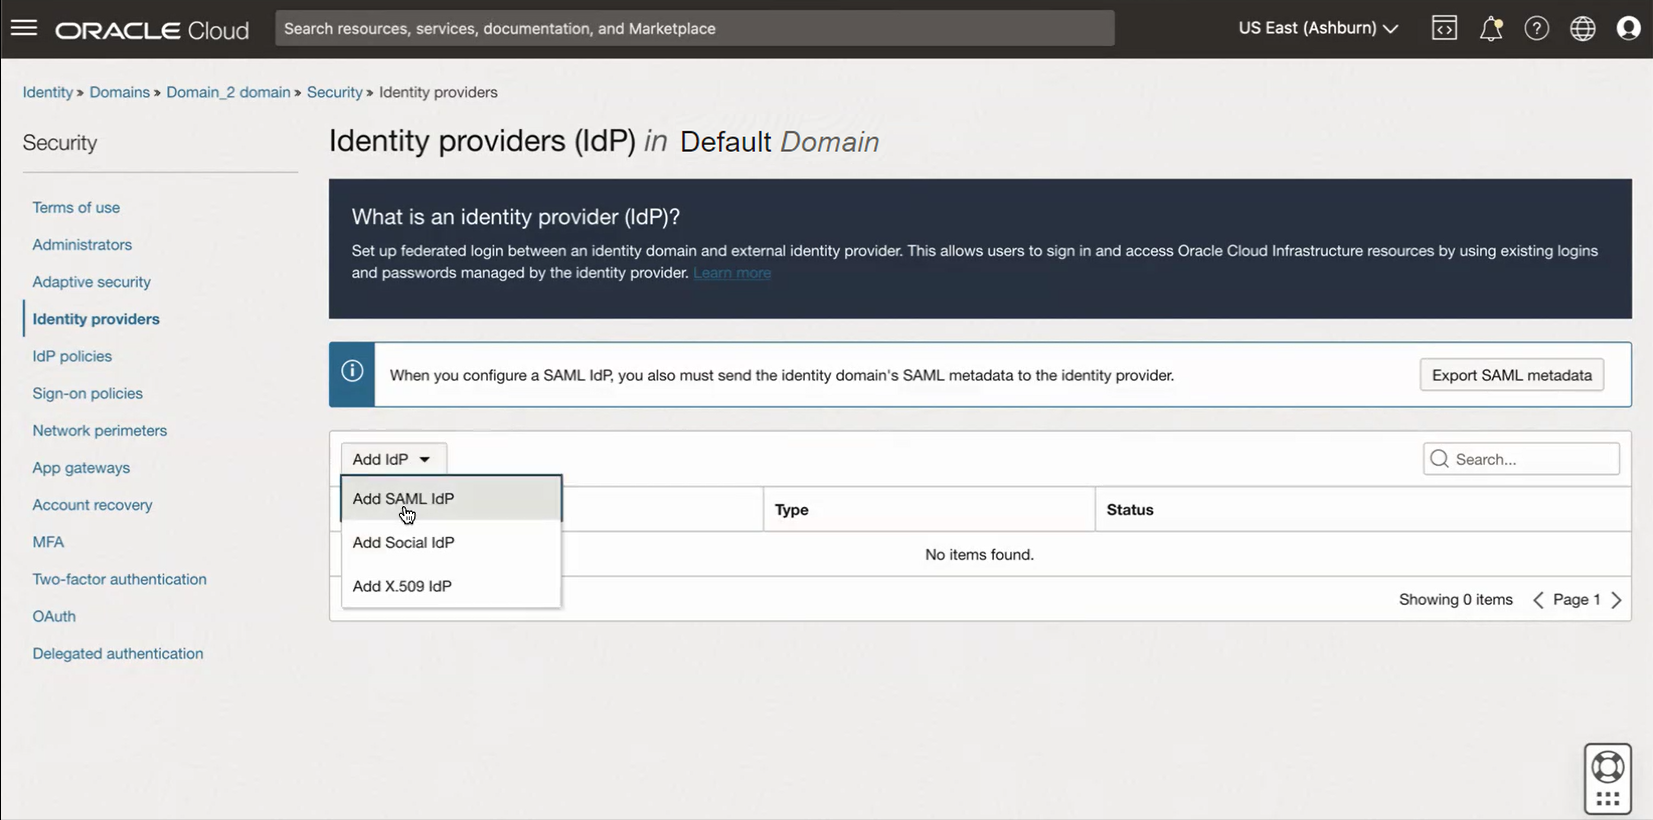
On the Identity providers page, select Add IdP, then select Add SAML IdP.
-
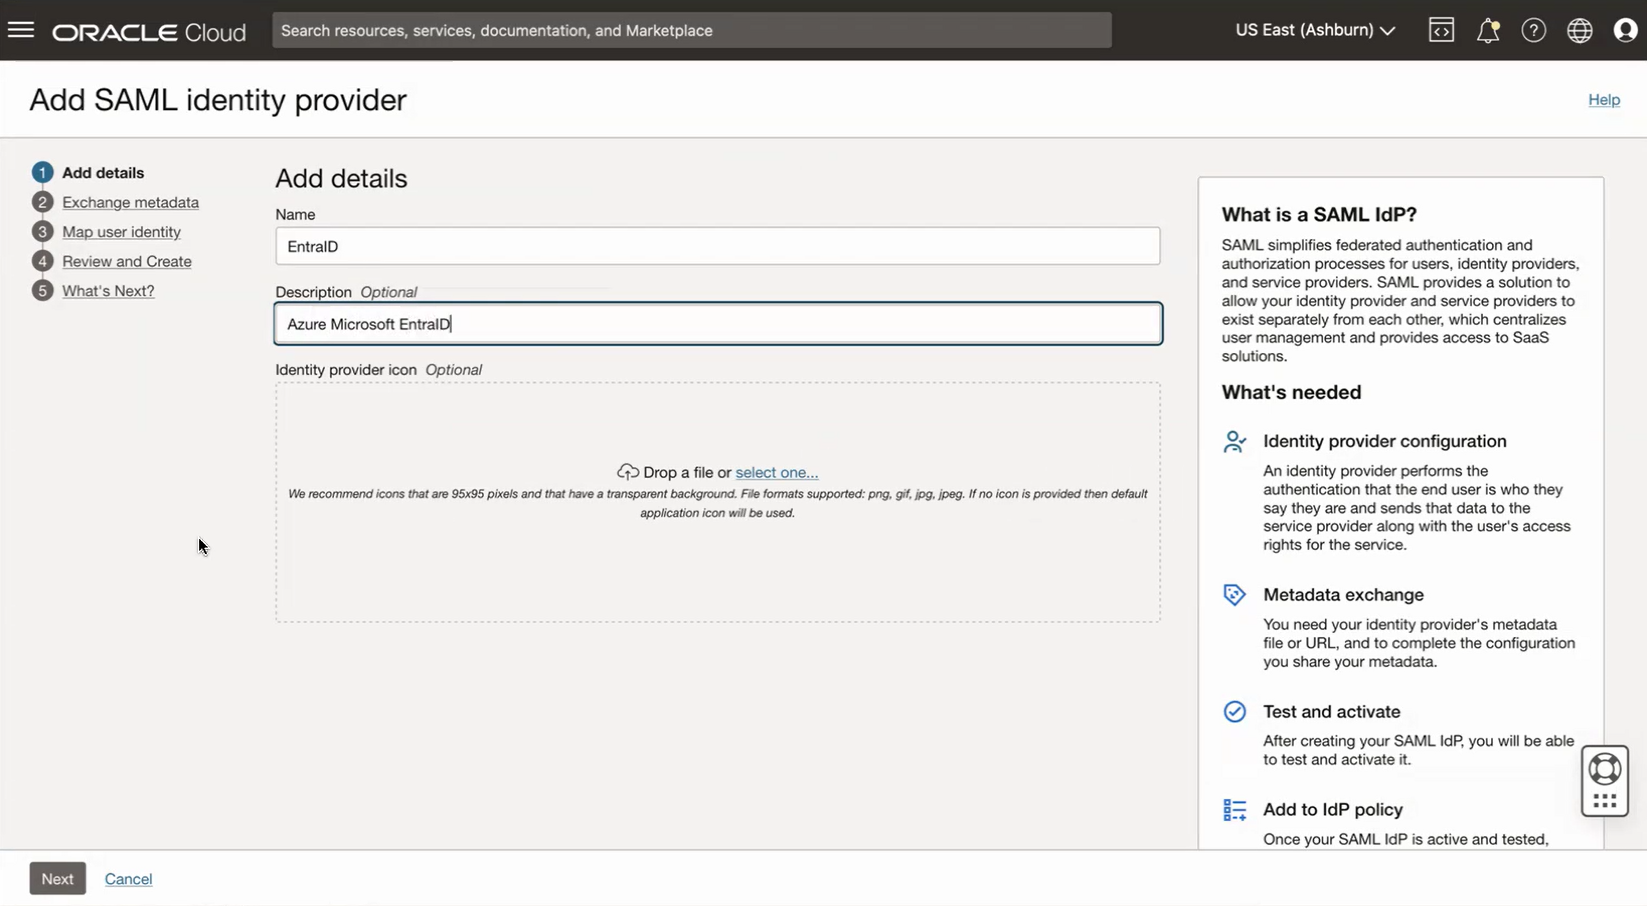
On the Add details page, enter the Name that you want to display on your OCI login page during single sign-on (SSO). Optionally, add a description. For example:
Name: EntraID
Description: Woodgrove Bank Azure Microsoft EntraID
Click Next to continue.
-
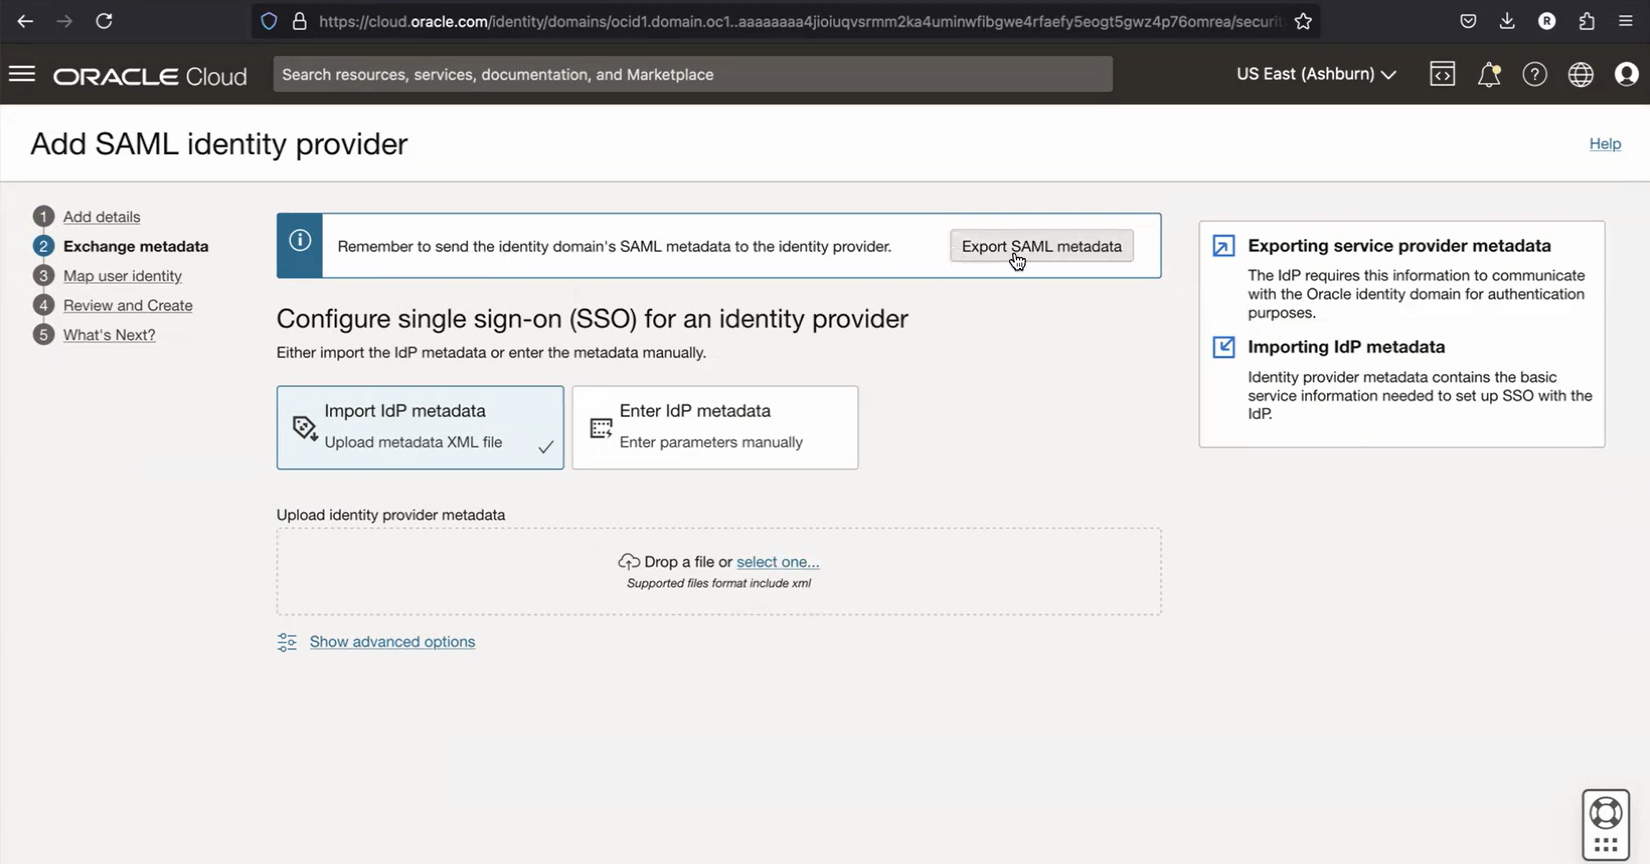
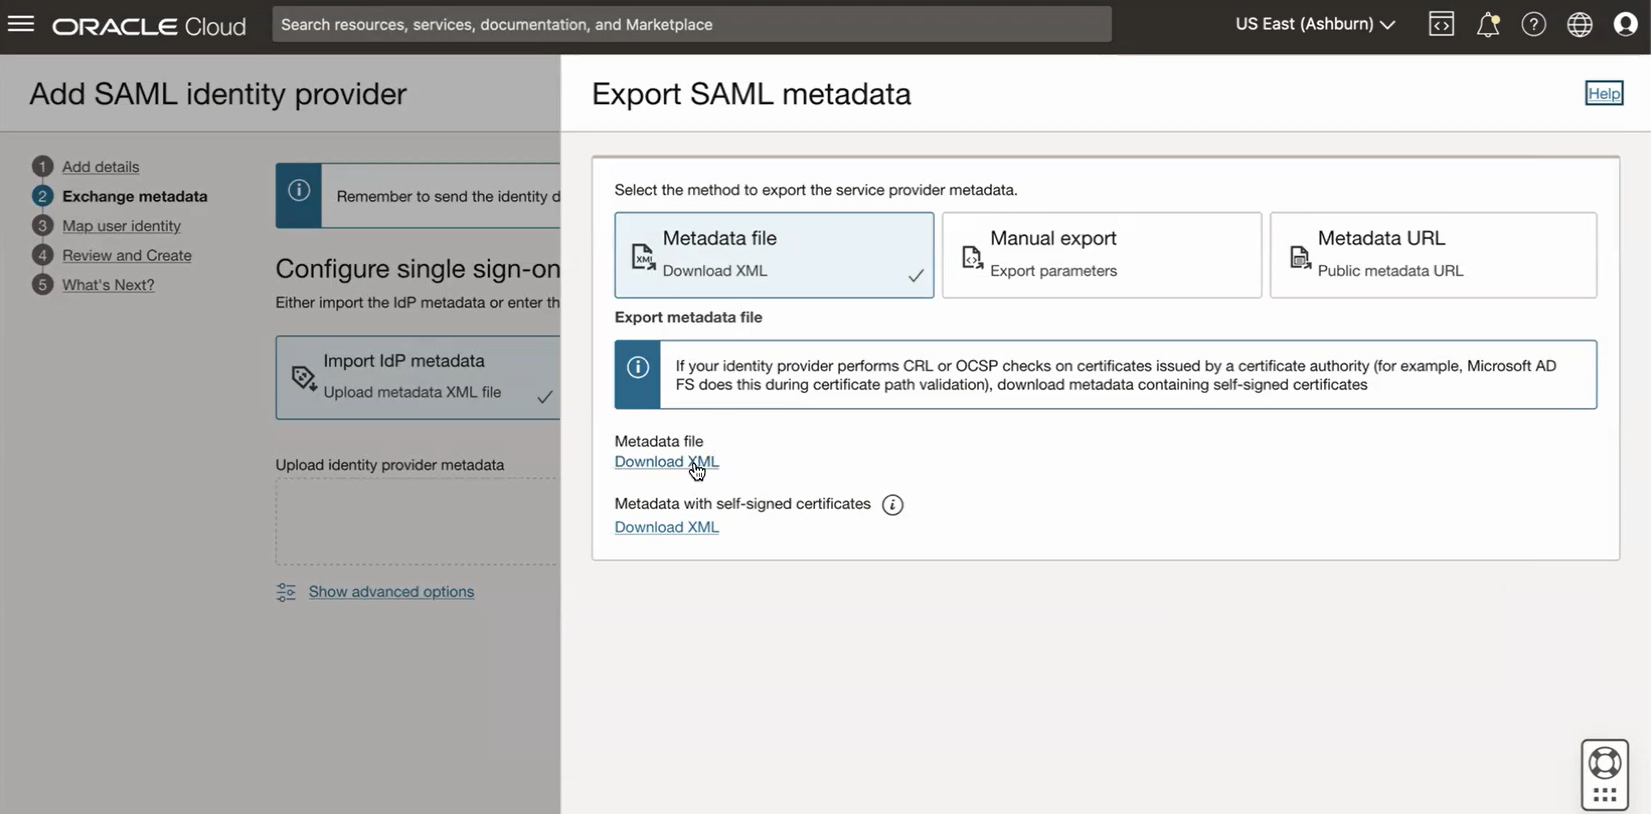
On the Exchange metadata page, click Export SAML metadata.
-
On the Export SAML metadata panel, Find the Metadata file section and select Download XML. Leave the browser window displaying the OCI Console open on your computer while you complete the next series of steps.
-
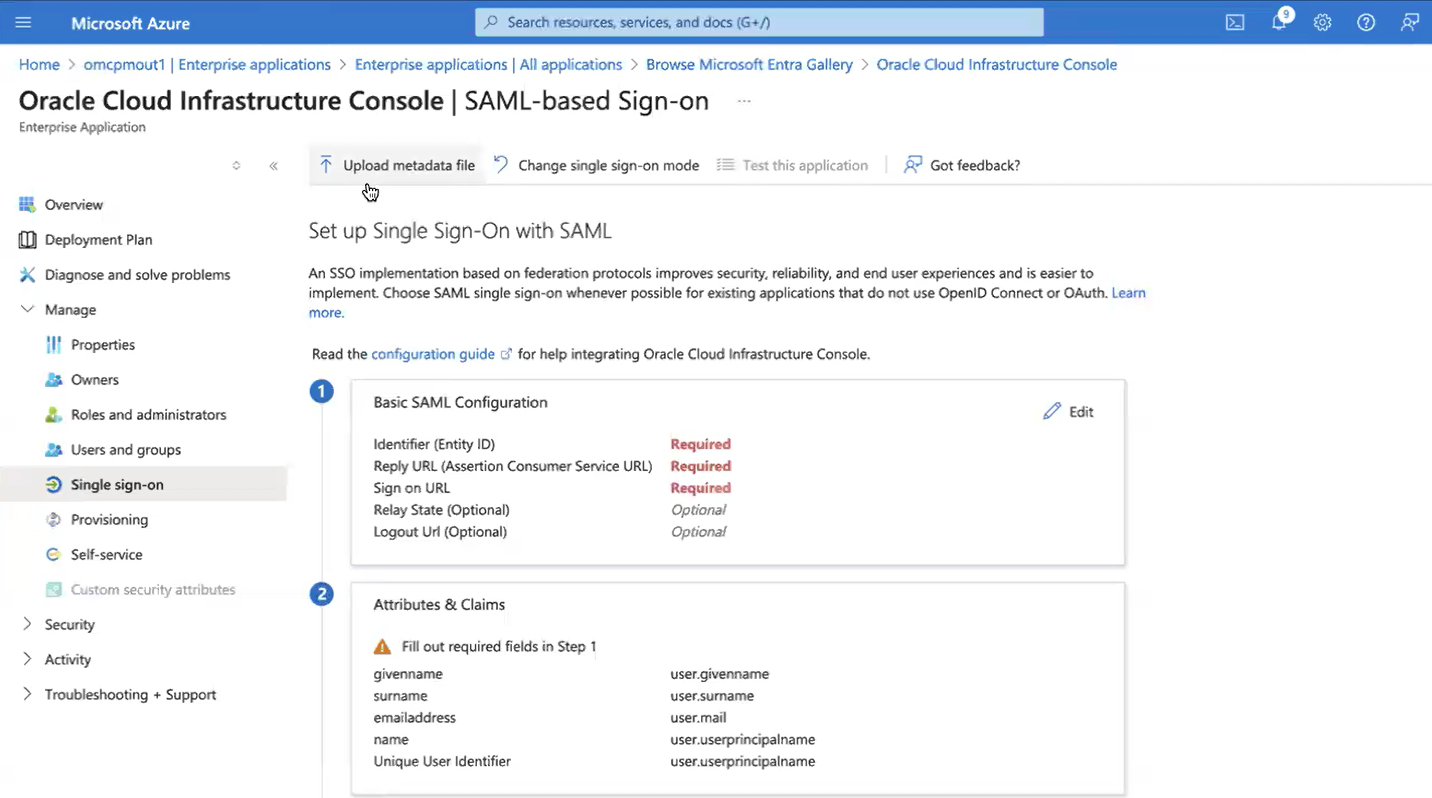
Return to the browser window displaying the Azure portal SAML-based Sign-on page and select Upload metadata file.
-
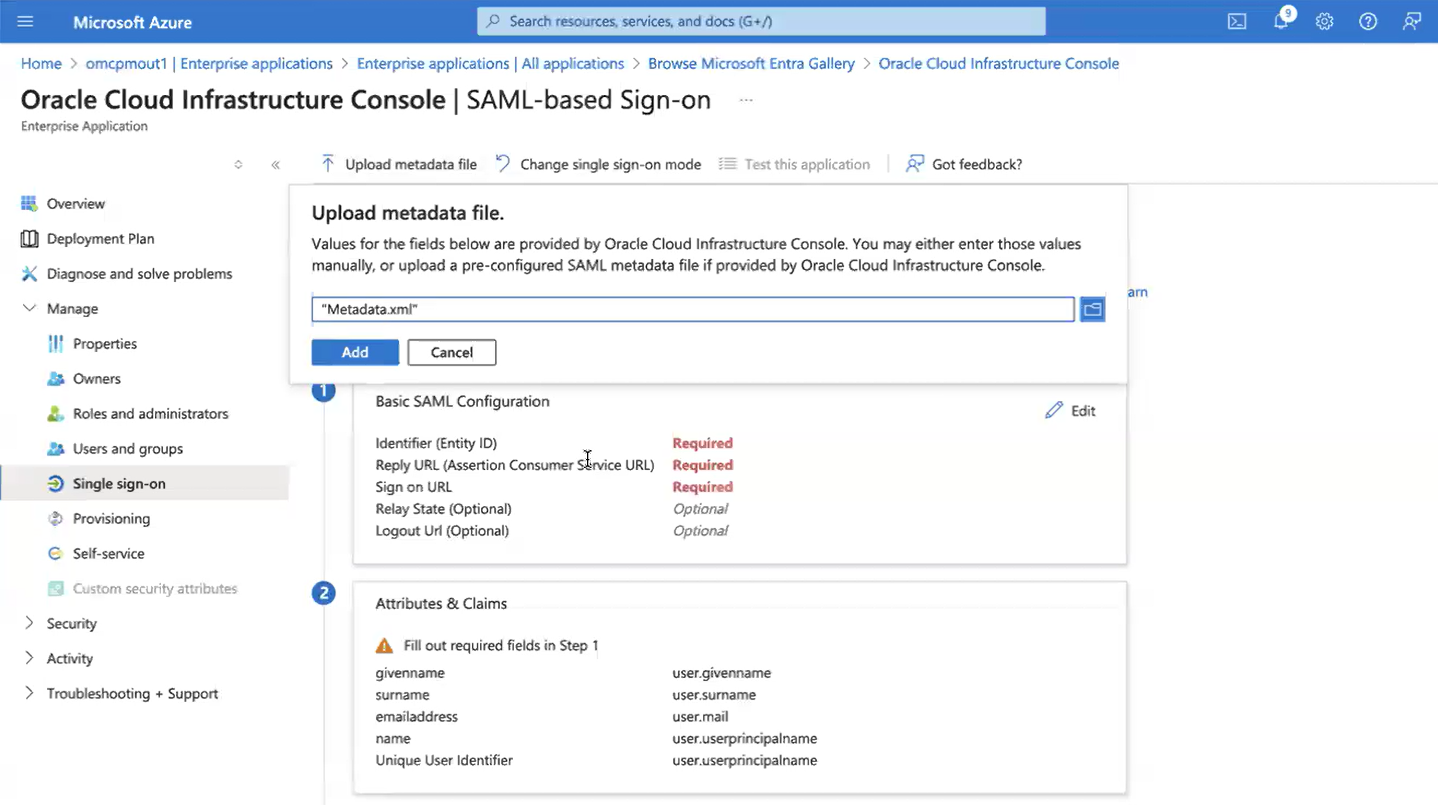
In the Upload metadata file pop-up window, select the folder logo to select the SAML XML metadata file you exported from the OCI Console. Select Add to continue.
-
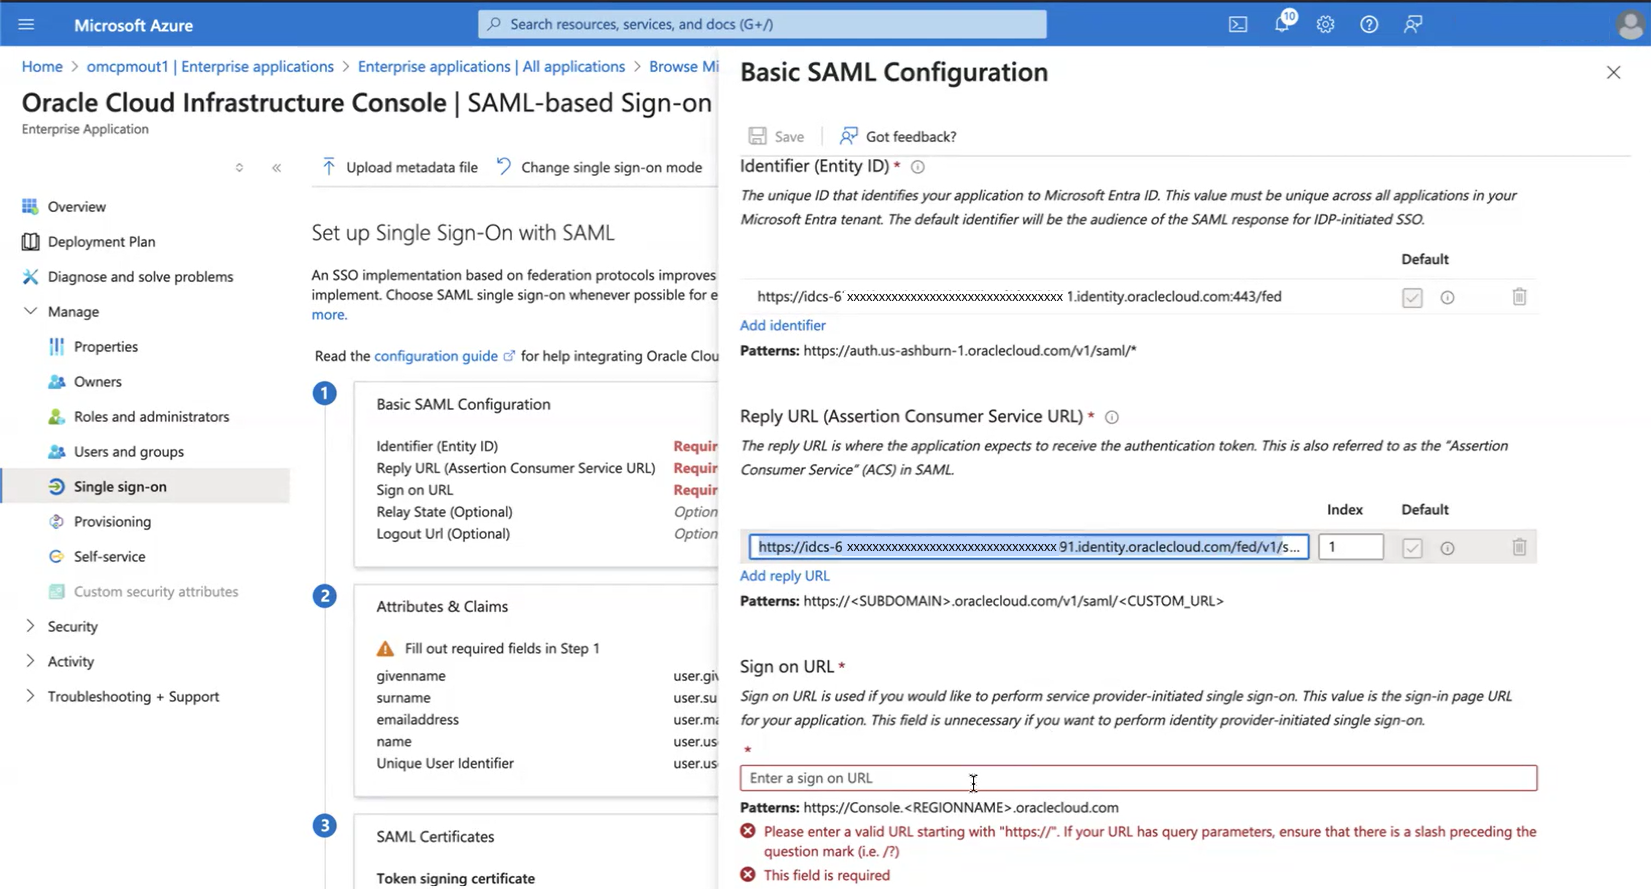
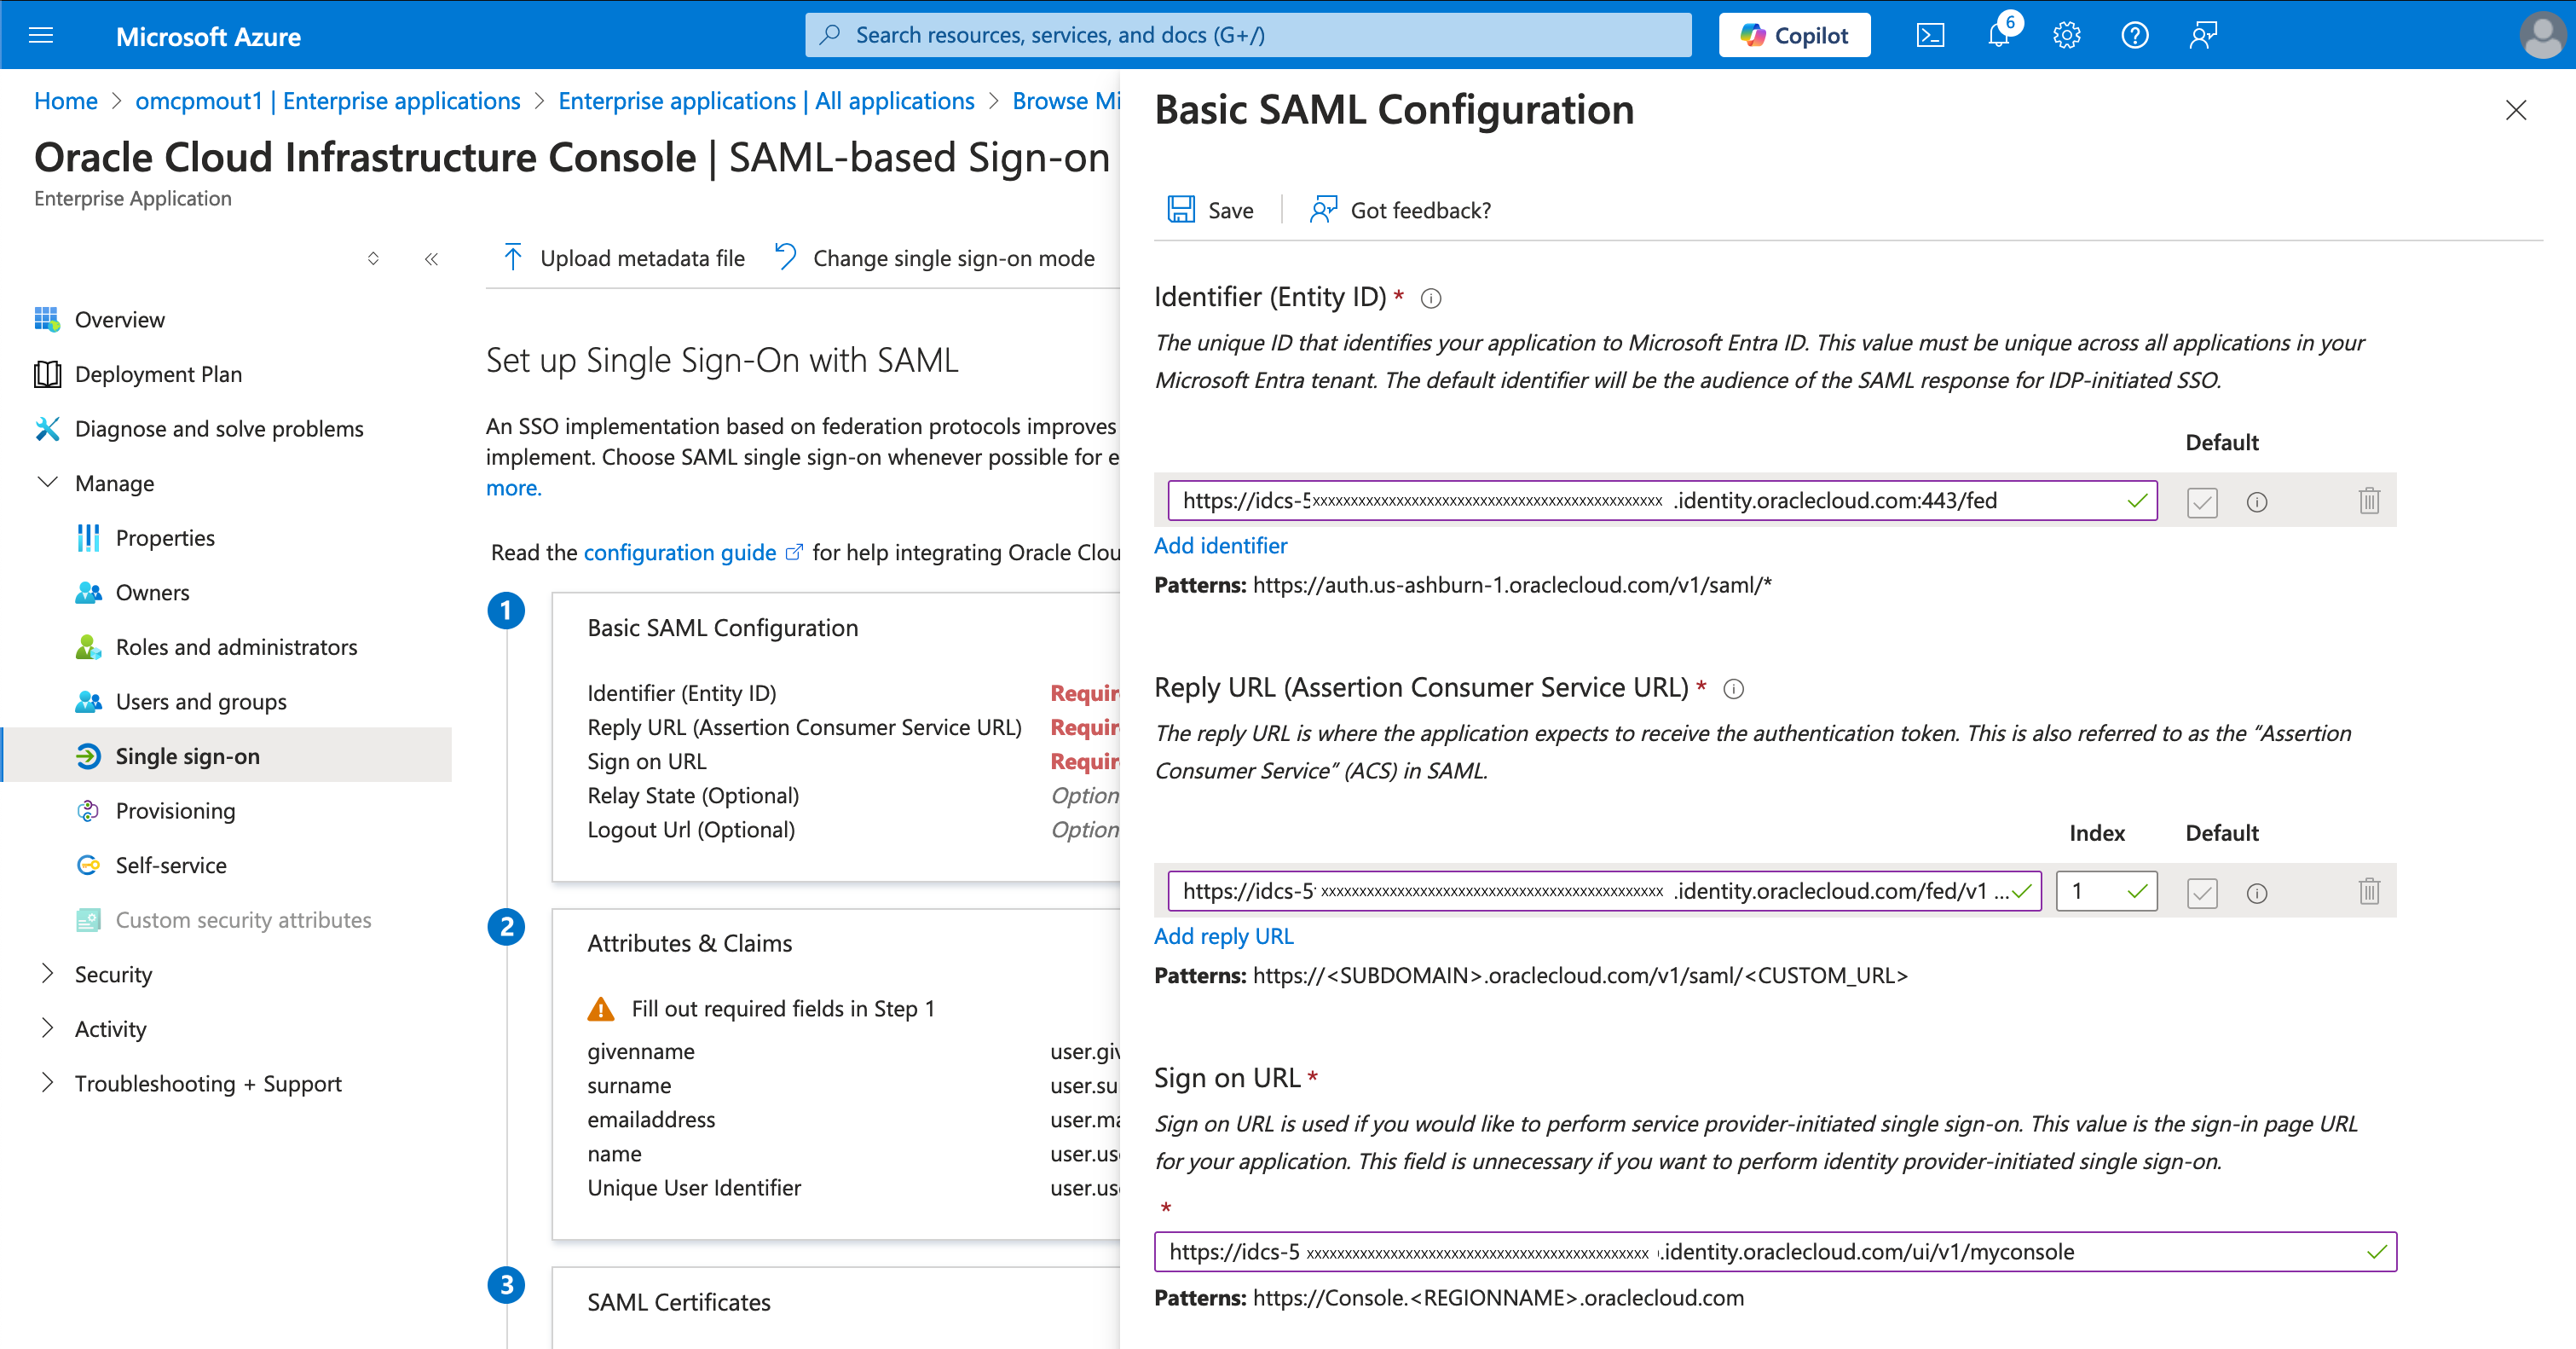
In the Basic SAML Configuration panel, find the Reply URL (Assertion Consumer Service URL) field. Copy the value in this field to your computer's clipboard. Don't edit any of the other populated fields.
-
Edit the copied Reply URL (Assertion Consumer Service URL) value by replacing
/fed/v1/with/ui/v1/myconsole. Then paste the edited URL into the Sign on URL field and click Save to continue.For example, if the Reply URL (Assertion Consumer Service URL) field has the following value:
https://idcs-123a4b56example1de45fgh6i789j012.identity.oraclecloud.com/fed/v1/Then paste the edited version of the URL as the following example shows:
https://idcs-123a4b56example1de45fgh6i789j012.identity.oraclecloud.com/ui/v1/myconsole -
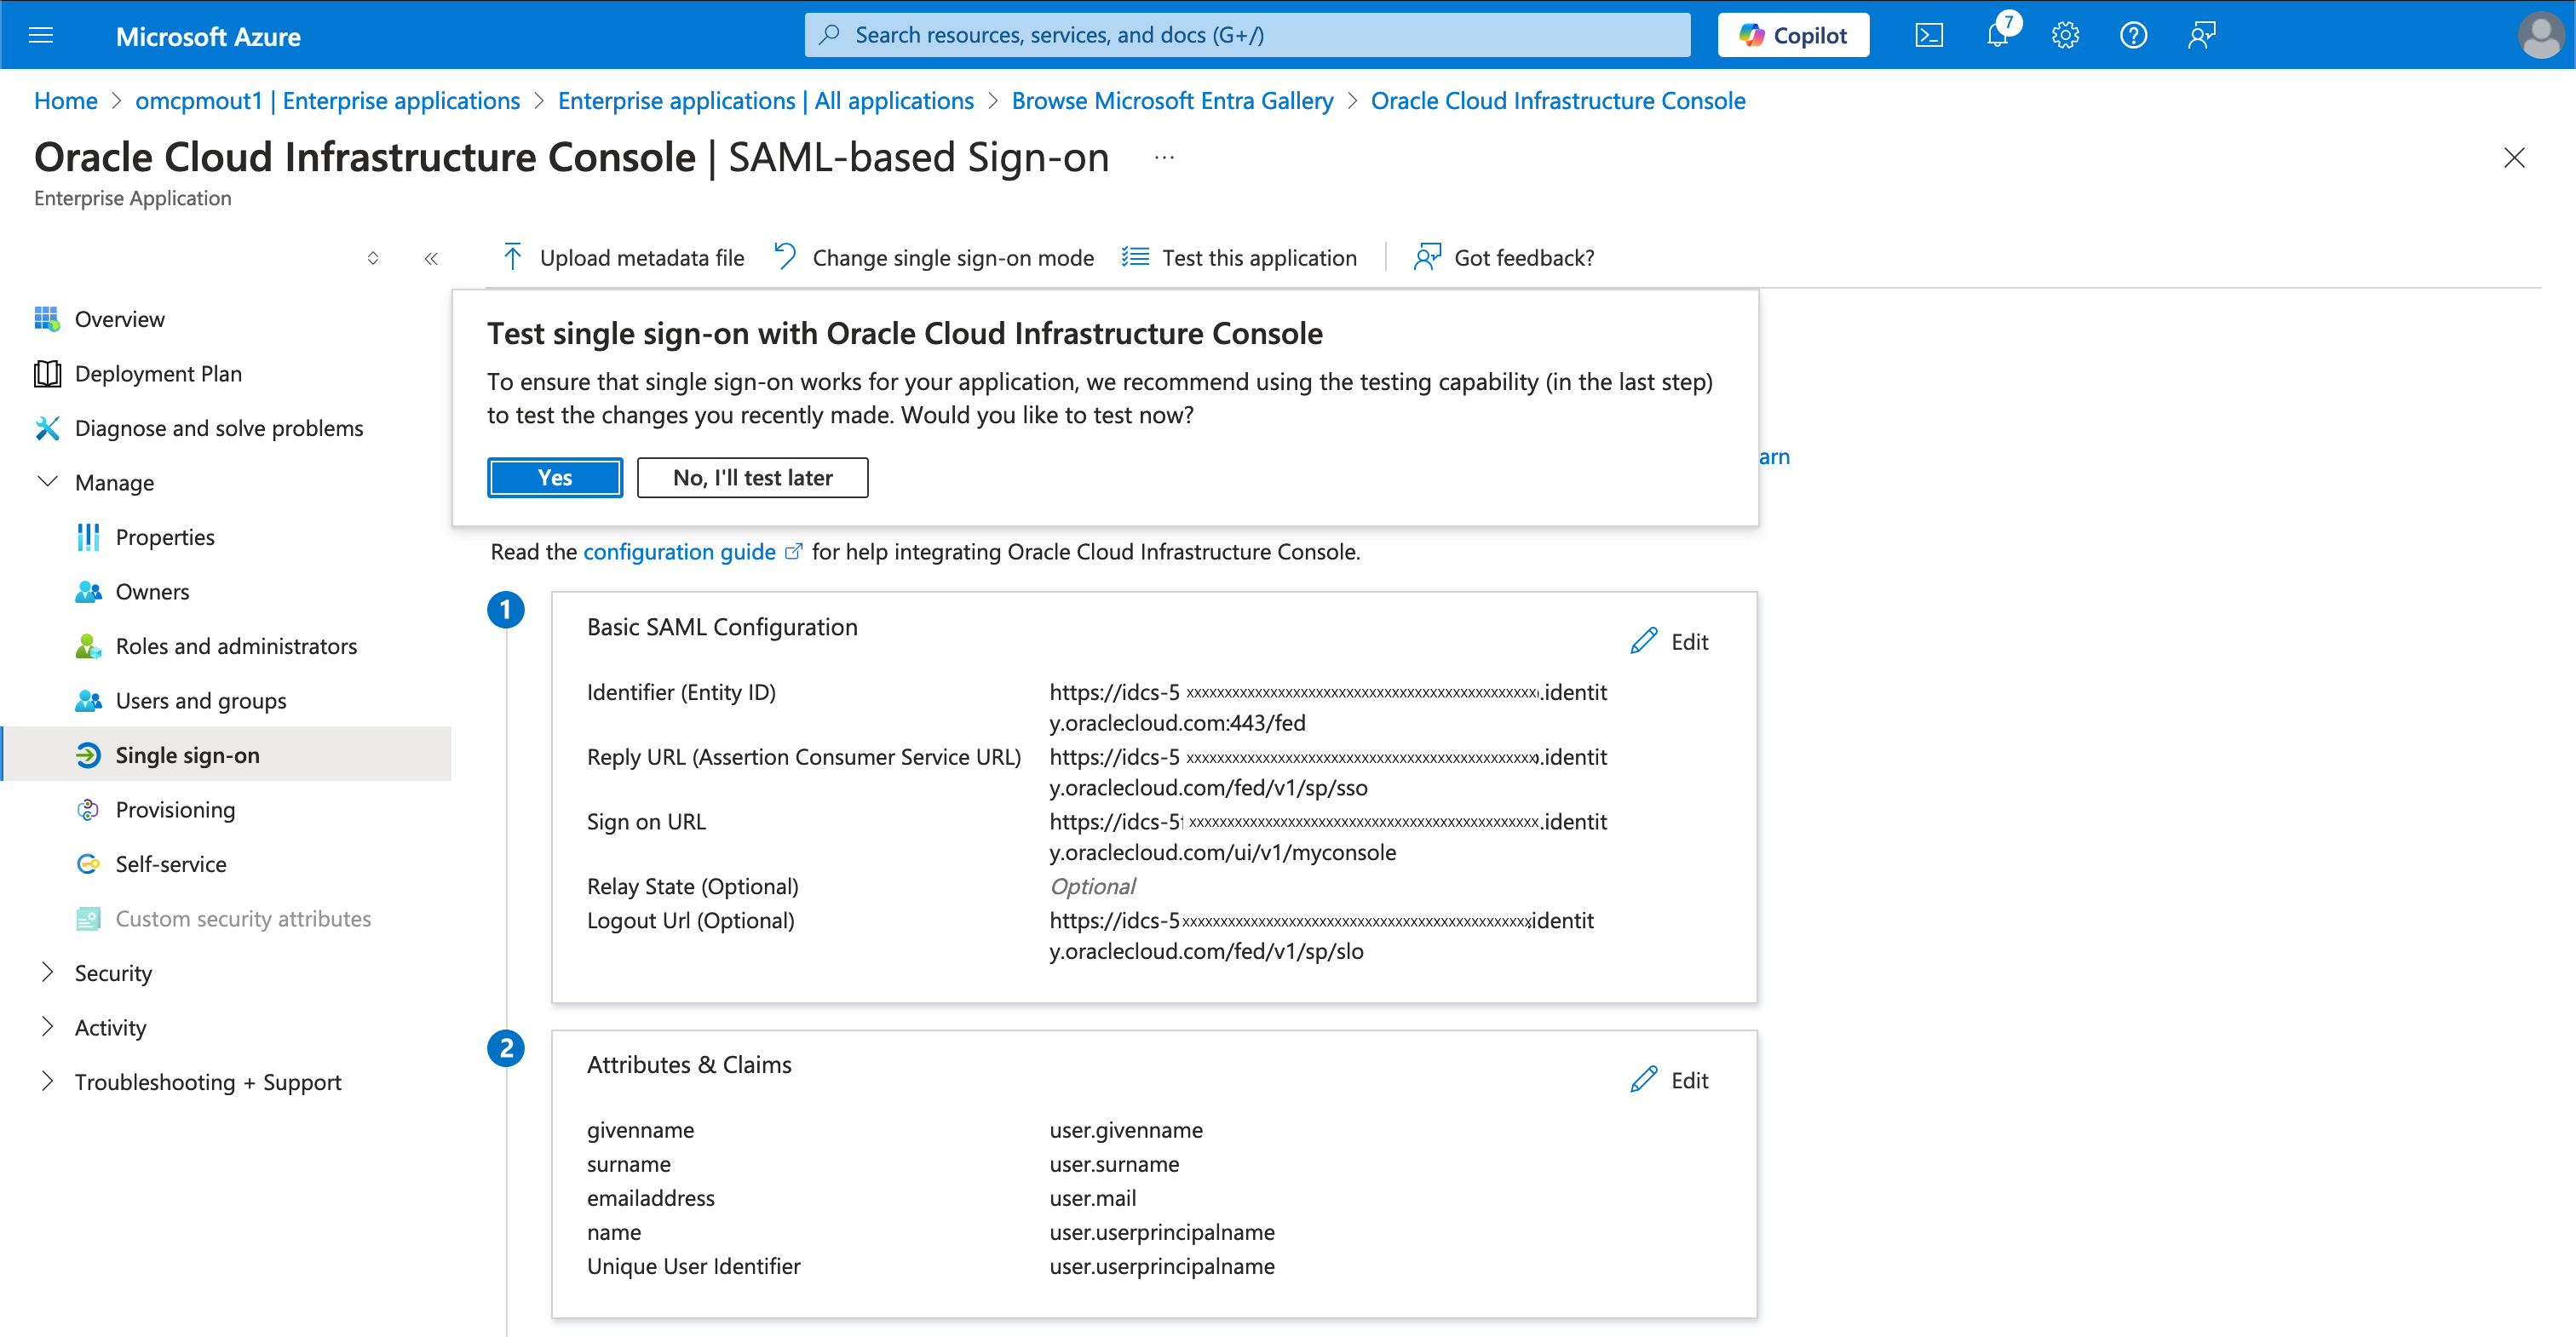
In the Test single sign-on with Oracle Cloud Infrastructure Console pop-up window, select No, I'll test later.
-
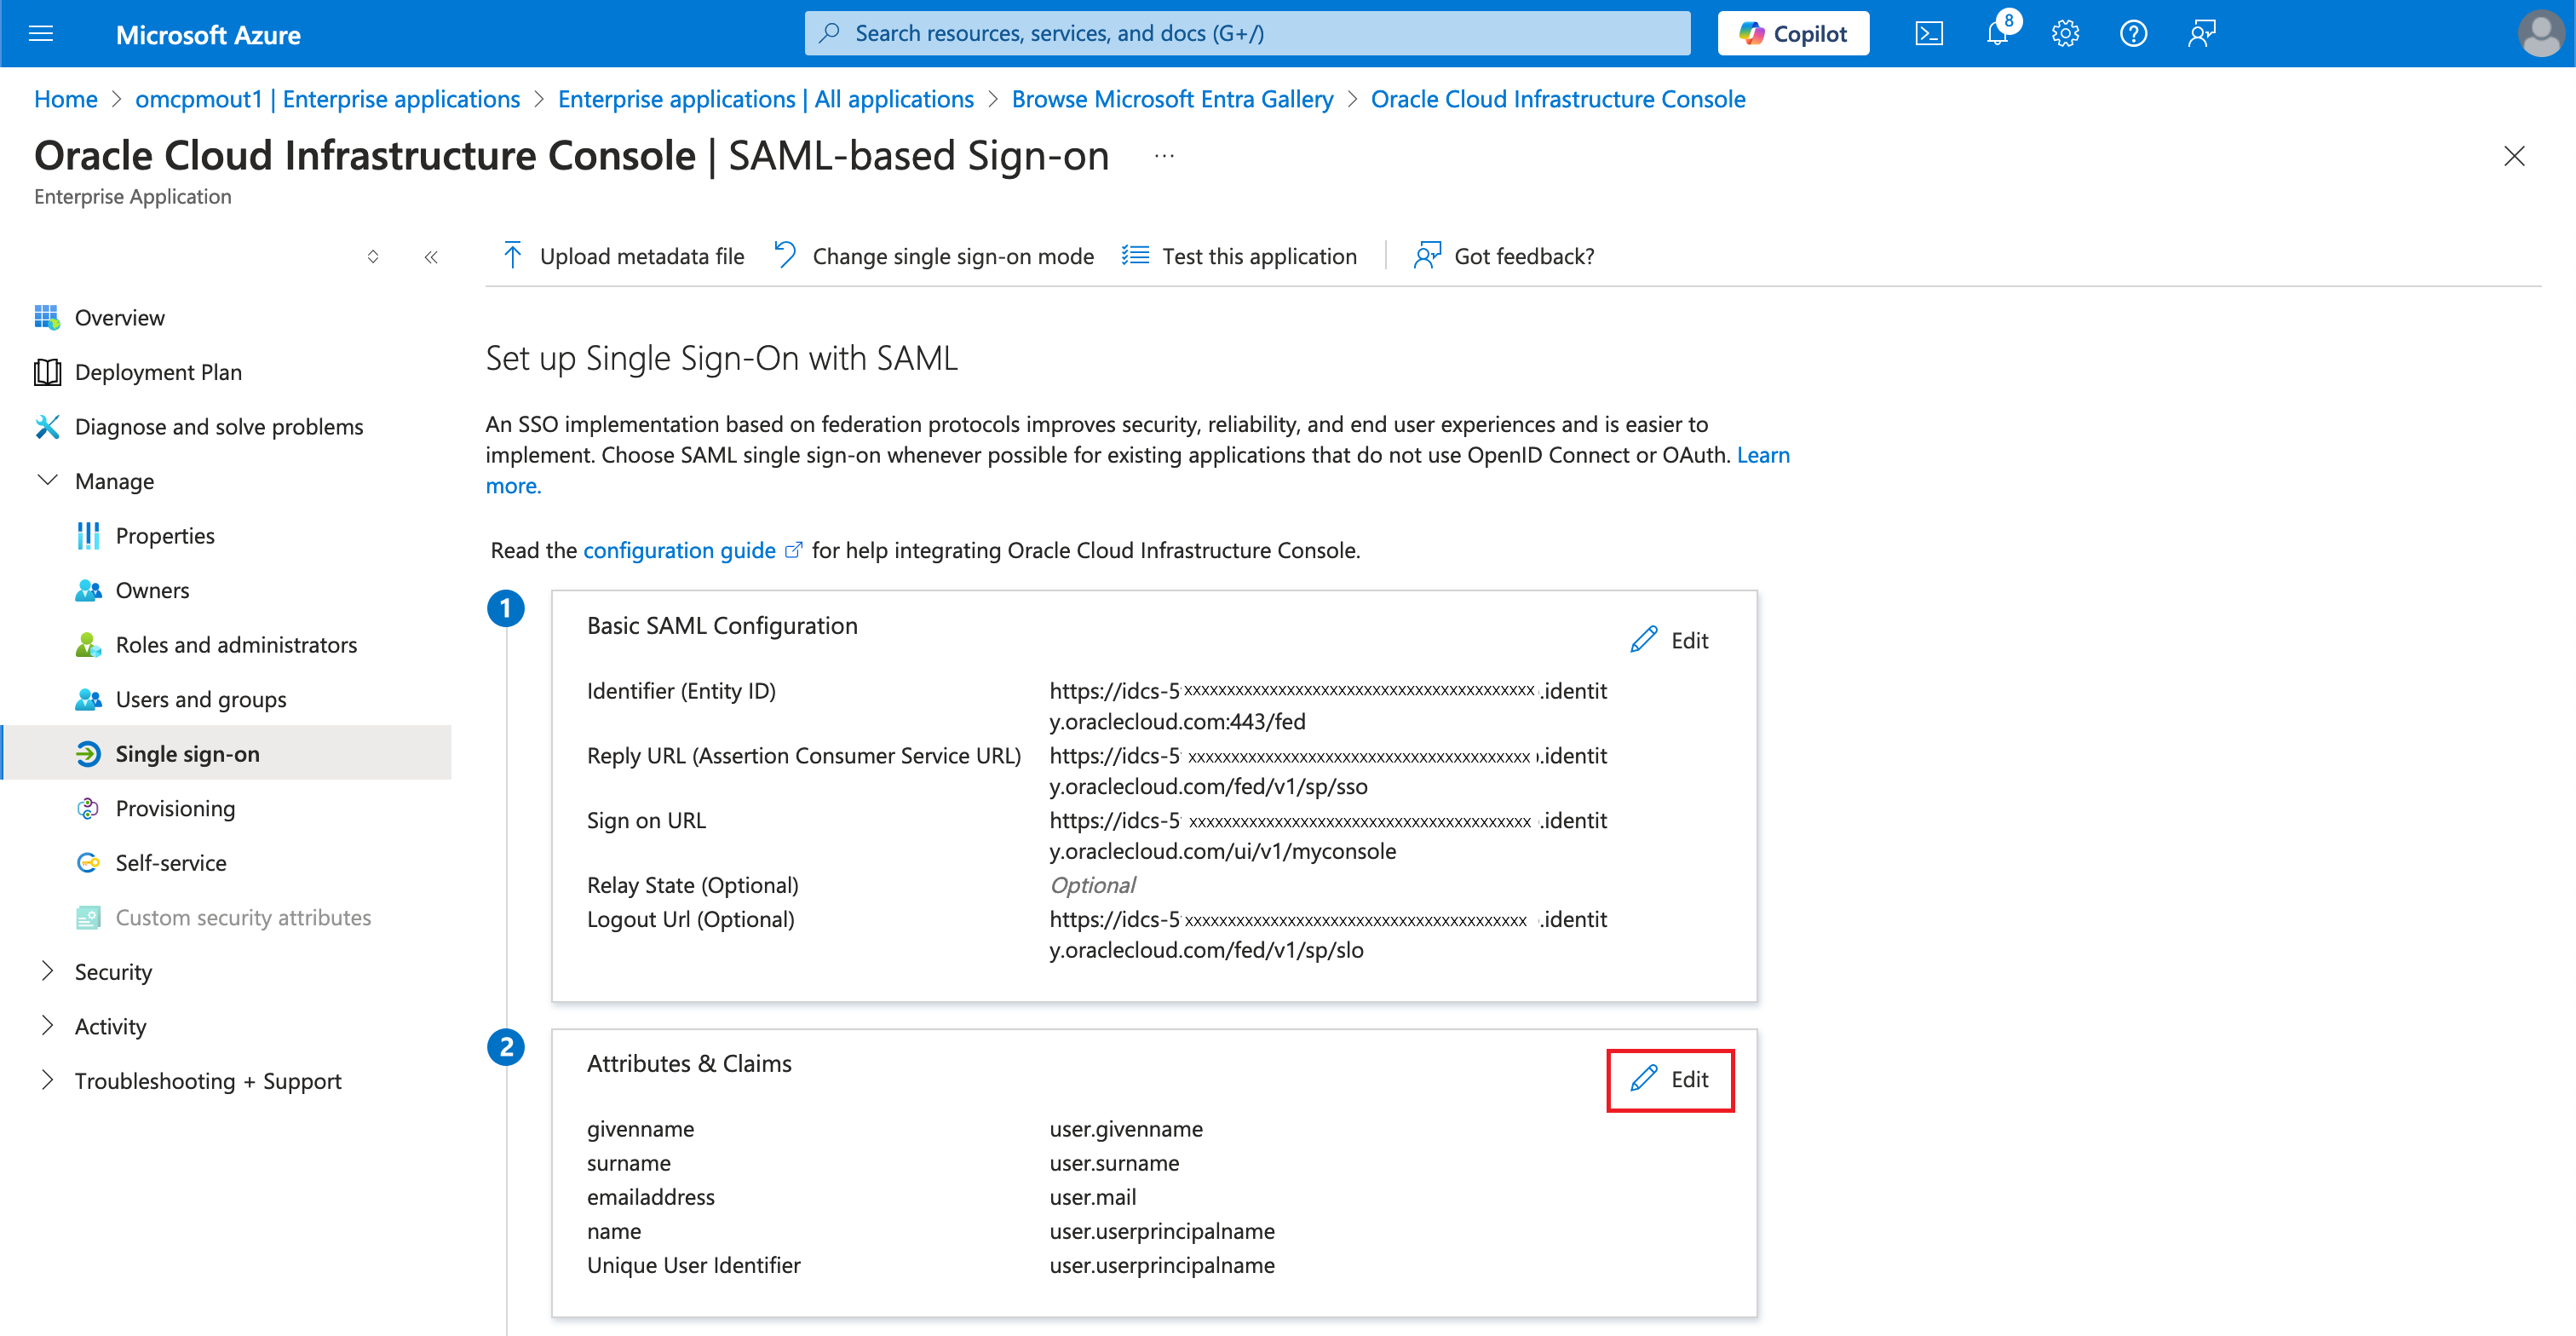
In the Attributes and Claims section, select Edit.
-
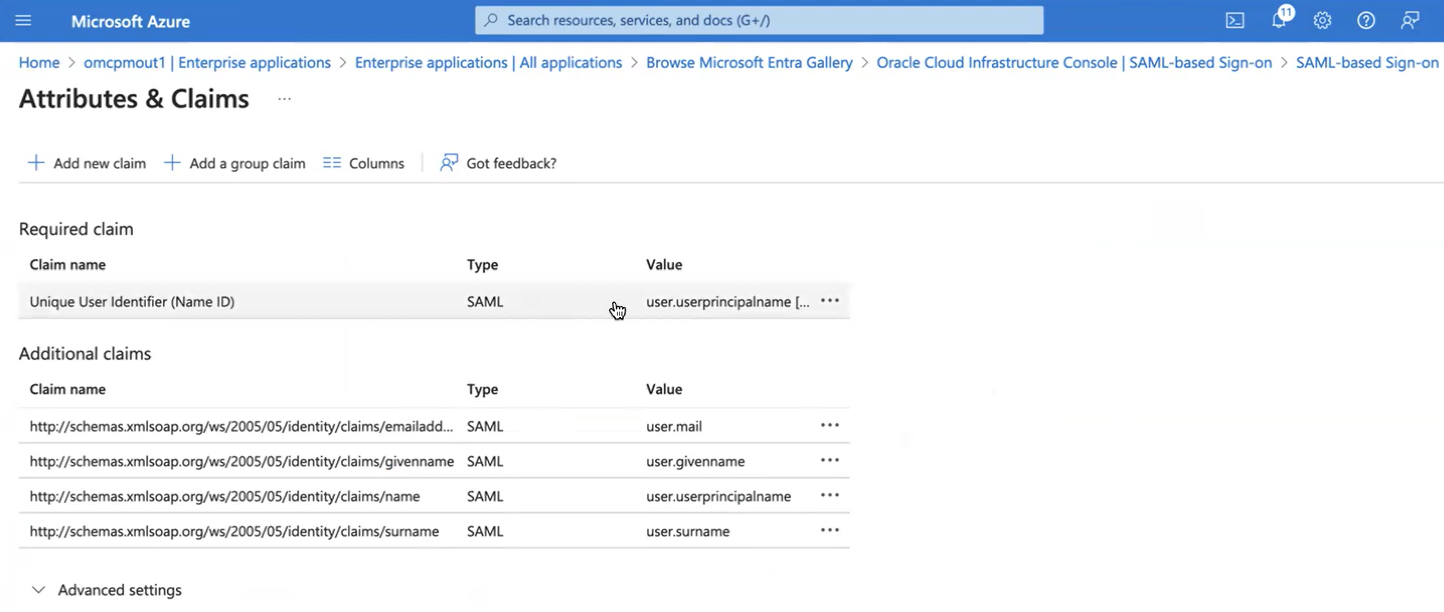
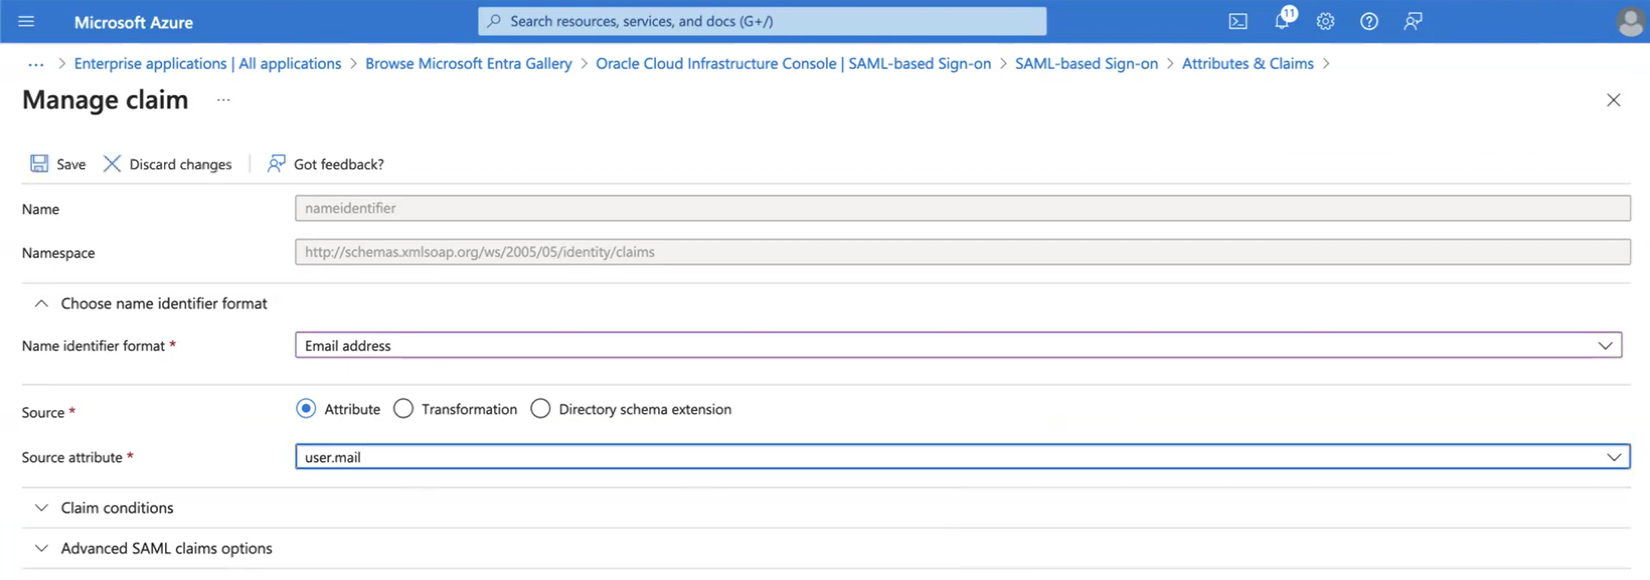
In the Required claim section, select the Unique User Identifier (Name ID) claim.
-
In the Source attribute field, select the unique user identifier appropriate for your organization:
- user.mail: Select this value if your organization's user accounts use an email address as the unique identifier.
- user.userprincipalname: Select this value if your organization's user accounts use UserPrincipalName as the unique identifier. If you use this option, ensure that your OCI identity domain isn't configured to require an email address in user accounts. See Requiring User's Email Address for Account Creation for information on configuring an identity domain so that new users can be created without an email address.
Select Save, then select X to close the Manage claim dialog and to go back to the SAML-based Sign-on page.
-
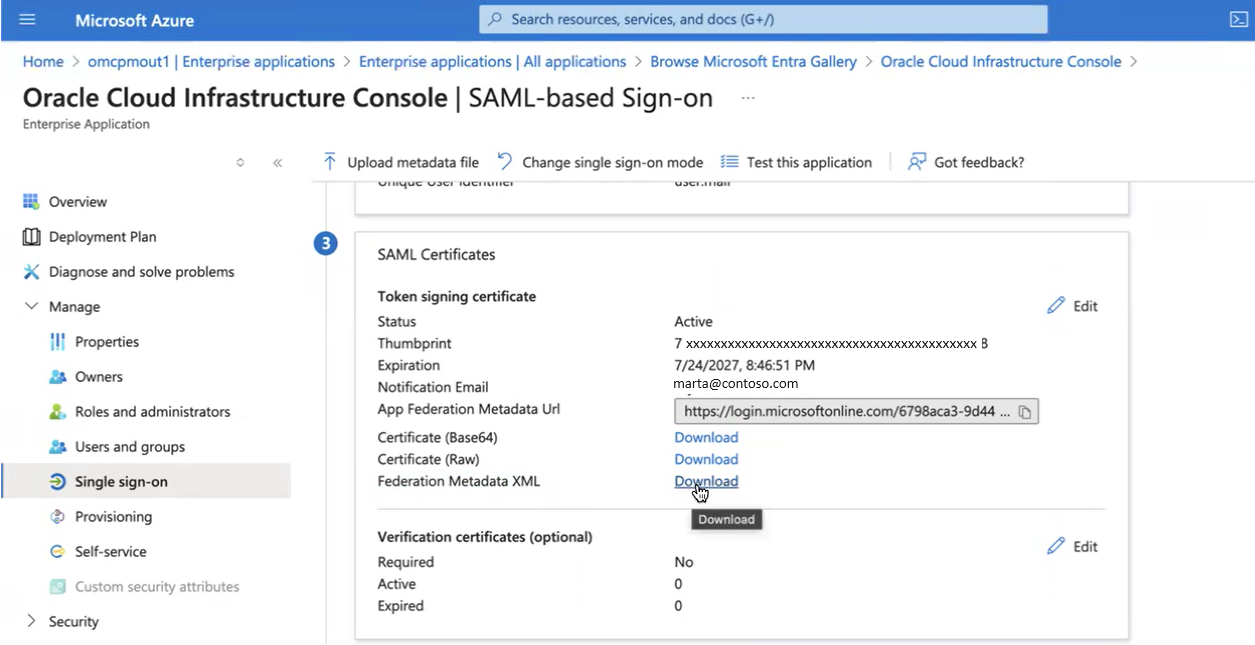
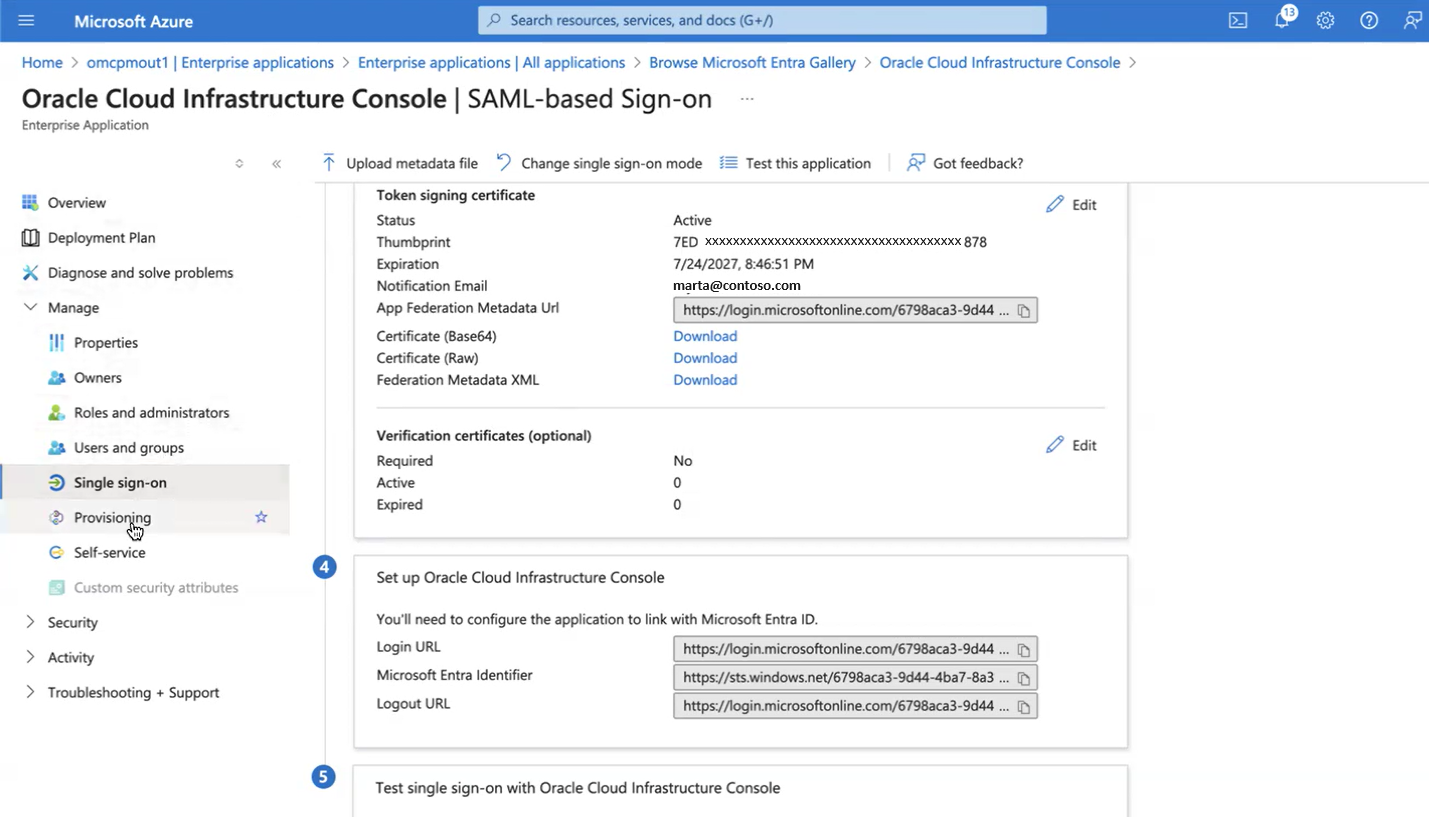
On the SAML-based Sign-on page, in the SAML Certificates section, find the Federation Metadata XML field and select Download. Leave this browser window open on your computer while you do the next series of steps in the OCI Console.
-
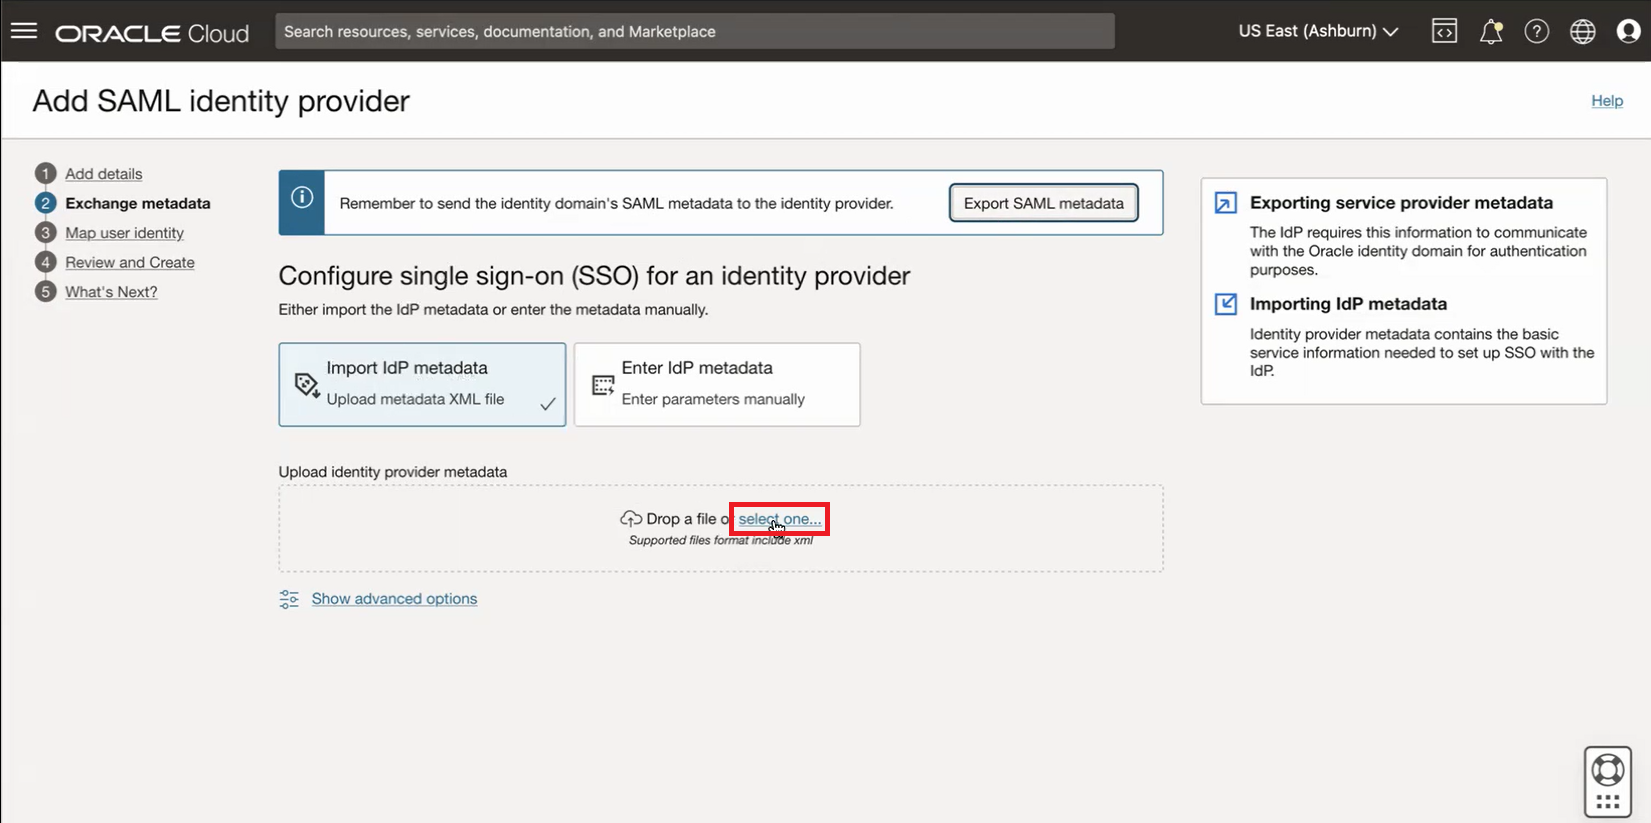
Return to the Add SAML identity provider page in the OCI Console. Select Import IdP metadata (Upload metadata XML file). In the Upload identity provider metadata section, select the select one... link to select the IdP metadata XML file downloaded from the Federation Metadata XML download link in the previous step.
-
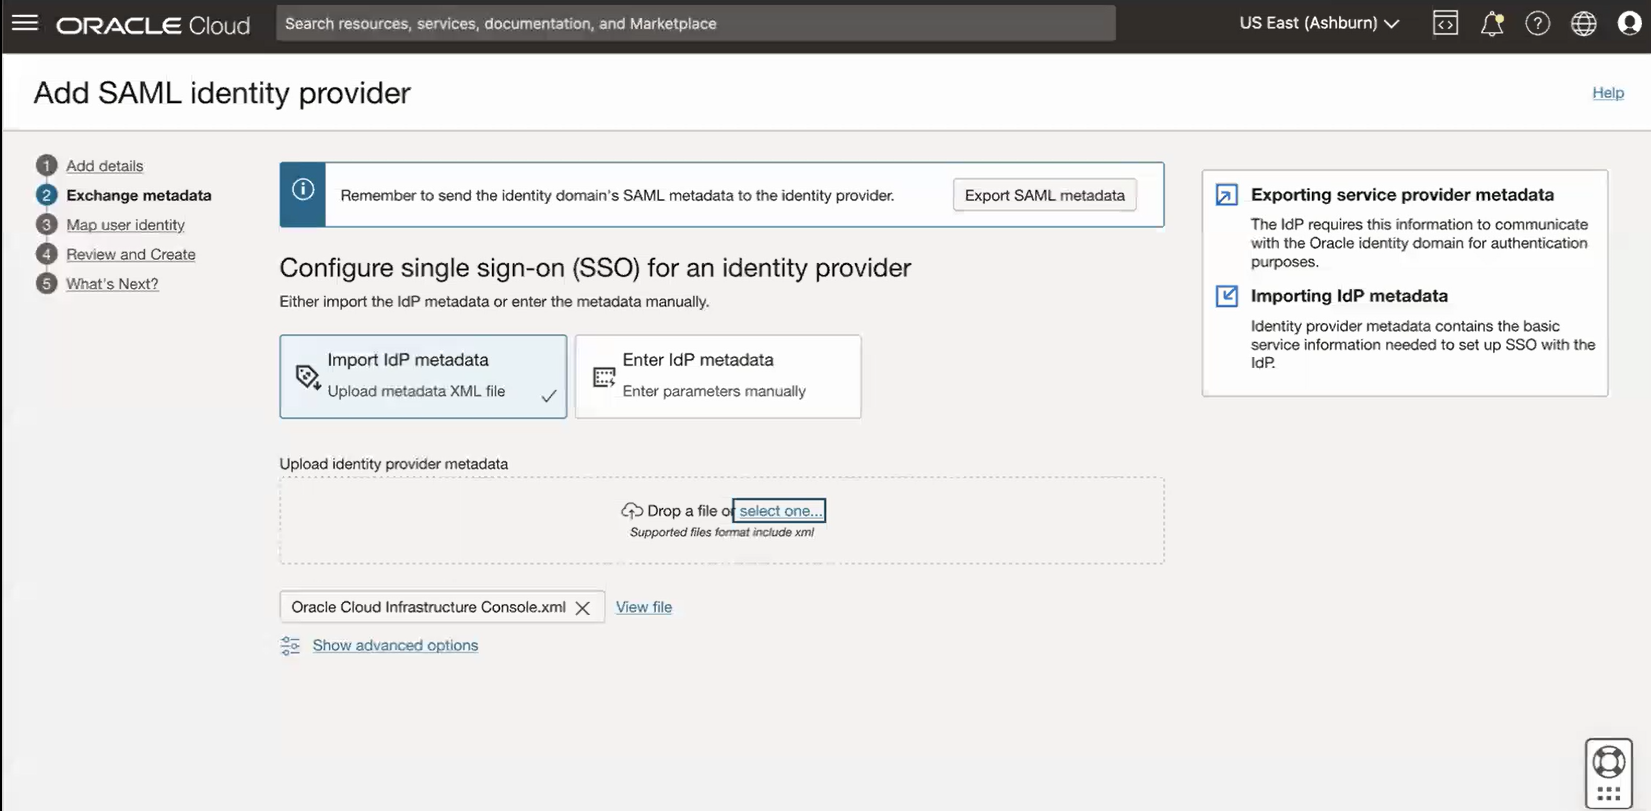
After you upload the XML file, the file name is displayed below the Upload identify provider section. Select Next to continue.
-
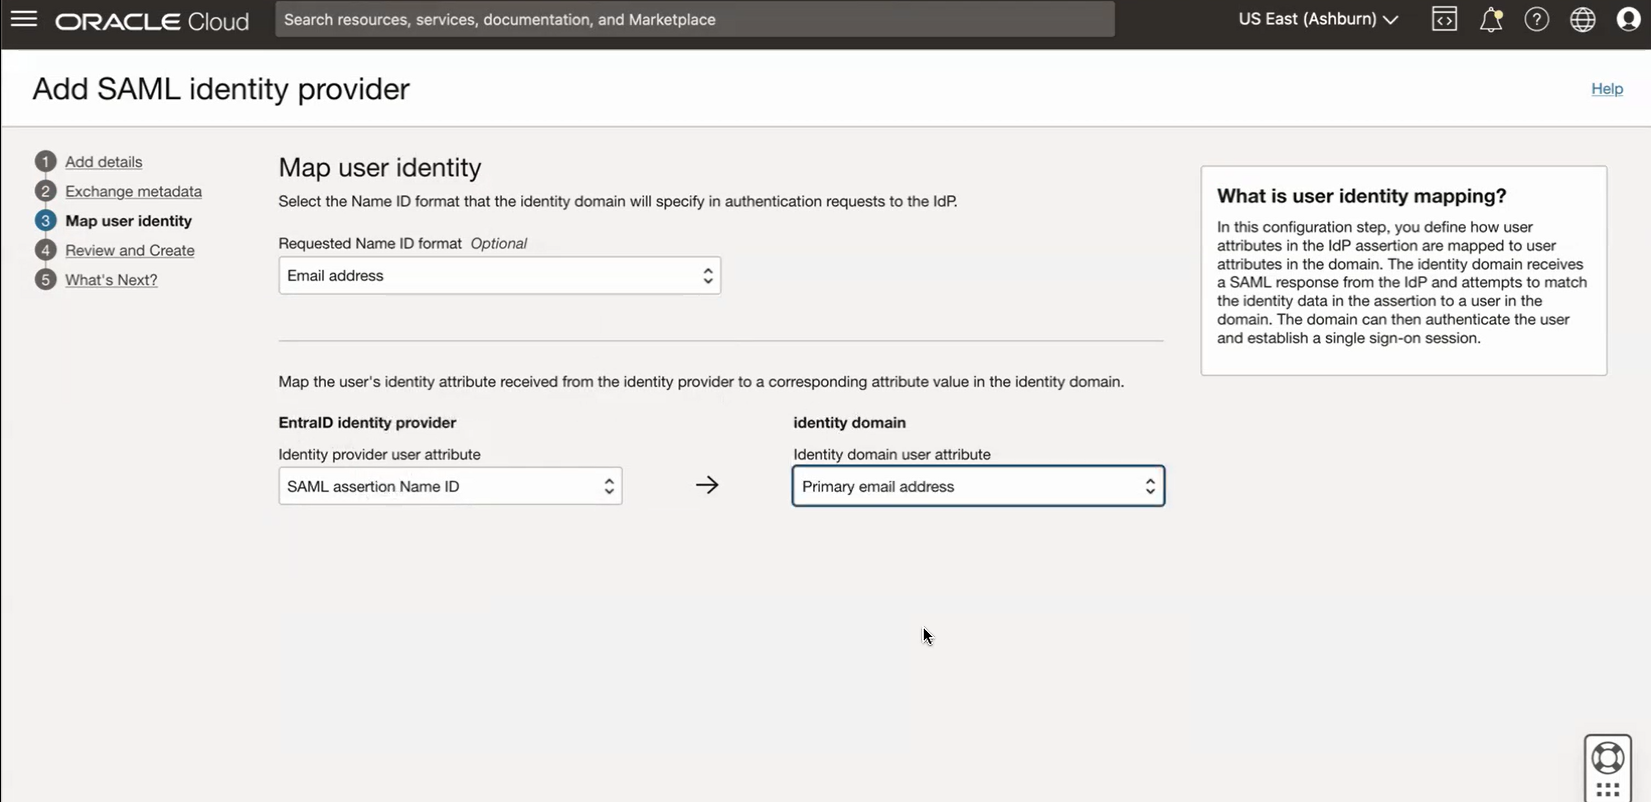
On the Map user identity page, select the following, then select Next to continue:
- Requested Name ID format: Select the unique identifier you specified in step 24 (email address or UserPrincipalName).
- Identity provider user attribute: SAML assertion Name ID
- Identity domain user attribute: Specify the primary email address or username, as configured in step 24.
-
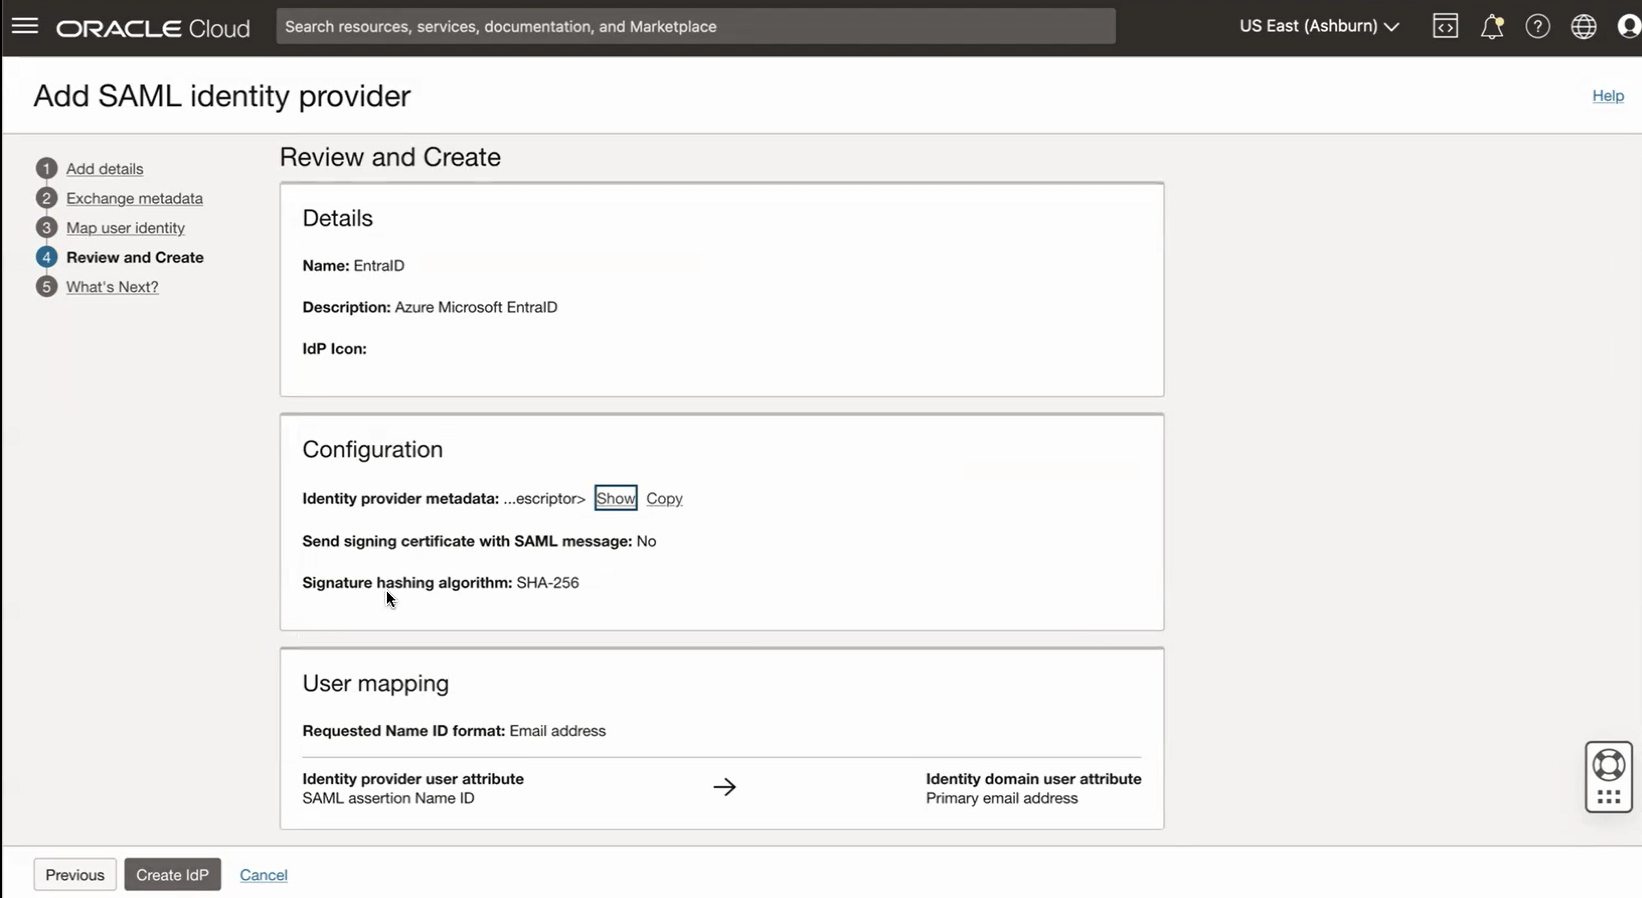
On the Review and Create page of the Add SAML identity provider workflow, review the displayed information, then select Create IdP.
-
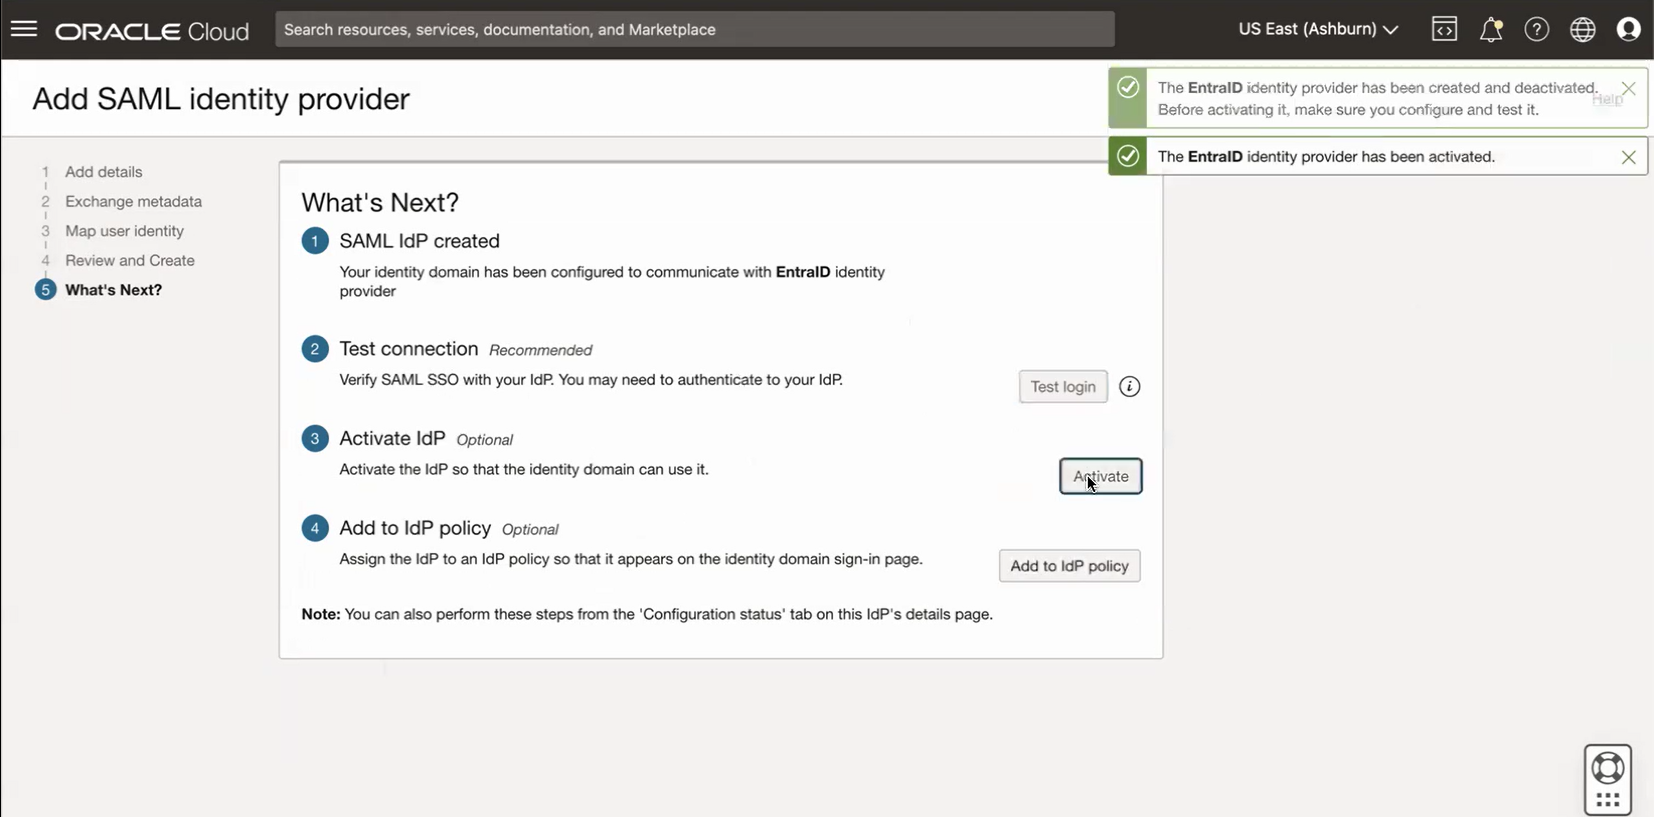
On the What's Next? page of the Add SAML identity provider work flow, select Activate to Activate the IdP. Wait for the "EntraID identity provider has been activated" message to appear on the page before continuing.
- On the What's Next? page of the Add SAML identity provider work flow, select Add to IdP policy.
-
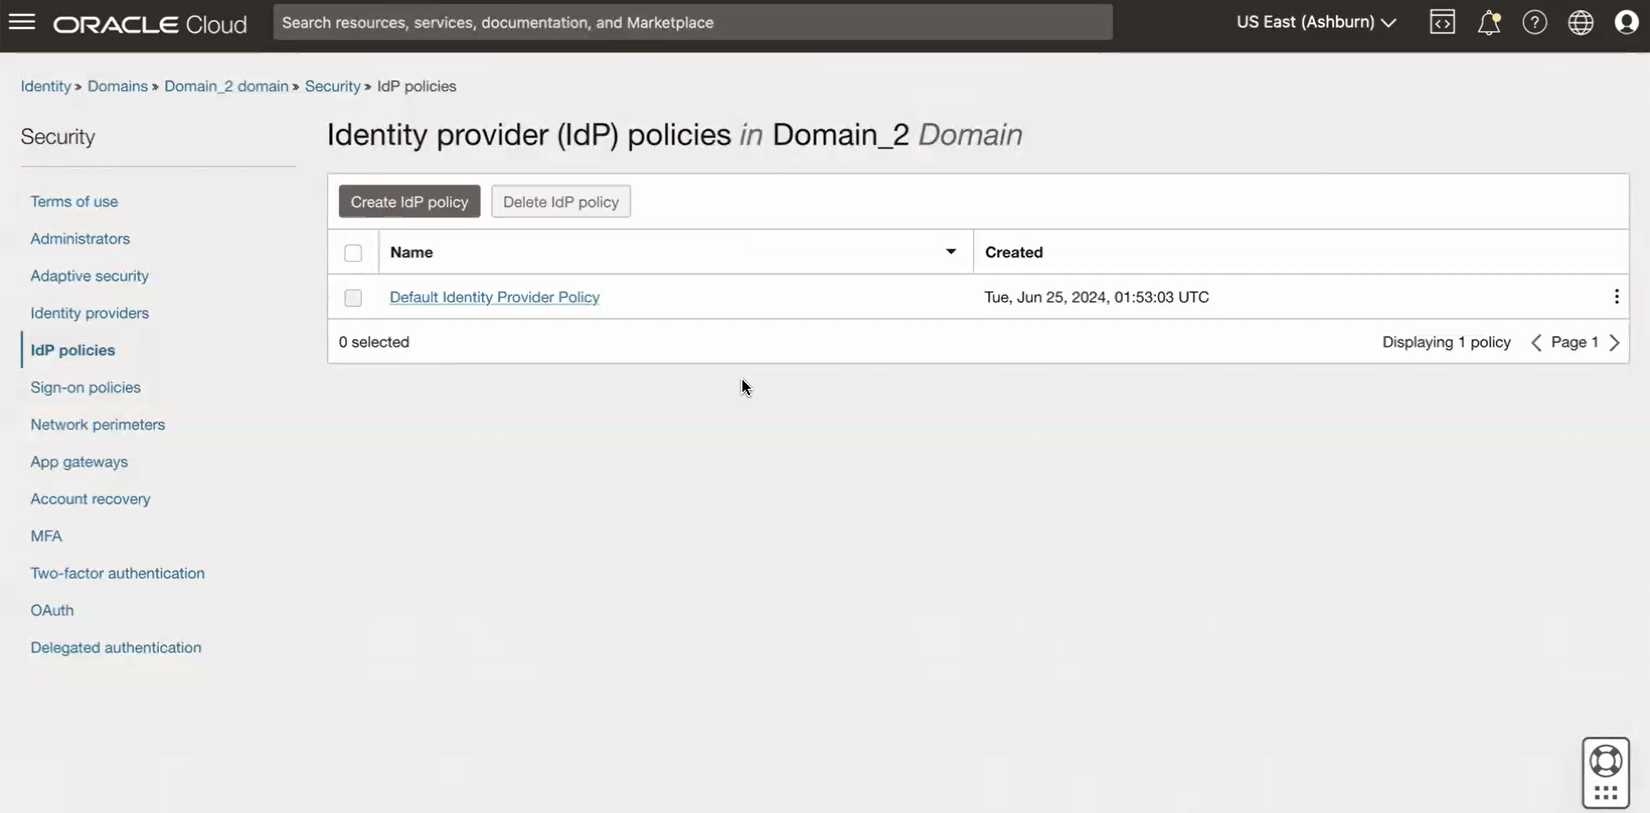
On the Identity provider (IdP) policies page, select Default Identity Provider Policy.
-
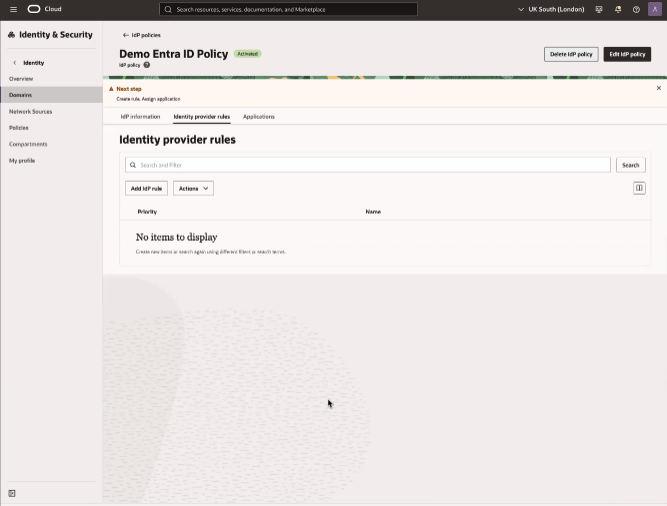
On the Default Identity Provider Policy policy details page, in the Identity prover rules section, select Edit IdP rule.
-
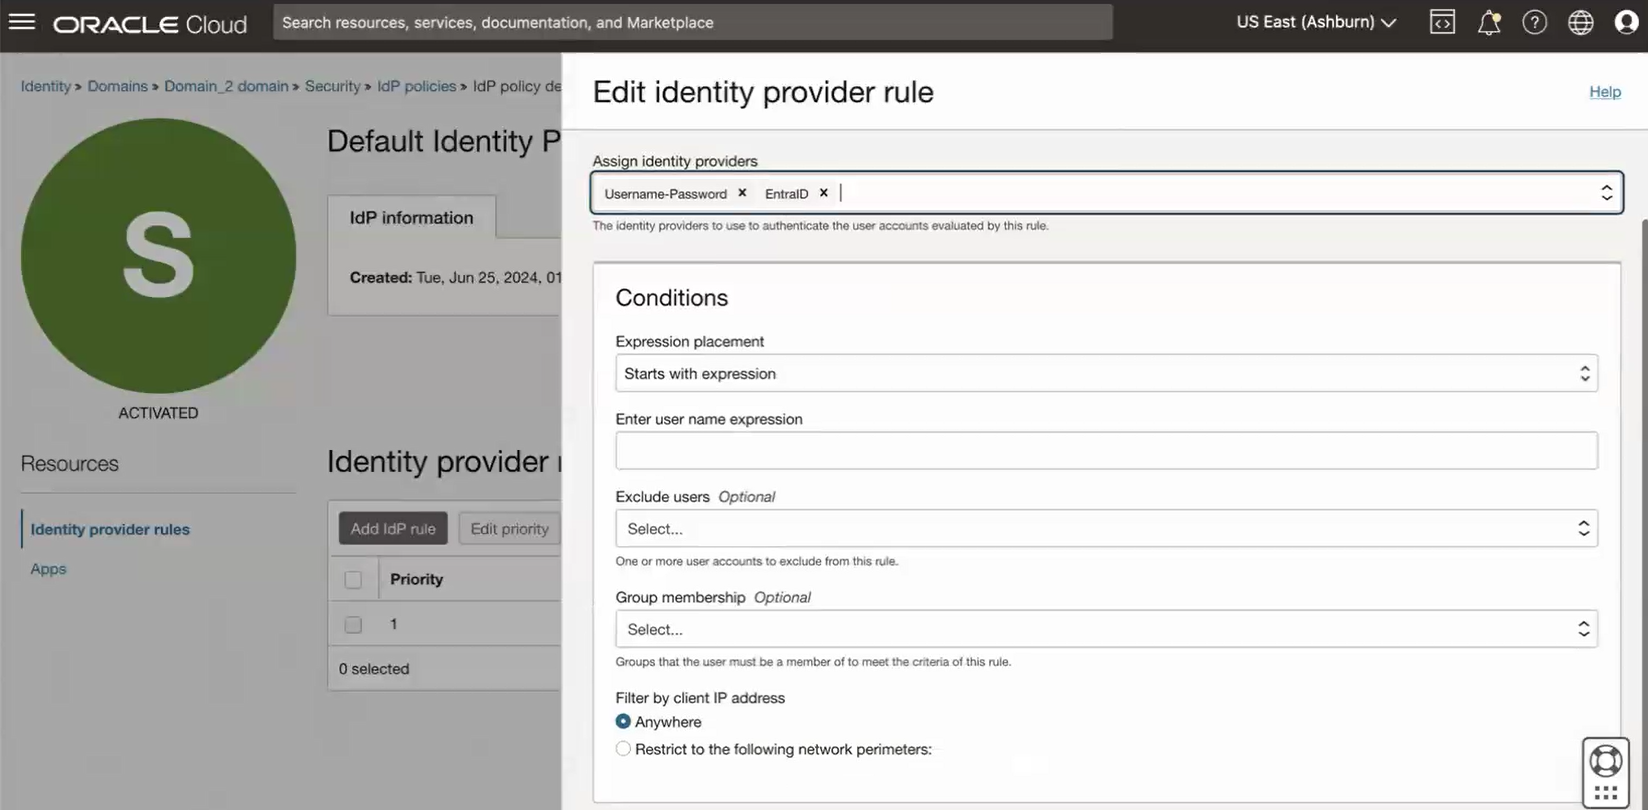
In the Edit Identity provider rule panel, in the Assign identity providers field, enter the "EntraID" value. The field displays "Username-Password" by default.
Select Save changes to continue.
- ImportantOpen the navigation menu and select Identity & Security. Under Identity, select Domains.
In the steps that follow, you configure the OCI Confidential Application for that provisions EntraID users in OCI. Note that all users must include the following field values, or the provisioning of the user in OCI fails:
- First name
- Last name
- Display name
- email address (if the OCI identity domain requires an email address)
To find if your OCI identity domain requires an email address to create new users, see Requiring User's Email Address for Account Creation. See step 24 in this task for information on configuring the unique identifier for Azure users.
- Select Default Domain. Then, select Integrated applications.
- Select Add application.
-
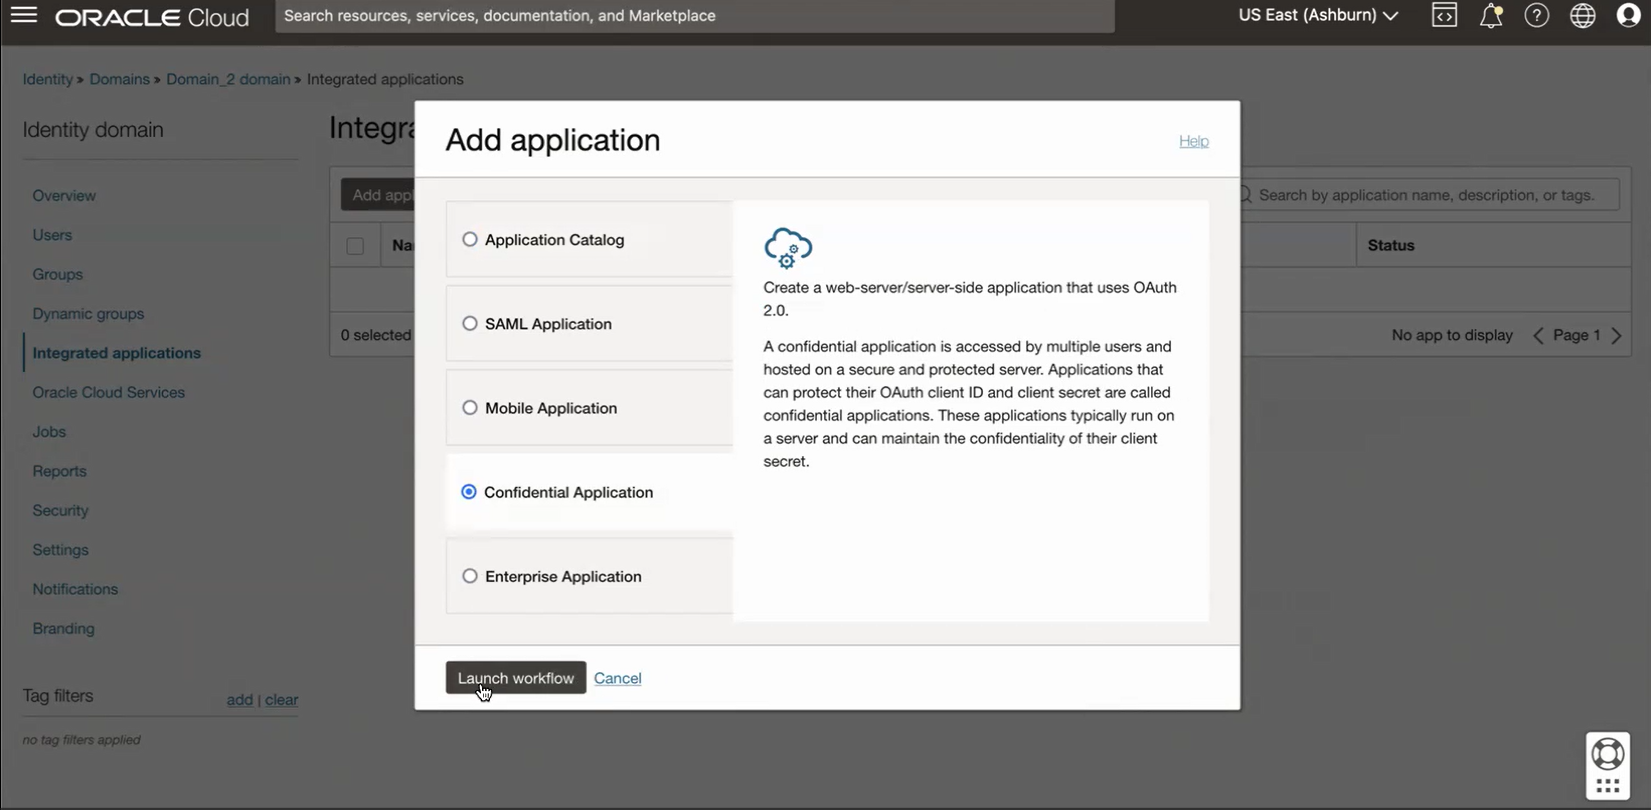
In the Add application window, select Confidential Application, and then select Launch workflow.
-
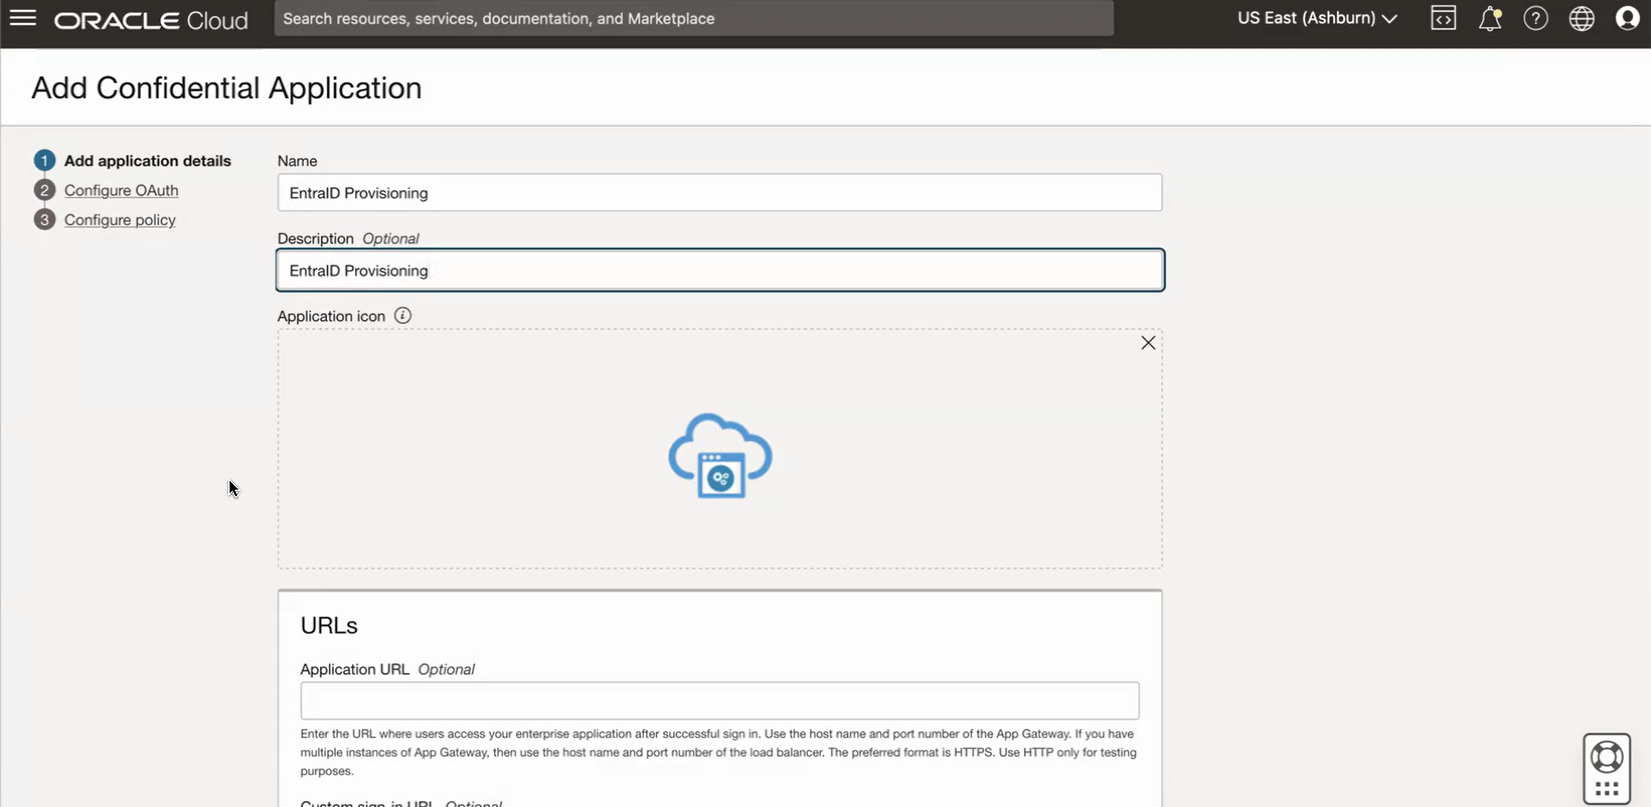
On the Add application details page of the Add Confidential Application workflow, enter the following:
- Name: Enter a name for the confidential application. You can enter up to 125 characters.
- Description: Enter a description for the confidential application. You can enter up to 250 characters.
Review the optional settings, then select Next.
-
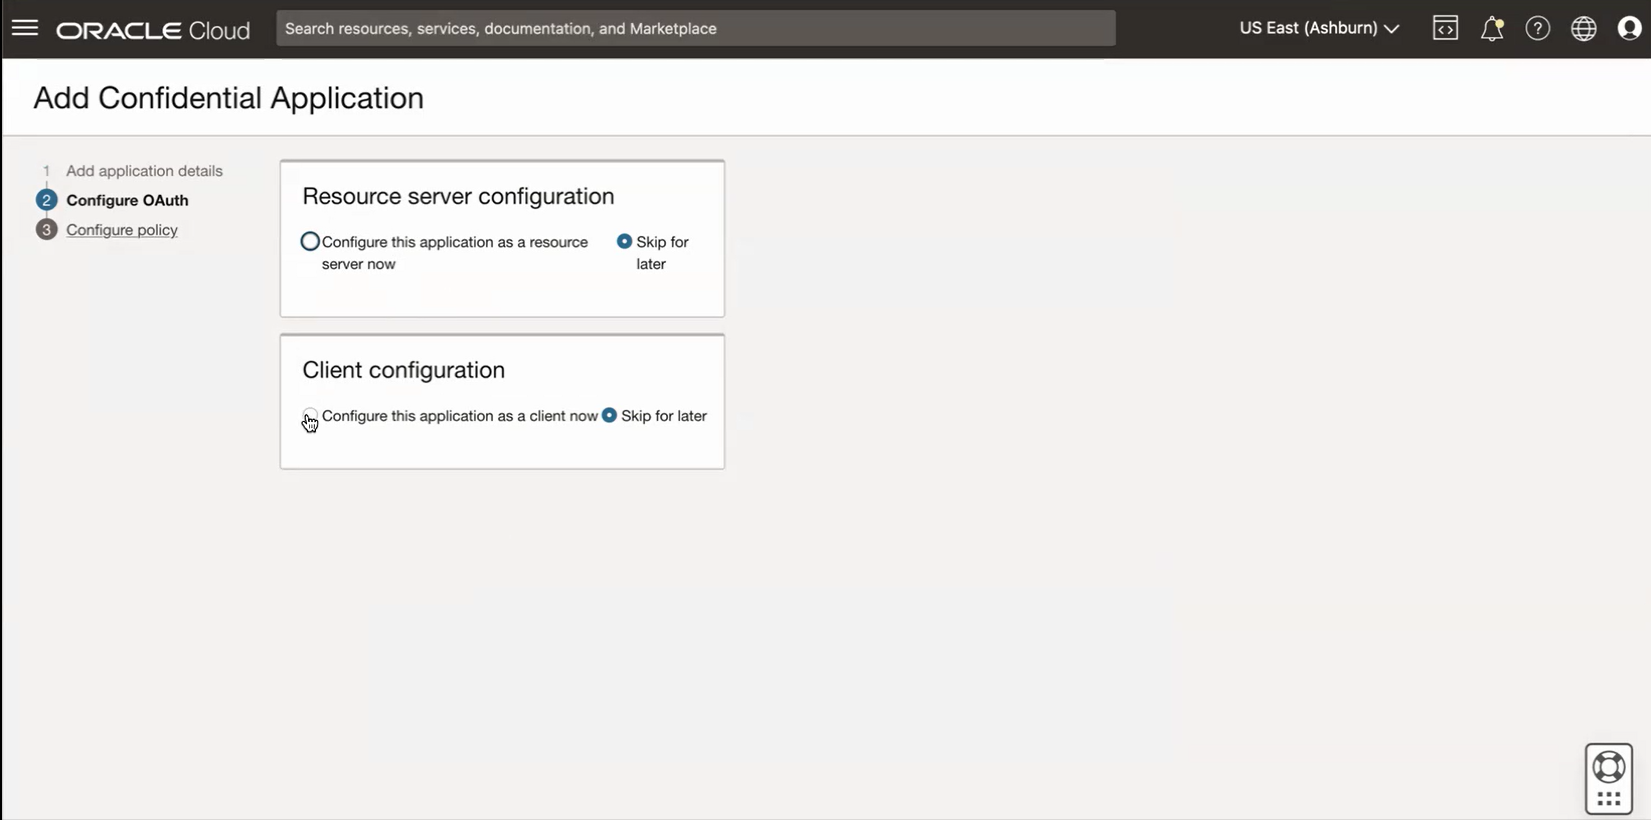
On the Configure OAuth page, in the Client configuration section, select Configure this application as a client now.
-
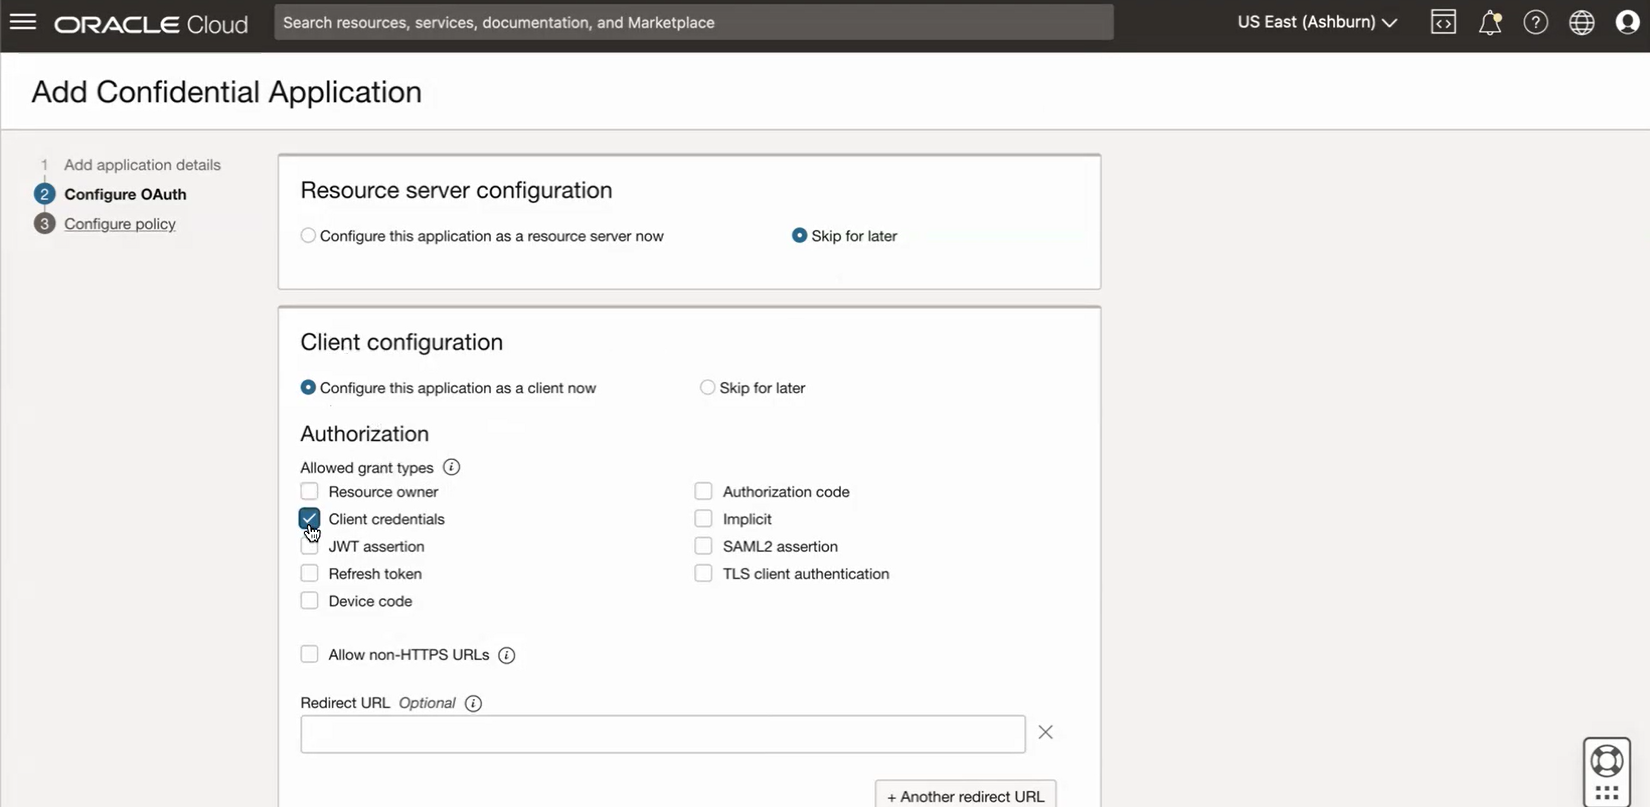
On the Configure OAuth page, in the Client configuration section, select Client Credentials
-
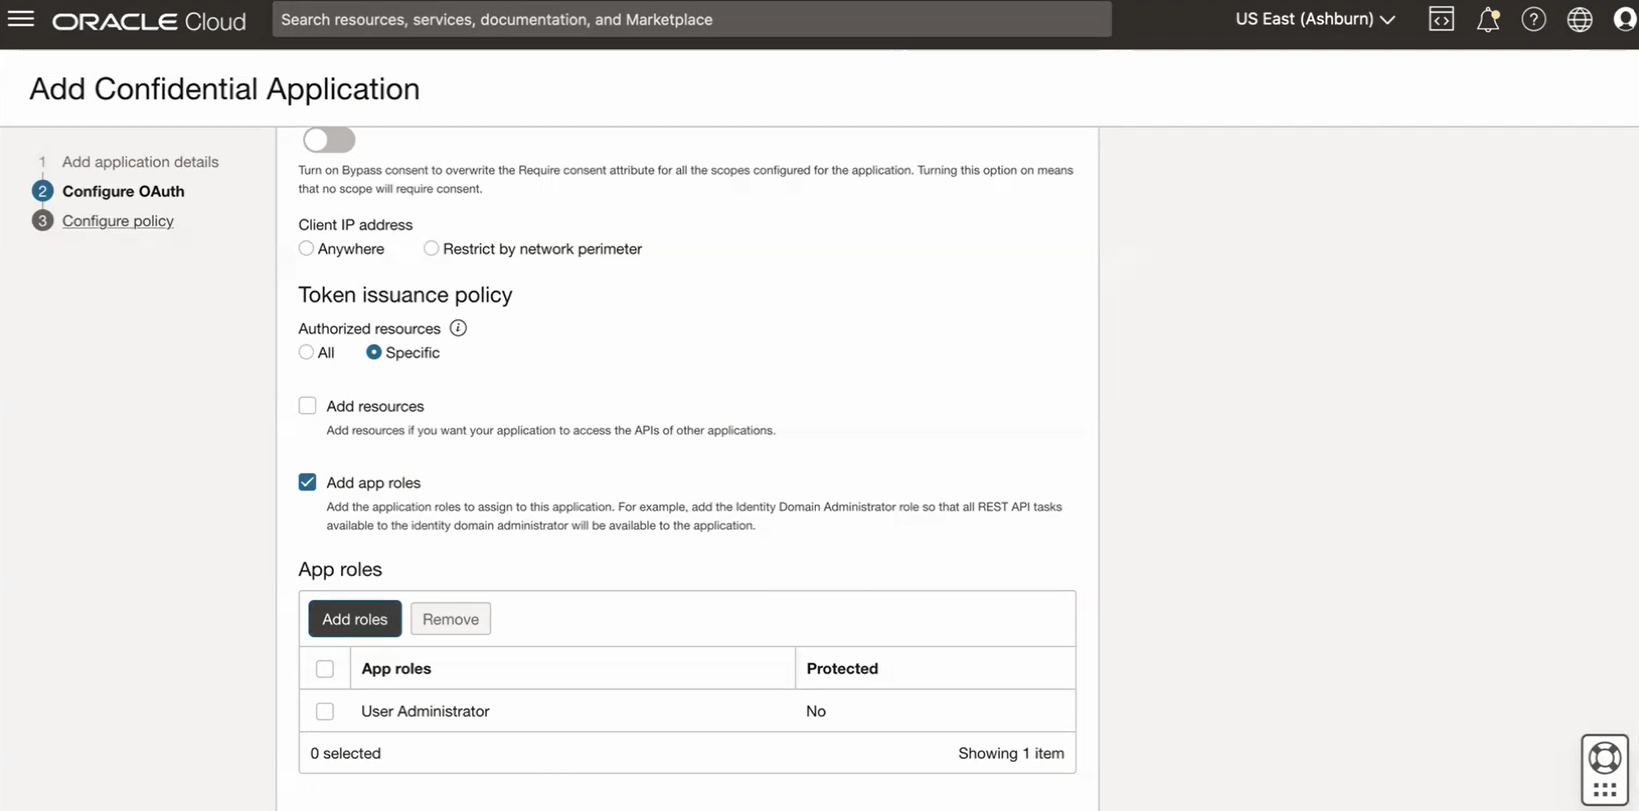
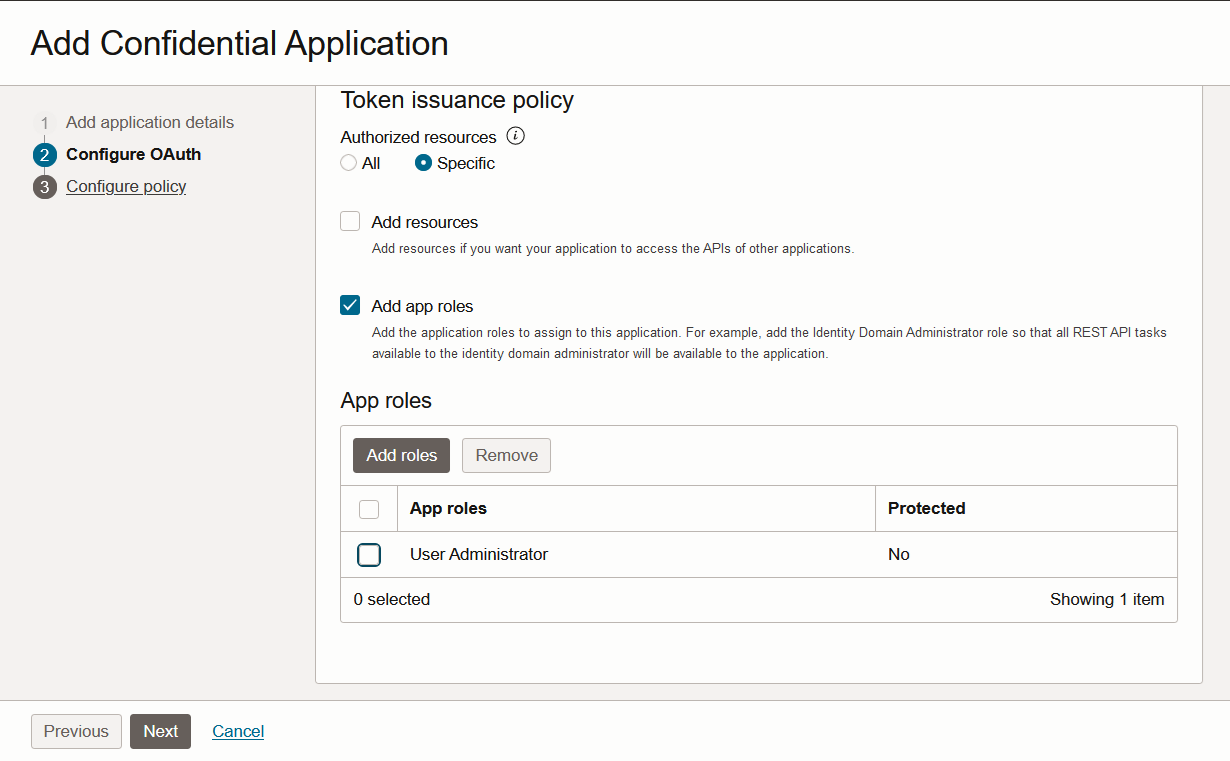
On the Configure OAuth page, scroll down and find the Token issuance policy section. Under Authorized resources, select Specific, then check Add app roles to open the App roles section of the workflow.
-
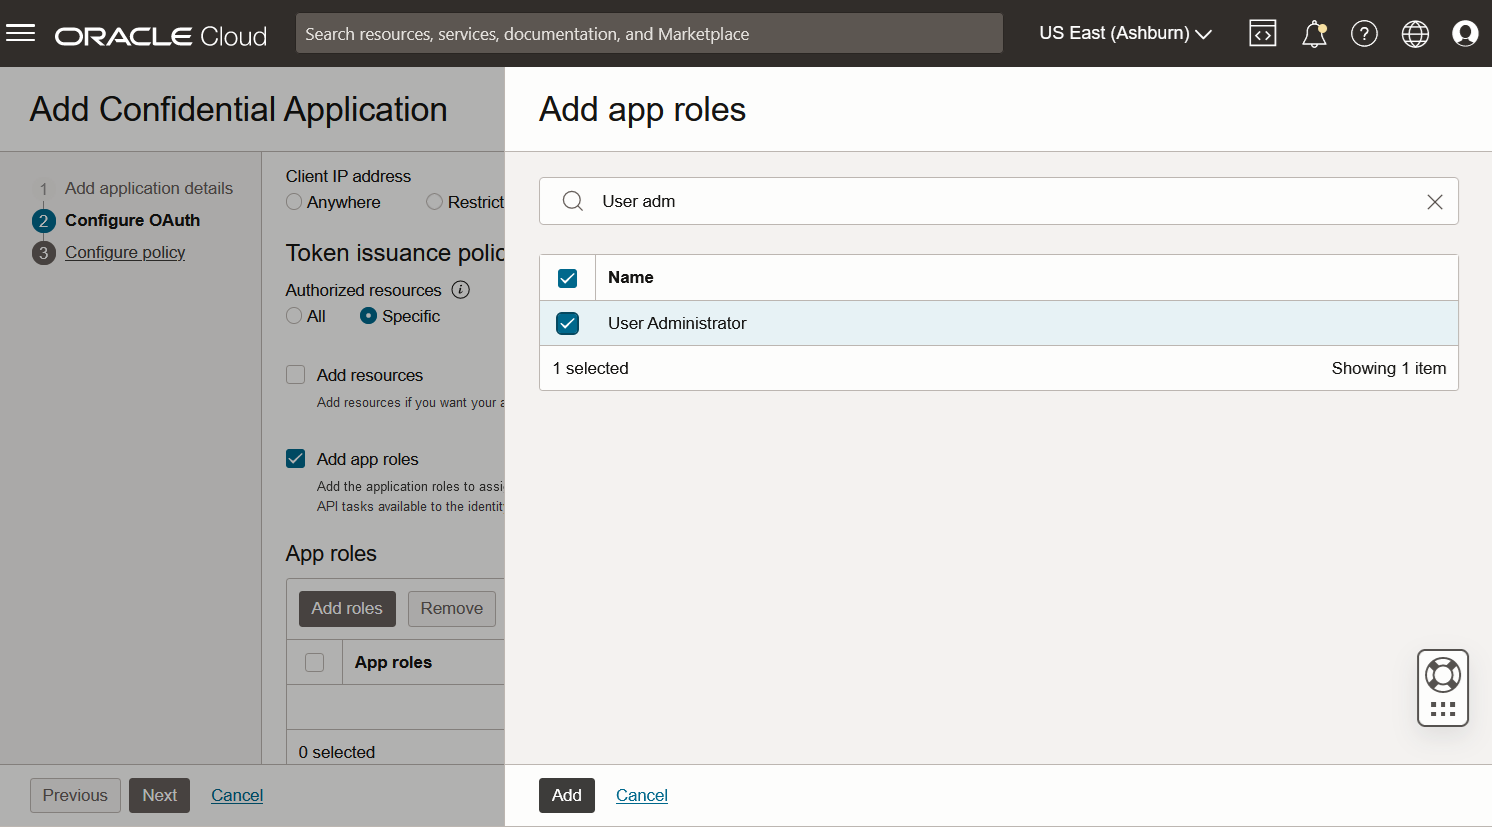
In the App roles section, select Add roles, and search for "User Administrator". In the list of search results, select User Administrator, then select Add.
-
With the User Administrator role displaying in the App Roles list, select Next.
-
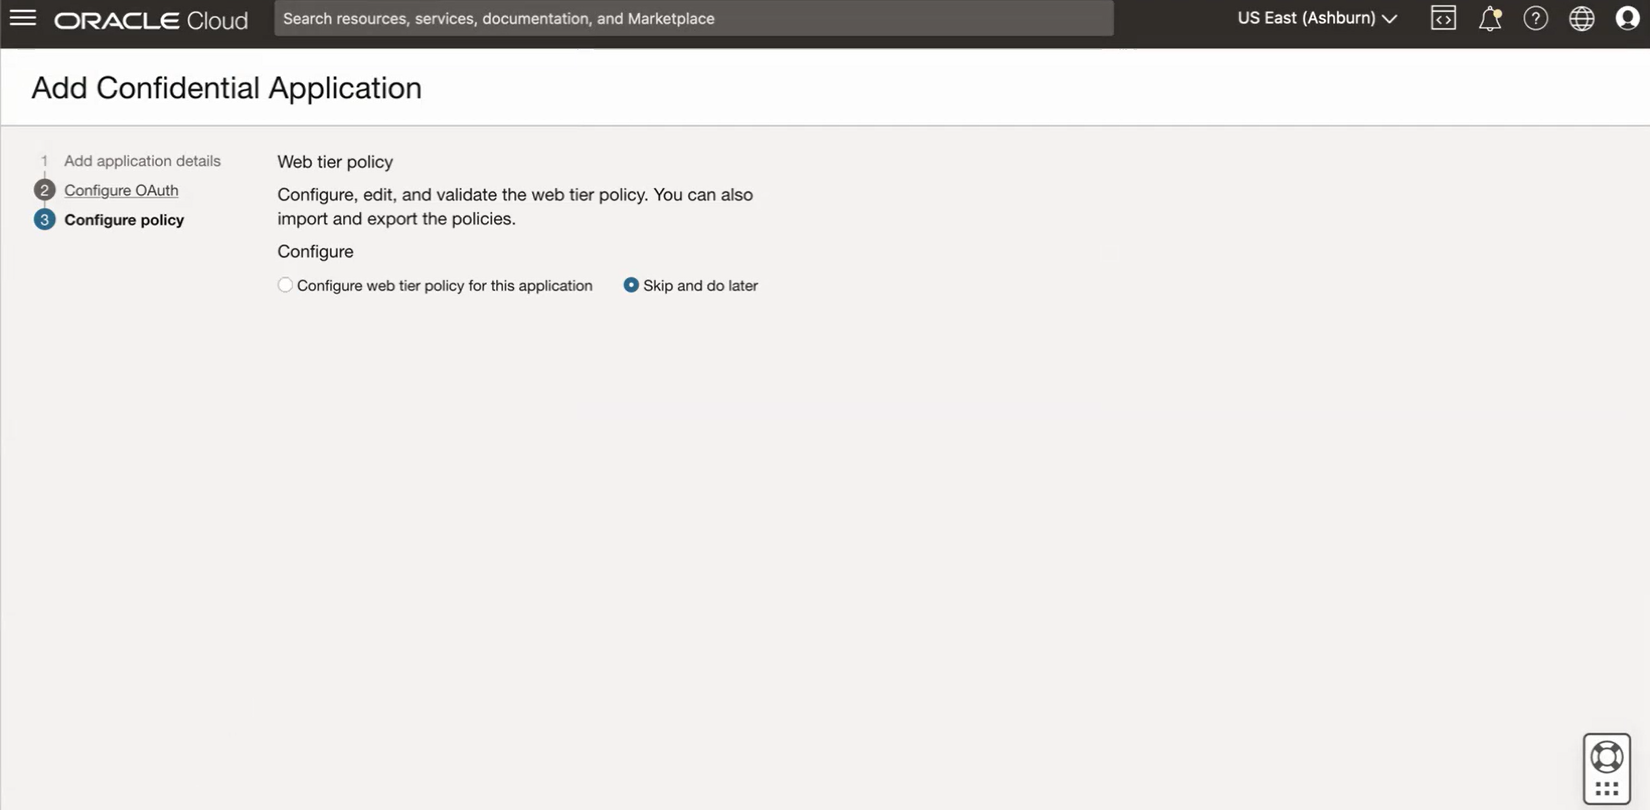
On the Configure policy page, review the default selection and select Finish.
-
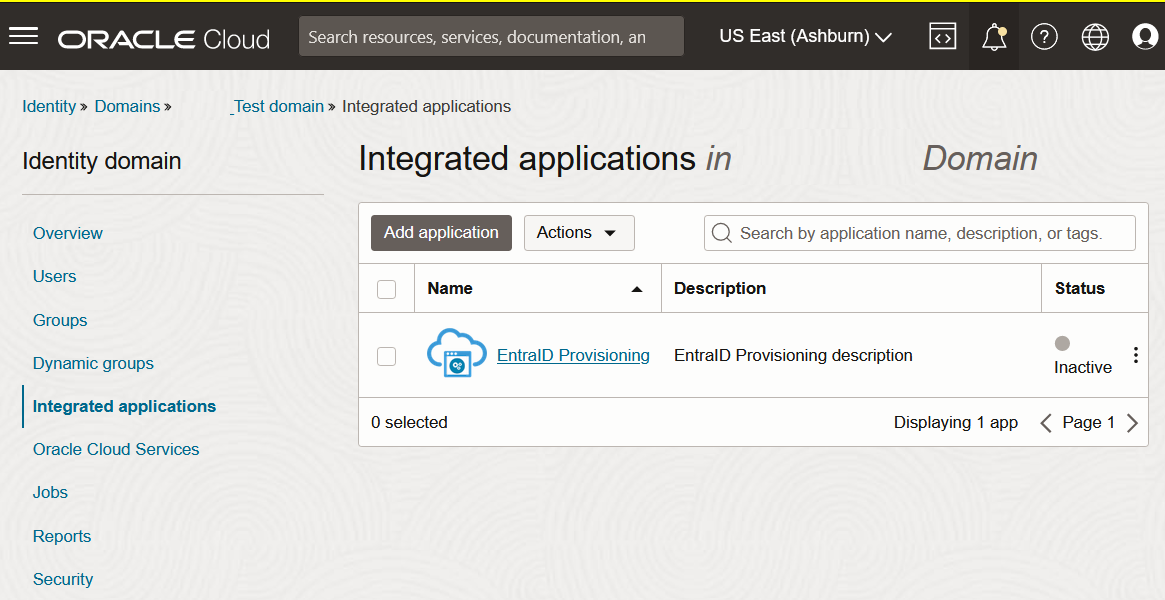
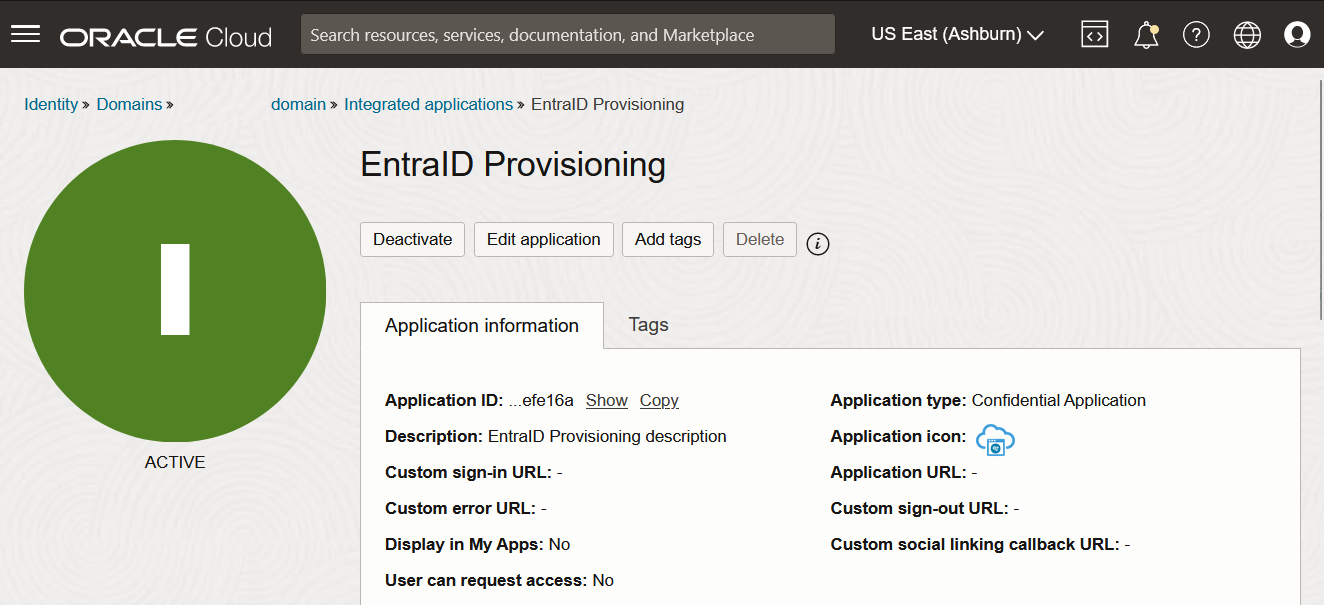
On the Integrated applications tab of the "Default" domain details page, select the name of the Entra ID application you created to open the details page for the application.
-
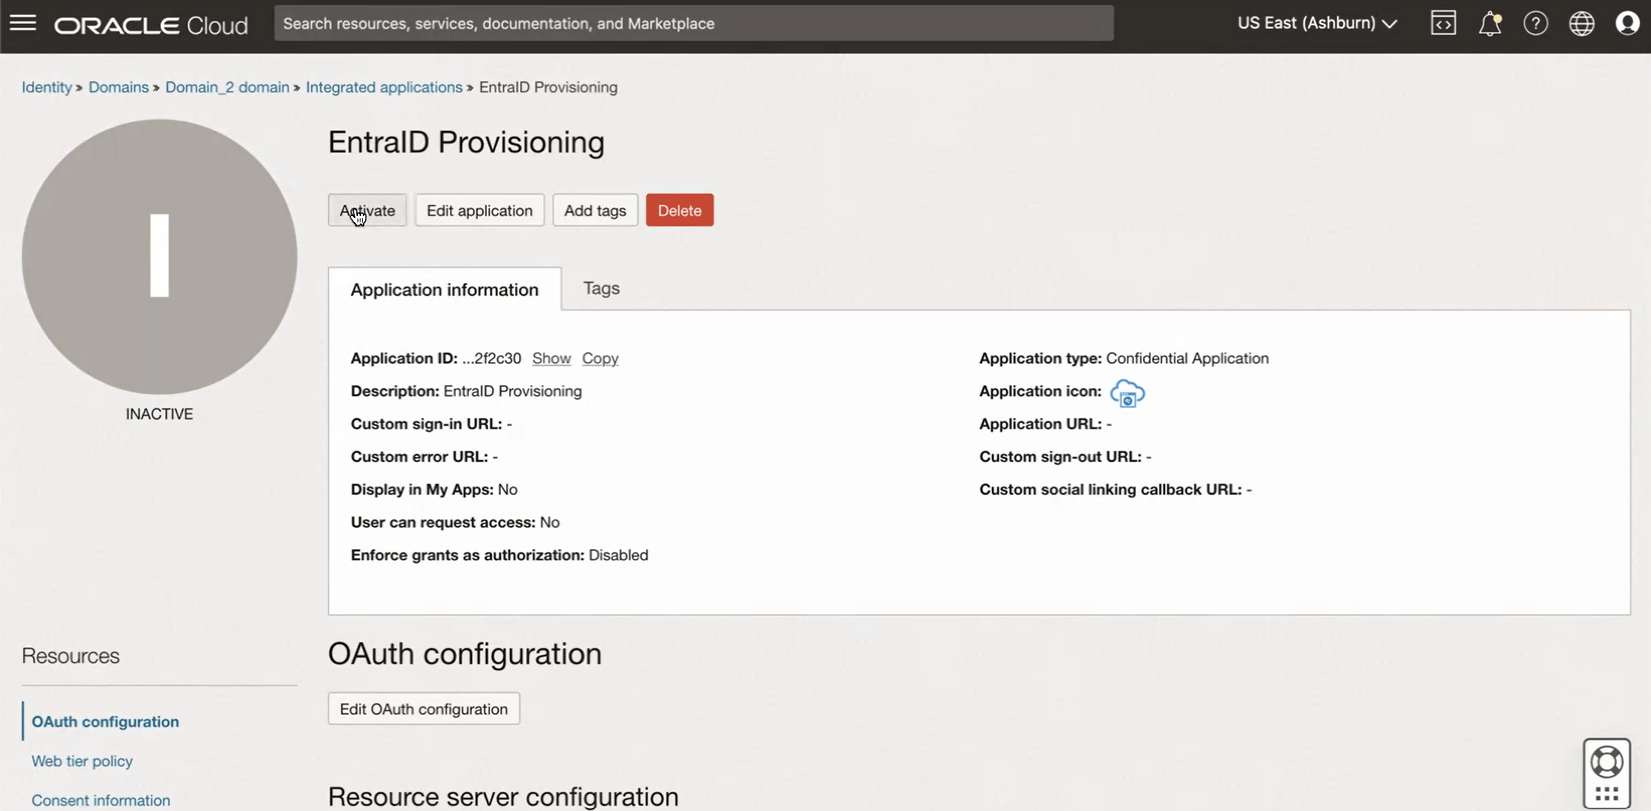
Select Activate on the details page.
Confirm that the application status is "Active".
-
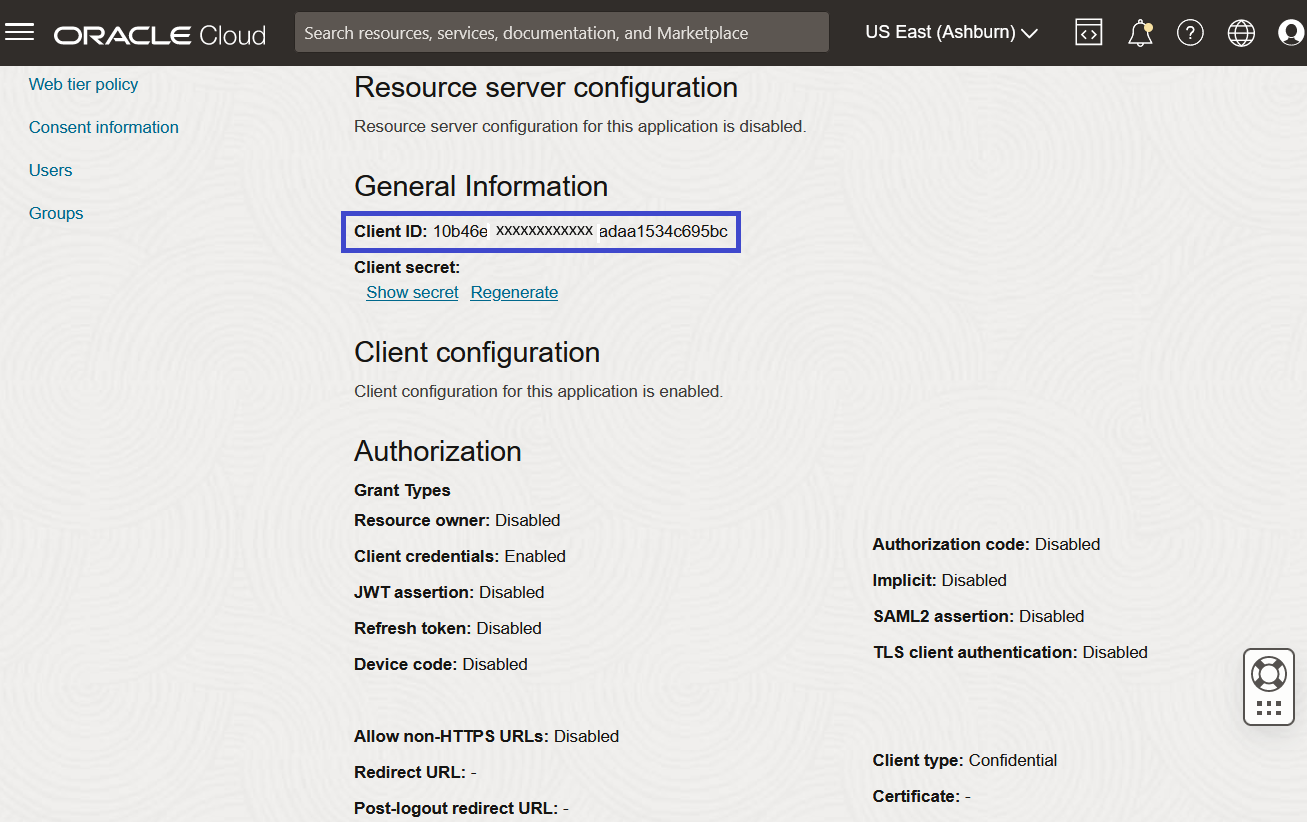
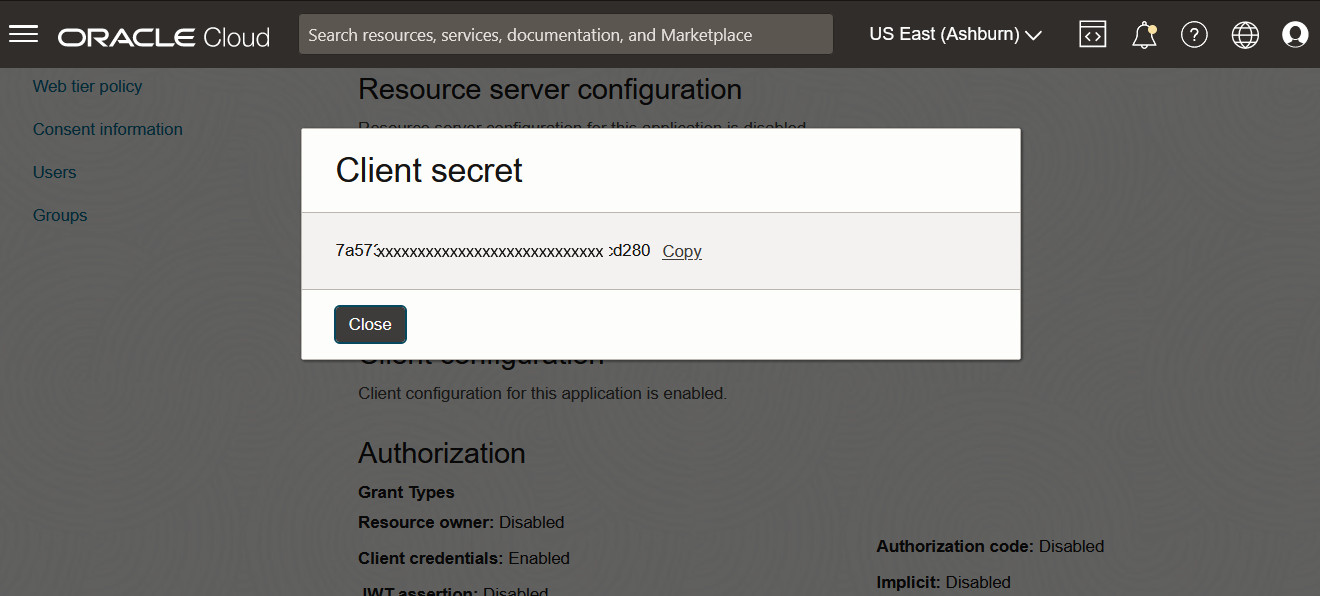
Find the General Information section of the details page for your Entra ID application. In this section, do the following:
- Copy the Client ID value to a notepad or other location on your computer for use in a CLI command discussed in the next step.
- Select Show secret, and copy the client secret to the file with your Client ID.
Close the Client secret dialog after copying the secret to continue.
-
Use the Client ID and Client secret values to create the following command.
echo -n <clientID>:<clientsecret> | base64 --wrap=0For example:
echo -n 7a5715example8b7429cdexample74a:63n8765exmaple49asbcs56abc235784 | base64 --wrap=0 -
Run the command in the OCI Cloud Shell (CLI). Select the Cloud Shell icon in the OCI Console header, then select Cloud Shell to open the CLI interface in your browser window. Paste the command into the CLI , then run the command.
See the following topics for more information:
- Open the navigation menu and select Identity & Security. Under Identity, select Domains.
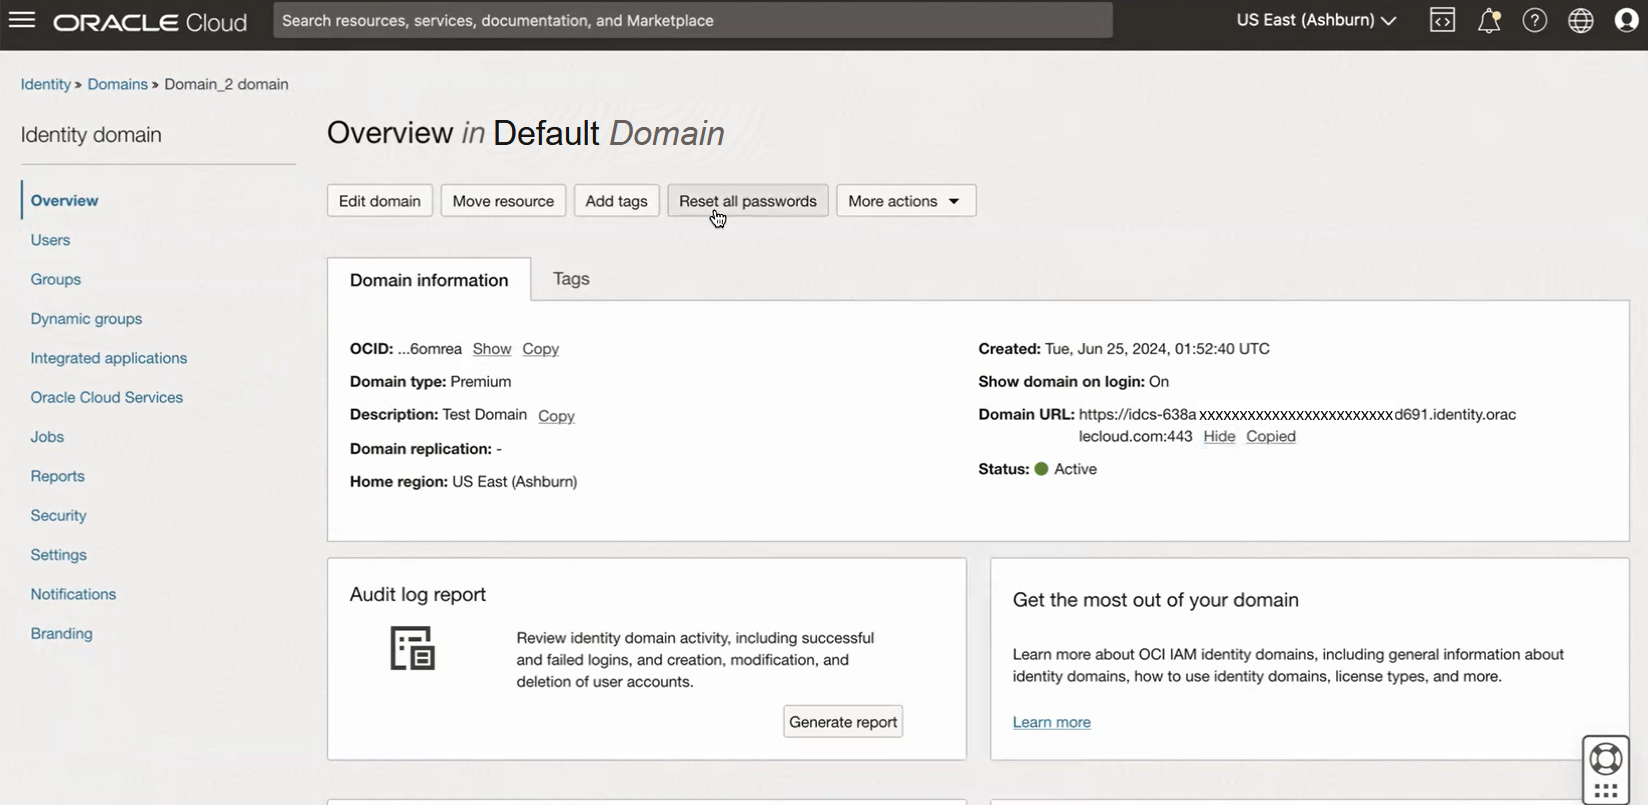
- Select Default Domain to open the details page for the "Default" domain.
-
On the domain Overview page, copy the Domain URL to a notepad or other location on your computer.
For example:
https://idcs-638a9b18aexampleb77becf0f123d691.identity.oraclecloud.com:443 -
Return to the Azure portal Enterprise Application page displaying SAML-based Sign-on details shown in step 25. Select Provisioning in the Manage section.
-
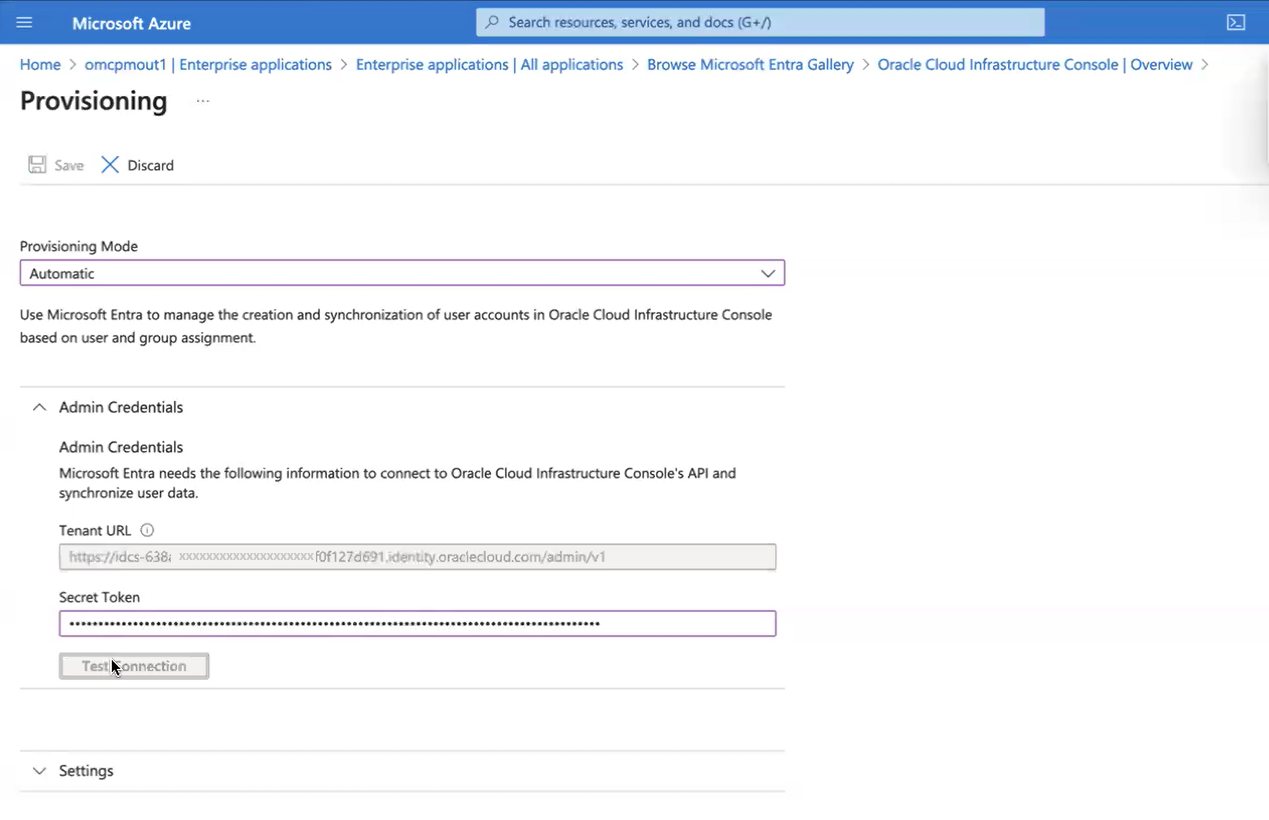
On the Provisioning page, enter the following:
- Provisioning Mode: Automatic
-
Tenant URL: Edit the copied URL from step 53 as follows:
- Remove ":443" at the end of the URL
- Add "/admin/v1" to the end of the URL
For example:
https://idcs-638a9b18aexampleb77becf0f123d691.identity.oraclecloud.com/admin/v1After editing the URL, paste it into the Tenant URL field.
- Secret Token: Paste the base64 encryption secret copied from the OCI Console in step 49.
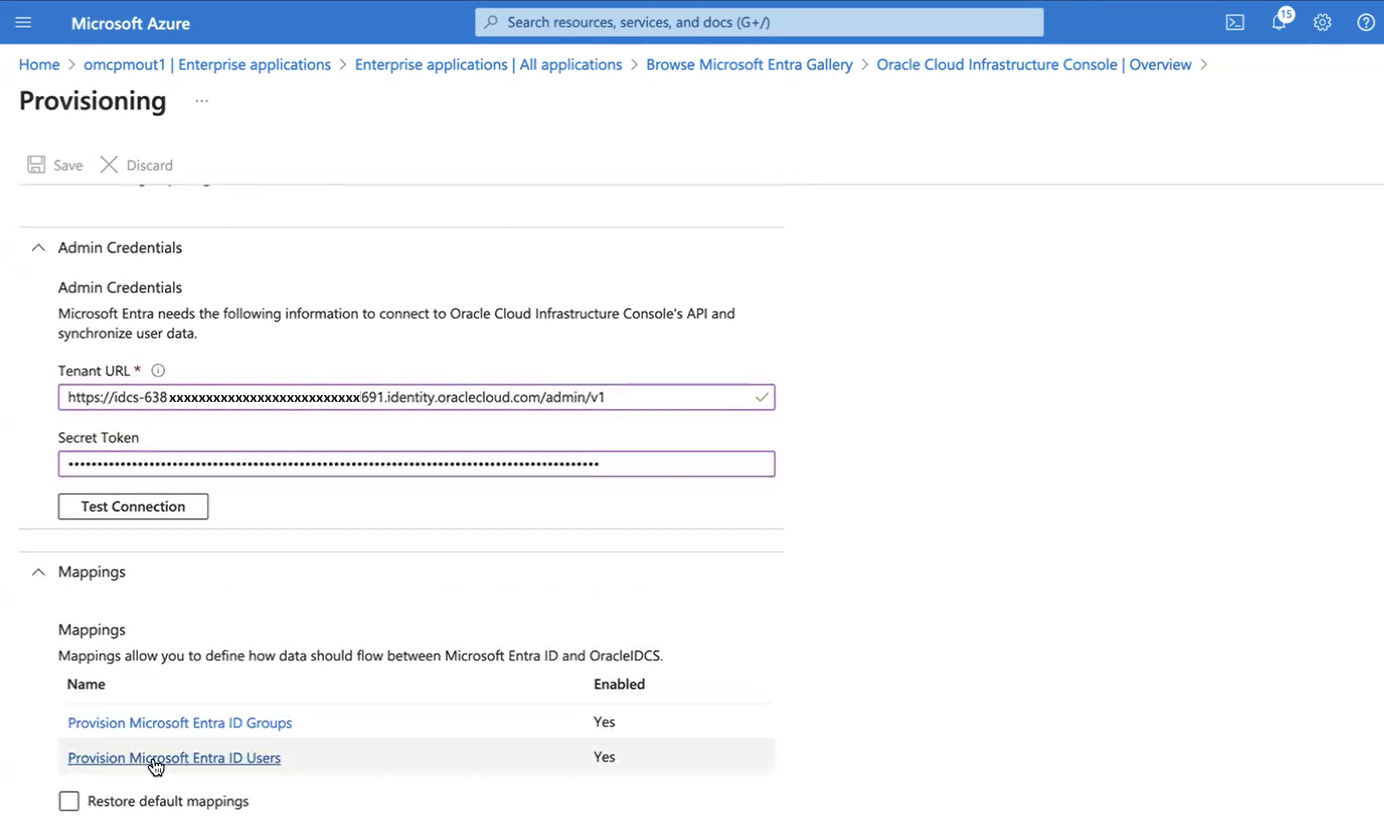
Select Test Connection, then select Save to continue.
Important
Wait for the message that confirms that the connection was successful. The message displays in the upper right corner of the page. -
On the Provisioning page, select Provision Microsoft Entra ID Users in the Mappings section.
-
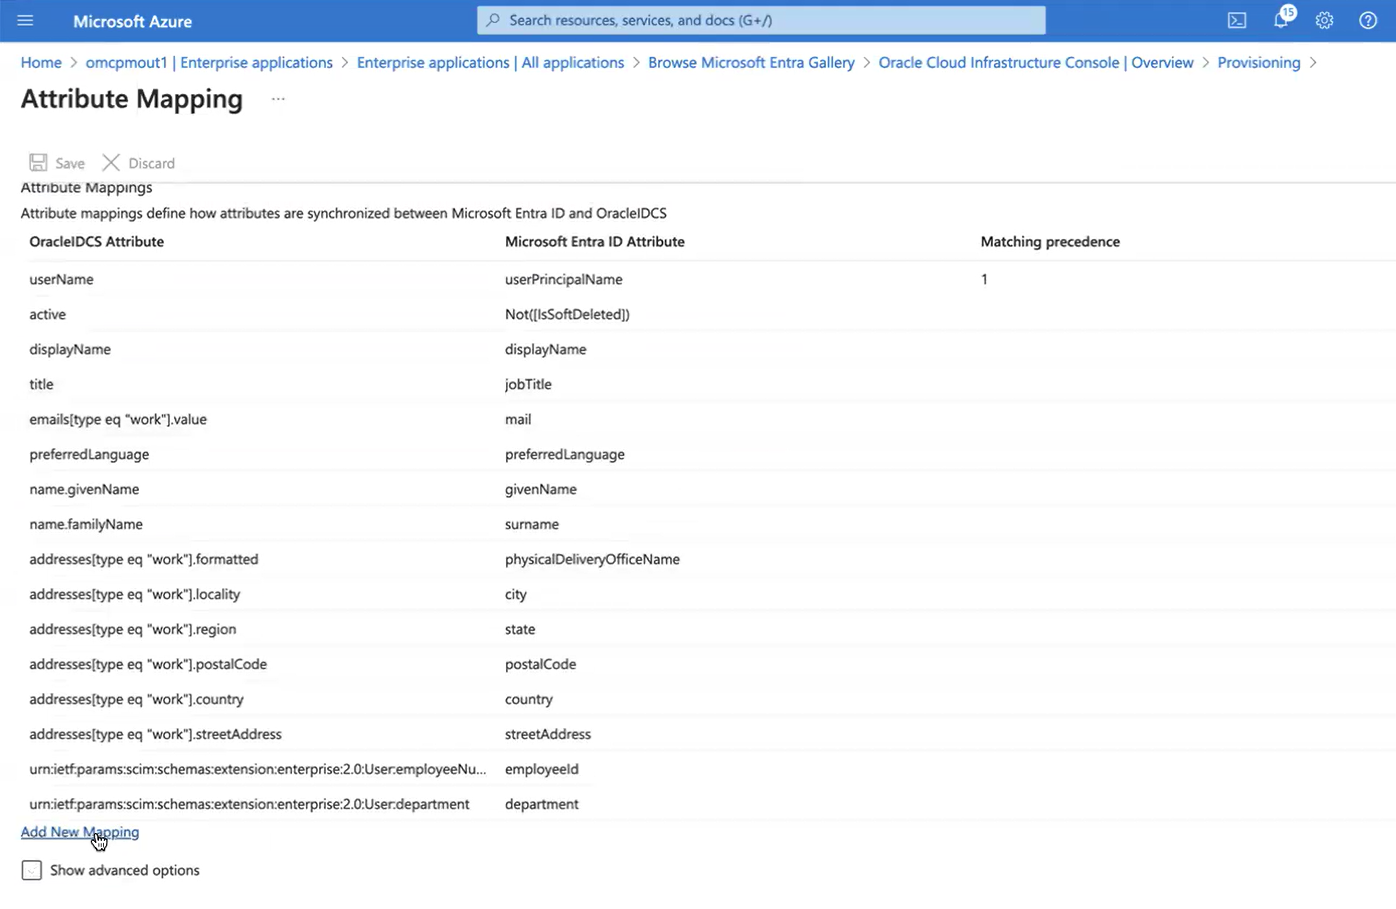
On the Attribute Mapping page, find the Mappings section and select Add New Mapping.
-
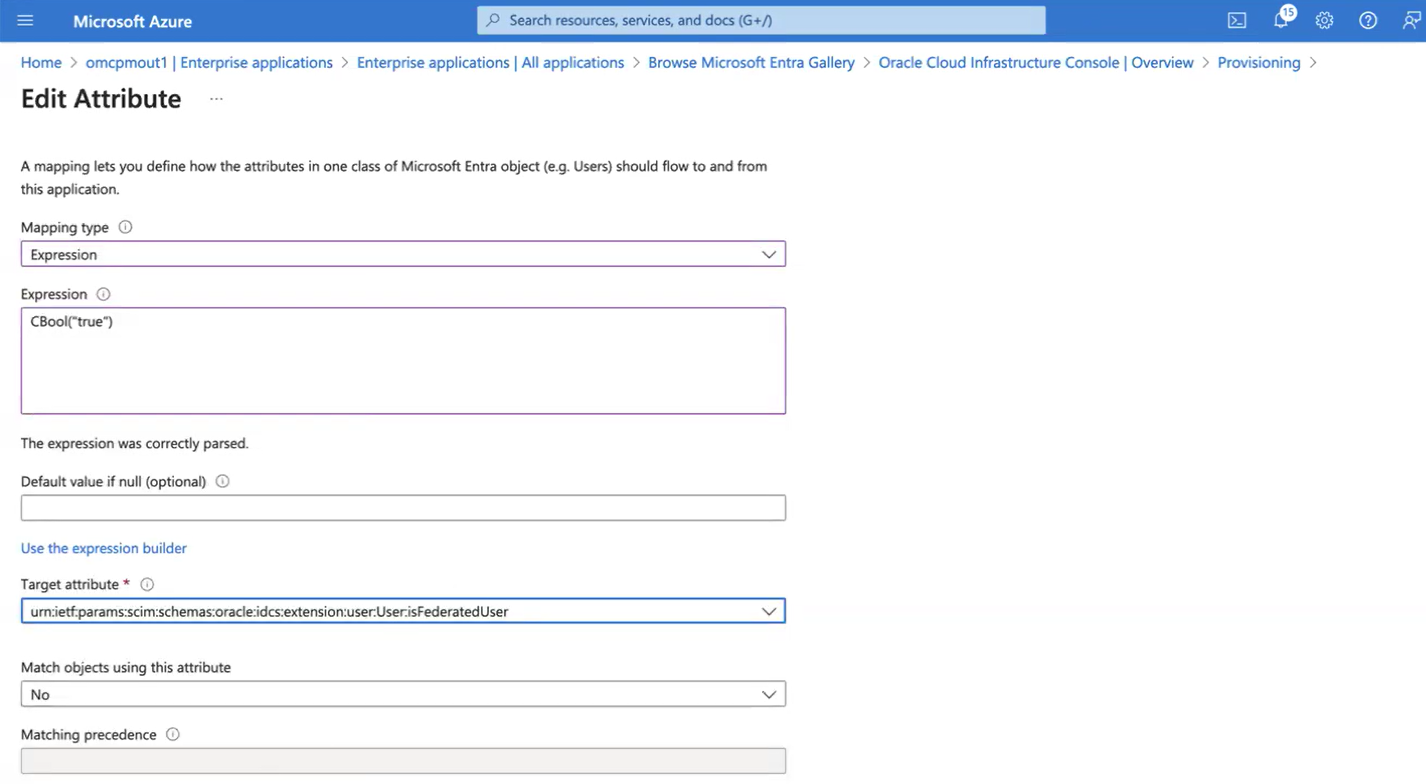
On the Edit Attribute page, enter the following:
- Mapping type: Expression
- Expression: CBool("true")
-
Target attribute: Select the string ending in ":isFederatedUser". For example:
urn:ietf:params:scim:schemas:oracle:idcs:extension:user:User:isFederateUser
Select OK to continue.
-
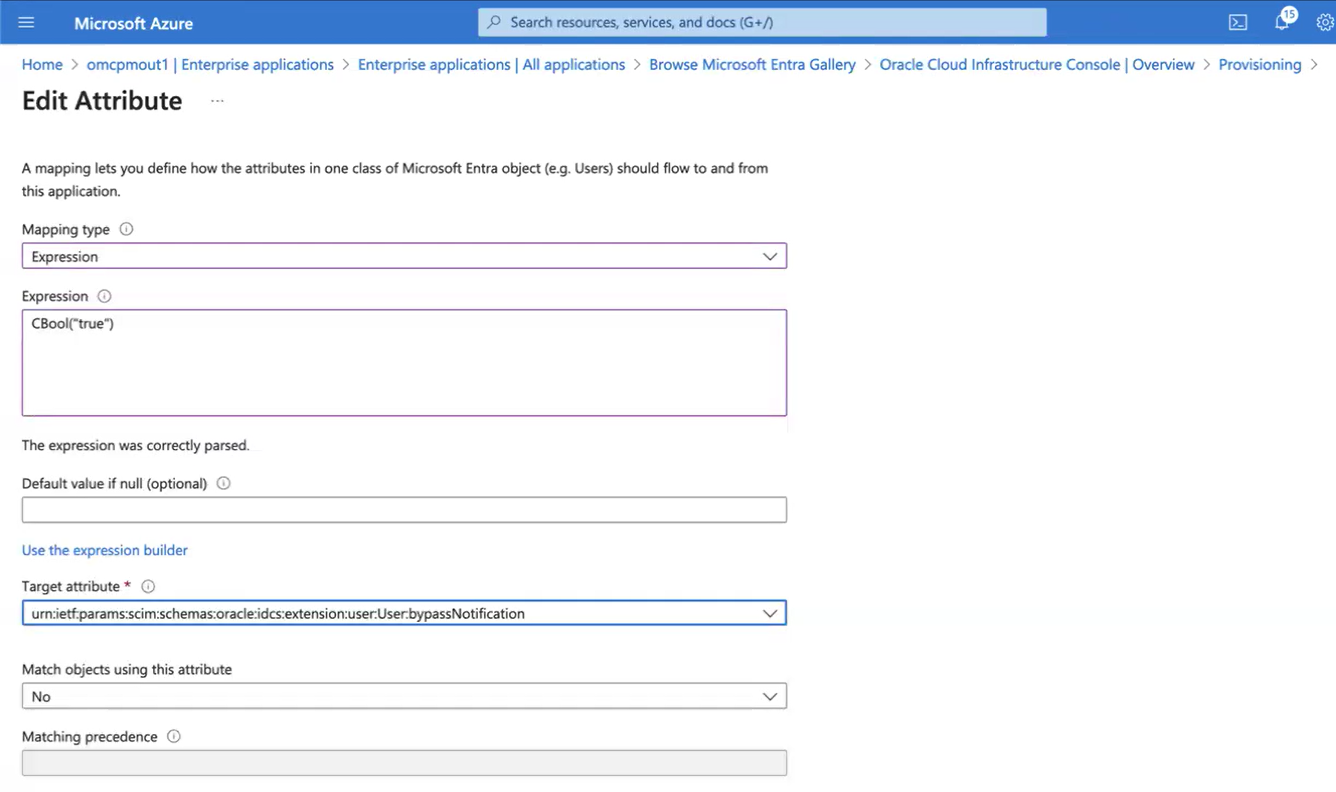
On the Attribute Mapping page, select Add New Mapping again to add a second mapping.
-
On the Edit Attribute page, enter the following:
- Mapping type: Expression
- Expression: CBool("true")
-
Target attribute: Select the string ending in ":bypassNotification". For example:
urn:ietf:params:scim:schemas:oracle:idcs:extension:user:User:bypassNotification
Select OK to continue.
-
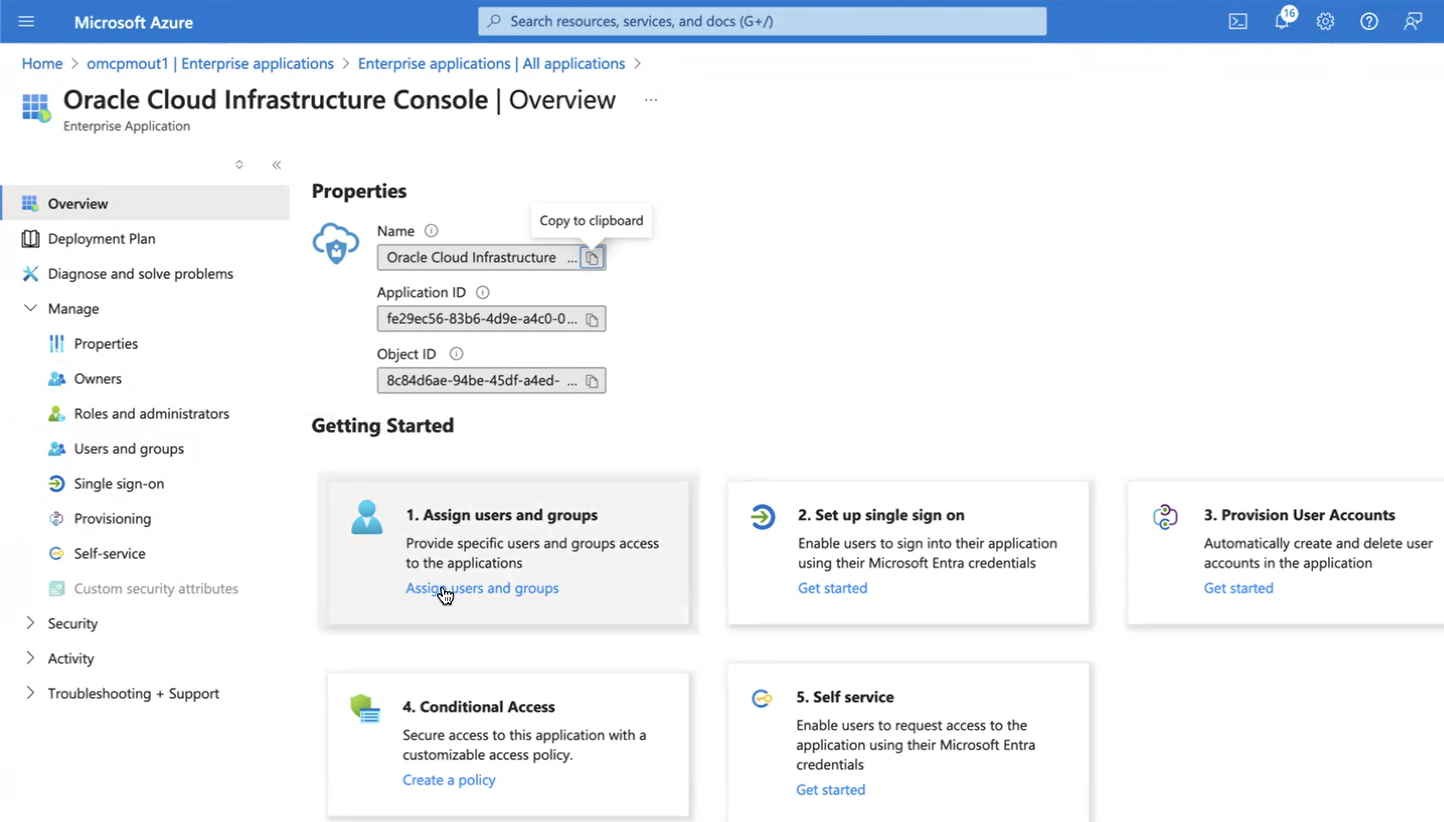
Navigate to the Azure Enterprise Applications Overview page for the application you created in steps 3 to 6 of this task, then select Assign users and groups.
Important
All users must include the following field values, or the user assignments in OCI fail:
- First name
- Last name
- Display name
- email address (if the OCI identity domain requires an email address)
To find if your OCI identity domain requires an email address to create new users, see Requiring User's Email Address for Account Creation. See step 24 in this task for information on configuring the unique identifier for Azure users.
-
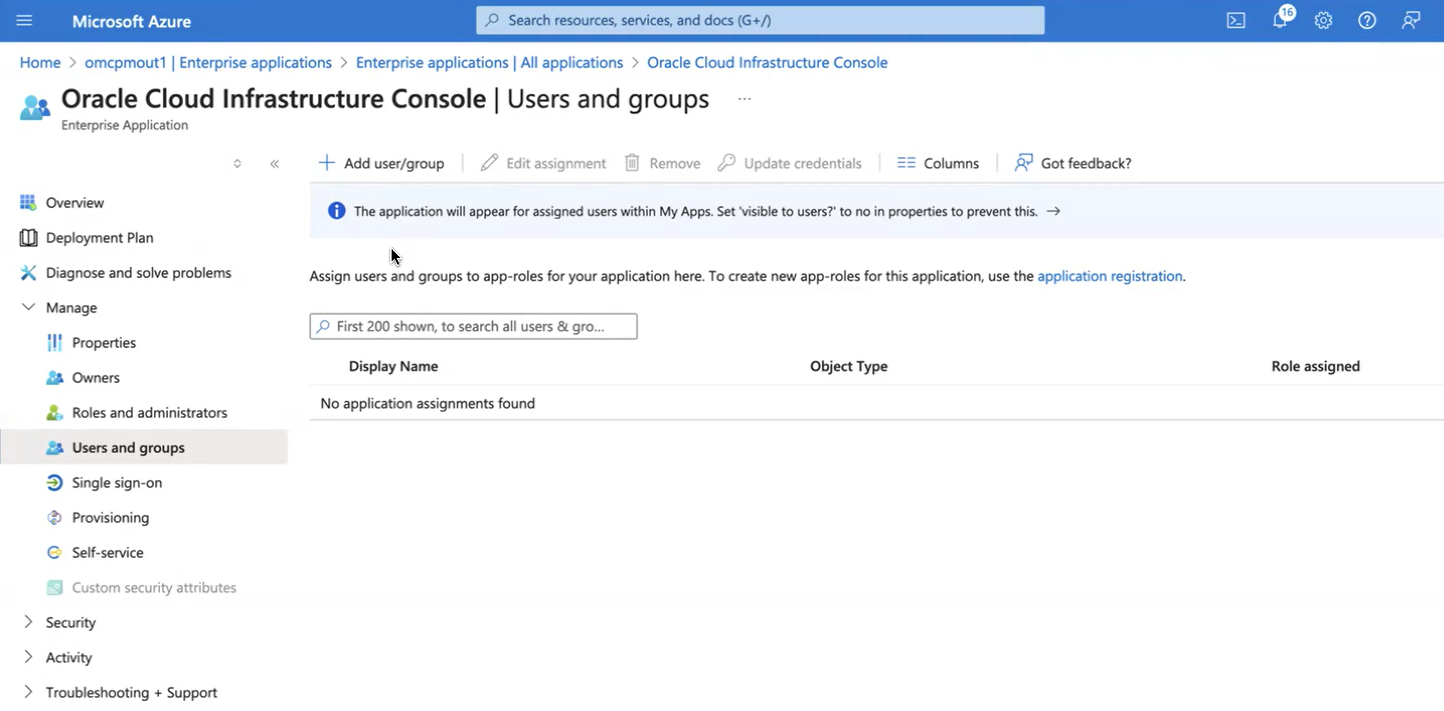
Select Add user/group and add the users and groups you want to include in the identity federation. After you enter the users and groups, they're synced with you OCI account.
What's Next?
You have completed Oracle Database@Azure onboarding. See What's Next After Onboarding? for suggestions on using the service and configuring your cloud accounts.
