5 Defining an ADF Mobile Application
This chapter describes using the overview editors to define the display behavior of the ADF Mobile application's springboard and navigation bar and how to designate content by embedding application features.
This chapter includes the following sections:
-
Section 5.1, "Introduction to Defining ADF Mobile Applications"
-
Section 5.2, "About the Mobile Application Configuration File"
-
Section 5.3, "Setting the Basic Information for an ADF Mobile Application"
-
Section 5.4, "Configuring the Springboard and Navigation Bar Behavior"
-
Section 5.5, "Configuring the Application Features within a Mobile Application"
-
Section 5.7, "About the Mobile Feature Application Configuration File"
-
Section 5.8, "Setting the Basic Configuration for the Application Feature"
-
Section 5.9, "Defining the Content Types for an Application Feature"
5.1 Introduction to Defining ADF Mobile Applications
An ADF Mobile application can have one or more view controller-type projects, each of which describes a set of features in an adfmf-feature.xml file. As described in Chapter 4, "Getting Started with ADF Mobile Application Development," ADF Mobile provides you with the adfmf-application.xml configuration file for the mobile application itself, and the adfmf-feature.xml file, which you use to define the content of the application. While you can manually change these files, ADF Mobile provides two overview editors that enable you to build these files declaratively.
5.1.1 Using the Overview Editor for adfmf-applications.xml
The overview editor enables you to configure the adfmf-application.xml file to describe a mobile application and its resources. Each page of the editor enables you to add or update the elements of the configuration file.
5.2 About the Mobile Application Configuration File
The adfmf-application.xml configuration file enables you to set the basic configuration of the ADF Mobile application by designating its display name, a unique application ID (to prevent naming collisions) and also by selecting the application features that will display on the application springboard (the equivalent of a home page on a smartphone). Further, this file enables you to create the user preferences pages for the mobile application. This file, which is generated by JDeveloper after you complete the application creation wizard as described in Section 4.2, "Creating an Application Workspace," is comprised of the elements listed in Table 5-1.
Table 5-1 Elements of the Application Descriptor File
| Element | Description |
|---|---|
|
|
The root element of |
|
|
A description of the application. |
|
|
A feature reference denotes which of the application features packaged in the FAR (Feature archive file) or defined in the |
|
|
Enables you to set the user preference options and behavior at the application level. You can also set how user preferences display and behave for the application features in the |
|
|
Enables you to set the login page for an application feature. For more information, see Chapter 17, "ADF Mobile Application Security." |
|
|
Enables you to define the behavior of the navigation bar and the springboard. A springboard is a home page in which all of the application icons and labels for the embedded application features are organized in a List View. A springboard provides a top-level view of all of the applications available to a user, who can page through and select applications. For more information, see Section 5.4, "Configuring the Springboard and Navigation Bar Behavior." |
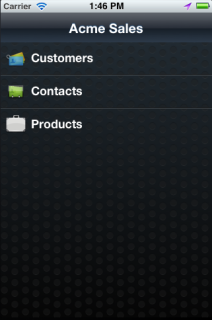
Example 5-1 illustrates the adfmf-application.xml file for an application called Acme Sales, a mobile application whose content includes a customer contacts application (<adfmf:featureReference id="customers" showOnNavigationBar="true"/>) which displays on the springboard, as shown in Figure 5-2.
Example 5-1 The adfmf-application.xml File
<?xml version="1.0" encoding="UTF-8" ?>
<adfmf:application xmlns:xsi="http://www.w3.org/2001/XMLSchema-instance"
                   xmlns:adfmf="http://xmlns.oracle.com/adf/mf"
                   name="Acme Sales"
                   id="com.company.AcmeSales"
                   appControllerFolder="ApplicationController"
                   version="1.0"
                   vendor="Oracle"
                   listener-class="application.LifeCycleListenerImpl">
    <adfmf:description>Sample Application</adfmf:description>
<adfmf:featureReference id="Customers"
                        allowDeviceAccess="true"
                        showOnSpringboard="true"
                        showOnNavigationBar="true"/>
<adfmf:featureReference id="HCM"
                        allowDeviceAccess="true"
                        showOnSpringboard="true"
                        showOnNavigationBar="true"/>
<adfmf:featureReference id="PROD"
                        allowDeviceAccess="true"
                        showOnSpringboard="true"
                        showOnNavigationBar="true"/>
    <adfmf:preferences>
        <adfmf:preferenceGroup id="Root.Security" label="Security">
            <adfmf:preferenceText id="OracleSecurityProvider_serviceURL"
                                  label="Security URL"
                                  default="http://somecomputer.example.com:someaddress/
                                           idaas_rest/rest/tokenservice1/tokens/getprofile"/>

            <adfmf:preferenceText id="OracleADFMobile_UserName" label="User Name" default="sean"/>
            <adfmf:preferenceText id="OracleADFMobile_Password" label="Password" default="welcome1"
                                                                secret="true"/>
        </adfmf:preferenceGroup>
    </adfmf:preferences>
    <adfmf:navigation>
        <adfmf:springboard enabled="false"/>
        <adfmf:navigationBar enabled="true"/>
    </adfmf:navigation>
</adfmf:application>
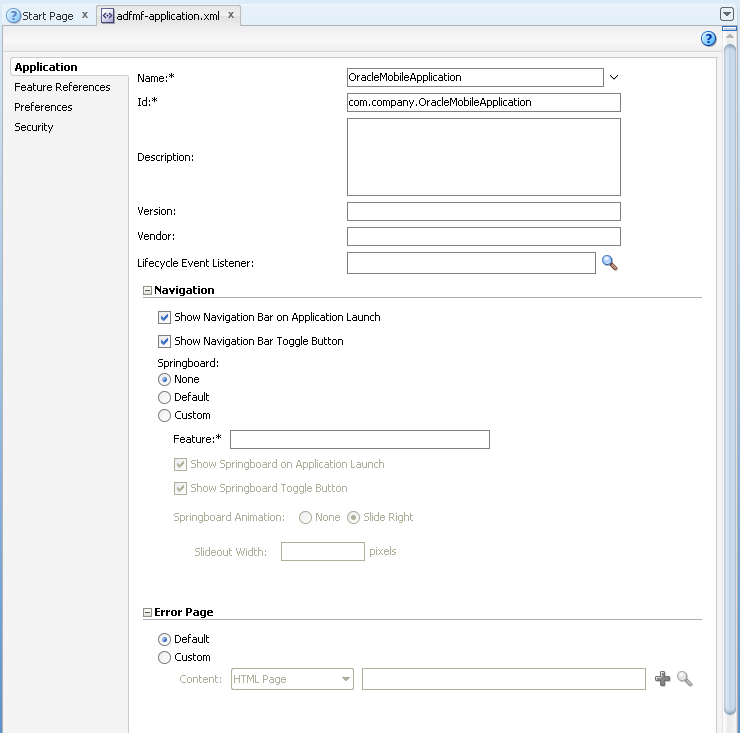
You can modify these elements declaratively using the overview editor, shown in Figure 5-2, or manually using the Source editor. You can use either of these approaches interchangeably.
5.3 Setting the Basic Information for an ADF Mobile Application
The Application page enables you to set the name, application ID, and how the mobile application displays.
5.3.1 How to Set the ID and Display Behavior for a Mobile Application
The Application page of the overview editor, shown in Figure 5-2, enables you to name the mobile application and control the display of the mobile application within the springboard and navigation bar.
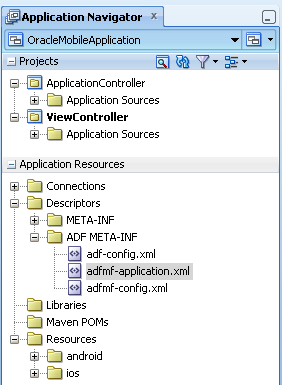
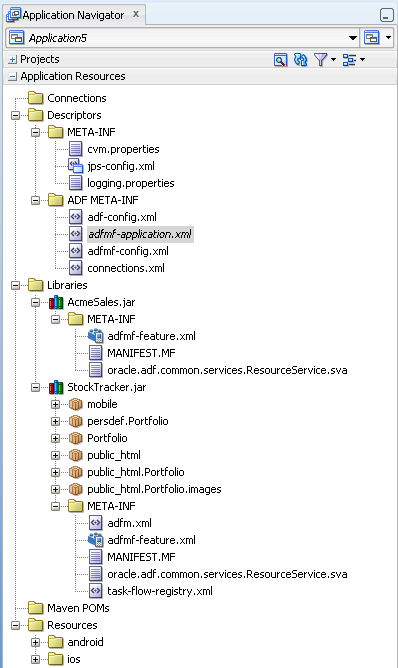
Open the overview editor for the adfmf-application.xml file by double-clicking the adfmf-application.xml file (located in the ADF META-INF node of the Application Resources panel, as shown in Figure 5-3).
To set the basic information for a mobile application:
-
Choose the Application page and if needed, choose the Overview tab.
Note:
By default, the editor opens the Application page.
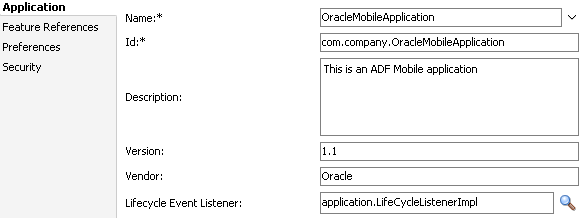
Figure 5-4 shows the portion of the application page where you define the basic information.
-
Enter a display name for the application in the Name field. This attribute can be localized. For more information, see Section 5.10, "Working with Resource Bundles."
Note:
ADF Mobile uses the value entered in this field as the name for the iOS archive file (that is, the
.ipafile) that it creates when you deploy the application to an iOS-powered device. For more information, see Section 16.2.4, "How to Create an iOS Deployment Profile." -
Enter a unique ID in the Id field.
To avoid naming collisions, Android and iOS use reverse package names, such as com.company.application. JDeveloper prepends com.company as a reverse package to the application name, but you can overwrite this value with another as long as it is unique and adheres to the ID guidelines for both iOS- and Android-powered devices. For iOS application, see the "Creating and Configuring App IDs" section in iOS Team Administration Guide (available from the iOS Developer Library at
http://developer.apple.com/library/ios). For Android, refer to the information provided about the Android manifest file available from the Android Developers website (http://developer.android.com/guide/topics/manifest/manifest-intro.html). You can overwrite this ID in the deployment profiles described in Section 16.2.3, "How to Create an Android Deployment Profile" and Section 16.2.4, "How to Create an iOS Deployment Profile."Note:
To ensure that an application deploys successfully to an Android-powered device or emulator, the ID must begin with a letter, not with a number. For example, an ID comprised of a wholly numeric value, such as 925090 (com.company.925090) will prevent the application from deploying. An ID that begins with letters, such as hello925090 (com.company.hello925090) will enable the deployment to succeed.
-
Enter a short, but detailed summary of the application that describes the application's purpose in the Description field.
-
Enter the version in the Version field.
-
Enter the name of the vendor who originated this application in the Vendor field.
-
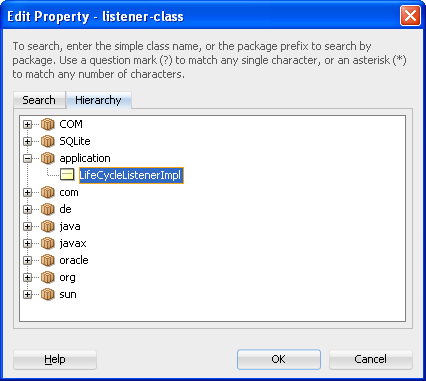
Click Browse in the Lifecycle Event Listener field to invoke the Edit Property dialog, shown in Figure 5-5, to register the event listener that enables runtime calls for start, stop, activate, and deactivate events. You must enter the fully qualified class name of the event listener. This is an optional field.
The default application listener class is
application.LifeCycleListenerImpl. ADF Mobile does not register this class by default, because it starts the JVM and therefore may not be preferable for each ADF Mobile application. You must instead register this class manually using the Edit Property dialog, shown in Figure 5-5. After you close this dialog, JDeveloper updates<adfmf:application>element with alistener-classattribute, as illustrated in Example 5-2.Example 5-2 Adding the listener-class Attribute
<adfmf:application xmlns:xsi="http://www.w3.org/2001/XMLSchema-instance"
                   xmlns:adfmf="http://xmlns.oracle.com/adf/mf"
                   name="OracleMobileApplication"
                   id="com.company.OracleMobileApplication"
                   appControllerFolder="ApplicationController"
                   listener-class="application.LifeCycleListenerImpl"
                   version="1.1"
                   vendor="Oracle">
   <adfmf:description>This is an ADF Mobile application</adfmf:description>
   <adfmf:featureReference id="feature1"/>
</adfmf:application>
For more information, see Section 5.6, "About Lifecycle Event Listeners."
5.4 Configuring the Springboard and Navigation Bar Behavior
You can configure the ADF Mobile application to control the display behavior of the springboard and the navigation bar in the following ways:
-
Hide or show the springboard and navigation bar to enable the optimal usage of the mobile device's real estate. These options override the default display behavior for the navigation bar, which is shown by default unless otherwise specified by the application feature.
-
Enable the springboard to slide from the right. By default, the springboard does not occupy the entire display, but instead slides from the left, pushing the active content (which includes the navigation bar's Home button and application features) to the right.
5.4.1 How to Configure Application Navigation
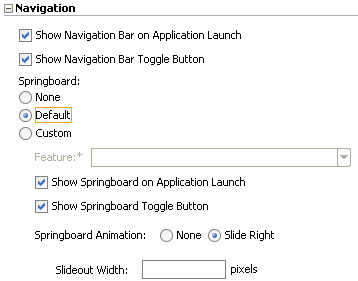
The Navigation options of the Applications page, shown in Figure 5-6, enable you to hide or show the navigation bar, select the type of springboard used by the application, and define how the springboard reacts when users page through applications.
You must select the Application page of the adfmf-application.xml overview editor.
To set the display behavior for the navigation bar:
-
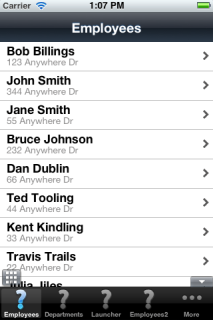
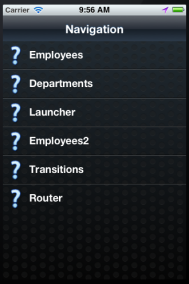
Select Show Navigation Bar on Application Launch to enable the mobile application to display its navigation bar, rather than the springboard, by default after it is launched, as shown in Figure 5-7.
If you clear this option, then you hide the navigation bar when the application starts, presenting the user with the springboard as the only means of navigation. Because the navigation bar serves the same purpose as the springboard, hiding it can, in some cases, remove redundant functionality.
-
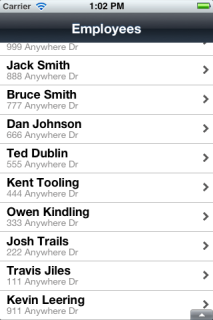
Select Show Navigation Bar Toggle Button to hide the navigation bar when the content of a selected application feature is visible. Figure 5-8 illustrates this option, showing how the navigation bar illustrated in Figure 5-7 becomes hidden by the application feature content.
This option is selected by default; the navigation bar is shown by default if the show or hide state is not specified by the application feature.
To set the display behavior for the springboard:
-
Select the type of springboard (if any):
-
None—Select this option if the springboard should not be displayed in the application.
-
Default—Select to display the default springboard provided by ADF Mobile, which uses styles illustrated in Figure 5-1. The default springboard is implemented as an ADF Mobile AMX page. For more information, see Section 5.4.5, "What You May Need to Know About Custom Springboard Application Features with ADF Mobile AMX Content."
-
Custom—Select to use a customized springboard, which can be implemented either as an HTML page or as an ADF Mobile AMX page. This application is declared as an application feature in the
adfmf-feature.xmlfile, which is located within a view controller project. For more information, see Section 5.8.1, "How to Define the Basic Information for the Application Feature." For information on enabling navigation within a customized springboard written in HTML, see Chapter 6, "Controlling the Display of Application Features."-
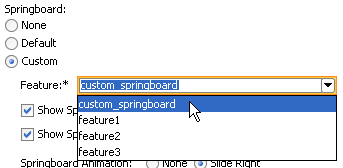
Feature—Select the application feature used as a springboard, as shown in Figure 5-10.
Note:
A custom springboard application feature cannot display within the ADF Mobile application's navigation bar, nor can it display as one of the application features that display in its springboard. For more information, see Section 5.5.1, "How to Designate the Content for a Mobile Application."
-
-
-
Select Show Springboard on Application Launch to enable the mobile application to display the springboard to the end user after the mobile application has been launched. (This option is only available for the Default or Custom options.)
-
Select Show Springboard Toggle Button to enable the display of the springboard button, shown in Figure 5-10, that displays within an application feature. Figure 5-7, "The Navigation Bar, Shown By Default (on iPhone)" shows this button within the context of an application feature. This option is only available for the Default or Custom options.
To set the slide out behavior for the springboard:
-
Select Springboard Animation and then choose Slide Right. The springboard occupies an area determined by the number of pixels (or the percent) entered for the Slideout Width option. If you select None, then the springboard cannot slide from the right (that is, ADF Mobile does not provide the animation to enable this action). The springboard takes the entire display area.
Note:
The slide out option is only applicable when you select either the Custom or Default springboard options.
-
Set the width (in pixels). The default width of a springboard on an iOS-powered device is 320 pixels. On Android-powered devices, the springboard occupies the entire screen by default, thereby taking up all of the available width.
Note:
If the springboard does not occupy the entire area of the display, then an active application feature occupies the remainder of the display. For more information, see Section 5.4.3, "What Happens When You Set the Animation for the Springboard."
5.4.2 What Happens When You Configure the Navigation Options
Setting the springboard and navigation bar options updates or adds elements to the adfmf:application.xml file's <adfmf:navigation> element. For example, selecting None results in the code updated with <springboard enabled="false"> as illustrated in Example 5-3.
Example 5-3 Preventing the Displaying the Springboard
<adfmf:application>
  ...
  <adfmf:navigation>
     <adfmf:navigationBar enabled="true"/>
     <adfmf:springboard enabled="false"/>
  </adfmf:navigation>
</adfmf:application>
Tip:
By default, the navigation bar is enabled, but the springboard is not. If you update the XML manually, you can enable the springboard as follows:
<adfmf:application>
  ...
<adfmf:navigation>
    <adfmf:springboard enabled="true"/>
  </adfmf:navigation>
  ...
</adfmf:application>
Example 5-4 illustrates how the enabled attribute is set to true when you select Default.
Note:
Because the springboard fills the entire screen of the device, the navigation bar and the springboard do not appear simultaneously.
Example 5-4 Enabling the Display of the Default Springboard
<adfmf:application>
  ...
  <adfmf:navigation>
     <adfmf:navigationBar enabled="true"/>
     <adfmf:springboard enabled="true"/>
  </adfmf:navigation>
</adfmf:application>
If you select Custom and then select the application feature used as the springboard, the editor populates the <adfmf:navigation> element as illustrated in Example 5-5. The id attribute refers to an application feature defined in the adfmf-feature.xml file that is used as a custom springboard.
5.4.3 What Happens When You Set the Animation for the Springboard
Example 5-6 shows the navigation block of the adfmf-application.xml file, where the springboard is set to slide out and occupy a specified area of the display (213 pixels).
Example 5-6 Configuring Springboard Animation
<adfmf:navigation>
   <adfmf:navigationBar enabled="true"
                        displayHideShowNavigationBarControl="true"/>
   <!-- default interpretation of width is pixels -->
   <adfmf:springboard enabled="true"
                      animation="slideright"
                      width="213"
                      showSpringbaordAtStartup="true"/>
</adfmf:navigation>
The following line disables the animation:
<adfmf:springboard enabled="true" animation="none"/>
The following line sets the springboard to occupy 100 pixels from the left of the display area and also enables the active application feature to occupy the remaining portion of the display:
<adfmf:springboard enabled="true" animation="slideright" width="100px"/>
In addition to the animation, Example 5-6 demonstrates the following:
-
The use of the
showSpringboardAtStartupattribute, which defines whether the springboard displays when the application starts. (By default, the springboard is displayed.) -
The use of the
navigationBar'sdisplayHideShowNavigationBarControlattribute.
To prevent the springboard from displaying, set the enabled attribute to false.
5.4.4 What You May Need to Know About Custom Springboard Application Features with HTML Content
The default HTML springboard page provided by ADF Mobile uses the following technologies, which you may also want to include in a customized login page:
-
Cascading Style Sheets (CSS)—Defines the colors and layout.
-
JavaScript—The
<script>tag embedded within the springboard page contains methods described in Chapter 6, "Controlling the Display of Application Features" that call PhoneGap APIs. In addition, the HTML page uses JavaScript to respond to the callbacks and to detect page swipes. When swipe events are detected, JavaScript enables the dynamic modification of the style sheets to animate the page motions. -
WebKit—Provides smooth animation of the icons during transitions between layouts as well as between different springboard pages. For more information on the WebKit rendering engine, see
http://www.webkit.org/.
Springboards written in HTML are application features declared in the adfmf-feature.xml file and referenced in the adfmf-application.xml file.
5.4.5 What You May Need to Know About Custom Springboard Application Features with ADF Mobile AMX Content
Like their HTML counterparts, springboards written using ADF Mobile AMX are application features that are referenced by the ADF Mobile application, as described in Section 5.5.1, "How to Designate the Content for a Mobile Application."
Note:
A custom springboard page (authored in either HTML or ADF Mobile AMX) must reside within a view controller project which also contains the adfmf-feature.xml file. For more information, see Section 5.5.1, "How to Designate the Content for a Mobile Application."
The default springboard (adfmf.default.springboard.jar, located in jdev_install\jdeveloper\jdev\extensions\oracle.adf.mobile\lib) is an ADF Mobile AMX page that is bundled in a Feature Archive (FAR) JAR file and deployed with other FARs that are included in the ADF Mobile application. This JAR file includes all of the artifacts associated with a springboard, such as the DataBindings.cpx and PageDef.xml files. This file is only available after you select Default as the springboard option in the adfmf-application.xml file. Selecting this option also adds this FAR to the application classpath. For more information, see Section 16.5, "Deploying Feature Archive Files (FARs)."
The default springboard (springboard.amx, illustrated in Example 5-7) is implemented as an ADF Mobile AMX application feature.
Example 5-7 The Default Springboard page, springboard.amx
<?xml version="1.0" encoding="UTF-8" ?>
<amx:view xmlns:xsi="http://www.w3.org/2001/XMLSchema-instance"
          xmlns:amx="http://xmlns.oracle.com/adf/mf/amx"
          xmlns:dvtm="http://xmlns.oracle.com/adf/mf/amx/dvt">
   <amx:panelPage id="pp1">
      <amx:facet name="header">
         <amx:outputText value="#{bindings.name.inputValue}" id="ot3"/>
      </amx:facet>
      <amx:listView var="row"
                    value="#{bindings.features.collectionModel}"
                    fetchSize="#{bindings.features.rangeSize}"
                    id="lv1"
                    styleClass="amx-springboard">
         <amx:listItem showLinkIcon="false"
                       id="li1"
                       actionListener="#{bindings.gotoFeature.execute}">
            <amx:tableLayout id="tl1"
                             width="100%">
               <amx:rowLayout id="rl1">
                  <amx:cellFormat id="cf11"
                                  width="46px"
                                  halign="center">
                      <amx:image source="#{row.image}"
                                 id="i1"
                                 inlineStyle="width:36px;height:36px"/>
                  </amx:cellFormat>
                  <amx:cellFormat id="cf12"
                                  width="100%"
                                  height="43px">
                     <amx:outputText value="#{row.name}"
                                     id="ot2"/>
                  </amx:cellFormat>
               </amx:rowLayout>
            </amx:tableLayout>
               <amx:setPropertyListener from="#{row.id}"
                                        to="#{pageFlowScope.FeatureId}"/>
         </amx:listItem>
      </amx:listView>
   </amx:panelPage>
</amx:view>
As shown in Figure 5-11, an ADF Mobile AMX file defines the springboard using a List View whose List Items are the ADF Mobile application's embedded application features. These application features, once deployed, are displayed by their names and associated icons. Selecting an application feature calls the AdfmfContainerUtilities.gotoFeature method. For more information, see Section 6.2.7, "gotoFeature." See also Section 8.2.7, "How to Use List View and List Item Components."
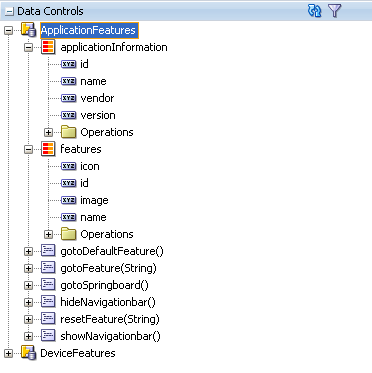
ADF Mobile provides the basic tools to create a custom springboard (or augment the default one) in the ApplicationFeatures data control. This data control, illustrated in Figure 5-12, enables you to declaratively build a springboard page using its data collections of attributes that describe both the ADF Mobile application and its application features.
The methods of the ApplicationFeatures data control enable you to add navigation functions. These adfmf.containerUtilities methods are described in Table 5-2. For more information, see Section 6.2, "The ADF Mobile Container Utilities API." See also Chapter 9, "Using Bindings and Creating Data Controls."
Table 5-2 ApplicationFeature Methods
| Method | Description |
|---|---|
|
|
Navigates to default application feature. |
|
|
Navigates to a specific application as designated by the parameter that is passed to this method. |
|
|
Navigates to the springboard. |
|
|
Hides the navigation bar. |
|
|
Displays the navigation bar (if it is hidden). |
|
|
Resets the application feature that is designated by the parameter passed to this method. |
5.5 Configuring the Application Features within a Mobile Application
Each ADF Mobile application must have at least one application feature.
5.5.1 How to Designate the Content for a Mobile Application
Figure 5-13 shows the Feature References page, which enables you to build the content for the mobile application. As noted in Section 5.2, "About the Mobile Application Configuration File," the mobile application descriptor file's <adfmf:featureReference> element designates these application features.
Example 5-8 Designating Feature References the in the adfmf-application.xml File
<adfmf:featureReference id="Customers"
                        allowDeviceAccess="true"
                        showOnSpringboard="true"
                        showOnNavigationBar="true"/>
<adfmf:featureReference id="HCM"
                        allowDeviceAccess="true"
                        showOnSpringboard="true"
                        showOnNavigationBar="true"/>
<adfmf:featureReference id="PROD"
                        allowDeviceAccess="true"
                        showOnSpringboard="true"
                        showOnNavigationBar="true"/>
Example 5-8 shows some of the defined feature references and their associated attributes. The overview editor displays these feature references in the Feature References table. Figure 5-13 shows the defined feature references for HCM and PROD that represent the Customers and Products application features, respectively. Using this page, you enter the references to the application feature and set its display within the mobile application's springboard, as shown in Figure 5-1.
In addition, the page enables you to set the order in which the application features display on the navigation bar and springboard.
Note:
Because building a mobile application is an iterative process, you can add, delete or update feature references as new FARs become available (and new application features are added to the adfmf-feature.xml file).
You must have application features configured in the adfmf-feature.xml file, as described in Section 5.8, "Setting the Basic Configuration for the Application Feature." In addition, you must open the adfmf-application.xml overview editor.
To designate feature references:
-
Click the Feature References page of the
adfmf-application.xmloverview editor. -
Click Add.
-
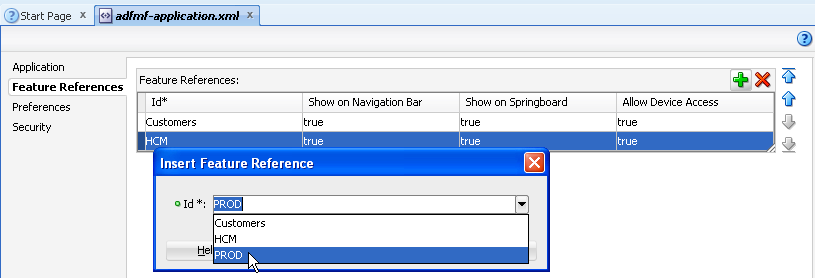
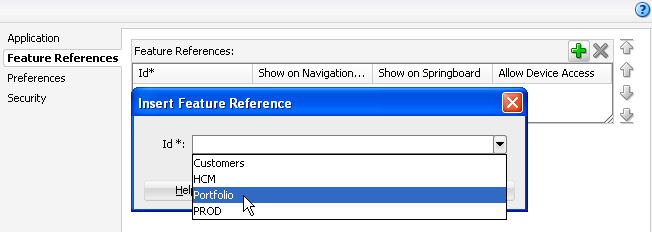
In the Insert Feature Reference dialog, select the ID of the application feature from the dropdown list, as shown in Figure 5-14.
This dialog lists all of the application features described in the
<adfmf:feature>elements of theadfmf-feature.xmlfile Using this dialog ensures that theidattributes of both the<adfmf:featureReference>and<adfmf:feature>elements match. See also Section 5.5.2, "What You May Need to Know About Feature Reference IDs and Feature IDs." -
If needed, use the up- and down-arrows shown in Figure 5-14 to arrange the display order of the feature references, or use the dropdown list in rows of the Id column, shown in Figure 5-15, to reorder the feature references.
Note:
The top-most ID in the Feature References table is the first application feature to display within the ADF Mobile application. See, for example, the Employees application feature illustrated in Figure 5-7.
-
Set the springboard and navigation bar display behavior for the application feature by selecting
trueorfalsefrom the dropdown lists in the rows of the Show on Navigation Bar and Show on Springboard columns. Figure 5-16 shows selecting these options to prevent an application feature from displaying in the navigation bar.By default, display is enabled (that is,
true) for the springboard and the navigation bar. If both the navigation bar and springboard attributes are set tofalse, then the application feature only displays if it is in the first position. See also Section 6.2.12, "hideNavigationBar" and Section 6.2.13, "showNavigationBar."Note:
Because springboard applications do not display on the navigation bar or within the springboard of an ADF Mobile application, Show on Navigation Bar and Show on Springboard must both be set to
falsefor feature references for custom springboard application features. See also Section 5.4.5, "What You May Need to Know About Custom Springboard Application Features with ADF Mobile AMX Content." -
To enable a domain configured within the
connections.xmlfile to access the device services enabled by the ADF Mobile PhoneGap API, selecttruein the Allow Device Access column. By default, all application features allow such access. To prevent domains from accessing device services, selectfalse. For more information, see Chapter 12, "Implementing Application Features as Remote URLs."
5.5.2 What You May Need to Know About Feature Reference IDs and Feature IDs
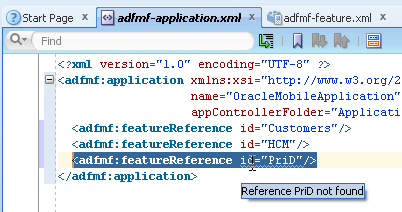
An ADF Mobile application can contain many projects and can therefore also include multiple adfmf-feature.xml files. In the application configuration file, a feature reference relates to a feature described by an adfmf-feature.xml file. The ID of an <adfmf:featureReference> identifies where the corresponding application feature is defined. In other words, the id attributes for <adfmf:featureReference> elements in the adfmf-application.xml file must be the same as the id attribute defined for <adfmf:feature> element in adfmf-feature.xml. For example, <adfmf:featureReference id="customers"> in adfmf-application.xml is defined by <adfmf:feature id="customers"> in adfmf-feature.xml. JDeveloper audits the references between the application and feature descriptor files in the same mobile application, and warns you when it finds discrepancies. As shown in Figure 5-17, JDeveloper highlights the mismatch within the code between a feature reference and the features declared in the features application descriptor file with a wavy underline and a Reference not Found warning, which in this case is a feature reference ID defined as PRiD rather than the correct PROD. For more information on JDeveloper's syntax auditing, see the "Auditing and Profiling Applications" chapter in Oracle Fusion Middleware User's Guide for Oracle JDeveloper.
Note:
The feature IDs must be unique across applications. Since the application features can be reused, use proper naming conventions to ensure that feature IDs are unique.
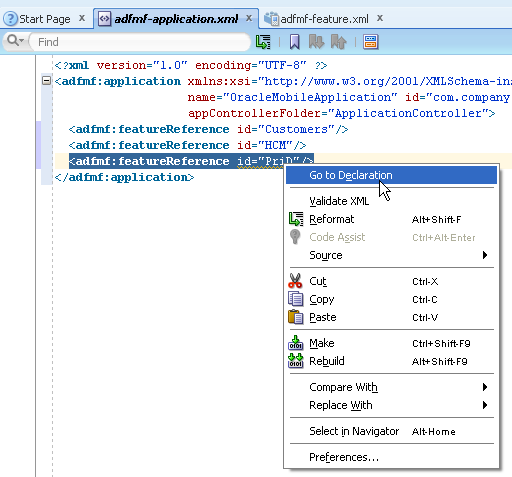
If the ID for an <adfmf:featureReference> is defined in the adfmf-feature.xml file, you can use Go To Declaration in the context menu, as shown in Figure 5-18, to traverse from the id of a <adfmf:featureReference> in the adfmf-application.xml file to the corresponding id of the <adfmf:feature> in the adfmf-feature.xml file.
5.6 About Lifecycle Event Listeners
Within the ADF Mobile runtime, classes implement various LifeCycleListener methods to communicate event notifications sent from the native operating system frameworks to the JVM. These event notifications describe various states (starting, stopping, or hibernating) for both the mobile application and its embedded application features. ADF Mobile invokes the class functions to the JVM using a generic invoke message.
The overview editors for both the adfmf-application.xml and adfmf-feature.xml files enable you to declaratively add a lifecycle listener class that ADF Mobile calls when events occur. After you enter a fully qualified class name (including the package) using the Class and Package Browser in the overview editor's LifeCycle Event Listener Class field, JDeveloper populates the XML page with the listener-class attribute. For ADF Mobile applications, this attribute is included in the <adfmf:application> element, as shown in Example 5-9.
Example 5-9 The listener-class Attribute in the adfmf-application.xml File
<adfmf:application xmlns:xsi="http://www.w3.org/2001/XMLSchema-instance"
                   xmlns:adfmf="http://xmlns.oracle.com/jdev/adfmf"
                   id="app-20110308"
                   name="#{strings.Title}"
                   vendor="Oracle"  version="1.0"
                   listener-class="oracle.adfmf.application.AppListener">

...

</adfmf:application>
Within the adfmf-feature.xml file, the listener-class attribute is contained within the <adfmf:feature> attribute, as shown in Example 5-10.
Example 5-10 The listener-class Attribute in the adfmf-feature.xml File
...

   <adfmf:feature id="mycompany.phonelist"
                 name="Phone List"
                 icon="mycompany.phonelist/PhoneIcon.png"
                 listener-class="oracle.adfmf.feature.LifeCycleListener">
                 image="mycompany.phonelist/PhoneImage.png"
      <adfmf:content id="general">

         <adfmf:amx file="mycompany.phonelist/Phone.amx"/>
      </adfmf:content>

   </adfmf:feature>

...
The LifeCycle Events sample application provides an example of declaring the event listener class in both the adfmf-application.xml and adfmf-feature.xml files. This sample application is in the PublicSamples.zip file at the following location within the JDeveloper installation directory of your development computer:
jdev_install/jdeveloper/jdev/extensions/oracle.adf.mobile/Samples
5.6.1 Events in ADF Mobile Applications
Lifecycle listener classes for ADF Mobile applications must implement the start, stop, activate, and deactive methods of the LifeCycleListener interface, illustrated in Example 5-11.
Example 5-11 The LifeCycleListener Interface for ADF Mobile Applications
package oracle.adfmf.application;

public interface LifeCycleListener
{
   void start();
   void stop();
   void activate();
   void deactivate();
}
The AppListener class, shown in Example 5-12, uses the LifeCycleListener method calls for starting or stopping events as well as those used when the application is about to hibernate (deactivate) or return from hibernating (activate).
Example 5-12 Implementation of the LifeCycleListener Interface
package some.package;
import oracle.adfmf.application.LifeCycleListener;

public class AppListener implements LifeCycleListener
{
    public AppListener()
    {
        super();
    }
    public void start()
    {
        // Perform application startup tasks...
    }
    public void stop()
    {
        // Perform tasks to stop the application...
    }
    public void activate()
    {
        // Perform appplication activation tasks...
    }
    public void deactivate()
    {
        // Perform application deactivation tasks...
    }
}
Tip:
For an example of implementing the LifeCycleListenerImpl.java interface at the application level, see the AppHandler.java file in the LifeCycleEvents sample application. This file is located in the application node within the application controller project's Application Sources folder.
5.6.2 Timing for Mobile Application Events
ADF Mobile calls application lifecycle events at specific times during the ADF Mobile application's startup, shutdown, and hibernation. Table 5-3 describes when these events are fired and also notes their Objective-C counterparts.
Table 5-3 ADF Mobile LIfecycle Events
| ADF Mobile Application Event | Timing | Relation to iOS Application Delegate Methods |
|---|---|---|
|
|
Called after the ADF Mobile application has completely loaded the application features and immediately before presenting the user with the initial application feature or the springboard. |
This event does not correspond to a specific application delegate method. It is called after the |
|
|
Called as the ADF Mobile application begins its shutdown. |
This is called in the |
|
|
Called as the ADF Mobile application activates from being situated in the background. |
This is called in the |
|
|
Called as the ADF Mobile application deactivates and moves into the background. |
This is called in the |
5.6.3 About Application Feature Lifecycle Listener Classes
An ADF Mobile application feature lifecycle listener class, such as FeatureListenerPhoneList illustrated in Example 5-14, must implement the activate and deactivate methods of the LifeCycleListener interface, shown in Example 5-13, to hide the application feature when it hibernates or to display it when it returns from hibernating.
Example 5-13 Application Feature LifeCycleListener Interface
package oracle.adfmf.feature;
public interface LifeCycleListner
{
   void activate();
   void deactivate();
}
Example 5-14 illustrates a class called FeatureListenerPhoneList that uses the activate and deactive functions by implementing the LifeCycleListener to show and hide the application feature as described in Table 5-4.
Example 5-14 Implementing the Application Feature Lifecycle
package some.package;

import oracle.adfmf.feature.LifeCycleListener;

public class FeatureListenerPhoneList implements LifeCycleListener
{
    public FeatureListenerPhoneList()
    {
        super();
    }
    public void activate()
    {
        // Perform application activation tasks...
    }
    public void deactivate()
    {
        // Perform application deactivation tasks...
    }

}
Tip:
The LifeCycle Events sample application provides an example of using the LifeCycleListener interface at the feature application level through the Feature1Handler.java and Feature2Handler.java files. These files are located within the view controller project's Application Sources folder.
5.6.4 Timing for Activate and Deactivate Events in the Application Feature Application Lifecycle
Table 5-4 describes when the activate and deactivate events are fired for an application feature.
5.7 About the Mobile Feature Application Configuration File
The adfmf-feature.xml file, an example of which is illustrated in Example 5-15, enables you to configure the actual mobile application features that are referenced by the <adfmf:featureReference> element in the corresponding adfmf-application.xml file.
Example 5-15 The adfmf-feature.xml File
<?xml version="1.0" encoding="UTF-8" ?>
<adfmf:features xmlns:xsi="http://www.w3.org/2001/XMLSchema-instance"
                xmlns:adfmf="http://xmlns.oracle.com/adf/mf">
    <adfmf:feature id="PROD"
                   name="Products"
                   icon="images/logo.png">
        <adfmf:constraints>
        </adfmf:constraints>
        <adfmf:description>ADF Products</adfmf:description>
        <adfmf:content id="PROD.1">
            <adfmf:amx file="PROD/Products_page.amx"/>
        </adfmf:content>
    </adfmf:feature>
    <adfmf:feature id="HCM"
                   name="Contents"
                   icon="images/directory.png">
        <adfmf:description>People Finder</adfmf:description>
        <adfmf:content id="HCM.1">
            <adfmf:remoteURL connection="Connections1"/>
        </adfmf:content>
    </adfmf:feature>
    <adfmf:feature id="Customers"
                   name="Customers"
                   icon="images/people.png">
        <adfmf:constraints>
            <adfmf:constraint property="user.roles"
                              operator="equal"
                              value="field sales"/>
            <adfmf:constraint property="user.roles"
                              operator="not"
                              value="consultant"/>
        </adfmf:constraints>
        <adfmf:description>Customers</adfmf:description>
        <adfmf:content id="Customers.2">
            <adfmf:localHTML url="Customers/customers_page.html"/>
        </adfmf:content>
    </adfmf:feature>
</adfmf:features>
By defining the elements of the adfmf-feature.xml file, you set the behavior for the application features by, in turn, defining the child elements of the <Feature> element, the top-most element in the XML file under the root element, <adfmf:features>. The <Feature> element itself describes the basic information of the application feature, including its name, version, and whether or not it participates in security. For the latter, see Chapter 17, "ADF Mobile Application Security." The child elements of the <Feature> elements are listed in Table 5-5. Like the overview editor for the adfmf-application.xml descriptor file, you can update this file with these elements (or edit them) declaratively using the overview editor for the adfmf-feature.xml file, described in Section 5.8, "Setting the Basic Configuration for the Application Feature."
Table 5-5 Child Elements of <Feature> Element
| Element | Description |
|---|---|
|
|
Describes how to implement the content of an application feature. The content of an application feature can be delivered as ADF Mobile AMX pages, locally stored HTML pages, or remotely served web applications. For more information on designating content as a web application, see Chapter 12, "Implementing Application Features as Remote URLs." |
|
|
Determines whether a given application feature can be displayed in the application runtime. Constraints can be used to allow or prevent the use of an application feature based on such criteria as user roles or device properties. For more information, see Chapter 14, "Setting Constraints." |
5.8 Setting the Basic Configuration for the Application Feature
Each mobile application must have at least one application feature. Because each application feature can be developed independently from one another (and also from the mobile application itself), the overview editor for the adfmf-feature.xml file enables you to define the child elements of <adfmf:features> to differentiate the application features by assigning each a name, an ID, and setting how their content can be implemented. Using the overview editor for application features, you can also control the runtime display of the application feature within mobile application and designate when an application feature requires user authentication.
5.8.1 How to Define the Basic Information for the Application Feature
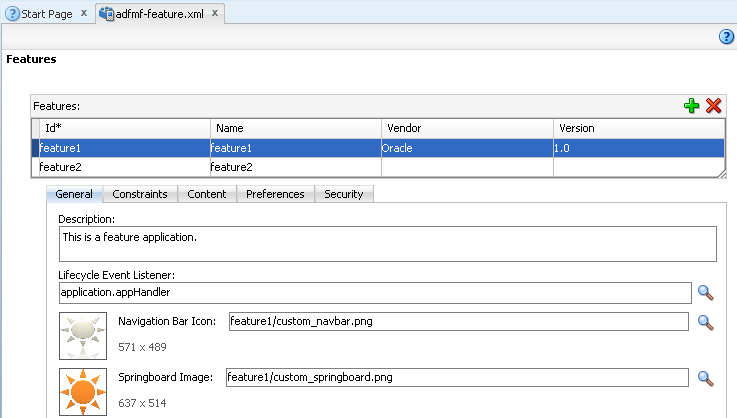
The General tab of the overview editor, shown in Figure 5-19, enables you to add an application feature, designate its basic information, and its display icons.
If an application feature uses custom images for the navigation bar and springboard rather than the default ones provided by ADF Mobile, you must create these images to the specifications described the Android Developers website (http://developer.android.com/guide/practices/ui_guidelines/icon_design.html) and in the "Custom Icon and Image Creation Guidelines" chapter in iOS Human Interface Guidelines, which is available from the iOS Developer Library (http://developer.apple.com/library/ios/navigation/).
You place these images in the view controller project's public_html directory. See also Section 5.9.2, "What You May Need to Know About Selecting External Resources."
In addition, you must open the adfmf-feature.xml file and select the General tab.
To set the basic information for the application feature:
-
Choose the General tab.
-
Click Add in the Features table.
-
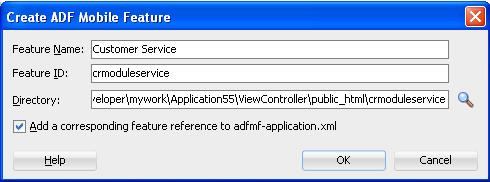
Complete the Create ADF Mobile Feature dialog, shown in Figure 5-17, and then click OK. To complete this dialog:
-
Enter a display name for the application feature in the Feature Name field.
-
Enter a unique identifier for the application feature in the Feature ID field.
-
If needed, change the location for the application feature to any directory within the
public_htmldirectory (the default parent directory). Enter this location in the Directory field. -
To include the newly defined application feature in the mobile application, add a new
<adfmf:featureReference>element to theadfmf-application.xmlfile with theidattribute that matches the value that you entered in the Feature ID. Choose Add a corresponding feature reference to adfmf-application.xml. The table in the Feature References page, shown in Figure 5-13, includes the feature reference after you complete the dialog. See also Section 5.5.2, "What You May Need to Know About Feature Reference IDs and Feature IDs."
-
-
In the General tab of the overview editor, enter the originator of the application feature in the Vendor field. This is an optional value.
-
Enter the version number of the application feature in the Version field. This is an optional value.
-
Enter a brief description of the application's purpose in the Description field. This is an optional value.
-
Enter the fully qualified class name (including the package, such as
oracle.adfmf.feature) using the Class and Package Browser in the Lifecycle Event Listener field to enable runtime calls for start, stop, hibernate, and return to hibernate events. For more information, see Section 5.6, "About Lifecycle Event Listeners." This is an optional value. -
In the Navigation Bar Icon and Springboard Image fields, browse to, and select, images from the project to use as the icon in the navigation bar and also an image used for the display icon in the springboard. You can also drag and drop the image files from the Application navigator into the file location field. This is an optional value.
5.9 Defining the Content Types for an Application Feature
Adding a child element to the <adfmf:content> element, shown in Example 5-16, enables you to define if the application feature is implemented as local HTML, remote URL, a Mobile ADF AMX file. You can implement each application feature as one or all of the content types.
Example 5-16 The <adfmf:content> Element
<adfmf:content id="Feature1">
      <adfmf:amx file="FeatureContent.amx">
</adfmf:content>
5.9.1 How to Define the Application Content
The Content tab of the overview editor, shown in Figure 5-21, provides you with dropdown lists and fields for defining the target content-related elements and attributes shown in Example 5-16. The fields within this tab enable you to set constraints that can control the type of content delivered for an application feature as well as the navigation and springboard icon images that it uses.
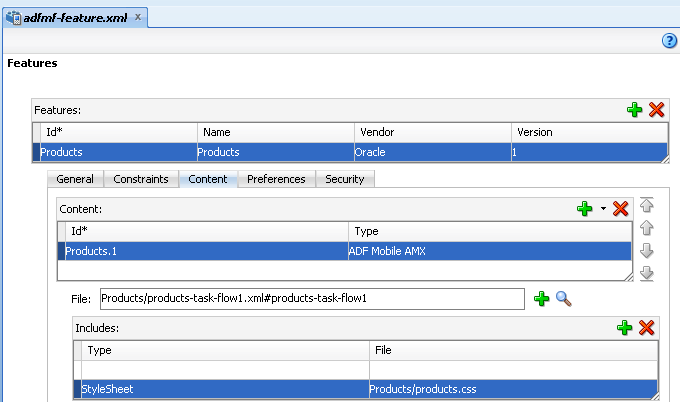
Each content type has its own set of parameters. As shown in Figure 5-21, for example, you must specify the location of the ADF Mobile AMX page or task flow for the application features that you implement as an ADF Mobile AMX. In addition, you can optionally select a CSS file to give the application feature a look and feel that is distinct from other application features (or the ADF Mobile application itself), or select a JavaScript file that controls the actions of the ADF Mobile AMX components.
Each content type has its own prerequisites, as follows:
-
ADF Mobile AMX—An application feature implemented as ADF Mobile AMX requires an existing view (that is, a single ADF Mobile AMX page) or a bounded or unbounded task flow. Including a JavaScript file provides rendering logic to the ADF Mobile AMX components or overrides the existing rendering logic. Include a style sheet (CSS) that includes selectors to specify a custom look and feel, one that overrides the look and feel of the skinning files provided for the embedded application features at the ADF Mobile application level. By including a CSS, you ensure that the entire application feature has its own look and feel.
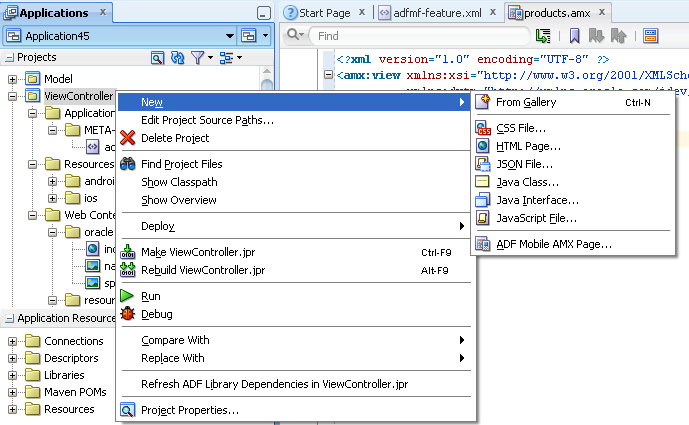
If you create the ADF Mobile AMX pages as well as the mobile application that contains them, you can create both using the wizards in the New Gallery. You access these wizards by first highlighting the view controller project in the Application Navigator and then by choosing New. Alternatively, you can create an ADF Mobile AMX page using the context menu shown in Figure 5-22 that appears when you right-click the view controller project in the Application Navigator and then choose New. For information on building an ADF Mobile AMX page, see Chapter 7, "Creating ADF Mobile AMX Pages."
-
Remote URL—The remote URL implementation requires a valid web address as well as a hosted mobile application. For more information, see Chapter 12, "Implementing Application Features as Remote URLs."
-
Local HTML—An application feature implemented as local HTML requires an existing bundle of HTML files and supporting resources.
To define the application content as Remote URL or Local HTML:
-
Select an application feature listed in the Features table in the
adfmf-feature.xmlfile. -
Click Content.
-
Click Add to create a new row in the Content table (see, for example, products.1 in Figure 5-21).
-
Select one of the following content types to correspond with the generated ID:
-
Remote URL
-
Local HTML
-
-
Define the content-specific parameters:
-
For remote URL content, select the connection, as shown in Figure 5-23, that represents address of the web pages on the server (and the location of the launch page).
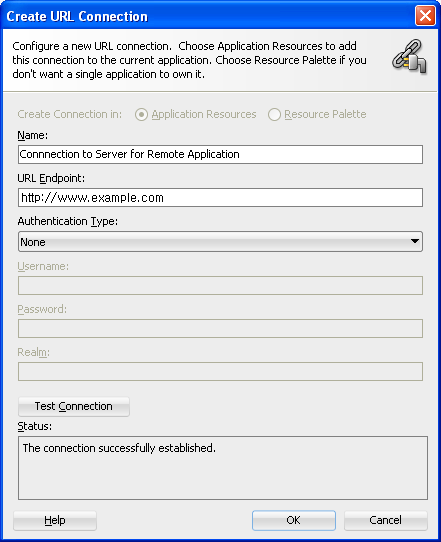
You can create this connection by first clicking Add and then completing the Create URL Connection dialog, shown in Figure 5-24. For more information on this dialog, see the online help for Oracle JDeveloper. This connection is stored in the
connections.xmlfile.Note:
This connection can only be created as an application resource.
-
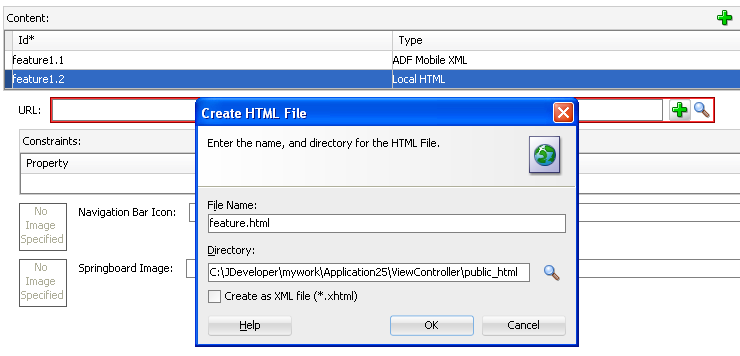
For local HTML content, enter the location of the local bundle or create the HTML page by clicking Add in the URL field, completing the dialog as shown in Figure 5-25, and then building the page using JDeveloper's HTML editor. Because this is an application feature, this page is stored within the Web Content folder of the view controller project.
-
-
If needed, do the following:
-
Enter constraints that describe the conditions under which this content is available to users. For more information, see Chapter 14, "Setting Constraints."
-
Select navigation bar and springboard images.
-
To designate the application feature content as ADF Mobile AMX:
-
Select the application feature.
-
Click Content.
-
If needed, click Add to create a row in the Content table and the choose ADF Mobile AMX from the dropdown list in the Type column as shown in Figure 5-26.
-
In the File field, click Browse, and choose either ADF Mobile AMX Page or Task Flow, as shown in Figure 5-27, to navigate to, and retrieve, the location of the ADF Mobile AMX page or the bounded task flow. Alternatively, you can drag and drop an ADF Mobile AMX page from the Application Navigator into the file location field.
-
Alternatively, create the page or task flow. To do this:
-
Click Add in the File field and then choose either ADF Mobile AMX or Task Flow as shown in Figure 5-28.
-
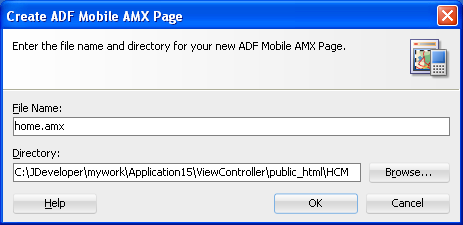
Complete the create dialogs, such as the Create ADF Mobile AMX Page dialog shown in Figure 5-29.
-
Build the ADF Mobile AMX page or Task flow using an editor.
-
-
If needed, do the following:
-
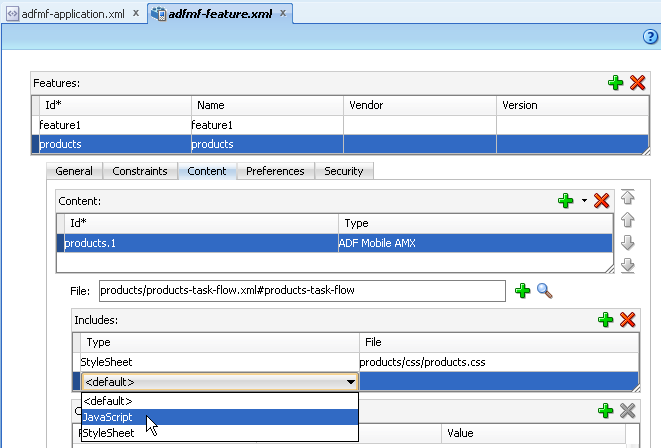
Enter the JavaScript files by clicking Add in the Includes table, choose JavaScript, and then browse to the location of the file. For more information, see Section 5.11.4, "Overriding the Default Skin Styles."
-
Override the default style sheet designated as
adfmf-config.xmlby first clicking Add and then by choosing Stylesheet. Browse to the location of the file. For more information, see Section 5.11, "Skinning ADF Mobile Applications." -
Enter the constraints, as described in Chapter 14, "Setting Constraints."
-
Select navigation bar and springboard images.
Note:
The images, style sheet, and JavaScript files must reside within the
public_htmlfolder to enable deployment. See Section 5.9.2, "What You May Need to Know About Selecting External Resources." -
5.9.2 What You May Need to Know About Selecting External Resources
To enable deployment, all resources referenced by the following attributes must be located within the public_html directory of either the view controller or application controller projects.
-
The
iconandimageattributes for<adfmf:feature>(for example,<adfmf:feature id="PROD" name="Products" icon="feature_icon.png" image="springboard.png">). See also Section 5.8.1, "How to Define the Basic Information for the Application Feature." -
The
iconandimageattributes for<adfmf:content>(for example,<adfmf:content id="PROD" icon="feature_icon.png" image="springboard_image.png">). See also Section 5.9, "Defining the Content Types for an Application Feature." -
The
fileattribute for<adfmf:amx>(for example,<adfmf:amx file="PRODUCT/home.amx" />). See also Section 5.9, "Defining the Content Types for an Application Feature." -
The
urlattribute for <adfmf: localHTML> (for example,<adfmf:localHTML url="oracle.hello/index.html"/>). See also Section 5.9, "Defining the Content Types for an Application Feature" and Section 17.4.10, "What Happens When You Designate a Custom Login Page." -
The file attribute defined for
type=stylesheetandtype=JavaScriptin<adfmf:includes>(for example,<adfmf:include type="JavaScript" file="myotherfile.js"/>). See also Section 5.11, "Skinning ADF Mobile Applications."
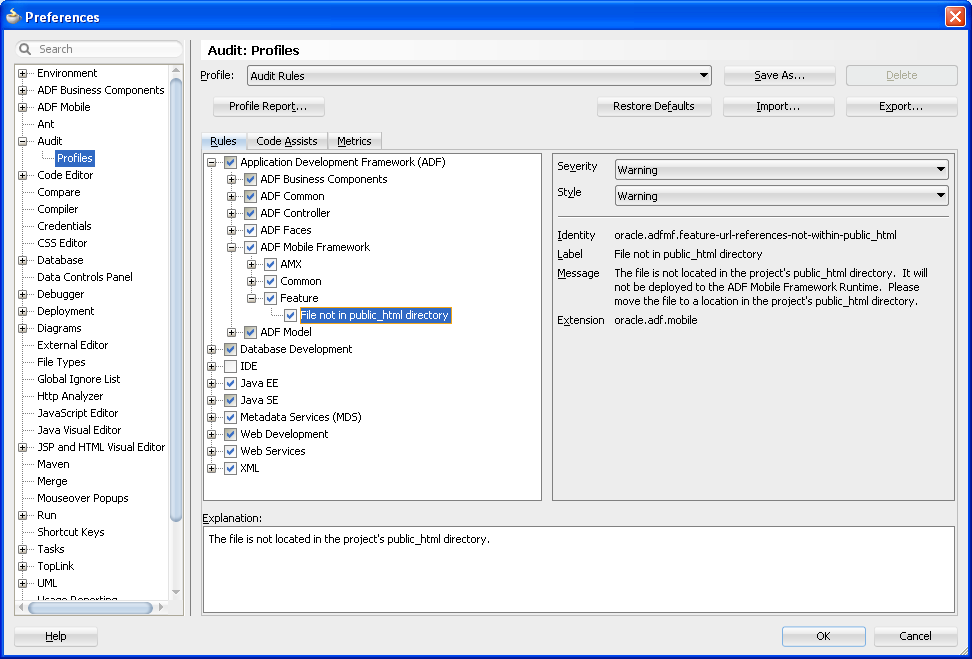
ADF Mobile does not support resources referenced from another location, meaning that you cannot, for example, enter a value outside of the public_html directory using ../ as a prefix. To safeguard against referencing resources outside of public_html, ADF Mobile includes an audit rule called File not in public_html directory. You can access the ADF Mobile audit profiles, shown in Figure 5-30, from the Audit Profiles node in Preferences by choosing Tools > Preferences > Audit > Profiles.
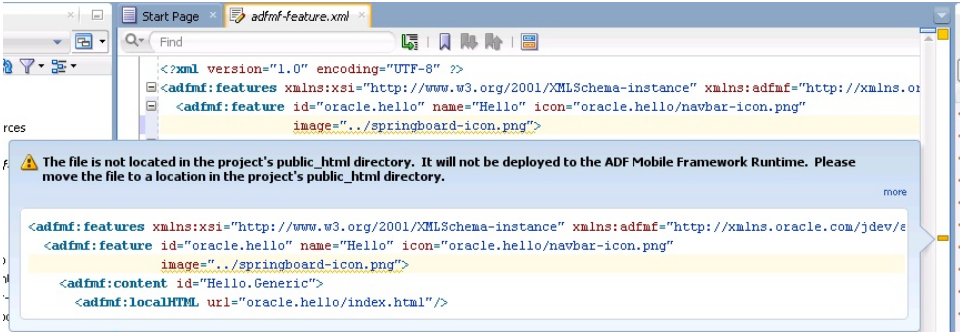
When this profile is selected, JDeveloper issues a warning if you change the location of a resource. As shown in Figure 5-31, JDeveloper displays such a warning when the default values are overridden. For information on auditing, see the "Auditing and Profiling Applications" chapter in Oracle Fusion Middleware User's Guide for Oracle JDeveloper.
5.10 Working with Resource Bundles
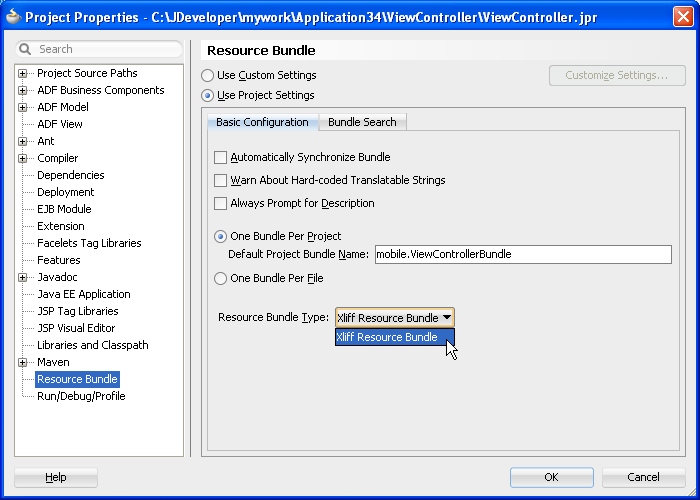
ADF Mobile uses the standard localization structures of ADF to specify English language text resources (although you can use any tool to generate resource bundle files in other languages). You can configure an ADF Mobile application to store translatable UI strings at both the application and project level, as described in the "Working with Resource Bundles" section in Oracle Fusion Middleware Fusion Developer's Guide for Oracle Application Development Framework. ADF Mobile uses only XLIFF (XML Localization Interchange File Format) files for localization, meaning that JDeveloper produces an .xlf file to store the strings. (Also, xliff Resource Bundle is the only available resource bundle type in the Resource Bundle Settings page for projects, shown in Figure 5-32. For more information on this page, see the online help for Oracle JDevelolper.)
At the application level, you can localize strings for such attributes as application names or preference page labels, which are listed in Table 5-6.
Table 5-6 Localizable ADF Mobile Application Attributes
| Element | Attribute(s) |
|---|---|
|
|
|
|
|
|
|
|
|
|
|
|
|
|
|
|
|
|
|
|
|
|
|
|
At the project (view controller) level, you can localize application feature-related attributes listed in Table 5-7.
Table 5-7 Localizable Application Feature Attributes
| Element | Attribute |
|---|---|
|
|
|
|
|
|
|
|
|
|
|
|
|
|
|
|
|
|
|
|
|
|
|
|
|
|
|
|
|
|
You can create resource bundles for attributes of such ADF Mobile AMX components as the text attribute of <amx:commandButton>. Table 5-8 lists these ADF Mobile AMX (amx) components. For more information see Section 8.7, "Localizing UI Components."
Table 5-8 Localizable Attributes of ADF Mobile AMX Components
| Component | Attribute |
|---|---|
|
|
|
|
|
|
|
|
|
|
|
|
|
|
|
|
|
|
|
|
|
|
|
|
|
|
|
|
|
|
|
|
|
|
|
|
|
|
|
|
|
|
|
|
|
|
|
|
5.10.1 How to Create Project-Level Resource Bundles
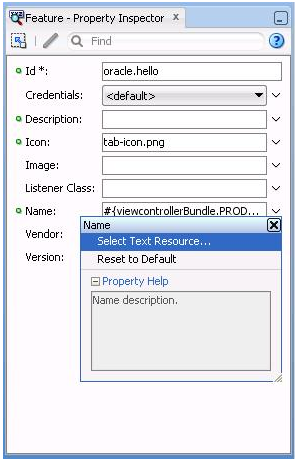
At the project-level, you create resource bundle files when you use the resource bundle dialog, accessed by clicking Select Text Resource in the Property Inspector, shown in Figure 5-33. This dialog enables you to automatically create text resources in the base resource bundle for the adfmf-feature.xml attributes listed in Table 5-7.
You may need to configure the resource bundle properties as described in the "How to Set Message Bundle Options" section in Oracle Fusion Middleware Fusion Developer's Guide for Oracle Application Development Framework.
To use strings in a resource bundle:
-
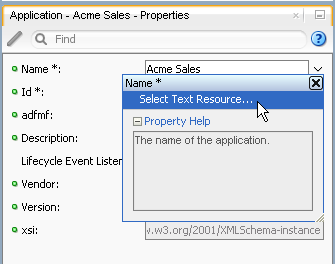
Select an attribute in the Property Inspector, such as
Namein Figure 5-34. -
Choose Select Text Resource. Figure 5-34 shows the application name attribute selected in the Property Inspector.
-
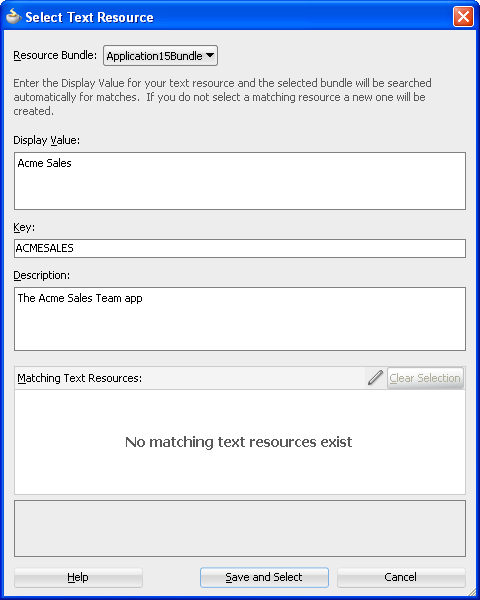
In the Select Text Resource dialog, shown in Figure 5-35, create a new string resource by entering a display name, key, and then click Save and Select.
5.10.2 What Happens When You Add a Resource Bundle
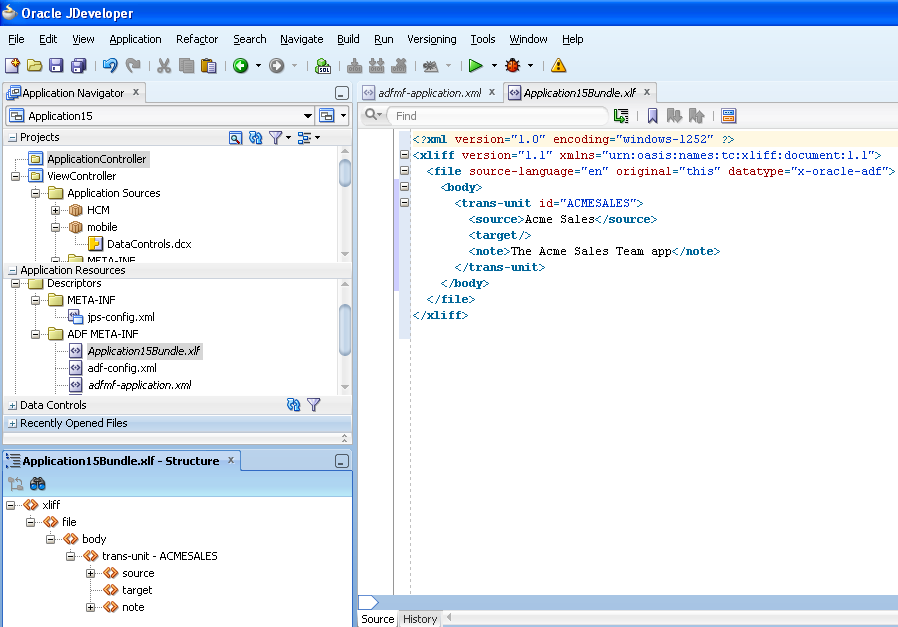
After you add a resource in the Select Text Resource dialog, JDeveloper creates a new application-level resource bundle containing the specified display name string and key file in the ADF Meta-INF file, as shown by Application15Bundle.xlf in Figure 5-36.
If an attribute has been localized for the first time, JDeveloper adds an <adfmf:loadbundle> element whose basename attribute refers to the newly created resource bundle.
JDeveloper also changes the localized attribute string to an EL expression that refers to the key of the string defined in the resource bundle. For example, JDeveloper changes an application name attribute called Acme Sales to name="#{application15Bundle.ACME_SALES}" based on the ACME_SALES value entered for the Key in the Select Resource Dialog.
JDeveloper adds each additional string that you localize to the same resource bundle file because there is only one resource bundle file at the application level.
Each adfmf-application.xml and adfmf-feature.xml file contains only one adfmf:loadBundle element. When you deploy an application, the resource bundles are converted into the language format expected by the runtime.
5.10.2.1 What Happens When You Create Project-Level Resource Bundles for ADF Mobile AMX Components
You can use the project- level resource bundles to localize strings for the attributes of ADF Mobile AMX components as described in Section 8.7, "Localizing UI Components." When you localize a component, such as the text attribute for a <amx:commandButton> in Example 5-17, JDeveloper transforms the string into an EL expression (such as #{viewcontrollerBundle.MYBUTTON in Example 5-17).
Example 5-17 Localizing an ADF Mobile XML Component
<?xml version="1.0" encoding="UTF-8" ?>
<amx:view xmlns:xsi="http://www.w3.org/2001/XMLSchema-instance" xmlns:amx="http://xmlns.oracle.com/jdev/amx"
          xmlns:dvtm="http://xmlns.oracle.com/jdev/dvtm">
  <amx:panelPage id="pp1">
    <amx:commandButton id="commandButton1" text="#{viewcontrollerBundle.MYBUTTON}"
  </amx:panelPage>
  <amx:loadBundle basename="mobile.ViewControllerBundle" var="viewcontrollerBundle"/>
</amx:view>
In addition, JDeveloper creates the resource bundle under the project default package, similar to ViewControllerBundle.xlf in Figure 5-37. In the generated <amx:loadBundle> element, the basename represents this package as, for example, mobile.ViewControllerBundle.
5.10.3 What You May Need to Know About Localizing Image Files
If an image contains text or reflects a specific country or region (for example, a picture of a flag), you can specify an alternate image as part of the localization process. You cannot hard-code the image, such as <amx:image="image2" source="feature1/test.jpg">. Instead, you must edit the ViewControllerBundle.xlf file manually by adding a <trans-unit> element for the image path, as illustrated in Example 5-18.
Example 5-18 Defining the Resource for an <amx:image> Component
<trans-unit id="IMAGEPATH">
     <source>/feature1/test.jpg</source>
     <target/>
</trans-unit>
Note:
The image location defined in the <source> element in Example 5-18 is relative to the location of the application feature file in ViewController\public_html. Alternatively, you can enter the name of the image file, such as <source>test.jpg</source>. See also Section 5.9.2, "What You May Need to Know About Selecting External Resources."
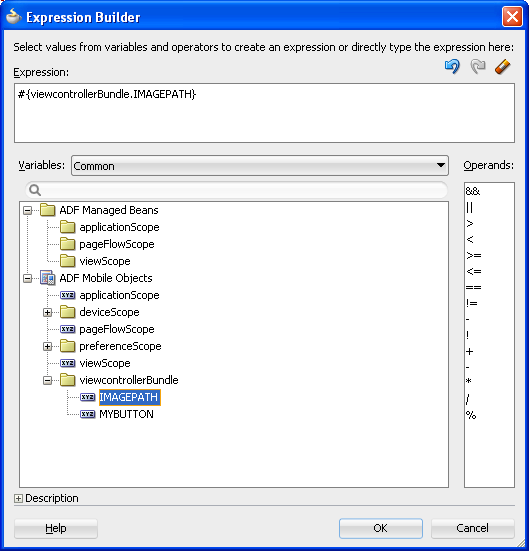
After you update ViewControllerBundle.xlf, use the Expression Builder to define an EL expression for the source attribute for the <amx:image> component, as shown in Figure 5-38.
5.10.4 What You May Need to Know About XLIFF Files for iOS Applications
A family of one or more XLIFF files must exist at the location described by the <adfmf:loadBundle> element. A family of XLIFF files includes the following:
-
Base XLIFF File—The name of the base XLIFF file must match the last token in the path specified by the
basenameattribute. This file bears the.xlfextension, such asViewControllerBundle.xlf. In the following definition, the file is calledViewControllerBundle:<adfmf:loadBundle var="stringBundle" basename="view.ViewControllerBundle"/>
-
Zero, or more, localized XLIFF Files—There can be zero (or many) localized XLIFF files for each base XLIFF file. For each file:
-
The file extension must be
.xlf. -
Must be co-located in the same directory as the corresponding base XLIFF file.
-
The file name is in the following format:
<BASE_XLIFF_FILE_NAME>_<LANGUAGE_TOKEN>.xlf
Where:
-
<BASE_XLIFF_FILE_NAME>is the base XLIFF file name, without the.xlfextension. -
<LANGUAGE_TOKEN>is in the following format:<ISO-639-lowercase-language-code>
Note:
ADF Mobile does not support countries or regions.
For example, for Spain, the language token is
es. For more information, see the "Manually Defining Resource Bundles and Locales" section in Oracle Fusion Middleware Web User Interface Developer's Guide for Oracle Application Development Framework.
For example, localized file names for XLIFF files referencing a base XLIFF named
stringBundle.xlffor language codesen,es, andfrwould be:-
stringBundle_en.xlf -
stringBundle_es.xlf -
stringBundle_fr.xlf
-
-
5.10.5 Internationalization for iOS Applications
The localizable elements of the adfmf-application.xml and adfmf-feature.xml files reference internationalized strings through the use of EL-like strings in the attributes listed in Table 5-7 and Table 5-6. Because these configuration files are read early in the application lifecycle, these strings are not evaluated as EL statements at runtime. Instead, these strings are taken as the full key for the translated string in the native device translation infrastructure.
Although the Expression Language syntax is "${BUNDLE_NAME.STRING_KEY}", ADF Mobile uses the entire string enclosed by "#{}" as the key to look up the translated string. These strings are in the form of #{bundleName.['My.String.ID']}, where the XLIFF string is separated by periods and #{bundleName.['MyStringID']}, which is used only for string identifiers that are not separated by periods. Example 5-19 illustrates the latter, such as #{strings.CONTACTS}, that modify the name attribute. For the iOS native framework, the deployment ensures that the content of that statement matches the proper key in the *.string file used for translation.
Only the attributes that are displayed to the end user, or control the location of content displayed to the end user, support the use of internationalized strings. These include the following attributes:
-
The
<adfmf:application>element'snameattribute -
The
<adfmf:feature>element'snameattribute -
The
<adfmf:feature>element'siconattribute -
The
<adfmf:feature>element'simageattribute -
The
<adfmf:content>element'siconattribute -
The
<adfmf:content>element'simageattribute
Example 5-19 shows an application feature with name, icon, and image attributes use internationalization strings.
Example 5-19 Internationalization Using Strings
<adfmf:feature id="CTCS" name="#{strings.CONTACTS}"
                         icon="#{strings.CONTACTS_ICON}"
                         image="#{strings.CONTACTS_IMAGE}">
        <adfmf:constraints>
            <adfmf:constraint property="user.roles"
                              operator="contains"
                              value="employee" />
        </adfmf:constraints>
        <adfmf:description>The HTML Device Contacts</adfmf:description>
        <adfmf:loadBundle basename="mobile.adfmf-stringsBundle"
                          var="strings"/>
        <adfmf:content id="CTCS.Generic">
            <adfmf:constraints />
            <adfmf:localHTML url="contacts.html" />
        </adfmf:content>
    </adfmf:feature>
When you define the <adfmf:loadBundle> elements, as shown in Example 5-20, you create the mapping of bundle names to actual bundles. The bundle name is used when the expression is evaluated.
Example 5-20 Mapping Bundle Names Using <adfmf:loadBundle>
<adfmf:constraint property="user.roles"
                  operator="contains"
                  value="employee" />
        </adfmf:constraints>
        <adfmf:description>The HTML Device Contacts</adfmf:description>
        <adfmf:loadBundle basename="mobile.adfmf-featureBundle"
                          var="mobileBundle"/>
        <adfmf:loadBundle basename="mobile.adfmf-stringsBundle"
                          var="strings"/>
ADF Mobile's runtime holds the <adfmf:loadBundle> elements until the first access of the JVM. After the ADFChannel for the application feature is created, a message is sent to the JVM to initialize the mapping of basenames to EL names for all of the bundles. Example 5-21 illustrates the structure of the message sent to the JVM:
5.11 Skinning ADF Mobile Applications
ADF Mobile's use of CSS (Cascading Style Sheet) language-based skins ensures that all application components within an ADF Mobile application (including those used in its constituent application features) share a consistent look and feel. Changes that affect the presentation of an application can be made by creating or extending a skin rather than through re-configuring an ADF Mobile AMX or HTML component. Any changes made to a skin take effect when an application starts, because ADF Mobile applies skins at runtime.
As noted in Section 4.2.2, "What Happens When You Create an ADF Mobile Application," the artifacts resulting from the creation of an application controller project include two skinning-related files, adfmf-config.xml and adfmf-skins.xml. You use these files to control the skinning for the ADF Mobile application. The adfmf-config.xml file designates the default skin family used to render application components and the adfmf-skins.xml file enables you to customize the default skin family or define a new one.
5.11.1 About the adfmf-config.xml File
After you create an ADF Mobile application, JDeveloper populates the adfmf-config.xml file to the ADF Mobile application's META-INF node. The file itself is populated with the base ADF Mobile skin family, MobileFusionfx, illustrated in Example 5-22.
Example 5-22 The Default Skin, mobileFusionFX in the adfmf-config.xml File
<?xml version="1.0" encoding="UTF-8" ?>
<adfmf-config xmlns="http://xmlns.oracle.com/adf/mf/config">
  <skin-family>mobileFusionFx</skin-family>
<skin-version>1</skin-version>
</adfmf-config>
Note:
The <skin-family> element does not support EL expressions. The <skin-version> element has only one value, 1.
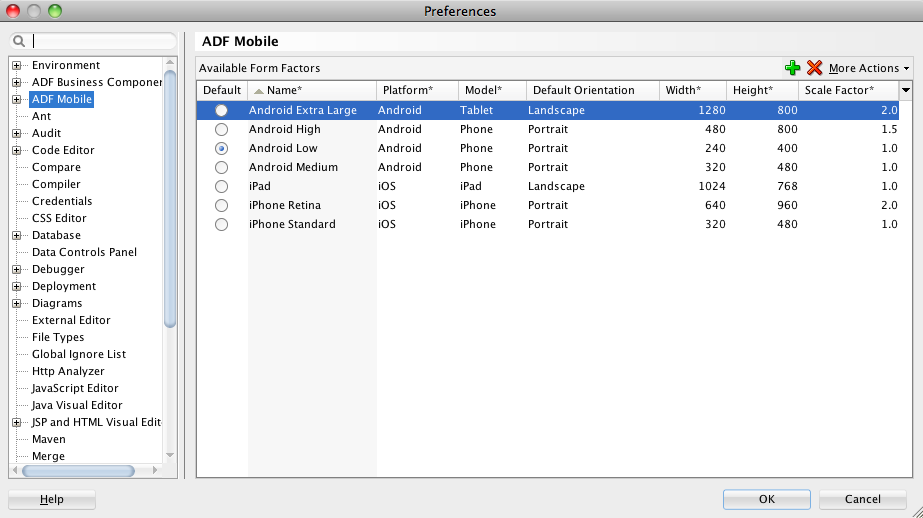
ADF Mobile defines skins for the mobileFusionFx skin family. The skinning hierarchy descends from mobileFusionFx, the top-most skin, the next skin is the platform (iOS), and device-type skins (iPad and iPhone) are at the third level. Figure 5-39 shows the list of seeded form factors in ADF Mobile preference page, which illustrates this hierarchy in terms of platform and model. For more information on how skins are applied at various levels, see Section 5.11.5, "What You May Need to Know About Skinning."
5.11.2 About the adfmf-skins.xml File
The adfmf-skins.xml file, located in the META-INF node of the application controller project, uses the <skin> and the <skin-addition> elements. Use the <skin> element to extend a skin family. The <skin-addition> element adds a style sheet to an existing skin.
By default, this file is empty, but the elements listed in Table 5-9 describe the child elements that you can use to populate this file to extend mobileFusionFx or to define the CSS files that are available to the application. You use the <skin> element to create new skins or extend an existing skin. Do not use the <extends> element when defining a new skin.
Table 5-9 Child Elements of the <skin> Element
| Elements | Description |
|---|---|
|
|
Because ADF Mobile skinning customizes the default
|
|
|
Identifies the skin family. This is a required element. |
|
|
Use this element to customize the default skin,
<?xml version="1.0" encoding="UTF-8" ?>
<adfmf-skins xmlns="http://xmlns.oracle.com/adf/mf/config">
    <skin>
        <id>mobileFusionFx.iPhone</id>
        <family>mobileFusionFx</family>
        <extends>mobileFusionFx.iOS</extends>
       <style-sheet-name>styles/myiphone.css</style-sheet-name>
    </skin>
</adfmf-skins>
A |
|
|
The file location of the CSS file (a relative URL). This is an optional element. |
|
|
An optional element that can be used if you change the CSS to fix bugs. |
Table 5-10 lists elements that you can use to define the <skin-addition> element in an ADF Mobile CSS when you must integrate style sheet into an existing skin.
Table 5-10 The <skin-addition> Child Elements
| Element | Description |
|---|---|
|
|
The name of the existing skin which you are injecting into the style sheet. This identifier must match the value for the |
|
|
The relative URL for the style sheet for the skin. |
Example 5-23 illustrates designating the location of the CSS file in the <style-sheet-name> element and the target skin family in <skin-id>.
Example 5-23 Using the <skin-addition> Element
<?xml version="1.0" encoding="UTF-8" ?>
<adfmf-skins xmlns="http://xmlns.oracle.com/adf/mf/config">
  <skin-addition>
    <skin-id>mobileFusionFx.iPhone</skin-id>
    <style-sheet-name>skins/mystyles.iphone.addition1.css</style-sheet-name>
  </skin-addition>
</adfmf-skins>
5.11.2.1 About the ADF Mobile Skin Identifiers
The skin identifier (<skin-id>) is identical to the <skin-family> element and can be appended with the operating system, such as iOS, iPhone, or iPad. ADF Mobile first searches for the skin identifier in the format of <skin-family>.<OS>, such as mobileFusionFx.iPad. If it cannot find the skin, it searches instead for a skin identifier of <skin-family> which falls back to the default skin family, mobileFusionFx. (This top-level skin is referenced by the <skin-id> which equals the <skin-family>). The <skin-family> must always be identified in the adfmf-config.xml file.
5.11.3 How to Change the Default Skin Family
By editing the adfmf-config.xml and adfmf-skins.xml files, which respectively designate the current skin used by the ADF Mobile application and then describing the skin families available to it, you can customize, add, and test skins.
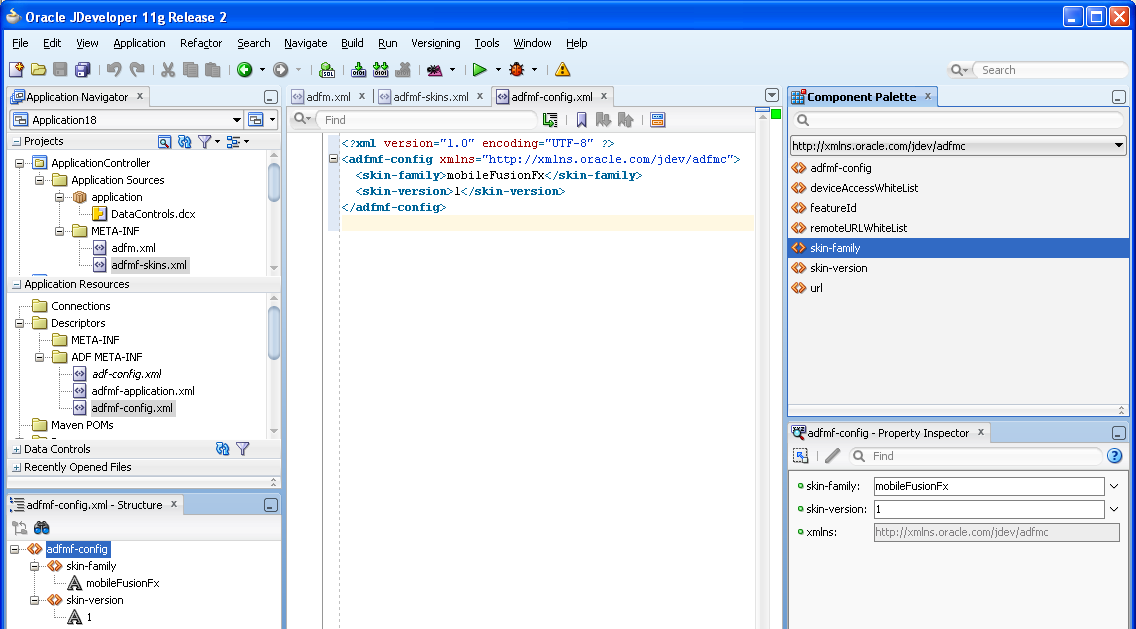
You can edit the source file directly, or use the Structure window, shown in Figure 5-40, to update the adfmf-skins.xml and adfmf-config.xml files. You maintain all of the skins and skin additions within the adfmf-skins.xml file and then designate the default skin for rendering the application components in the adfmf-config.xml file. You create new CSS files within the application controller project using the Create Cascading Style Sheet dialog. Because the CSS files are associated with the <skin-id>, you then update the <skin-id> elements in adfmf-skins.xml with the new CSS references. If a skin family is not specified in adfmf-config.xml, then it cannot be used for skinning.
To customize the default skin:
-
If needed, create a new CSS file:
-
Right-click the application controller project and then choose New, or click File > New.
-
In the New Gallery, select HTML (located within Web Tier) and then CSS File. Click OK.
-
Complete the Create Cascading Style Sheet dialog by entering a name for the CSS file and also a directory location.
Note:
The CSS file must reside somewhere within the
public_htmlfolder of the application controller project (such as/Users/user name/jdeveloper/mywork/Mobile Application/ApplicationController/public_html/resources/css). Theadfmf-skins.xml, where you reference this CSS, is also located within the application controller project (application_workspace/ApplicationController/src/META-INF).
-
-
Open the
adfmf-skins.xmlfile. -
Drag and drop a
<skin>component from the ADF Mobile Skins Component Palette to the Structure window. -
Populate the
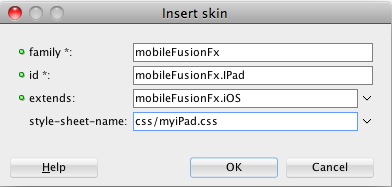
<skin>element with the elements described in Table 5-9 by completing the Insert skin dialog, shown in Figure 5-42, as follows:-
family—Enter the base skin family. For these styles to be applied, the base skin family must be the same as the one defined by the
<skin-family>element in theadfmf-config.xmlfile. -
id—Enter the identifier for the skin.
-
extends—Enter the name of the parent style. For the
mobilefusionFXfamily, enter the base family, appended with the operating system (mobileFusionFx.iOS). -
style-sheet-name—Retrieve the style sheet.
-
-
Click OK.
-
Define the CSS within the
adfmf-config.xmlfile. The context of the CSS definition within this file depends on whether this style sheet is used to extend themobilefusionfxskin family or be added to it.
To add a new style sheet to a skin
-
Drag and drop a
<skin-addition>element from the Component Palette to the Structure window. -
Populate the
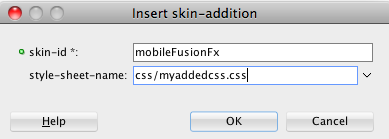
<skin-addition>element with the elements described in Table 5-10 by completing the Insert skin-addition dialog, shown in Figure 5-43.-
Enter the identifier of the skin to which you want to add a new style.
-
Retrieve the location of the CSS file.
-
-
Click OK.
Caution:
Creating custom styles that use DOM-altering structures can cause ADF Mobile applications to hang. Specifically, the display property causes rendering problems in the HTML that is converted from ADF Mobile AMX. This property, which uses such values as table, table-row, and table-cell to convert components into a table, may result in table-related structures that are not contained within the appropriate parent table objects. Although this problem may not be visible within the application user interface itself, the logging console reports it through a Signal 10 exception.
5.11.4 Overriding the Default Skin Styles
For an ADF Mobile AMX application, you can designate a specific style for the application feature implemented as ADF Mobile AMX, thereby overriding the default skin styles set at the application-level within the adfmf-config.xml and adf-skins.xml files. You add individual styles to the application feature using a CSS file as the Includes file.
5.11.4.1 How to Apply New Style Classes to an Application Feature
The Includes table in the overview editor for the adfmf-feature.xml files enables you to add a cascading style sheet (CSS) to an ADF Mobile AMX application feature.
Create an ADF Mobile task flow as described in Section 7.2, "Creating Task Flows." Create or add a Cascading Style Sheet as described in the "Importing ADF Skins from an ADF Library JAR" and "About Creating an ADF Skin" sections in Oracle Fusion Middleware Creating ADF Skins with Oracle ADF Skin Editor.
How to add a style to an application feature:
-
Click Add to create a new row in the Includes table.
-
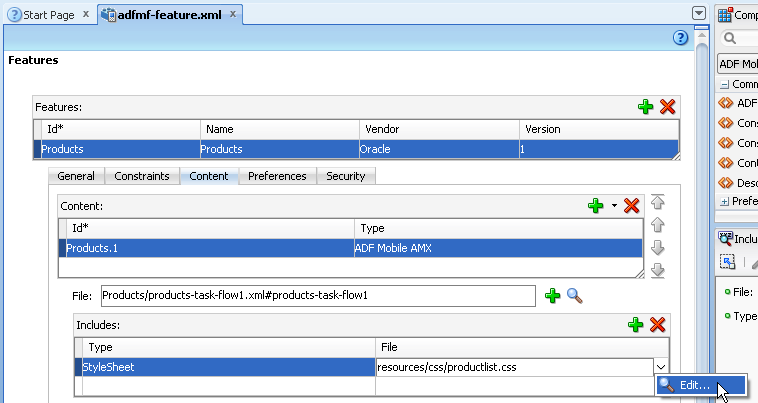
Choose Stylesheet from the dropdown menu in the Type column, as shown in Figure 5-45.
-
In the File column, click Edit, as shown in Figure 5-45.
-
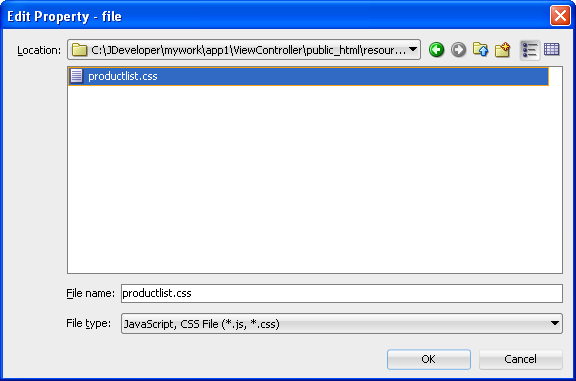
Select the CSS from the Edit Property dialog, shown in Figure 5-46, and then click OK.
5.11.4.2 What Happens When You Apply a Skin to a Feature Application
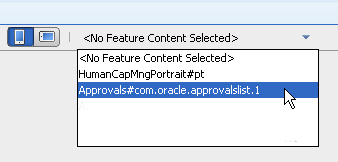
After you add a CSS (or JavaScript file) to the Includes table, the CSS and JavaScript pages added to the application feature can be applied to an ADF Mobile AMX page by selecting the application feature from the Feature Content dropdown menu in the preview pane of the ADF Mobile AMX editor, as shown in Figure 5-47.
5.11.5 What You May Need to Know About Skinning
The CSS files defined in the adfmf-skins.xml file, illustrated in Example 5-24, show how to extend a skin to accommodate the different display requirements of the Apple iPhone and iPad. These styles are applied in a descending fashion, as illustrated in Figure 5-39. The SkinningDemo sample application provides a demonstration of how customized styles can be applied when the application is deployed to different devices. This sample application is in the PublicSamples.zip file at the following location within the JDeveloper installation directory of your development computer:
jdev_install/jdeveloper/jdev/extensions/oracle.adf.mobile/Samples
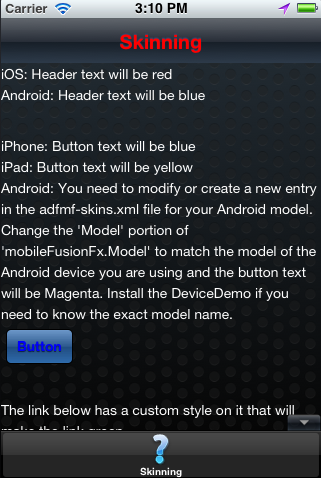
For example, at the iOS level, the stylesheet (mobileFusionFx in Example 5-24) is applied to both an iPhone or an iPad. For device-specific styling, you would define the <skin-id> elements for the iPhone and iPad skins. The skinning demo application illustrates the use of custom skins defined through this element. Figure 5-48 shows how a custom style is applied to an iPhone.
Example 5-24 Skinning Levels Defined in the adfmf-skins.xml File
adfmf-skins.xml
<?xml version="1.0" encoding="UTF-8" ?>
<adfmf-skins xmlns="http://xmlns.oracle.com/adf/mf/skins">
    <skin>
        <id>mobileFusionFx.iPhone</id>
        <family>mobileFusionFx</family>
        <extends>mobileFusionFx.iOS</extends>
        <style-sheet-name>skins/mobilefusionfx.iphone.css</style-sheet-name>
    </skin>
    <skin>
        <id>mobileFusionFx.iPad</id>
        <family>mobileFusionFx</family>
        <extends>mobileFusionFx.iOS</extends>
        <style-sheet-name>skins/mobilefusionfx.ipad.css</style-sheet-name>
    </skin>
    <skin>
        <id>mobileFusionFx.iPod</id>
        <family>mobileFusionFx</family>
        <extends>mobileFusionFx.iOS</extends>
        <style-sheet-name>skins/mobilefusionfx.ipod.css</style-sheet-name>
    </skin>
    <!--  Skin Additions -->
    <skin-addition>
        <skin-id>mobileFusionFx.iPhone</skin-id>
        <style-sheet-name>skins/mystyles.iphone.addition1.css</style-sheet-name>
    </skin-addition>
    <skin-addition>
        <skin-id>mobileFusionFx.iPhone</skin-id>
        <style-sheet-name>skins/mystyles.iphone.addition2.css</style-sheet-name>
    </skin-addition>
    <skin-addition>
        <skin-id>mobileFusionFx.iOS</skin-id>
        <style-sheet-name>skins/mystyles.ios.addition2.css</style-sheet-name>
    </skin-addition>
</adfmf-skins>
5.12 Working with Feature Archive Files
The adfmf-application.xml file references at least one application feature. These application features, when packaged into a JAR file known as a Feature Archive file (FAR), provide the reusable content that can be consumed by other ADF Mobile applications. A FAR is essentially a self-contained collection of everything that an application feature requires, such as icon images, resource bundles, HTML, JavaScript, or other implementation-specific files. As described in Section 16.5, "Deploying Feature Archive Files (FARs)," the contents of a FAR includes a single adfmf-feature.xml file, which identifies each of the packaged application features by a unique ID. You can edit this file, as described in Section 5.7, "About the Mobile Feature Application Configuration File," to update such feature properties as content implementation (local or remote HTML files or ADF Mobile AMX pages) and display based on such factors as user roles and privileges or device properties. A mobile application can reference one FAR, several of them, or none at all.
5.12.1 How to Use FAR Content in an ADF Mobile Application
You make an application feature available to an ADF Mobile application by adding it to the consuming application's class path.
Deploy the application feature as a Feature Archive file, as described in Section 16.5.2, "How to Deploy the Feature Archive Deployment Profile."
How to add application feature content to an ADF Mobile application:
-
Open the Resource Palette and then choose New File Systems Connection.
-
Complete the File Systems Connection dialog to create a file connection to the directory that contains the Feature Archive JAR file. For more information, refer to the Oracle JDeveloper Online help.
-
Right-click the Feature Archive file (which is noted as a JAR file) in the Resource Palette.
-
Choose Add to Application to add consuming application's classpath, as shown in Figure 5-49.
Note:
Choose Remove from Application to remove the feature archive JAR from the consuming application's classpath.
5.12.2 What Happens When You Add a Feature Archive JAR to a Classpath
After a FAR is added to the application's classpath:
-
The contents of the FAR display in the Application Resources under the Libraries node, as shown in Figure 5-50.
-
Every application feature declared in the
adfmf-feature.xmlfiles included in the JARs becomes available to the consuming application, as illustrated by Figure 5-51 where the dropdown lists IDs of the available application features belonging toAcmeSales.jar(HCM, PROD, and Customers) as well as one called Portfolio that is defined in another Feature Archive that has been added to the application,StockTracker.jar. See also Section 5.5.1, "How to Designate the Content for a Mobile Application."Tip:
Manually adding the Feature Archive JAR to the application classpath also results in the application features displaying in the Insert Feature Reference dialog.
-
The information in the
connections.xmlfile located in the Feature Archive JAR is merged into the consuming application'sconnections.xmlfile. The Log window, shown in Figure 5-52, displays naming conflicts.Note:
You must verify that the connections are valid in the consuming application.
5.12.3 What You May Need to Know About Enabling the Reuse of Feature Archive Resources
To ensure that the resources of a FAR can be used by an application, both the name of the FAR and its feature reference ID must be globally unique. Within the FAR itself, the DataControl.dcx file must be in a unique package directory. Rather than accepting the default names for these package directories, you should instead create a unique package hierarchy for the project. You should likewise use a similar package naming system for the feature reference IDs.
