4 Writing Oracle Security Token Service Module Classes
This chapter discusses Oracle Access Manager 11g and Oracle Security Token Service custom token options. It includes the following sections:
-
Section 4.1, "Introduction to Oracle Security Token Service Custom Token Module Classes"
-
Section 4.5, "Managing a Custom Oracle Security Token Service Configuration"
4.1 Introduction to Oracle Security Token Service Custom Token Module Classes
When Oracle Security Token Service does not support the token that you want to validate or issue out-of-the-box, you can write your own validation and issuance module classes. One of the two (validation or issuance class) is required for custom tokens:
-
Oracle Security Token Service uses the custom validation class to validate a custom token.
-
Oracle Security Token Service uses the custom issuance class to issue a custom token.
Note:
One of the two (validation or issuance class) is required for custom tokens.The following overview outlines the tasks you must perform.
Task overview: Deploying custom token module classes
-
Writing a TokenValidatorModule Class to validate a custom token with Oracle Security Token Service, if needed.
-
Writing a TokenIssuanceModule Class to issue a custom token with Oracle Security Token Service, if needed.
-
Making Custom Classes Available to create a Custom Token module that will allow the user to create Validation Templates and Issuance Templates for their custom token.
-
Managing a Custom Oracle Security Token Service Configuration to create Validation and Issuance Templates for the custom token, and use the custom templates in Endpoints and Partner Profiles as you would use the templates of standard tokens.
4.2 Writing a TokenValidatorModule Class
This section provides the following topics:
4.2.1 About Writing a TokenValidatorModule Class
The Oracle Security Token Service Validation module class implements the oracle.security.fed.sts.token.tpe.TokenValidatorModule interface. The following properties can be fetched from the TokenContext during the validation process:
-
XML_TOKEN: The bytes of the XML message that contains the token that must be validated.
-
BST_VALUE_TYPE: If the custom token is sent as a Binary Security Token, this will contain the Binary Security Token value type.
-
BST_ENCODING: If the token is sent as a Binary Security Token, this will contain the encoding.
-
BST_CONTENT: If the token is sent as a Binary Security Token, this will contain the Binary Security Token content.
-
TOKEN_ELEMENT: If the token is not a binary security token and does not have a jaxb representation in the Oracle Security Token Service internal classes, this will contain the XML element or custom JAXB class representing the token.
-
XML_DOM: This is the DOM representation of the incoming message. This will be present only if a DOM object was created as a part of Oracle Security Token Service processing thus far.
The token should be validated using the information in the properties in the TokenContext and a TokenResult should be returned. The following properties can be set on a TokenResult object to return information to Oracle Security Token Service:
-
TPE_RESULT_FAILURE_CODE: The failure code if there was a failure.
-
TPE_RESULT_FAILURE_STRING: A string describing the failure.
-
Any other properties that are set in the result are available in the context to be used for token mapping. Usually, validators set STS_SUBJECT_ID property to the name ID and use this to map to a user record.
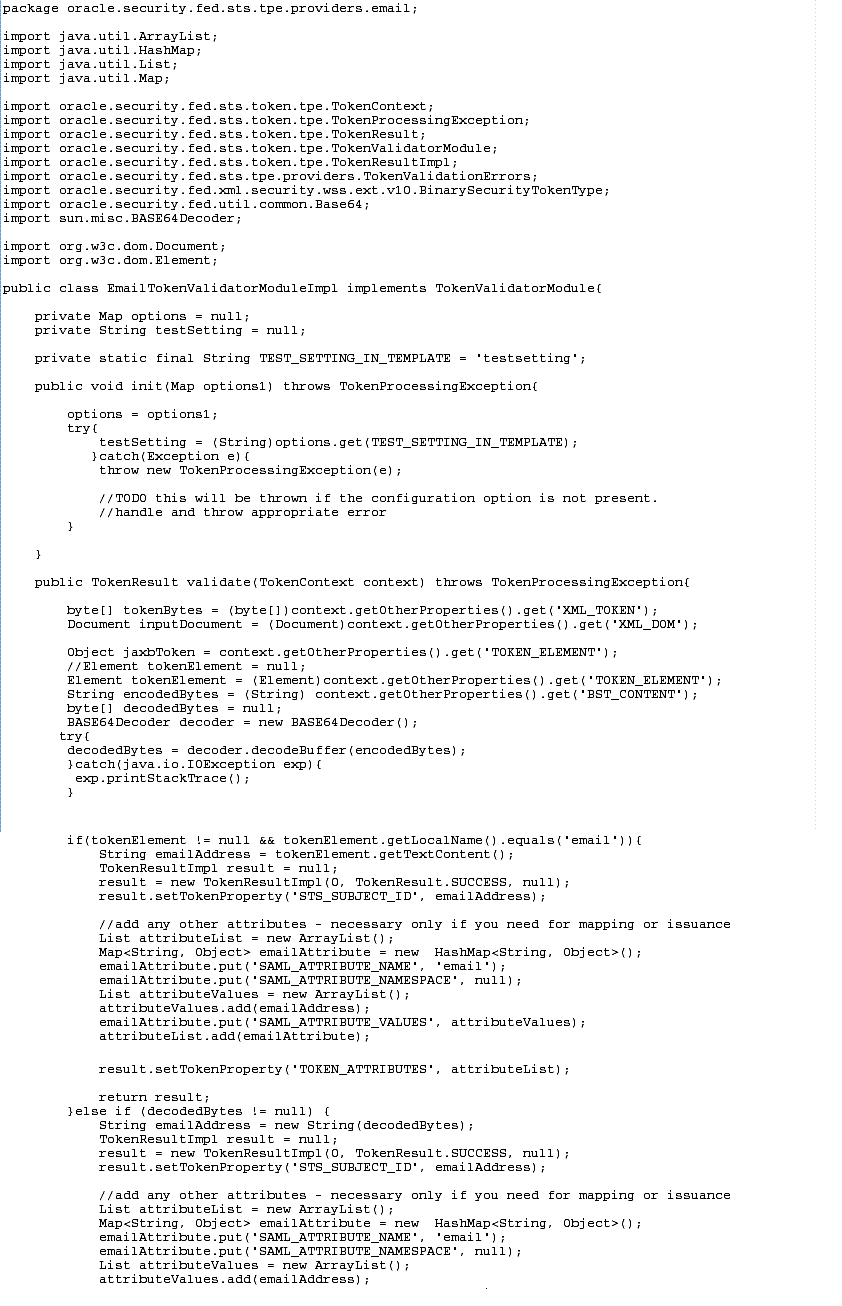
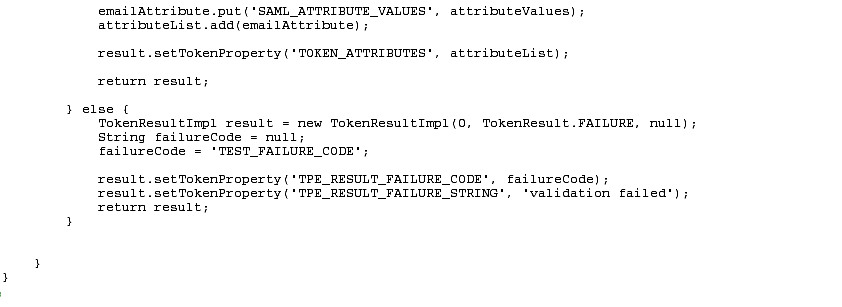
See the following figures contain examples for the full implementation of EmailTokenValidatorModuleImplforBinary.java:
-
Figure 4-1, "Part 1: EmailTokenValidatorModuleImplforBinary.java"
-
Figure 4-2, "Part 2: EmailTokenValidatorModuleImplforBinary.java"
The following overview outlines development highlights for this module class.
Development highlights: Writing a TokenValidatorModule class
-
Implement the
init(Map options)method, called when theTokenValidatorModuleis initialized. Theinitmethod is passed in a map containing the parameters defined in the validation template. -
Implement the
validate(TokenContext context)method, called when a particular incoming custom token must be validated.-
Fetch token information from the properties in the
TokenContextobject. -
Validate the token and return a
TokenResultobject:On Success, return:
TokenResultImpl result = new TokenResultImpl(0, TokenResult.SUCCESS, token);
On Failure, return:
TokenResultImpl result = new TokenResultImpl(0, TokenResult.FAILURE, token); result.setTokenProperty("TPE_RESULT_FAILURE_CODE", failureCode); result.setTokenProperty("TPE_RESULT_FAILURE_STRING", "validation failed"); -
Confirm the validated token result returns the
NameIdin the token and any attributes that are parsed from the token, in the following format:result.setTokenProperty(TPEConstants.NAMEID_VALUE, emailAddress); //attributes List attributeList = new ArrayList(); Return any other properties that should be available in the context for : token mapping and issuance by setting the properties on the result result.setTokenProperty(name, value); Return any other properties that should be available in the context for token mapping and issuance by setting the properties on the result as follows: result.setTokenProperty(name, value); emailAttribute.put(TPEConstants.SAML_ATTRIBUTE_NAMESPACE, null); List attributeValues = new ArrayList(); attributeValues.add(emailAddress); emailAttribute.put(TPEConstants.SAML_ATTRIBUTE_VALUES, attributeValues); attributeList.add(emailAttribute); result.setTokenProperty(TPEConstants.TOKEN_ATTRIBUTES, attributeList);
-
4.3 Writing a TokenIssuanceModule Class
This section provides the following topics:
4.3.1 About Writing a TokenIssuanceModule Class
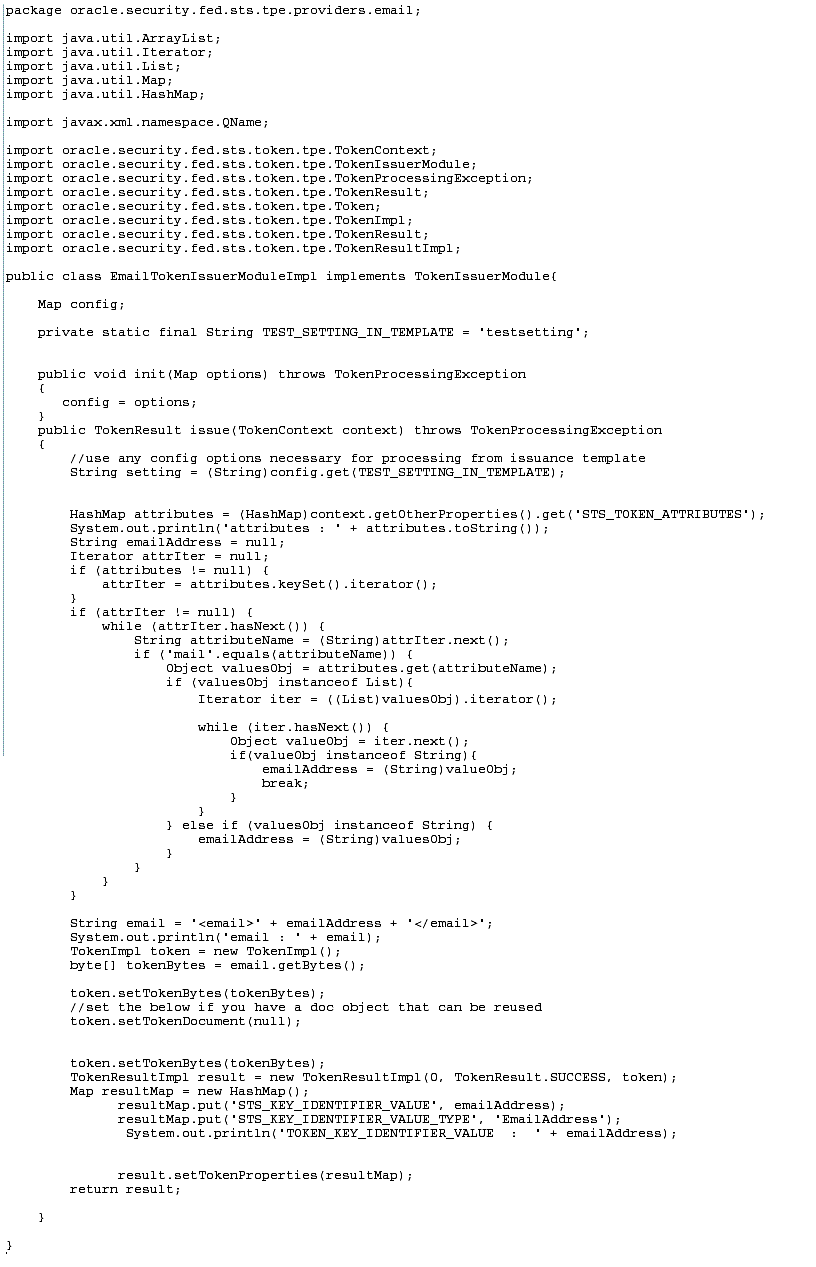
The EmailTokenIssuerModuleImpl.java class should implement the oracle.security.fed.sts.token.tpe.TokenIssuerModule interface and attributes in the TokenContext.
See Figure 4-3 for an example. The overview that follows outlines development highlights for this module class.
Development highlights: Writing a TokenIssuanceModule class
-
Implement the
public void init(Map options)throws TokenProcessingExceptionmethod.The
init()method is called when the issuer module is initialized. Theinitmethod is passed a map contain the parameters defined in the issuance template. -
Implement the
public TokenResult issue(TokenContext context) throws TokenProcessingExceptionmethod.This method is called when a custom outgoing token must be created.
-
Create, within the
issuemethod, the token using the attributes in the issuance template and the attributes passed in theTokenContext. Attributes in theTokenContextare accessed in the following way:List attributes = (List)context.getOtherProperties().get(TPEConstants.TOKEN_ATTRIBUTES); String emailAddress = null; HashMap attributes = (HashMap)context.getOtherProperties().get("STS_TOKEN_ATTRIBUTES"); Object valueObj = attributes.get("mail"); //valuesObj will be a list if mail has more than 1 value; if(attributes != null) attrIter = attributes.iterator(); if(attrIter != null){ HashMap attributes = (HashMap)context.getOtherProperties().get("STS_TOKEN_ ATTRIBUTES"); Object valueObj = attributes.get("mail"); //valuesObj will be a list if mail has more than 1 value. Map<String, Object> attribute = attrIter.next(); String attributeName = (String)attribute.get(TPEConstants.SAML_ATTRIBUTE_NAME); if("mail".equals(attributeName)){ {Object valuesObj = attribute.get(TPEConstants.SAML_ATTRIBUTE_VALUES); if(valuesObj instanceof List) { Iterator iter = ((List)valuesObj).iterator(); while(iter.hasNext()) {Object valueObj = iter.next(); if(valueObj instanceof String) } }else if(valuesObj instanceof String) Unknown macro: { emailAddress = (String)valuesObj; } } -
Create a result object and set the bytes of the token and the Document Object Model (DOM) representation of the token (only if the DOM representation was created during the processing in this class):
token.setTokenDocument(null);--> if you have a doc object that can be reuse.d set it here
token.setTokenBytes(tokenBytes);
TokenResult result = new TokenResultImpl(0, TokenResult.SUCCESS, token);
-
Set the key identifier information into the token properties, as follows:
Map resultMap = new HashMap();
   resultMap.put("STS_KEY_IDENTIFIER_VALUE", emailAddress);
   resultMap.put("STS_KEY_IDENTIFIER_VALUE_TYPE", "EmailAddress");
   result.setTokenProperties(resultMap);
-
4.3.2 Writing a TokenIssuanceModule Class
Task overview: Writing an Issuance Module class
-
Write the issuance module class as you refer to Section 4.3.1, "About Writing a TokenIssuanceModule Class" and Oracle Security Token Service Java API Reference.
4.4 Making Custom Classes Available
This section describes how to make custom classes available to Oracle Access Manager 11g using the console.
The information here can be applied when you have:
-
WS-Security User Name Token
-
WS-Trust Custom Token
-
Issuing Custom Token
Note:
You can also write a script that includes WebLogic Scripting Tool commands for any operation that you can accomplish through the console. For more information, see Oracle Fusion Middleware WebLogic Scripting Tool Command Reference.This section provides the following topics:
4.4.1 About Making Classes Available
After writing the custom token validation and/or issuance classes, you must add Custom Token Configuration to Oracle Security Token Service to indicate when and how these classes should be used.
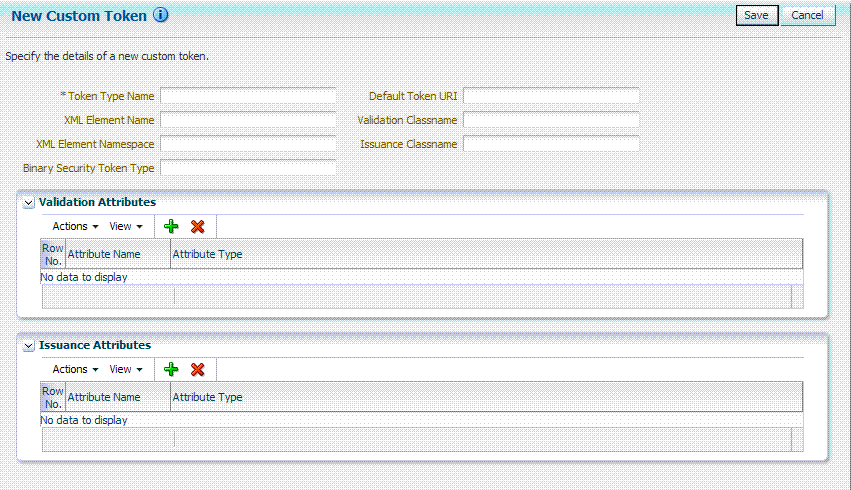
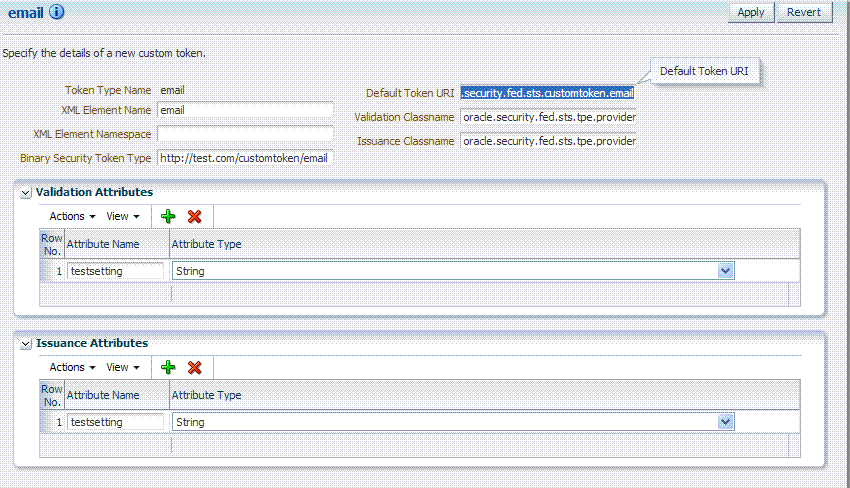
On the New Custom Token page only the Token Type Name is required (identified with an asterisk, *), as shown in Figure 4-4. Not all elements apply to all custom tokens. However, if you submit information that is incomplete, a dialog box appears to identify what is missing.
After successful submission of new custom token details, the saved page is available for editing as shown in Figure 4-5.
For the custom token, you must decide on the XML Element Name, XML Element Namespace, Binary Security Token Type, and so on. Table 4-1 describes the elements on a Custom Token page based on the examples in this chapter.
Table 4-1 New Custom Token Elements
| Element | Description |
|---|---|
|
Token Type Name |
The unique name you choose for this custom token. For example: email_token Note: After you save a new custom token configuration, you cannot edit this name. |
|
Default Token URI |
The URI for this custom token. This URI can then be used in the RST to request that a custom token of this type should be issued. For the example in this chapter, the value would be: oracle.security.fed.sts.customtoken.email |
|
XML Element Name |
The name you decide on, which will be associated with the Token Type Name. For example: If you specify Note: Minimally, you need either an XML Element Name or Binary Security Token Type. |
|
Validation Classname |
The name of the custom token validation class that you made available to Oracle Security Token Service. For example: oracle.security.fed.sts.tpe.providers.email.EmailTokenValidatorModuleImpl Note: Minimally, you need either an issuance class name or validation class name, depending on whether you want to issue or validate a custom token. |
|
XML Element Namespace |
The namespace of the custom token element name. For example: http://email.example.com |
|
Issuance Classname |
The name of the custom token issuance class that you made available to Oracle Security Token Service. For example: oracle.security.fed.sts.tpe.providers.email.EmailTokenIssuerModuleImpl Note: Minimally, you need either an Issuance classname or Validation classname, depending on whether you want to issue or validate a custom token. |
|
Binary Security Token Type |
Enables the class to validate a custom token sent in as a BinarySecurityToken. The ValueType of the BinarySecurityToken for this custom token. If Oracle Security Token Service receives a Binary Security Token with this valuetype, it will be forwarded to this custom token's Validation class for validation. |
|
Validation Attributes |
This section enables you to add (or remove) validation attributes. The table displays existing validation attributes, if any. For this example:
Note: You will add a value to the attribute when creating a Token Validation Template. |
|
Issuance Attributes |
This section enables you to add (or remove) issuance attributes. The table displays the following information for existing issuance attributes.
Note: You will add a value to the attribute when creating a Token Issuance Template. |
|
Save |
Click this button on the New Custom Tokens page to save your configuration information. |
|
Cancel |
Click this button to dismiss your configuration details. |
|
Apply |
Click this button to submit your changes. |
|
Revert |
Click this button to dismiss your changes. |
Task overview: Adding custom tokens for custom classes
-
Create a JAR file containing only your custom
TokenIssuerModule orTokenValidatorModuleclasses (or both). No XML metadata or manifest is needed. -
Review information in Figure 4-5 and Table 4-1.
-
Add the JAR to the OAM Server hosting Oracle Security Token Service and create a new custom token, as described in Section 4.4.3, "Managing Custom Tokens".
4.4.2 About Narrowing a Search for Custom Tokens
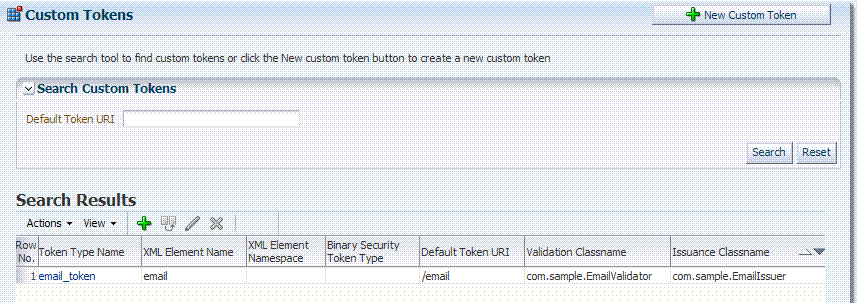
Figure 4-6 illustrates the Custom Tokens Search controls and Results table. These appear when you double-click the Custom Tokens node in the navigation tree. By default, all currently defined custom tokens are listed when the Search Results table is displayed.
Table 4-2 describes the Custom Tokens Search elements and controls. No wild cards (*) are allowed in Custom Token searches.
Table 4-2 Custom Tokens Search Elements and Controls
| Element | Description |
|---|---|
|
Default Token URI |
The URI that was defined for the custom token. You can enter the entire URI or only part of it. For instance, if you enter "ai" the Search Results table will display all custom tokens defined with a token URI that includes the letters "ai". Note: Wild cards are not allowed in Custom Token searches. |
|
Search |
Initiates the Search function using criteria provided in the form. |
|
Reset |
Resets the Search form with defaults only. |
|
Search Results |
Provides the results of your search based on your choices in the View menu. |
|
Actions menu |
Provides the following functions that can be performed on a selection in the results table: 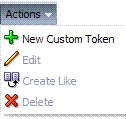
Note: Actions menu functions mirror command buttons above the results table. For example:
|
|
View menu |
Provides functions you can use to display various information in the results table: 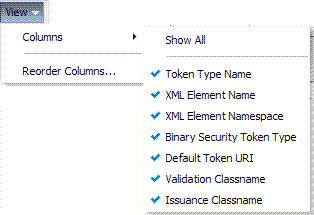 |
|
Controls affecting the ordering of items listed in the results table:
|
4.4.3 Managing Custom Tokens
Users with valid administrator credentials can use the procedure in this section to manage custom tokens for custom Token Module classes.
The following procedure includes steps to add, edit, and delete custom tokens or attributes of a custom token. Skip any steps that you do not need.
Writing a TokenValidatorModule Class
Writing a TokenIssuanceModule Class
See Also:
To make custom classes available
-
Create and add the JAR containing your Issuance and Validation classes to the OAM Server hosting Oracle Security Token Service using one of these methods:
-
Add the custom token jar and the sts-common.jar that is available in DOMAIN_HOME/config/fmwconfig/mbeans/oam to the Managed Server classpath by editing the startup script.
-
Add the custom token jar and the sts-common.jar that is available in DOMAIN_HOME/config/fmwconfig/mbeans/oam to the DOMAIN_HOME/lib directory to automatically add these jars to the Managed Server classpath.
-
Restart the OAM Server.
-
-
New Custom Token: From the Oracle Access Suite System Configuration tab, open the Security Token Services section and:
-
Double-click the Custom Tokens node to open the page.
-
Click the New Custom Token button.
-
Fill in the New Custom Token page with details for your custom classes (Table 4-1).
-
Click Save and dismiss the confirmation window (or click Cancel to dismiss the page without submitting it).
-
Close the page (or edit as described in Step 4).
-
Proceed to Step 4, if needed, or to Section 4.5, "Managing a Custom Oracle Security Token Service Configuration".
-
-
Find Custom Tokens: From the Security Token Service section of the System Configuration tab:
-
Find All: Double-click the Custom Tokens node to display a results table with all custom tokens listed.
-
Narrow the Search: Enter some or all characters in the desired Default Token URI, click the Search Button, and review the results table.
-
Reset the Search Form: Click the Reset button.
-
-
Edit Custom Token Configuration: Start with the saved page you just created.
Alternatively: Use Step 3 to find the desired Custom Token, then double-click the name in the Search Results table to open the page.
-
In the named Custom Token page, click the appropriate field and edit as needed.
-
Add Attributes: Click the Add (+) icon for the Attributes table, enter the Attribute Name and an Attribute Type (Table 4-1).
-
Remove Attributes: From the Attributes table, click the row containing the attribute to remove, click the Delete (X) icon for the table, and dismiss the Confirmation window.
-
Apply Changes: Click the Apply button at the top of the page to submit changes.
-
-
Remove a Custom Token:
-
Click the desired name in the Search Results table to select the item to remove.
-
From the Actions menu, click Delete (or click the Delete (X) command button above the table.
-
Click the Delete button in the Confirmation window (or click No to cancel the operation).
-
4.5 Managing a Custom Oracle Security Token Service Configuration
This tasks consists of the following procedures:
4.5.1 Creating the Validation Template
Users with valid Oracle Access Manager administrator credentials can perform the following task to create a Validation Template with a Token Protocol of Webservice Trust to map the token to the requester.
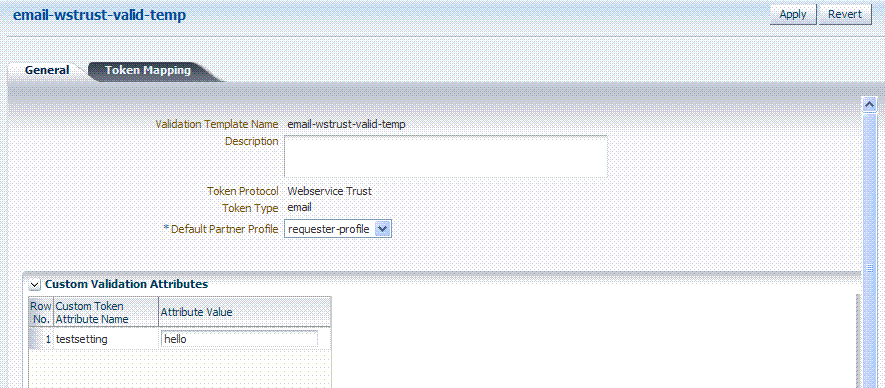
The template in this example can be used for the module classes described earlier in this chapter. Full implementation details are shown in the following figures. As you review these, notice how specifications for this template reference the module class code:
To create the validation template for the custom module classes
-
Display the list of existing Token Validation Templates.
Oracle Access Suite
System Configuration
Security Token Services
Token Validation Templates -
Click the New Validation Template button in the upper-right corner (or click the Add (+) command button above the Search Results table).
-
General: Set the following for use with the custom token.
Validation Template Name: email-wstrust-valid-temp
Token Protocol: Webservice Trust
Token Type: email
Default Partner Profile: requester-profile
Custom Validation Attributes: testsetting: hello
-
Token Mapping: Set the following for use with the custom token in this chapter.
Check the box beside Map Token To User (to enable it).
Check the box beside Enable Simple User Mapping and enter:
User Token Attribute: STS_SUBJECT_ID
Datastore Attribute: mail -
Click Save and dismiss the confirmation window.
-
Proceed to "Creating the Issuance Template for a Custom Token".
4.5.2 Creating the Issuance Template for a Custom Token
This is a server side configuration. Users with valid Oracle Access Manager administrator credentials can perform the following task to create a Token Issuance Template.
Each Token Issuance Template indicates how to construct a token, and which signing or encryption to use when constructing a token. Each Token Issuance Template also defines the attributes to be sent as part of the outbound token for mapping, and filtering data. However, Issuance Templates do not list mapping or filtering rules, which are defined in the Relying Party Partner Profile.
The template in this example can be used for the email custom token described earlier in this chapter. Implementation details are shown in the following figures, and described in the accompanying procedure. As you review these, notice how specifications for this template reference the module class code:
When you have a custom token type deployed, the Issuance Properties are tailored to accommodate the custom token. For instance, the custom email token type was chosen for the issuance template show in Figure 4-10.
This procedure produces a companion Issuance Template for the custom module classes in this chapter. For the example:
-
Ignore the Token Encryption Algorithm, which is not used for the custom token type: email.
-
Fill in a value for the Custom Token Attribute, which is populated from the custom token code.
To create the Issuance Template for the custom module classes
-
Go to the list of existing Token Issuance Templates.
Oracle Access Suite
System Configuration
Security Token Services
Token Issuance Templates -
New Token Issuance Template:
-
Click the New Issuance Template button in the upper-right corner (or click the Add (+) command button above the Search Results table).
-
General: Set the following for use with the custom token in this chapter.
Issuance Template Name: email-issuance-temp
Token Type: email -
Click Save and dismiss the confirmation window (or click Cancel without saving).
-
Issuance Properties: Set the following for use with the custom token in this chapter.
Custom Token Attribute Value: world -
Click Apply and dismiss the confirmation window (or click Revert without saving it).
-
Close the definition (or edit it as described in Step 4).
-
-
Edit a Template: Start with the saved page you just created.
Alternatively: Use Step 3 to find the desired template and click the name in the Search Results table to display the definition.
-
Edit details as needed.
-
Click the Apply button at the top of the page to submit changes (or Revert to undo your changes).
-
4.5.3 Adding the Custom Token to a Requester Profile
You can either edit an existing requester profile to add your custom token to the Token Type Configuration table, or create a new requester profile to use with the custom token. Either way, configure:
-
Token Type: email (your custom token)
-
Validation Template: email-wstrust-valid-temp
Your Custom Token and Validation Template must be defined.
To create or edit a requester profile for the custom token
-
From the Oracle Access Suite System Configuration tab, open the Security Token Services section.
-
In the navigation tree, open the Partner Profiles node and double-click the Requestor Profiles node to display a list of existing profiles
-
Existing Profile:
-
In the Search Results table of the Requester Profiles page, click the name of the desired profiles.
-
Token and Attributes: Fill in the following details for the custom token in this chapter and then click the Save button at the top of the page.
Token type:email
Validation Template:email-wstrust-valid-temp -
Click Save, dismiss the confirmation window, and close the page (or click Cancel to dismiss the page without submitting it).
-
Proceed to Section 4.5.4, "Adding the Custom Token to the Relying Party Profile".
-
-
New Profile: Click the New Requester Profile button to display the New Partner Profile page where you enter details:
-
General: Fill in the following details for the custom token in this chapter and then click the Next button at the top of the page.
Profile ID:unique_requesterprofile_name
Default Relying Party Profile:unique_relyingparty_name -
Add Token Type Configuration: Fill in the following details for the custom token in this chapter and then click the Save button at the top of the page.
Token type:email
Validation Template:email-wstrust-valid-temp -
Proceed to Section 4.5.4, "Adding the Custom Token to the Relying Party Profile".
-
4.5.4 Adding the Custom Token to the Relying Party Profile
You can either edit an existing Relying Party profile, or create a new one to issue the custom token by default, and refer to the Issuance Template and related information. Either way, configure:
-
Default token to issue: email (your custom token)
-
Issuance Template:
email-issuance-temp
Your Custom Token and Issuance Template must be defined.
To edit the requester profile for the custom module classes
-
From the Oracle Access Suite System Configuration tab, open the Security Token Services section.
-
In the navigation tree, open the Partner Profiles node and double-click the Relying Party Profiles node to display a list of existing profiles.
-
Existing Profile:
-
In the Search Results table of the Relying Party Profiles page, click the name of the desired profile.
-
Click the Token and Attributes tab.
-
Token Type Configuration: Click the Add (+) button above the Token Type Configuration table and enter the following details:
Token type:email
Issuance Template:email-issuance-temp -
Attributes: Click the Add (+) button above the Attributes table and define the following:
Attribute name: mail
Store Type:Userstore
Include in Token:(check to enable)
Encryption (leave blank)
Value (leave blank) -
Click Apply, dismiss the confirmation window, and close the page (or click Cancel to dismiss the page without submitting it).
-
-
New Profile: Click the New Relying Party Profile button to display the New Partner Profile page where you enter details:
-
General: Fill in the following details for the custom token in this chapter and then click the Next button at the top of the page.
Profile ID:unique_relyingparty-name
Default Token:email -
Click the Token and Attributes tab and perform Steps 2c and 2d, then click Apply.
-
4.5.5 Mapping the Token to a Requestor
If you don't have a Username Validation Template (username-wss-valid-template), use the Oracle Access Suite to create one to map the token to the requester.
Validation Template Name: username-wss-valid-template
Token Type: Username
4.5.6 Creating an /wssuser EndPoint
"Mapping the Token to a Requestor"
-
From the Oracle Access Suite System Configuration tab, open the Security Token Services section.
-
Double-click the Endpoints node to display a list of existing Endpoints.
-
New Endpoint:
-
Click the Add (+) button above the table (or choose New Endpoint from the Actions menu).
-
Enter the new Endpoint URI: /wssuser
-
Choose the Oracle WSM policy: sts/wss_username_service_policy
-
Choose the Validation Template: username-wss-validation-template.
-
Click Apply to submit the definition and dismiss the confirmation window (or click Revert to dismiss the page without submitting it).
-
Close the page.
-
