13 Diagnosing Problems
This chapter describes how to use the Oracle Fusion Middleware Diagnostic Framework to collect and manage information about a problem so that you can resolve it or send it to Oracle Support for resolution.
This chapter contains the following topics:
13.1 Understanding the Diagnostic Framework
Oracle Fusion Middleware includes a Diagnostic Framework, which aids in detecting, diagnosing, and resolving problems. The problems that are targeted in particular are critical errors such as those caused by code bugs, metadata corruption, customer data corruption, deadlocked threads, and inconsistent state.
When a critical error occurs, it is assigned an incident number, and diagnostic data for the error (such as log files) are immediately captured and tagged with this number. The data is then stored in the Automatic Diagnostic Repository (ADR), where it can later be retrieved by incident number and analyzed.
The goals of the Diagnostic Framework are:
-
First-failure diagnosis
-
Limiting damage and interruptions after a problem is detected
-
Reducing problem diagnostic time
-
Reducing problem resolution time
-
Simplifying customer interaction with Oracle Support
The Diagnostic Framework includes the following technologies:
-
Automatic capture of diagnostic data upon first failure: For critical errors, the ability to capture error information at first failure greatly increases the chance of a quick problem resolution and reduced downtime. The Diagnostic Framework automatically collects diagnostics, such as thread dumps, DMS metric dumps, and WebLogic Diagnostics Framework (WLDF) server image dumps. Such diagnostic data is similar to the data collected by airplane "black box" flight recorders. When a problem is detected, alerts are generated and the fault diagnosability infrastructure is activated to capture and store diagnostic data. The data is stored in a file-based repository and is accessible with command-line utilities.
-
Standardized log formats: Standardized log formats (using the ODL log file format) across all Oracle Fusion Middleware components allows administrators and Oracle Support personnel to use a single set of tools for problem analysis. Problems are more easily diagnosed, and downtime is reduced.
-
Diagnostic rules: Each component defines diagnostic rules that are used to evaluate whether a given log message should result in an incident being created and which dumps should be executed. The diagnostic rules also indicate whether an individual dump should be created synchronously or asynchronously.
In addition, you can define custom rules that apply to a domain, a server, or an application in a domain or server.
-
Incident detection log filter: The incident detection log filter implements the java.util.logging filter. It inspects each log message to see if an incident should be created, basing its decision on the diagnostic rules for components and applications.
-
Incident packaging service (IPS) and incident packages: The IPS enables you to automatically and easily gather the diagnostic data—log files, dumps, reports, and more—pertaining to a critical error that has a corresponding incident, and package the data into a zip file for transmission to Oracle Support. All diagnostic data relating to a critical error that has been detected by the Diagnostics Framework is captured and stored as an incident in ADR. The incident packaging service identifies the required files automatically and adds them to the zip file.
Before creating the zip file, the IPS first collects diagnostic data into an intermediate logical structure called an incident package. Packages are stored in the Automatic Diagnostic Repository. If you choose to, you can access this intermediate logical structure, view and modify its contents, add or remove additional diagnostic data at any time, and when you are ready, create the zip file from the package and upload it to Oracle Support.
-
Integration with WebLogic Diagnostics Framework (WLDF): The Oracle Fusion Middleware Diagnostics Framework integrates with some features of WebLogic Diagnostics Framework (WLDF), including the capturing of WebLogic Server images on detection of critical errors. WLDF is a monitoring and diagnostic framework that defines and implements a set of services that run within WebLogic Server processes and participate in the standard server life cycle. Using WLDF, you can create, collect, analyze, archive, and access diagnostic data generated by a running server and the applications deployed within its containers. This data provides insight into the run-time performance of servers and applications and enables you to isolate and diagnose faults when they occur.
Oracle Fusion Middleware Diagnostics Framework integrates with the following components of WLDF:
-
WLDF Watch and Notification, which watches specific logs and metrics for specified conditions and sends a notification when a condition is met. There are several types of notifications, including JMX notification and a notification to create a Diagnostic Image. Oracle Fusion Middleware Diagnostics Framework integrates with the WLDF Watch and Notification component to create incidents.
-
Diagnostic Image Capture, which gathers the most common sources of the key server state used in diagnosing problems. It packages that state into a single artifact, the Diagnostic Image. With Oracle Fusion Middleware Diagnostics Framework, it writes the artifact to ADR.
For more information about WLDF, see Oracle Fusion Middleware Configuring and Using the Diagnostics Framework for Oracle WebLogic Server.
-
13.1.1 About Incidents and Problems
To facilitate diagnosis and resolution of critical errors, the Diagnostic Framework introduces two concepts for Oracle Fusion Middleware: problems and incidents.
A problem is a critical error. Critical errors manifest as internal errors or other severe errors. Problems are tracked in the ADR. Each problem has a problem key, which is a text string that describes the problem. It includes an error code (in the format XXX-nnnnn) and in some cases, other error-specific values.
An incident is a single occurrence of a problem. When a problem (critical error) occurs multiple times, an incident is created for each occurrence. Incidents are timestamped and tracked in the ADR. Each incident is identified by a numeric incident ID, which is unique within the ADR home. When an incident occurs, the Diagnostic Framework:
-
Gathers first-failure diagnostic data about the incident in the form of dump files (incident dumps).
-
Stores the incident dumps in an ADR subdirectory created for that incident.
-
Registers the incidents dumps with the incident in ADR.
13.1.1.1 Incident Flood Control
It is conceivable that a problem could generate dozens or perhaps hundreds of incidents in a short period of time. This would generate too much diagnostic data, which would consume too much space in the ADR and could possibly slow down your efforts to diagnose and resolve the problem. For these reasons, the Diagnostic Framework applies flood control to incident generation after certain thresholds are reached. A flood-controlled incident is an incident that is not recorded in the ADR. Instead, the Diagnostic Framework writes a message at the WARNING level to the log file and returns an oracle.dfw.incident.Incident object. Flood-controlled incidents provide a way of informing you that a critical error is ongoing, without overloading the system with diagnostic data.
By default, if more than 5 incidents with the same problem key occur within 60 minutes, subsequent incidents with the same problem key are flood controlled. You can change this value using MBeans, as described in Section 13.3.
13.1.2 Diagnostic Framework Components
The following topics describe the key components of the Diagnostic Framework:
Note:
To use the Diagnostic Framework, in particular the Automatic Diagnostic Repository, the Managed Servers must have Oracle JRF applied. The following directory will exist for each Managed Server if Oracle JRF has been applied:DOMAIN_HOME/SERVERS/server_name/adr
If the directory does not exist take one of the following steps:
-
Apply Oracle JRF, as described in Section 19.3.1.
-
If Oracle JRF has been applied, restart the servers, making sure that the Node Manager property
startScriptEnabledis set totrue, as described in Section 4.2.1.
13.1.2.1 Automatic Diagnostic Repository
The Automatic Diagnostic Repository (ADR) is a file-based hierarchical repository for Oracle Fusion Middleware diagnostic data, such as traces and dumps. The Oracle Fusion Middleware components store all incident data in the ADR. Each Oracle WebLogic Server stores diagnostic data in subdirectories of its own home directory within the ADR. For example, each Managed Server and Administration Server has an ADR home directory.
The ADR root directory is known as ADR base. By default, the ADR base is located in the following directory:
DOMAIN_HOME/servers/server_name/adr
Within ADR base, there can be multiple ADR homes, where each ADR home is the root directory for all incident data for a particular instance of Oracle WebLogic Server. The following path shows the location of the ADR home:
ADR_BASE/diag/ofm/domain_name/server_name
Figure 13-1 illustrates the directory hierarchy of the ADR home for an Oracle WebLogic Server instance.
Figure 13-1 ADR Directory Structure for Oracle Fusion Middleware
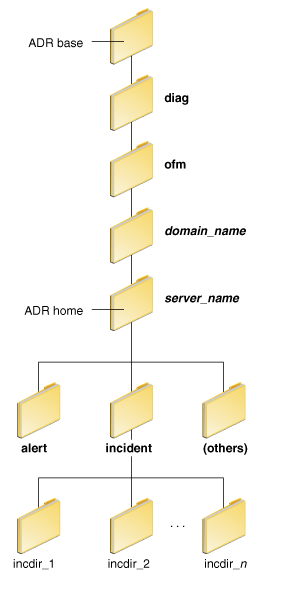
Description of "Figure 13-1 ADR Directory Structure for Oracle Fusion Middleware"
The subdirectories in the ADR home contain the following information:
-
alert: The XML-formatted alert log.
-
incident: A directory that can contain multiple subdirectories, where each subdirectory is named for a particular incident. The subdirectories are named incdir_n, with n representing the number of the incident. Each subdirectory contains information and diagnostic dumps pertaining only to that incident.
-
(others): Other subdirectories of ADR home, which store incident packages and other information.
Note:
ADR uses the domain name as the Product ID and the server name as the Instance ID when it packages an incident. However, if either name is more than 30 characters, ADR truncates the name. In addition, dollar sign ($) and space characters are replaced with underscores.13.1.2.2 Diagnostic Dumps
A diagnostic dump captures and dumps specific diagnostic information when an incident is created (automatic) or on the request of an administrator (manual). When executed as part of incident creation, the dump is included with the set of incident diagnostics data. Examples of diagnostic dumps include a JVM thread dump, JVM class histogram dump, and DMS metric dump. For a list of diagnostic dumps, see Table 13-7.
13.1.2.3 Management MBeans
The Diagnostic Framework provides MBeans that you can use to configure the Diagnostic Framework. For example, you can enable or disable flood control and you can configure how many incidents with the same problem key can occur within a specified time period. For information about using the management MBeans to configure the Diagnostic Framework, see Section 13.3.
You can also use the MBeans to query and create incidents, discover the list of available diagnostic dump types, and execute individual diagnostic dumps.
13.1.2.4 WLST Commands for Diagnostic Framework
The Diagnostic Framework provides WLST commands that you can use to view information about problems and incidents, create incidents, execute specific dumps and query the set of diagnostic dump types. For more information, see:
-
Section 13.4.4.2, "Viewing a Description of a Diagnostic Dump"
-
"Diagnostic Framework Custom WLST Commands" in the Oracle Fusion Middleware WebLogic Scripting Tool Command Reference
To use the custom WLST Diagnostic Framework commands, you must invoke the WLST script from the Oracle Common home. See Section 3.5.1.1 for more information.
13.1.2.5 ADRCI Command-Line Utility
The ADR Command Interpreter (ADRCI) is a utility that enables you to investigate problems, and package and upload first-failure diagnostic data to Oracle Support, all within a command-line environment. ADRCI also enables you to view the names of the dump files in the ADR, and to view the alert log with XML tags stripped, with and without content filtering.
ADRCI is installed in the following directory:
(UNIX) MW_HOME/wlserver_10.3/server/adr
(Windows) MW_HOME\wlserver_10.3\server\adr
See the following sections for information about using the ADRCI command-line utility:
See Also:
-
The chapter "ADRCI: ADR Command Interpreter" in Oracle Database Utilities
-
The chapter "Managing Diagnostic Data" in the Oracle Database Administrator's Guide
13.2 How the Diagnostic Framework Works
The Diagnostic Framework is active in each server and provides automatic error detection through predefined configured rules. Oracle Fusion Middleware components and applications automatically benefit from this always-on checking.
Incidents are automatically detected in two ways:
-
By the incident detection log filter, which is automatically configured to detect critical errors.
-
By the WLDF Watch and Notification component. The Diagnostics Framework listens for a predefined notification type and creates incidents when it receives such notifications.
For information about configuring WLDF Watch and Notification, see Section 13.3.4.
-
Programmatic incident creation. Some components create incidents directly.
Figure 13-2 shows the interaction when the incident is detected by the incident log detector. It shows the interaction among the incident log detector, the WLDF Diagnostic Image MBean, ADR, and component or application dumps when an incident is detected by the incident log detector.
Figure 13-2 Incident Creation Generated by Incident Log Detector

Description of "Figure 13-2 Incident Creation Generated by Incident Log Detector"
The steps represented in Figure 13-2 are:
-
The incident detection log filter is initialized with component and application diagnostic rules.
-
An application or component (in this case Oracle WebCenter Portal) logs a message using the java.util.logging API.
-
The ODL log handler passes the message to the incident detection log filter.
-
The incident log detection filter inspects the log message to see if an incident should be created, basing its decision on the diagnostic rules for the component. If the diagnostic rule indicates that an incident should be created, it creates an incident in the ADR.
-
The ODL log handler writes the log message to the log file, and returns control back to Oracle WebCenter Portal.
When an incident is created, a message, similar to the following, is written to the log file:
[2010-09-16T06:37:59.264-07:00] [dfw] [NOTIFICATION] [DFW-40104] [oracle.dfw]
[tid: 10] [ecid: 0000IF34gtMC8xT6uBf9EH1AgEck000000,0] [errid: 6]
[detailLoc: /oracle/config/base_domain/servers/AdminServer/adr/diag/ofm/base_domain/AdminServer]
[probKey: MDS-123456 [testComponent][testModule]] incident 6 created with
 problem key "MDS-123456 [testComponent][testModule]", in directory
 /oracle/config/base_domain/servers/AdminServer/adr/diag/ofm/base_domain/AdminServer/incident/incdir_6
-
The Diagnostic Framework executes the diagnostic dumps that are indicated by the diagnostic rules for the component.
-
The Diagnostic Framework writes the dumps to ADR, in the directory created for the incident.
-
The Diagnostic Framework invokes the WLDF Diagnostic Image MBean requesting that a Diagnostic Image be created in ADR.
-
WLDF writes the Diagnostic Image to ADR.
Figure 13-3 shows the interaction when an incident is detected by the WLDF Watch and Notification system. It shows the interaction among the incident notification listener, the WLDF Watch and Notification system, and the WLDF Diagnostic Image MBean.
Figure 13-3 Incident Creation Generated by WLDF Watch Notification

Description of "Figure 13-3 Incident Creation Generated by WLDF Watch Notification"
The steps represented in Figure 13-3 are:
-
The incident notification listener is initialized with component and application diagnostic rules.
-
Oracle Fusion Middleware Diagnostic Framework registers a JMX notification listener with WLDF. The listener listens for events from the WLDF Watch and Notification system. It only processes notifications of type oracle.dfw.wldfnotification.
-
Something in the system causes the configured WLDF watch to be triggered, causing a notification to be sent to the incident notification listener. The notification includes event information describing the data that caused the watch to trigger.
-
The Diagnostic Framework creates an incident in ADR.
-
The Diagnostic Framework executes the diagnostic dumps that are indicated by the diagnostic rules.
-
The Diagnostic Framework writes the dumps to ADR, in the directory created for the incident.
-
The Diagnostic Framework invokes the WLDF Diagnostic Image MBean requesting that a Diagnostic Image be created in ADR.
-
WLDF writes the Diagnostic Image to ADR.
13.3 Configuring the Diagnostic Framework
You can configure some settings for the Diagnostic Framework. In addition, you can configure an WLDF Watch and Notification to create an incident. The following topics describe how to configure the Diagnostic Framework:
13.3.1 Configuring Diagnostic Framework Settings
You can configure the following settings:
-
Enabling or disabling the detection of incidents through the log files
-
Enabling or disabling flood control and setting parameters for flood control
You configure these settings by using the Diagnostic Framework MBean DiagnosticConfig. The following shows the MBean's ObjectName:
oracle.dfw:type=oracle.dfw.jmx.DiagnosticsConfigMBean,name=DiagnosticsConfig
Table 13-1 shows the attributes for the DiagnosticConfig MBean and a description of each parameter.
Table 13-1 DiagnosticConfig MBean Attributes for Diagnostic Framework
The following example shows how to configure these settings using the Fusion Middleware Control System MBean Browser:
-
From the target navigation pane, expand the farm, then WebLogic Domain.
-
Select the domain.
-
From the WebLogic Domain menu, choose System MBean Browser.
The System MBean Browser page is displayed.
-
Expand Application Defined Beans, then oracle.dfw, then domain.domain_name, then dfw.jmx.DiagnosticsConfigMBean.
-
Select one of the DiagnosticConfig entries. There is one DiagnosticConfig entry for each server.
-
In the Application Defined MBean pane, expand Show MBean Information to see the server name.
The following shows the System MBean Browser page:
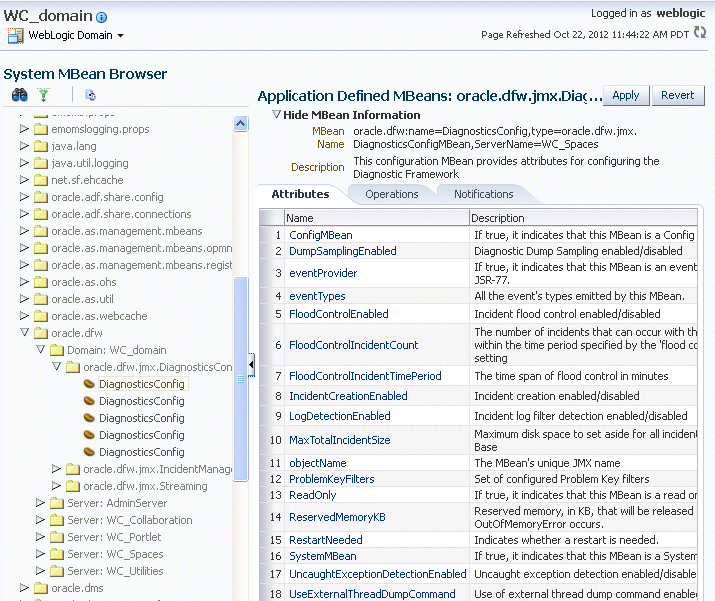
Description of the illustration dfw_config.gif
-
To change the values for the attributes listed in Table 13-1, enter or select the value in the Value field.
-
Click Apply.
13.3.2 Configuring Custom Diagnostic Rules
You can configure custom diagnostic rules that apply to a domain, a server, or an application in a domain or server.
You create the custom diagnostic rules by creating an .xml file with a particular format, which is shown in the example later in this section. You must save the file to one of the following locations:
-
For rules that apply to the entire domain:
DOMAIN_HOME/config/fmwconfig/dfw -
For rules that apply to a particular server:
DOMAIN_HOME/config/fmwconfig/servers/server_name/dfw
The file name must use the following format:
name.xml
appname#name.xml
In the format, appname is the name of the application to which the rule applies. The appname must be the exact name of the deployed application. name is the name of the rule you specify. If you do not specify appname, the rules will apply to the entire server. For example, the following rule applies to the application myApp:
myApp#custom_rule.xml
The custom diagnostic rules file can contain the following types of elements to define the rule:
-
Log detection conditions, which is optional
You can define a set of conditions, in the logDetectionConditions element, to check for in the diagnostic logs applicable to the server or to the specified application against which that the rules are registered. When a log message matching the condition is detected, an incident is created, capturing diagnostics that will help identify the problem. By default, all INCIDENT_ERROR messages are detected and an incident created for them. In addition, specific components may have configured rules to detect specific messages.
The following example shows a fragment of a custom diagnostic rules file that defines four log detection conditions. If one or more of the conditions are true, an incident is created.
<?xml version="1.0" encoding="UTF-8"?>
<diagnosticRules xmlns="http://www.oracle.com/DFW/DiagnosticsFrameworkRules/" xmlns:xs="http://www.w3.org/2001/XMLSchema-instance">
  <logDetectionConditions>
      <condition messageSeverity="INCIDENT_ERROR"/>
      <condition messageSeverity="ERROR" component="jrfServer_admin"/>
      <condition messageSeverity="ERROR" module="test.servletA"/>
      <condition messageId="FMW-40300"/>
    </logDetectionConditions>
See Table 13-2 for a description of the conditions you can use.
-
Processing rules
You can define processing rules that are evaluated when either the server or application rules are involved in incident creation. For example, if the application MyApp is involved in incident creation, any rules associated with the MyApp application are evaluated. In all cases, server-wide rules are evaluated regardless of the application.
Processing rules consist of two parts:
-
Default actions, which are optional. If they are present, they are always executed during incident creation. The actions are a list of diagnostic dumps to execute, along with optional arguments.
The following shows an example set of default actions:
<defaultActions>
      <dumpAction name="odl.logs">
        <argument name="timestamp" value="INCIDENT_TIME" valueType="fact"/>
      </dumpAction>
      <dumpAction name="dms.metrics"/>
    </defaultActions>
See Table 13-3 for a description of the optional arguments that you can use.
-
Condition-based actions, which are executed only if the condition evaluates to true. Each <rule> element consists of a name attribute, along with a child <ruleCondition> element and a child <ruleActions> element. The <ruleActions> element contains one or more dumpAction elements. See Table 13-4 for a list of the <ruleCondition> element attributes.
If multiple <condition> elements are specified in a single <rule> element, the dumpAction is executed only if all conditions evaluate to true.
The following shows an example of a condition-based action rule. If the MESSAGE_ID is DFW-99997, the condition evaluates to true and the jvm.classhistogram dump is executed.
<processingRules>
      <rule name="OOME">
        <ruleCondition>
          <condition name="MESSAGE_ID" value="DFW-99997"/>
        </ruleCondition>
        <ruleActions>
          <dumpAction name="jvm.classhistogram"/>
        </ruleActions>
      </rule>
    </processingRules>
-
Table 13-2 describes the attributes you can use to create the log detection conditions:
Table 13-2 Conditions for the LogDetectionConditions Element
| Condition | Description |
|---|---|
|
messageSeverity |
The log level at which the message was logged. (This is the MESSAGE_LEVEL field for ODL log files.) For example, INCIDENT_ERROR, ERROR. |
|
messageId |
The ID of the message. (This is the MESSAGE_ID field for ODL log files.) For example, DFW-99997. |
|
component |
The component name. (This is the COMPONENT_ID field for ODL log files.) For example, |
|
module |
The name of the module that originated the message. (This is the MODULE_ID field for ODL log files.) |
See Table 12-1 for a description of the ODL log file fields.
Table 13-3 describes the optional arguments that you can use for the <defaultActions> element.
Table 13-3 Optional arguments for the defaultActions Element
| Argument | Description |
|---|---|
|
name |
The name of the argument. |
|
value |
The value of the argument |
|
type |
The type of argument. Valid values are:
|
Table 13-4 shows the <ruleCondition> element attributes.
Table 13-4 Attributes for the ruleCondition Element
| Element | Description |
|---|---|
|
name |
The name of the attribute. Valid values depend on the valueType:
|
|
operator |
The operator. Value values are EQ, EQNoCase, NE, Contains, StartsWith, EndsWith, LT, GT, LE, GE. The default is EQ. The values are case sensitive. |
|
value |
The literal value to compare. |
|
datatype |
The data type. Valid values are String or Integer. The default is String. The values are case sensitive. |
|
valueType |
The type of argument:
|
To create and load a custom diagnostic rule:
-
Create a file that contains the custom rules.
The following shows a sample custom rules file:
<?xml version="1.0" encoding="UTF-8"?> <diagnosticRules xmlns="http://www.oracle.com/DFW/DiagnosticsFrameworkRules/" xmlns:xs="http://www.w3.org/2001/XMLSchema-instance"> <logDetectionConditions> <condition messageSeverity="INCIDENT_ERROR"/> // detect all message logged at level INCIDENT_ERROR <condition messageSeverity="ERROR" component="jrfServer_admin"/> // detect all "jrfServer_admin" component messages logged at level ERROR <condition messageSeverity="ERROR" module="test.servletA"/> // detect all "test.servlet" module messages logged at level ERROR <condition messageId="FMW-40300"/> // detect message "FMW-40300" </logDetectionConditions> <defaultActions> <dumpAction name="odl.logs"> <argument name="timestamp" value="INCIDENT_TIME" valueType="fact"/> </dumpAction> <dumpAction name="dms.metrics"/> </defaultActions> <processingRules> <rule name="OOME"> <ruleCondition> <condition name="MESSAGE_ID" value="DFW-99997"/> </ruleCondition> <ruleActions> <dumpAction name="jvm.classhistogram"/> </ruleActions> </rule> </processingRules> </diagnosticRules> -
Save the file, naming it with the extension .xml. If the rule applies to an application, precede the file name with
app_name#. Save the file to one of the following locations:DOMAIN_HOME/config/fmwconfig/dfw DOMAIN_HOME/config/fmwconfig/servers/server_name/dfw
-
Load the rules, using the WLST command reloadCustomRules. The following example loads the rule customrules.xml, which applies to the application myApp:
reloadCustomRules(name='myApp#customrules.xml')
You can reload all the rules in the domain or all the rules that pertain to a particular server. The following example reloads all the rules for the server soa_server1:
reloadCustomRules(server='soaserver1')
For more information about the reloadCustomRules command, see "reloadCustomRules" in the Oracle Fusion Middleware WebLogic Scripting Tool Command Reference.
13.3.3 Configuring Problem Suppression
In certain situations, you may want to suppress the creation of incidents based on a particular problem key. For example, in a development environment, when you are developing a servlet, you may generate high number of uncaught exceptions as you refine the code. This results in the creation of unnecessary incidents.
The Diagnostic Framework allows you to configure problem suppression filters so that problems that match the filter criteria do not result in the creation of an incident.
When you configure a problem suppression filter, you use a regular expression that represents a pattern that you want to match. The regular expression is matched using the java.util.regex class. For example:
-
The following regular expression matches any incident with a problem key that starts with MDS-5000.
MDS-5000.*
-
The following regular expression matches any problem with the text
OutOfMemory. Because the regular expression is case-sensitive, it will not match problems with the textoutofmemory..*OutOfMemory.*
You can add and remove filters and get a list of filters or the detail of one filter using the DiagnosticConfig MBean.
Table 13-5 shows the operations and attribute for the configuring problem suppression filters and a description of each.
Table 13-5 DiagnosticConfig MBean Operations and Attributes for Problem Suppression Filters
| Operations and Attribute | Description |
|---|---|
|
Operation: addProblemKeyFilter(filter_pattern) |
Adds a new problem suppression filter. You pass it the regular expression that represents a pattern that you want to match. For example:
addProblemKeyFilter(".*OutOfMemory.*)
|
|
Attribute: getProblemKeyFilters() |
Returns a list of the configured problem suppression filters. For example: getProblemKeyFilters() |
|
Operation: getProblemKeyFilter(filterID) |
Returns the filter pattern associated with the specified ID. For example:
getProblemKeyFilter(id)
To find the ID, use the getProblemKeyFilters() operation. |
|
Operation: removeProblemKeyFilter(filterID) |
Removes the filter pattern associated with the given filter ID. For example:
removeProblemKeyFilter(id)
|
To configure a problem suppression filter:
-
From the target navigation pane in Fusion Middleware Control, expand the farm, then WebLogic Domain.
-
Select the domain.
-
From the WebLogic Domain menu, choose System MBean Browser.
The System MBean Browser page is displayed.
-
Expand Application Defined Beans, then oracle.dfw, then domain.domain_name, then dfw.jmx.DiagnosticsConfigMBean.
-
Select one of the DiagnosticConfig entries. There is one DiagnosticConfig entry for each server.
-
In the Application Defined MBeans pane, select the Operations tab.
-
Click addProblemKeyFilter. The Operation: addProblemKeyFilter page is displayed, as shown in the following figure:
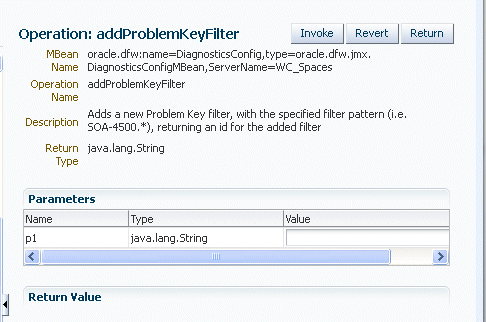
Description of the illustration problemkeyfilter.gif
-
For Value, enter a regular expression that represents a pattern that you want to match pattern. For example, in a development environment, you might want to add a filter so that incidents are not created when java.lang.IllegalStateException Java Exceptions are reported. In that case, enter the following:
".*[java.lang.IllegalStateException].*"
-
Click Invoke.
-
Click Return to return to the Application Defined MBeans page.
You can delete the filters using the removeProblemKeyFilter operation.
You can retrieve a specific filter, passing the ID of the filter to the getProblemKeyFilter operation.
Alternatively, you can retrieve a list of the filters using the getProblemKeyFilters attribute:
-
From the target navigation pane, expand the farm, then WebLogic Domain.
-
Select the domain.
-
From the WebLogic Domain menu, choose System MBean Browser.
The System MBean Browser page is displayed.
-
Expand Application Defined Beans, then oracle.dfw, then domain.domain_name, then dfw.jmx.DiagnosticsConfigMBean.
-
Select one of the DiagnosticConfig entries. There is one DiagnosticConfig entry for each server.
-
In the Application Defined MBeans pane, select the Attributes tab.
-
Click ProblemKeyFilters.
The list of problem suppression filters is displayed.
13.3.4 Configuring WLDF Watch and Notification for the Diagnostic Framework
Fusion Middleware configures a WLDF Diagnostics Module that contains a set of Watch and Notification rules for detecting a specific set of critical errors and creating an incident for each occurrence of those errors. The module is called Module-FMWDFW and contains the following set of Watch conditions:
| Name | Description |
|---|---|
| Deadlock | Two or more Java threads have circular lock chains among their Java Monitor object usage. |
| StuckThread | An Oracle WebLogic Server ExecuteThread, which is blocked or busy for more than the time specified by the Oracle WebLogic Server StuckThreadMaxTime parameter. |
| UncheckedException | This category includes all Unchecked Exception, RuntimeException, and Errors caught by the Oracle WebLogic Server ExecuteThread, such as NullPointerException, StackOverflowError, or OutOfMemoryError. |
The Diagnostic Module also includes a configured WLDF JMX Notification FMWDFW-notification of type oracle.dfw.wldfnotification. You can reuse this WLDF JMX Notification for your own WLDF Watch conditions to create an incident:
-
Display the Administration Console, as described in Section 3.4.1.
-
In the left pane, expand Diagnostics and select Diagnostic Modules.
The Summary of Diagnostic Modules page is displayed.
-
Click Module-FMWDFW.
The Settings for Module-FMWDFW page is displayed.
-
Select the Watches and Notifications tab, which is shown in the following figure:
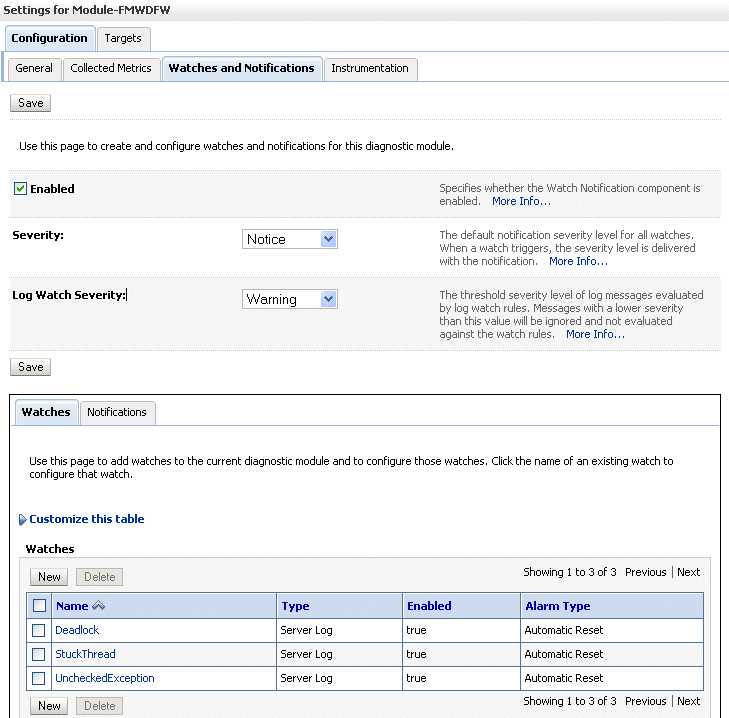
Description of the illustration dfw_notif.gif
-
Select the Watches tab and click New.
The Create Watch page is displayed.
-
For Name, enter a name for the watch.
You can enter any name. Alternatively, you can use the following format to force the Diagnostic Framework to use a custom message ID:
message-id#[application_name]#any_text
The message ID consists of a prefix that can be 1 to 6 characters, and a number, that can be 1 to 6 digits. The application name is optional. For example:
SOA-40500#My_Watch_Name
The following example uses the application name soa_infra:
SOA-40501#soa-infra#My_Watch_Name
The Diagnostic Framework uses the message ID as the incident message ID in constructing the incident problem key.
-
For Watch Type, select a type, for example, Server log.
-
Click Next.
-
For Current Watch Rule, construct an expression. For example, to construct the expression (SEVERITY = 'Error') AND (MSGID = 'BEA-000337'):
-
Click Add Expressions.
-
For Message Attribute, select Severity.
-
For Operator, select =.
-
For Value, enter ERROR.
-
Click OK.
-
Click Add Expressions.
-
For Message Attribute, select MSGID.
-
For Operator, select =.
-
For Value, enter BEA-000337.
-
Click OK.
-
In the Create Watch page, ensure that the operator selected is AND.
-
Click OK.
-
-
Click Next.
-
Select an alarm type and click NEXT.
-
For Notifications, select FMWDFW-notification and move it to the Chosen box.
-
Click Finish.
For more information on creating watches, see "Construct watch rule expressions" in the Administration Console Online Help.
13.4 Investigating, Reporting, and Solving a Problem
This section describes how to use WLST and ADRCI commands and Remote Diagnostic Agent (RDA) to investigate and report a problem (critical error), and in some cases, resolve the problem. The section begins with a roadmap that summarizes the typical set of tasks that you must perform. It describes the following topics:
13.4.1 Roadmap—Investigating, Reporting, and Resolving a Problem
Typically, investigating, reporting, and resolving a problem begins with a critical error. This section provides an overview of that workflow.
Figure 13-4 illustrates the tasks that you complete to investigate, report, and resolve a problem.
Figure 13-4 Flow for Investigating a Problem
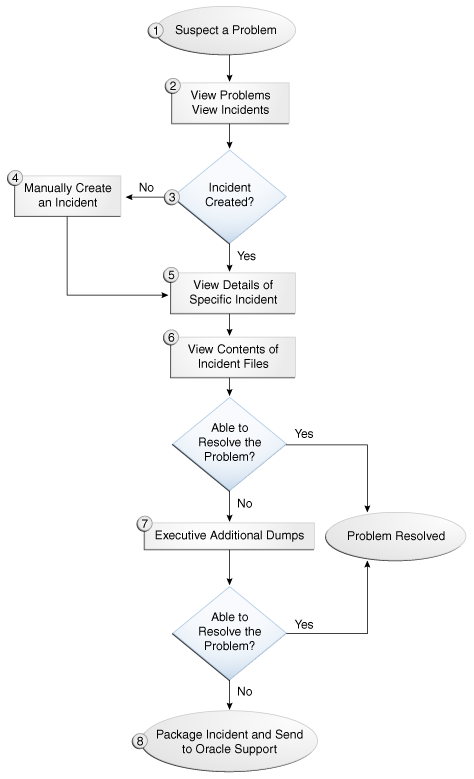
Description of "Figure 13-4 Flow for Investigating a Problem"
The following describes the workflow illustrated in Figure 13-4:
-
You notice that the system, component, or application is not functioning as expected. For example, you notice that there is a performance problem or users have reported that the application that they are trying to access is reporting errors.
-
Check to see if a problem and an incident have been created that may be related to the symptoms you are observing:
-
View the set of problems by using the WLST
listProblemscommand, as described in Section 13.4.2.1. -
If a problem has been created, list the incidents related to the specific problem using the
listIncidentscommand, as described in Section 13.4.2.2.
-
-
If an incident has not been created, go to Step 4. If an incident has been created, go to Step 5.
-
If you do not see any incidents listed that are related to your problem, you can create an incident manually using the
createIncidentcommand to capture diagnostics for the problem.Consider creating an incident when you encounter an issue, such as software failure or performance problem, and you want to gather more diagnostic data. You can view the log files and the messages in the files. If there is a specific message that you believe is related to the issue you are seeing, you can use the message ID in the
createIncidentcommand.See Section 13.4.6.1 for more information about creating an incident.
-
View the details of the specific incident using the
showIncidentcommand, as described in Section 13.4.2.2. This command lists information about the incident, including the related message ID, the time of the incident, the ECID, and the files generated by the incident. -
Use the
getIncidentFilecommand to view the contents of files for the incident, as described in Section 13.4.2.2. The contents may provide information to guide you to the source of the problem and help in resolving it. -
If the contents of the files for the incident do not help you to resolve the problem, you can execute additional dumps to view detailed diagnostics. For example, if you are experiencing performance problems, execute the dms.metrics dump. See Section 13.4.4 for information about the dumps available and how to execute them.
-
If you still cannot resolve the problem, package the incident, along with the RDA report, and send them to Oracle Support. See Section 13.4.6.2 and Section 13.4.7 for information about packaging incidents and generating RDA reports.
13.4.2 Viewing Problems and Incidents
You can view the set of problems, the list of incidents, and the details of a particular incident using the WLST command-line utility, as described in the following topics:
13.4.2.1 Viewing Problems
You can view the set of problems by executing the WLST listProblems command, using the following format:
listProblems([adrHome] [,server])
The listProblems command lists the problems in the ADR home. Each problem has a unique ID:
listProblems()
Problem Id      Problem Key
        1       BEA-101020 [HTTP]
13.4.2.2 Viewing Incidents
You can list of all available incidents or the incidents related to a specific problem by executing the WLST listIncidents command, using the following format:
listIncidents([id], [ADRHome])
For example, to see the list of all incidents, use the following command:
listIncidents()
Incident Id     Problem Key              Incident Time
        2       BEA-101020 [HTTP]        Fri Feb 26 13:42:01 PDT 2010
        1       BEA-101020 [HTTP]        Tue Feb 23 06:17:39 PDT 2010
To view the incidents related to a specific problem, use the following command:
listIncidents(id='1')
Incident Id     Problem Key              Incident Time
        2       BEA-101020 [HTTP]        Fri Feb 26 13:42:01 PDT 2010
        1       BEA-101020 [HTTP]        Tue Feb 23 06:17:39 PDT 2010
To view the details of a particular incident, use the WLST showIncident command, using the following format:
showIncident(id, [adrHome] [,server])
For example, to see the details of incident 1, use the following command:
showIncident(id='1')
Incident Id: 1
Problem Id: 1
Problem Key: BEA-101020 [HTTP]
Incident Time: Tue  Feb 23 06:17:39 PDT 2010
Error Message Id:  BEA-101020
Execution Context: 0000IExqUvyAhKB5JZ4Eyf1Afdj600009i
Flood Controlled: false
Dump Files :
    dms_ecidctx1_i1.dmp
    jvm_threads2_i1.dmp
    dms_metrics3_i1.dmp
    odl_logs4_i1.dmp
    odl_logs5_i1.dmp
    diagnostic_image_AdminServer_2010_02_23_06_17_42.zip
    readme.txt
To view the contents of a file in the incident, use the WLST getIncidentFile command, using the following format:
getIncidentFile(id, name [,outputFile] [,adrHome] [,server])
For example, to view the contents for the file odl_logs4_i1.dmp use the following command:
getIncidentFile(id='1', name='odl_logs4_i1.dmp', outputFile='/tmp/odl_logs4_i1_dmp.output')
The command writes the output to the file odl_logs4_i1_dmp.output.
13.4.3 Analyzing Specific Problem Keys
The Diagnostic Framework provides a set of well-defined problem keys for unhandled exceptions. These exceptions are either detected through the existing WLDF Watch "UncheckedException" or through the Diagnostic Framework java.lang.Thread.UncaughtExceptionHandler uncaught exception handler. Previously, the Diagnostic Framework generated problem keys with different formats for the same type of issues. Table 13-6 describes these problem keys and how to use them to investigate a problem.
Table 13-6 Uncaught Exception Problem Keys
| Exception | Problem Key | Description |
|---|---|---|
|
java.land.OutOfMemoryError |
DFW-99997 [java.land.OutOfMemoryError] |
Used by all java.lang.OUtOfMemoryError incidents. With each incident of this type, a jvm.classhistogram dump is executed. The dump captures statistics about the instances of classes that have been loaded and the counts of associated Objects. Review the contents of this dump for a good starting point for understanding what has been loaded into the JVM's memory. In addition, the dms.metrics dump records statistics about the overall JVM memory. |
|
java.sql.SQLException |
DFW-99996 [ora-code|java.sql.SQLException]][package.class.method][app-name] |
Used for all exceptions of type java.sql.SQLException, including its subclasses. The Diagnostic Framework attempts to extract the Oracle error code from the exception error message, and if it is successful, uses that in the problem key. If not, it uses the exception name. Review the text associated with the exception to get more details, such as the operation that could not be performed on the database. In addition, you can review the SQL error code details for additional information. |
|
All others |
DFW-99998 [exception-name][package.class.name][app-name] |
Used by all other types of exceptions, such as java.lang.NullPointerException, java.io.IOException, java.lang.StringIndexOutOfBoundsException, that are not handled in a unique way. Review the text associated with the exception to get more details, such as the reason for the failure. The source line in the problem key is a best-attempt indicator of the location of the failure. |
13.4.4 Working with Diagnostic Dumps
If you suspect a problem, you can make use of the built-in diagnostic dumps to report detailed diagnostics that can help diagnose the problem. Diagnostic dumps provide a means to output and record diagnostics data which serve as valuable information when diagnosing issues with Oracle Fusion Middleware components, applications, and infrastructure. The output from these dumps is intended to be used by customers and Oracle Support to diagnose issues with Oracle Fusion Middleware.
Diagnostic dumps are executed in the following ways:
-
Manually, using WLST commands, as described in the following sections
For example, if your Java EE application is hanging and you suspect a deadlock, you could use the jvm.threads dump to obtain the set of threads.
-
Automatically, when the Diagnostic Framework detects a critical error and creates an incident or when the administrator creates an incident
13.4.4.1 Listing Diagnostic Dumps
You can find a list of diagnostic dumps that are available for a Managed Server by executing the WLST listDumps command, using the following format:
listDumps([appName] [,server])
For example, to list the available dumps for soa_server1:
listDumps(server='soa_server1')
Location changed to domainRuntime tree. This is a read-only tree with DomainMBean as the root.
For more help, use help(domainRuntime)

odl.activeLogConfig
jvm.classhistogram
dms.ecidctx
wls.image
odl.logs
dms.metrics
odl.quicktrace
http.requests
jvm.threads

Use the command describeDump(name=<dumpName>) for help on a specific dump.
Table 13-7 lists the diagnostic dump actions that are defined by Oracle Fusion Middleware and their descriptions.
Table 13-7 Diagnostic Dump Actions
| Dump Action | Description |
|---|---|
|
dms.ecidctx |
The data associated with a specific Execution Context ID (ECID), if specified. Otherwise, the data associated with all available ECIDs. |
|
dms.metrics |
Dynamic Monitoring Service (DMS) metrics. For information about these metrics, see "About Dynamic Monitoring Service (DMS)" in the Oracle Fusion Middleware Performance and Tuning Guide. |
|
http.requests |
A summary of the currently active HTTP requests. |
|
jvm.classhistogram |
A JVM class histogram, the output of which varies depending on the JVM vendor. |
|
jvm.flightRecording |
The active JRockit Flight Recorder recording. |
|
jvm.threads |
Summary statistics about the threads running in a JVM as well as performing a full thread dump. |
|
odl.activeLogConfig |
The active Java logging configuration. |
|
odl.logs |
Contents of diagnostic logs, correlated by ECID or time range. |
|
odl.quicktrace |
Quick trace messages. |
|
wls.image |
The WLDF server image dump. |
In addition, Oracle SOA Suite provides diagnostic dumps, as described in "Diagnosing Problems with SOA Composite Applications" in the Oracle Fusion Middleware Administrator's Guide for Oracle SOA Suite and Oracle Business Process Management Suite.
13.4.4.2 Viewing a Description of a Diagnostic Dump
You can view a description of a particular dump, including the syntax for executing the dump by using the WLST describeDump command. You specify the name of the dump in which you are interested. For example, to view a description of the dms.metrics dump, use the following command:
describeDump(name='dms.metrics')
Name: dms.metrics
Description: Dumps DMS (Dynamic Monitoring Service) metrics.
Mandatory Arguments:
Optional Arguments:
    Name        Type     Description
    format      STRING   Format of the dump output; raw or xml
13.4.4.3 Executing Dumps
If you detect a problem and want to gather additional diagnostic data, you can invoke the executeDump command for a specified dump. Each dump may have mandatory or optional arguments, or both. To view the arguments for a particular dump and how to specify them, use the describeDump command, as described in Section 13.4.4.2.
The following example executes the dump with the name dms.metrics and the incident ID 1 and writes it to the file dumpout.txt:
executeDump(name='dms.metrics', outputFile='/tmp/dumpout.txt', id='1')
Dump file dms_metrics1_i1.dmp added to incident 1
The command writes the dump output to the information about incident 1. If you execute the showIncident command for incident 1, the output includes dms_metrics1_i1.dmp.
13.4.5 Configuring and Using Diagnostic Dump Sampling
Diagnostic dump sampling captures the output of diagnostic dumps at specified intervals. By sampling at regular intervals, diagnostic dump sampling can help to reveal issues such as slow running web requests, and where work is being performed in those requests.
This section contains the following topics:
13.4.5.1 Understanding Diagnostic Dump Sampling
All diagnostic dump samplings are performed in the background, at specified intervals. By default, jvm.threads and jvm.classhistogram dumps are configured for sampling. You can modify the settings for the default dump samplings and you can create new sampling definitions for the dump actions listed in Table 13-7 and for any application-specific dumps. You can configure multiple sampling definitions for the same diagnostic dump, specifying different settings, such as sampling interval or server.
For each diagnostic dump sampling, the Diagnostic Framework stores the specified number of samples. When that limit is reached, the oldest sample is purged. All samples are purged when the server shuts down.
Table 13-8 shows the settings of the dump samplings that are configured by default.
Table 13-8 Default Diagnostic Dump Samplings Configuration
| Dump Name | Sampling Interval | Maximum Samples Stored |
|---|---|---|
|
jvm.threads |
60 seconds |
10 |
|
jvm.classhistogram |
30 minutes |
5 |
The Diagnostic Framework triggers the retrieval of the dump samples whenever an incident is created (through error detection or manual incident creation.) In addition, you can retrieve the contents of the dump samples, as described in Section 13.4.5.4.
You can retrieve the dump sample archives in either text or zip files:
-
Text: By default, the diagnostic dump samples are concatenated into a single archive file, in text format. An ASCII header an footer are wrapped around each sample in the archive file. The header contains a timestamp and the name of the diagnostic dump that produced the sample. Both the header and footer contain the number of the samples in the archive and the number of the particular sample. For example:
$$$=== BEGIN OF Diagnostic Dump - jvm.classhistogram (Archive #0 1_of_2) ===$$$
Fri Sep 07 07:00:00 PDT 2012

<text of dump sampling>

$$$=== END OF Diagnostic Dump - jvm.classhistogram (Archive #0 1_of_2) ===$$$
-
Zip: You can configure diagnostic dump samplings to return a zip file instead of a concatenated file. The zip file contains all available dump sample files. This format supports any diagnostic dumps whose outputs are in binary format not suitable for concatenation, as well as for dumps that generate output in text format. This format also reduces the size of the archive containing the samples.
The following example shows the contents of a zip file:
unzip -l jvm_dump.zip
Archive:  jvm_dump.zip
  Length     Date   Time    Name
 --------    ----   ----    ----
   508780  08-21-12 07:25   dfw_samplingArchive1065570966467923683.JVMThreadDump.dmp
      840  08-21-12 07:25   dfw_samplingArchive7749640004639161119.readme.txt
 --------                   -------
   509620                   2 files
In addition to a text or zip file, when you retrieve a dump sample, the Diagnostic Framework generates a readme file. The readme file either lists the line numbers for each dump sample in the archive (for text format) or the individual sample file names (for zip format). It also lists the timestamp for each sample and the index for the archive.
The dump sample files are named using the following format:
dfw_dumpArchivennn.Sampling_Name.{txt]|zip}
In the format nnn is a unique number assigned by the Diagnostic Framework.
For example, the following is an example of the name of a dump sample file for JVMThreadDump:
dfw_dumpArchive17394218037.JVMThreadDump.txt
The readme files are named using the following format:
dfw_dumpArchivennn.readme.txt
In the format nnn is a unique number assigned by the Diagnostic Framework.
All samplings are scheduled to begin at the next nearest interval, corresponding to the frequency. For example, if a sampling is configured at 12:05:13 PM and the frequency is 5 seconds, the sample will be collected at 12:05:15 PM. This ensures that the collection of a series of samplings with the same frequency will occur at the same time. It also aligns all samples across machines, assuming their system clocks are synchronized.
Note:
You must be connected to the Administration Server to execute the WLST dump sampling commands.13.4.5.2 Configuring Dump Sampling
You can create additional dump samplings, update existing dump samplings, remove dump samplings and enable or disable dump sampling, as described in the following topics:
13.4.5.2.1 Creating Dump Samplings
You can create dump samplings for any dump listed in Table 13-7 and for any application-specific dumps. To create dump samplings, use the WLST command addDumpSample. The addDumpSample command uses the following syntax:
addDumpSample(sampleName="sample_name", diagnosticDumpName="dump_name",
 [appName="application_name",] samplingInterval=num_seconds,
 rotationCount=num_samples, [dumpedImplicitly={true|false},]
 [toAppend={true|false},] [args={"arg_name" : "value"},]
 [server="server_name"])
For example, to create a dump sampling for the http.requests dump, setting the sampling interval to 300 seconds and the rotation count to 10 samples, for the server soa_server1:
addDumpSample(sampleName="HTTPSampling", diagnosticDumpName="http.requests", samplingInterval=300, rotationCount=10, server="soa_server1")

HTTPSampling is added
For complete syntax, see "addDumpSample" in the Oracle Fusion Middleware WebLogic Scripting Tool Command Reference.
13.4.5.2.2 Modifying Dump Sampling Settings
You can change the settings of existing dump samplings by using the WLST command updateDumpSample. The updateDumpSample command uses the following syntax:
updateDumpSample(sampleName="sample_name",
[        appName="application_name",] samplingInterval=num_seconds,
         rotationCount=num_samplings, [dumpedImplicitly={true|false},]
[        toAppend={true|false},] [args={"arg_name" : "value"},]
[        server="server_name"])
For example, to modify the dump sampling HTTPSampling, changing the sampling interval to 200 and the rotation count to 5:
updateDumpSample(sampleName="HTTPSampling", samplingInterval=200,
                   rotationCount=5, server="soa_server1")

HTTPSampling is updated
For complete syntax, see "updateDumpSample" in the Oracle Fusion Middleware WebLogic Scripting Tool Command Reference.
13.4.5.2.3 Removing Dump Samplings
You can remove existing dump samplings using the WLST command removeDumpSample. The removeDumpSample command uses the following syntax:
removeDumpSample(sampleName="sample_name", [server="server_name"])
For example, to remove the dump sampling HTTPSampling:
removeDumpSample(sampleName="HTTPSampling", server="soa_server1")

Removed HTTPSampling
For complete syntax, see "removeDumpSample" in the Oracle Fusion Middleware WebLogic Scripting Tool Command Reference.
13.4.5.2.4 Enabling or Disabling All Dump Sampling
You can enable or disable all dump sampling using the WLST command enableDumpSampling. This command affects all configured dump samplings. The enableDumpSampling command uses the following syntax:
enableDumpSampling(enable={true|false}, [server="server_name"])
Note that the server parameter is valid only if you are connected to the Administration Server. If you do not specify the server parameter, dump sampling is disabled for the Administration Server.
For example, to disable dump sampling for the Administration Server:
enableDumpSampling(enable=false)
To determine if dump sampling is enabled or disabled, use the WLST command isDumpSamplingEnabled. The isDumpSamplingEnabled command uses the following format:
isDumpSamplingEnabled([server="server_name"])
For complete syntax, see "enableDumpSampling" and "isDumpSamplingEnabled" in the Oracle Fusion Middleware WebLogic Scripting Tool Command Reference.
13.4.5.3 Listing Dump Samplings
You can list dump samplings using the WLST command listDumpSamples. You can list all dump samplings, a specified dump sampling, or all dump samplings associated with a specified server. The listDumpSamples command uses the following syntax:
listDumpSample([sampleName="sample_name",] [server="server_name"])
For example, to list all dump samplings associated with the server soa_server1:
listDumpSamples(server="soa_server1")
Location changed to domainRuntime tree. This is a read-only tree with DomainMBean as the root.
For more help, use help(domainRuntime)

Name              : JavaClassHistogram
Dump Name         : jvm.classhistogram
Application Name  :
Sampling Interval : 1800
Rotation Count    : 5
Dump Implicitly   : false
Append Samples    : true
Dump Arguments    :

Name              : JVMThreadDump
Dump Name         : jvm.threads
Application Name  :
Sampling Interval : 60
Rotation Count    : 10
Dump Implicitly   : true
Append Samples    : true
Dump Arguments    : context=true, timing=true
For complete syntax, see "listDumpSample" in the Oracle Fusion Middleware WebLogic Scripting Tool Command Reference.
13.4.5.4 Retrieving the Dump Sampling Output
To retrieve the output of dump samples, you can use the WLST executeDump command or the WLST getSamplingArchives command, as described in the following topics:
13.4.5.4.1 Retrieving Dump Samples Using the executeDump Command
You can retrieve dump samples using the WLST executeDump command, specifying the dfw.samplingArchive dump. This command collects all default sample archives and any dump samples that are specified with the parameter dumpImplicitly=true from a temporary location and concatenates them into a single file. The command also returns a readme file, with details of the dump samples.
When you use the executeDump command, you use the following syntax:
executeDump(name="dfw.samplingArchive",outputFile="filename"
For the outputFile parameter, you can specify a text file or a zip file. If you specify a zip file, you must use the argument zipOutput=true.
For any dump sampling that is configured with the parameter dumpImplicitly=false, you must specify the optional dfw.samplingArchive argument sampleName to collect the contents of those dump samples. For example:
executeDump(name='dfw.samplingArchive', args={'sampleName' : 'JavaClassHistogram'})
For more information, see "executeDump" in the Oracle Fusion Middleware WebLogic Scripting Tool Command Reference.
13.4.5.4.2 Retrieving Dump Samples Using the getSamplingArchives Command
You can retrieve dump samples using the WLST getSamplingArchives command. This command collects all dump samples in a zip file containing the individual dump sample files and a readme file. This method is particularly useful in dealing with binary format dumps.
The getSamplingArchives command uses the following syntax:
getSamplingArchives([sampleName="sample_name"] [,outputFile="filename" [,server="server_name"])
For example to retrieve the dump samples for the sampling JavaClassHistogram, use the following command:
getSamplingArchives(sampleName="JavaClassHistogram", outputFile="/tmp/sampling.zip")
The following shows the contents of the zip file:
unzip -l /tmp/sampling.zip
Archive:  /tmp/sampling.zip
  Length     Date   Time    Name
 --------    ----   ----    ----
  6241768  07-27-12 11:19   dfw_samplingArchive8680976839106379444.JavaClassHistogram.dmp
      552  07-27-12 11:19   dfw_samplingArchive7861027727509995202.readme.txt
 --------                   -------
  6242320                   2 files
For complete syntax, see "getSamplingArchives" in the Oracle Fusion Middleware WebLogic Scripting Tool Command Reference.
13.4.6 Managing Incidents
The Diagnostic Framework stores incidents, whether they are created automatically or manually, and Oracle Fusion Middleware provides tools to help you process incident reports and to package those incidents to send to Oracle Support. The following sections describe:
13.4.6.1 Creating an Incident Manually
System-generated problems—critical errors generated internally—are automatically added to the Automatic Diagnostic Repository (ADR). You can gather additional diagnostic data on these problems, upload diagnostic data to Oracle Support, and in some cases, resolve the problems, all with the workflow that is explained in Section 13.4.
Consider creating an incident manually when you encounter an issue, such as software failure or performance problem and you want to gather more diagnostic data, but the Diagnostic Framework has not automatically created an incident.
You use the WLST command createIncident to create an incident manually. You can specify an incident based on time, a message ID, an impact area, or an ECID. Then, you can inspect the content of the incident or send it to Oracle Support for further analysis.
The following describes how to manually create an incident based on a message ID:
-
Search the log files, as described in Section 12.3.2. If you find a message that you suspect is related to the issue you are seeing, you can use the message ID when you create the incident.
-
Use the following commands to invoke WLST, connect to the Managed Server and navigate to the Managed Server instance:
java weblogic.WLST connect('username', 'password', 'localhost:7001') cd('servers/server_name') -
Create the incident, using the
createIncidentcommand, with the following format:createIncident([adrHome] [,incidentTime] [,messageId] [,ecid] [,appName] [,description] [,server])
For example, to create an incident based on the error with the message ID MDS-50500, use the following command, specifying the message ID, and provide a description of the incident to help you and Oracle support track the incident:
createIncident(messageId='MDS-50500', description='sample incident')
Incident Id: 55
Problem Id: 4
Problem Key: MDS-50500 [MANUAL]
Incident Time: 23rd February 2010 11:55:45 GMT
Error Message Id: MDS-50500
Flood Controlled: false
If you do not specify a server, the incident collects information from the server to which you are connected. To specify a server, use the
serveroption, as shown in the following example:createIncident(messageId='MDS-50500', description='sample incident', server='soa_server1') )
If you do not specify the
adrHomeoption, the incident is created in the server to which you are connected. For example, if you are connected to the Administration Server, the incident is created in the adrHome for the Administration Server.The Diagnostic Framework evaluates the command and invokes the appropriate diagnostic dumps. The incident and the diagnostic dumps are written to the ADR. Each diagnostic dump writes its output to the incident.
You can view the information about the incident, as described in Section 13.4.2.2.
You can view the information in the dumps, as described in Section 13.4.4.
13.4.6.2 Packaging an Incident
You can package the incident to facilitate sending the information to Oracle Support by using the ADR Command Interpreter (ADRCI). The ADRCI utility enables you to investigate and report problems in a command-line environment. With ADRCI, you can package incident and problem information into a zip file for transmission to Oracle Support.
The ADRCI command-line utility is located in the following directory:
(UNIX) MW_HOME/wlserver_10.3/server/adr
(Windows) MW_HOME\wlserver_10.3\server\adr
Packaging an incident involves a three-step process:
-
Create a logical package.
The package is denoted as logical because it exists only as metadata in the ADR. It has no content until you generate a physical package from the logical package. The logical package is assigned a package number, and you refer to it by that number in subsequent commands.
You can create the logical package as an empty package, or as a package based on an incident number, a problem number, a problem key, or a time interval. If you create the package as an empty package, you can add diagnostic information to it in step 2.
Creating a package based on an incident means including diagnostic data, such as dumps, for that incident. Creating a package based on a problem number or problem key means including in the package diagnostic data for incidents that reference that problem number or problem key. Creating a package based on a time interval means including diagnostic data on incidents that occurred in the time interval.
-
Add diagnostic information to the package.
If you created a logical package based on an incident number, a problem number, a problem key, or a time interval, this step is optional. You can add additional incidents to the package or you can add any file within the ADR to the package. If you created an empty package, you must use ADRCI commands to add incidents or files to the package.
-
Generate the physical package.
When you submit the command to generate the physical package, ADRCI gathers all required diagnostic files and adds them to a zip file in a designated directory. You can generate a complete zip file or an incremental zip file. An incremental file contains all the diagnostic files that were added or changed since the last zip file was created for the same logical package. You can create incremental files only after you create a complete file, and you can create as many incremental files as you want. Each zip file is assigned a sequence number so that the files can be analyzed in the correct order.
Zip files are named according to the following format:
packageName_mode_sequence.zipIn the format:
-
packageNameconsists of a portion of the problem key followed by a timestamp. -
modeis eitherCOMorINC, for complete or incremental. -
sequenceis an integer.
-
For example, to package an incident, take the following steps:
-
Set the ORACLE_HOME and LD_LIBRARY_PATH environment variables as shown in the following example:
ORACLE_HOME=MW_HOME/oracle_common
LD_LIBRARY_PATH=MW_HOME/wlserver_10.3/server/adr
-
Invoke ADRCI. For example:
MW_HOME/wlserver_10.3/server/adr/adrci -
Use the SET BASE command to specify the ADR Base and the SET HOMEPATH command to specify the ADR home that contains the incident. The path for the HOMEPATH is relative to the ADR Base.
SET BASE /scratch/oracle/config/domains/soa_domain/servers/soa_server1/adr
SET HOMEPATH diag/ofm/soa_domain/soa_server1
-
Generate the logical package:
IPS CREATE PACKAGE INCIDENT incident_numberFor example, the following command creates a package based on incident 1:
IPS CREATE PACKAGE INCIDENT 1
Created package 1 based on incident id 1, correlation level typical
ADRCI assigns the logical package a number.
-
Optionally, you can add diagnostic information to the logical package. You can add the following types of information:
-
All diagnostic information for a particular incident. For example, you can add another incident that you think might be related to the incident you are packaging, using the following command:
IPS ADD INCIDENT incident_number PACKAGE package_number
-
A named file within the ADR. For example, if an incident is related to an application, you can add the .ear file for the application. You can also add a readme file with notes you provide to Oracle Support. For example, to add a file to the package, use the following command:
IPS ADD FILE filespec PACKAGE package_number
-
-
Generate the physical package using the following command:
IPS GENERATE PACKAGE package_number IN path
For example, to generate a package with the number 1, use the following command:
IPS GENERATE PACKAGE 1 in /tmp
Generated package 1 in file /tmp/BEA337Web_20100223132315_COM_1.zip, mode complete
This generates a complete physical package (zip file) in the designated path.
13.4.6.3 Purging Incidents
By default, incidents are purged when the total size of all incidents exceed 500 MB. You can use the maxTotalIncidentSize MBean parameter to change this value, as described in Section 13.3.1.
You can manually purge incidents using the ADRCI command. You can purge based on an ID or range of IDs, the age of the incident, or the type of incident. For example, to purge incidents that are older than 60 minutes, use the following command:
purge -age 60
See the "ADRCI: ADR Command Interpreter" chapter of the Oracle Database Utilities.
13.4.7 Generating an RDA Report
You can use the Remote Diagnostic Agent (RDA), a command-line diagnostic tool, to provide a comprehensive picture of your environment. Additionally, RDA can provide recommendations on various topics, for example configuration and security. This aids you and Oracle Support in resolving issues.
RDA is designed to be as unobtrusive as possible; it does not modify systems in any way. A security filter is provided if required.
For more information about RDA, see the readme file, which is located at:
(UNIX) ORACLE_HOME/rda/README_Unix.txt
(Windows) ORACLE_HOME\rda\README_Windows.txt
13.5 Managing and Running the Health Test Framework
Oracle Fusion Middleware provides a Health Test Framework that includes diagnostic tests that are designed to exercise particular aspects of Oracle Fusion Middleware and its applications, to determine whether they are operating correctly and to help identify and resolve any problems.
This section contains the following topics:
13.5.1 Understanding the Health Test Framework
The Health Test Framework lets you execute diagnostic tests and collects the results into detailed diagnostic reports. The diagnostics tests are installed when you install or patch Oracle Fusion Middleware.
You can use the Health Test Framework to check normal system health and to troubleshoot system problems. You can configure your Oracle Fusion Middleware environment to run the diagnostic tests using the Health Test Framework command line interface.
A diagnostic test may or may not be associated with a particular error message. If an Oracle Fusion Middleware application handles a particular error in a way that triggers the creation of an incident, then any diagnostic tests that are associated with the error message for the incident run automatically. The test results are associated with the incident and the identity of the user who received the error message is recorded. The diagnostic tests and results are stored in file-based repository, as described in Section 13.5.2.
13.5.2 Understanding the Health Test Framework File Repository
The Health Test Framework stores tests and test results in a file-based repository. The repository has two primary stores:
-
TestDef, which contains test definitions, test metadata, data related to test parameters, language data files, and index files.
-
Test Run, which contains data related to the test run and execution, report files, and index files.
Index files are used for improving the speed of searching and querying.
The repositories are created when you register tests or run tests if the repository does not exist at the specified location.
You can specify the location of the repository in the configuration properties file, diagfsconfig.properties. This file is located in:
MW_HOME/diagbase/dtf_filestore
By default, the file stores are located in:
MW_HOME/diagbase/dtf_filestore/testdef
MW_HOME/diagbase/dtf_filestore/testrun
13.5.3 Using the Health Test Framework Command Line
The Health Test Framework provides two command line interfaces, dfwhealthtestadminctl.sh for administration commands and dfwhealthtestctl.sh for execution commands, as described in the following sections:
13.5.3.1 dfwhealthtestadminctl.sh Command Line
The Health Test Framework provides the dfwhealthtestadminctl.sh command line for administering the health tests. With it, you can register tests and rebuild the index.
Before you can run the dfwhealthtestadmin.ctl command, you must set the following environment variables:
-
MW_HOME: The Middleware home
-
JAVA_HOME: The Java home
-
dtf_fs_diagbase: The location of the repository
The dfwhealthtestadminctl.sh command-line interface is located in:
ORACLE_COMMON_HOME/common/bin
The syntax of the command-line interface is:
/dfwhealthtestadminctl.sh command [options]
Table 13-9 lists the Health Test Framework administration commands:
Table 13-9 Health Test Framework dfwhealthtestadminctl.sh Commands
| Command | Description |
|---|---|
|
Provides command line help. |
|
|
Registers one or more Health Test Framework test with the repository. |
|
|
Rebuilds the index with the existing data files. |
13.5.3.1.1 help
Provides help for the commands.
The syntax is:
help command
The following table describes the parameters for the help command:
| Parameter | Description |
|---|---|
| command | The name of the command. |
13.5.3.1.2 register
Registers one or more tests with the repository.
The syntax is:
register testfile=test_xml_files | dir=test_dirs
          [validateonly={Y|N]]
          testjar=jar_file_location
The following table describes the parameters for the register command:
| Parameter | Description |
|---|---|
| testfile | One or more XML test files to register. Provide the path to the files, using a comma-separated list for more than one file. |
| dir | One or more directories to register. Provide the path to the directories, using a comma-separated list for more than one directory. Use this option to register multiple tests from the same directory. |
| validateonly | Optional. A Boolean value to specify whether to only validate the test or to upload the test or tests to the repository. Value values are Y (to only validate the test) or N (to upload the tests). |
| testjar | The location of the test jar files. |
13.5.3.1.3 index
Rebuilds the index for the testdef or testrun repository, using the data files in the repository.
The syntax is:
index [refresh={testdef|testrun}
The following table describes the parameters for the index command:
| Parameter | Description |
|---|---|
| refresh=testdef | Refreshes the index for the testdef repository. |
| refresh=testrun | Refreshes the index for the testrun repository. |
13.5.3.2 dfwhealthtestctl.sh Command Line
The Health Test Framework provides the dfwhealthtestctl.sh command line for running the health tests. With it, you can run tests, list runs and tests, get a description of a test, get the status of tests, and retrieve a report of a test or test run.
The dfwhealthtestctl.sh command-line interface is located in:
ORACLE_COMMON_HOME/common/bin
The syntax of the command-line interface is:
/dfwhealthtestctl.sh command [options]
Table 13-10 lists the Health Test Framework dfwhealthtestctl.sh commands:
Table 13-10 Health Test Framework dfwhealthtestctl.sh Commands
| Command | Description |
|---|---|
|
Provides a detailed description of a specified test. |
|
|
List the test runs. |
|
|
Lists the description of one or more tests. |
|
|
Extract a report of a test run. |
|
|
Run one or more tests. |
|
|
Get the status of a test run or execution. |
13.5.3.2.1 desctest
Provides a detailed description of a specified test.
The syntax is:
desctest {testid=testid | testname=testname}]
          [showparam={Y|N}]
The following table describes the parameters for the desctest command:
| Parameter | Description |
|---|---|
| testid | The ID of the test. To obtain the ID, use the listtest command. You must specify either this parameter or the testname parameter. |
| testname | The name of the test. You must specify either this parameter or the testid parameter. |
| showparam | Optional. A Boolean value to specify whether to retrieve the parameters for the test. Value values are Y or N. |
13.5.3.2.2 help
Provides help for the commands.
The syntax is:
help command
The following table describes the parameters for the help command:
| Parameter | Description |
|---|---|
| command | The name of the command. |
13.5.3.2.3 listrun
Retrieves summary information for the test runs. You can retrieve the information by run name, run status, start time, and test name.
The syntax is:
listrun { runname=runname | testname=testname | status=status | lasthours=hours }
         [showexec={Y|N]]
The following table describes the parameters for the listrun command:
| Parameter | Description |
|---|---|
| runname | The name of the run for which you want to return results. To get the runname, use the listrun command without any parameters. |
| testname | The name of the test for which you want to return results. |
| status | The status of the run for which you want to return results. Valid values are running, warning and success. |
| lasthours | The number of hours for which you want to return results. |
| showexec | Optional. A Boolean value to specify whether to retrieve the execution of the tests. Value values are Y or N. |
13.5.3.2.4 listtest
Lists one or more tests. You can use wildcards to specify the names of the tests
The syntax is:
listtest [testname=testname]
          [productcode=productcode
The following table describes the parameters for the help command:
| Parameter | Description |
|---|---|
| testname | The names of one or more tests, in a comma-separated list. You can use wildcards to specify a pattern to match the names of tests. |
| productcode | The name of the product. You can use wildcards to specify a pattern to match the name of the product. |
13.5.3.2.5 report
Extract a test report for a particular test run or execution.
The syntax is:
report { runname=runname | runid=run_id | execid=execution_id }
          [destdir=destination_directory}
          [format=HTML | XML]
          [translate={Y | N}
The following table describes the parameters for the report command:
| Parameter | Description |
|---|---|
| runname | The name of the run. To get the name, use the listrun command. You must specify this parameter, runid, or execid. |
| runid | The ID of the run. To get the ID, use the listrun command. You must specify this parameter. runname, or execid. |
| execid | The execution ID of the run. To get the ID, use the listrun command You must specify this parameter, runname, or runid. |
| destdir | Optional. The destination directory to which the report files are written. If not specified, the report files are extracted under the java.io.tmpdir/user.name/diagfwk directory, where java.io.tmpdir and user.name are Java system properties. |
| format | The format of the generated report. Valid values are HTML and XML. |
| translate | A Boolean value specifying whether to translate the report. Value values are Y or N. |
13.5.3.2.6 run
Run the specified tests.
run {test=testnames | productcode=codes }
     [runname=name
     [runoption=asynch]
     [input:param1=value1 param2=value2 ...
     [inputfile=filename]
     [contextfile=context_file]
     [moninterval=monitoring_interval]
     [nthreads=number_of_threads]
     [reportshowparam=show_param]
The following table describes the parameters for the run command:
| Parameter | Description |
|---|---|
| test | The names of one or more tests, in a comma-separated list.
If you specify a single test name, you can also specify one or more input parameter names and values using the input parameter. You must specify this parameter or the productcode parameter. |
| productcode | The code for one or more products that include the tests you want to run. Specify more than one product code in a comma-separated list. |
| runname | Optional. A name for the current run. If not specified, the command generates a default run name. |
| moninterval | The interval, in seconds, in which the status of the run is uploaded to the test repository. The default value is 30 seconds. |
| nthreads | The number of parallel threads that should be spawned to execute tests in this run. The default value is 5. Specifying a value of 1 for this parameter will execute the tests serially. |
| runoption | Optional. Options for running the tests. The valid value is asynch, which runs the test asynchronously in the background. |
| input | Optional. If you use this parameter, use one or more parameter name/ value pairs. For example:
domainhome=/scratch/oracle/domains/basedomain You can only use this parameter when you run only one test. |
| inputfile | The path to a file containing input parameters. The file should have each input name/value pair on a separate line. The format of each line is:
input_param_name:input_param_value |
| contextfile | The path to a file that contains user system properties to be used at run time. |
| reportshowparam | Sets the input and output parameter display. By default all parameters are hidden during execution. To specify that the parameters are shown, use input or output, or a comma-separated string with both. For example:
reportshowparam=input,output |
13.5.3.2.7 status
Get the status of a test run by specifying the run name, run ID, or execution ID.
The syntax is:
status { runname=runname | runid=run_id | execid=execution_id }
      [printtree={Y|N}
The following table describes the parameters for the status command:
| Parameter | Description |
|---|---|
| runname | The name of the run. To get the run name, use the listrun command. |
| runid | The ID of the run. To get the ID, use the listrun command. |
| execid | The execution ID of the run. To get the ID, use the listrun command. |
| printtree | Specifies whether to print the status of all nested conditions. Valid values are Y and N. |
13.5.4 Managing the Health Test Framework
You can register tests and rebuild the index, as described in the following topics:
13.5.4.1 Creating a Repository and Registering Health Test Framework Tests
To create a repository, you register a test using the dfwhealthtestadminctl.sh register command. The command creates a repository and registers one or more tests with the repository.
To create a repository and register the tests, take the following steps:
-
Set the dtf_fs_diagbase environment variable to specify the location of the repository. For example:
setenv dtf_fs_diagbase /scratch/Oracle/Middleware/diag
-
Execute the following command, which creates the repository and registers one test in the repository:
dfwhealthtestadminctl.sh register testfile=/scratch/tests/sampleTest.xml
                                     testjar=/scratch/tests/testjar
You can register more than one test at a time using the testfile or dir parameters:
-
To register more than one test using the testfile parameter, you can use a comma-separated list or wildcards.
The following example registers two tests, using a comma-separated list:
dfwhealthtestadminctl.sh register testfile=/scratch/tests/sampleTest.xml,
                                   /scratch/moretests/sampleTest.xml
                                     testjar=/scratch/tests/testjar
The following example registers more than one test, using wildcards:
dfwhealthtestadminctl.sh register testfile=/scratch/tests/%Test.xml, testjar=/scratch/tests/testjar -
To register more than one test using the dir parameter, you can specify one or more directories in a comma-separated list.
The following example registers all tests in the specified directory:
dfwhealthtestadminctl.sh register dir=/scratch/dtf_tests
13.5.4.2 Rebuilding the Health Test Framework Indexes
Indexes improve the speed of searching and querying the Health Test Framework repository. Indexes related to test definition are stored in the testdef file store. Indexes related to test runs and execution are stored in the testrun file store.
In some circumstances, you may want to refresh the indexes. You use the dfwhealthtestadminctl.sh index command, specifying the testdef or testrun file store. The following example refreshes the testdef file store:
dfwhealthtestadminctl.sh index refresh=testdef
13.5.5 Running Health Test Framework Diagnostic Tests
You run the Health Test Framework diagnostic tests using the dfwhealthtestctl.sh command line interface, which is located in:
ORACLE_COMMON_HOME/common/bin
To run a test, use the run command, using the format described in Section 13.5.3.2.6. For example, to run the test SampleTest, use the following command:
./dfwhealthtestctl.sh command
               [testfile=SampleTest.xml]
You can run one or more tests at the same time:
-
To run one or more tests by specifying the test names in a comma-separated list:
./dfwhealthtestctl.sh run test=oracle.dfw.healthtest.test.sample.SampleTest2
Processing "run" command ...

Executing run ID "1340125981427" with name "TestRun_1340125981427" ...
sampleTest2 sleep for a while....
sampleTest2 done

Run ID "1340125981427" with name "TestRun_1340125981427" started at 06/21/2012
 10:13:01 AM and completed at 06/21/2012 10:13:04 AM. No diagnostic issues were detected.
-
To run one or more tests by using wildcards for the test name:
./dfwhealthtestctl.sh run test=oracle.dfw.healthtest.test.sample.SampleTest*
-
To run all tests associated with a particular product:
./dfwhealthtestctl.sh run productcode=idm
If you are running only one test, you can specify input options either on the command line or in an input file:
-
To specify the input options on the command line, use the
input:parameter:./dfwhealthtestctl.sh run test=oracle.dfw.healthtest.test.sample.SampleTest,oracle.dfw.healthtest.test.sample.SampleTest2 input:userid=11 input:roleid=22 -
To specify the input options in an input file, create the file and specify it on the command line using the
inputfileparameter. The following shows the format of the input file:input_parameter1:parameter_value1 input_parameter2:parameter_value2
For example:
userid:11
roleid:22
Then, specify the file on the command line:
./dfwhealthtestctl.sh run test=oracle.dfw.healthtest.test.sample.SampleTest
                           inputfile=/tmp/inputfile
13.5.6 Searching for Health Test Framework Diagnostic Tests
You can search for tests or runs using the dfwhealthtestctl.sh listtest command. Optionally, you can specify the name of the test or product code:
-
To search for all tests:
./dfwhealthtestctl.sh listtest
-
To search for one test named SampleTest:
./dfwhealthtestctl.sh listtest testname=SampleTest
-
To search for more than one test using wildcards:
./dfwhealthtestctl.sh listtest testname="S*"
-
To search for all tests related to a particular product:
dfwhealthtestctl.sh listtest productcode=idm
13.5.7 Retrieving a Description of a Health Test Framework Test
You can retrieve the description of a specified test using the dfwhealthtestctl.sh listtest command. For example, to get the description of the test SampleTest, along with its parameters, use the following command:
./dfwhealthtestctl.sh desctest testname="SampleTest" showparam=Y
13.5.8 Listing Health Test Framework Test Runs
You can query the results of test runs, by test name, run name, status, or time, using the dfwhealthtestctl.sh listrun command:
-
To query the results for a test run by specifying the test name:
./dfwhealthtestctl.sh listrun testname="SampleTest"
-
To query the results for a test run by specifying the run name:
./dfwhealthtestctl.sh listrun runname="run_1"
-
To query the results for a test run by specifying the status. For example, to get the results of all tests with a status of running:
./dfwhealthtestctl.sh listrun status=r
-
To query the results for test runs that were started in the last 2 hours:
./dfwhealthtestctl.sh listrun lasthours=2
13.5.9 Generating Health Test Framework Reports
You can generate reports of the test runs for the Health Test Framework using the dfwhealthtestctl.sh report command. You can generate HTML or XML reports.
You can specify the run name, run ID or execution ID>
For example, to generate a report in HTML format for the run with the run ID of 1330128064268:
dfwhealthtestctl.sh report runid=1330128064268 format=HTML