27 Working with OmniPortlet
This chapter provides an overview of OmniPortlet and explains the user interface elements associated with OmniPortlet. This chapter contains the following sections:
For information regarding troubleshooting OmniPortlet, see Section 27.5, "Troubleshooting OmniPortlet."
This chapter is intended for users who want to understand OmniPortlet and learn how to use its features. It introduces how to customize OmniPortlet at runtime and in Oracle WebCenter Portal: Spaces, in addition to troubleshooting issues with OmniPortlet.
27.1 What You Should Know About OmniPortlet
OmniPortlet is a subcomponent of Oracle WebCenter Portal: Framework that enables developers to easily publish data from various data sources using a variety of layouts without writing any code. You can base an OmniPortlet on almost any kind of data source, including web services, SQL databases, spreadsheets (that is, files with character-separated values), XML, and even application data from existing web pages.
Note:
If your data source is a spreadsheet, the spreadsheet must be unsecured or must require only HTTP authentication; SSO authentication is not supported.
Additionally, OmniPortlet enables developers to:
-
Sort the data to display
-
Format data using a variety of layouts, including a customized layout
-
Use portlet parameters
-
Expose personalizable settings to page viewers
To display personalized data, you can refine the results returned from a data source and parameterize the credential information used to access secure data. Out of the box, OmniPortlet provides the most common layout for portlets: tabular, chart, news, bulleted list, form, HTML, and parameter form.
Notes:
For more information about developing different types of portlets and information about producers and other portlet technologies, see Oracle Fusion Middleware Developer's Guide for Oracle WebCenter Portal.
For more information about adding an instance of OmniPortlet to a page, see Section 27.2.1, "Adding an OmniPortlet Instance to a Page."
27.2 Working with the OmniPortlet Wizard
This section includes the following subsections:
27.2.1 Adding an OmniPortlet Instance to a Page
The steps for adding an instance of OmniPortlet to a page vary between an application built using Oracle WebCenter Portal: Framework and the Spaces application. For one thing, in a Framework application adding a portlet to a page is a design-time activity, carried out by the application developer. For information about adding OmniPortlet to a page in a Framework application, see the “Creating Portlets with OmniPortlet” chapter in the Oracle Fusion Middleware Developer's Guide for Oracle WebCenter Portal.
In Spaces, portlets are added to pages at runtime—when you run the application. Portlets are available for dragging and dropping from the Composer Catalog by any user with sufficient privileges. For information about adding a portlet to a page in Spaces, see Section 17.5, "Adding Resource Catalog Components to Pages."
Note:
In Spaces, avoid adding a portlet to a Movable Box layout component (For information, see Section 18.2.3, "Working with the Movable Box Layout Component"). The Movable Box layout component duplicates the showDetailFrame that the portlet provides by default. Adding a portlet to a Movable Box creates an unnecessary and potentially error-prone redundancy.
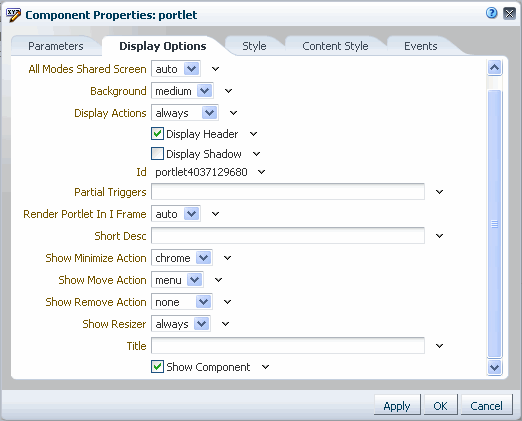
When you add an instance of OmniPortlet to a page, access the portlet's Component Properties dialog and ensure that the RenderPortletInIFrame property is set to true. This displays the OmniPortlet in its own inline frame (IFRAME) in View mode.
For information about the Component Properties dialog, see Section 27.4, "Setting OmniPortlet Properties."
27.2.2 Accessing the OmniPortlet Wizard
Once you add an instance of OmniPortlet to your page, click the Customize link to start the OmniPortlet wizard.
The OmniPortlet wizard initially contains five steps:
-
Select a data source type.
-
Identify the data source.
Note:
If your data source is a spreadsheet, the spreadsheet must be unsecured or must require only HTTP authentication; SSO authentication is not supported.
-
Set filtering options.
-
Set view options.
-
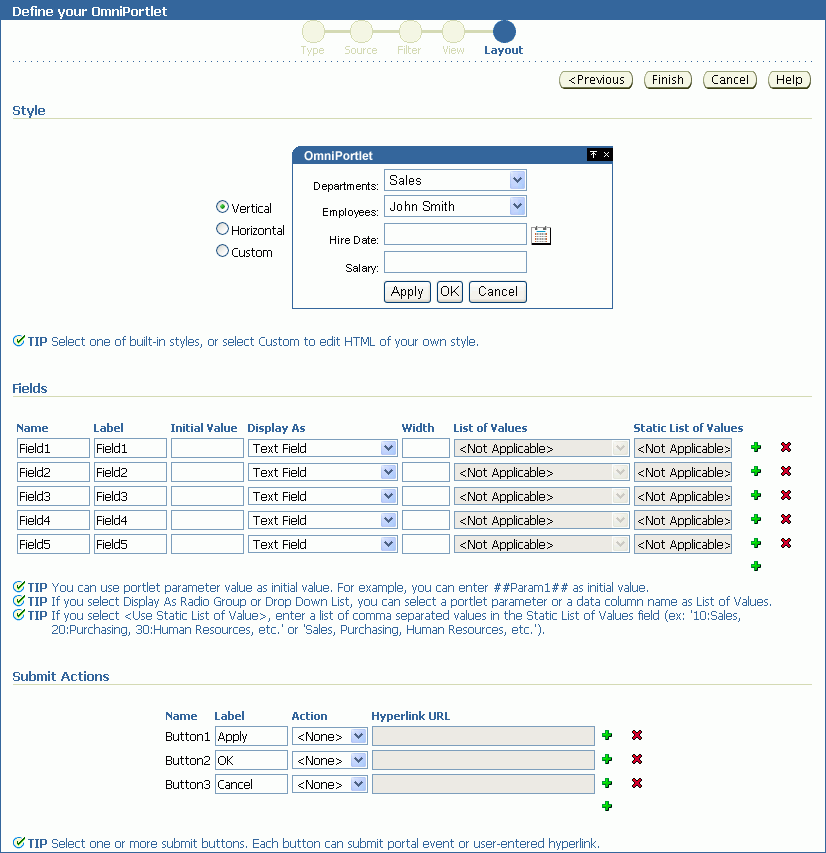
Set layout options.
Once you complete these steps, you are done. If you want to change your initial values, you can reenter the wizard by selecting the Customize option from the portlet's Actions menu. Tabs representing the steps you took to set up OmniPortlet display. Although the data type cannot be changed, you can revise values on the Source, Filter, View, and Layout tabs.
Table 27-1 provides a high-level overview of the steps/tabs provided for configuring an OmniPortlet instance.
Table 27-1 OmniPortlet Wizard and Customize Mode
| Step/Tab | Description |
|---|---|
|
Type |
Provides your data source options. Displays only in the initial definition of the portlet, and is not available when customizing the portlet defaults. For more information, see Section 27.2.3, "Selecting the Data Source Type." |
|
Source |
Provides options for configuring the data source connection, such as the URL of the web service you want to use. You can change these options later when editing the portlet defaults. For more information, see Section 27.2.4, "Identifying the Data Source." |
|
Filter |
Provides sorting options at the Framework application level to enable you to refine your results. You can change these options later when editing the portlet defaults. For more information, see Section 27.2.5, "Setting Filtering Options." |
|
View |
Provides options for displaying portlet header and footer text, the layout style, and caching. You can change these options later when editing the portlet defaults. For more information, see Section 27.2.6, "Setting View Options." |
|
Layout |
Provides detailed options for customizing the layout of content retrieved from the data source. You can change these options later when editing the portlet defaults. For more information, see Section 27.2.7, "Setting Layout Options." |
Note:
On the IBM Linux on Power platform, if the action buttons (Next, Previous, Finish, and Cancel) are minimized to dots when defining the OmniPortlet, increase the stack size shell limit to unlimited and restart the oc4j_portlet instance. Run the following command to set the stack size shell limit to unlimited: prompt> ulimit -s unlimited.
The following sections provide more detail about the different steps/tabs in the OmniPortlet wizard.
27.2.3 Selecting the Data Source Type
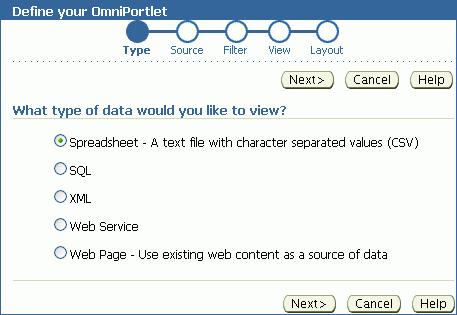
When you first start OmniPortlet, the Type step displays (Figure 27-1).
Figure 27-1 Type Tab of the OmniPortlet Wizard
Description of "Figure 27-1 Type Tab of the OmniPortlet Wizard"
Use the Type step to identify the type of data to display in your OmniPortlet instance. Table 27-2 lists and describes the data types that OmniPortlet supports out of the box.
Table 27-2 OmniPortlet Supported Data Source Types
| Data Source Type | Description |
|---|---|
|
Spreadsheet |
Displays data from a text file containing character-separated values (CSV). Note: If your data source is a spreadsheet, the spreadsheet must be unsecured or must require only HTTP authentication; SSO authentication is not supported. |
|
SQL |
Displays data from a database using SQL. |
|
XML |
Displays data from an XML file. |
|
Web Service |
Displays data from a discrete business service that can be accessed over the Internet using standard protocols. |
|
Web Page |
Displays data based on existing web content. |
After you complete the OmniPortlet wizard, you cannot change the data source type.
27.2.4 Identifying the Data Source
Once you choose a data type, you are ready to identify a data source. The Source tab renders according to the data type you selected in step 1. That is, the options that display on the Source tab vary according to the selected data type.
Additionally, if the OmniPortlet producer has been configured to use a proxy server requiring authentication, the Source tab contains a Proxy Authentication section and a Connection section where you can provide the necessary information for connecting to the data source.
This section contains information about the settings common to all Source tabs, including settings specific to the selected data type. It contains the following subsections:
27.2.4.1 Proxy Authentication
If the OmniPortlet producer was set up at design time to use proxy authentication that requires login credentials, then a Proxy Authentication section displays on the Source tab where you can enter this information.
OmniPortlet's support for proxy authentication includes support for global proxy authentication and authentication for each user, which means you can specify a login scenario for your OmniPortlet instance:
-
All users automatically log in using a user name and password you provide.
-
Each user logs in using an individual user name and password.
-
All users log in using the same specified user name and password.
The Proxy Authentication section displays only for the following data types, and only when the specific data source requires a proxy server for access:
-
CSV (character-separated values)
-
XML
-
Web Page
Notes:
Configuring an OmniPortlet producer is a design-time activity applicable to Framework applications. For more information about configuring the OmniPortlet producer to use proxy authentication, see the WebCenter Portal: Framework online Help topic that displays when you click Help on the Edit Producers: OmniPortlet Producer page.
If the OmniPortlet producer is configured to require login for all users, then each user must set his or her own proxy login information at runtime as follows:
-
For page designers, set this on the Customize: Source tab.
-
For page viewers, set this on the Personalize page.
To access the Customize: Source tab, click the Customize link on the portlet's Actions menu. To access the Personalize page, click the Personalize link on the portlet's Actions menu.
If you are using the Web Page data source, then the Proxy Authentication section displays in the Web Clipping Studio when you click the Select Web Page button on the Source tab.
For more information about Web Clipping Studio, see Chapter 28, "Working with the Web Clipping Portlet."
27.2.4.2 Connection and Portlet Parameters
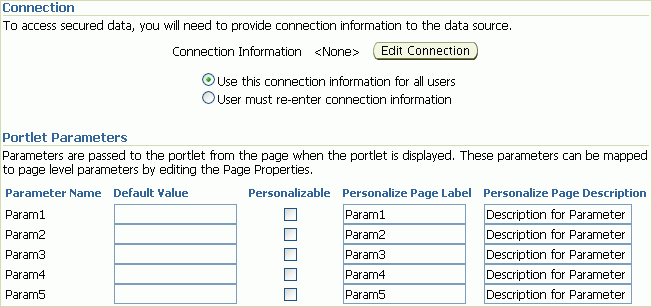
For each data source—except the Web Page data source—the Source step contains a Connection section, where you can define connection information for accessing secured data. The Source step for all data sources includes a Portlet Parameters section, where you can define portlet parameters (Figure 27-2).
Figure 27-2 Source Tab: Connection and Portlet Parameters Sections
Description of "Figure 27-2 Source Tab: Connection and Portlet Parameters Sections"
Note:
You can use the format ##ParamN## (for example, ##Param1##) for Username, Password, or Connection String. The Test button returns an error, however, even though the connection information is correct when parameter values are substituted.
Once you define the portlet parameters, you can map them to page parameters. For more information, see Section 27.3, "Working with OmniPortlet Parameters" and Chapter 19, "Wiring Pages, Task Flows, Portlets, and UI Components."
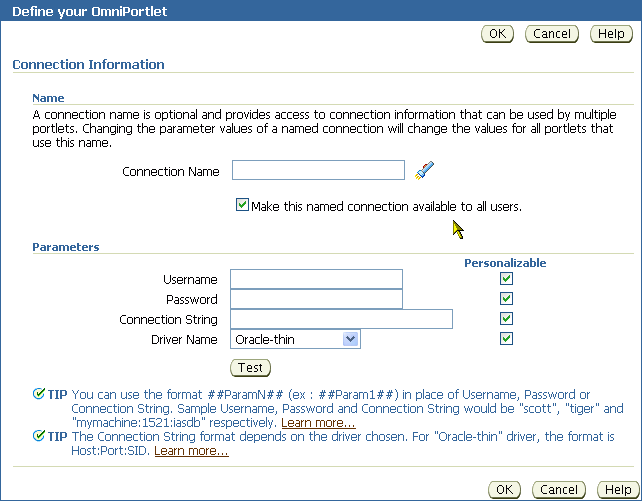
To edit the connection information, click the Edit Connection button to open the Connection Information page (Figure 27-3).
Figure 27-3 OmniPortlet Connection Information Page for a SQL Data Source
Description of "Figure 27-3 OmniPortlet Connection Information Page for a SQL Data Source"
On the Connection Information page, you can enter a name for the connection information, and also the user name and password. For a SQL data source, you can also enter information to specify the driver you want to use to connect to the data source. For more information, see Section 27.2.4.4, "SQL."
Note:
For more information about the Connection Information page, click Help on the Source tab of the OmniPortlet wizard.
27.2.4.3 Spreadsheet
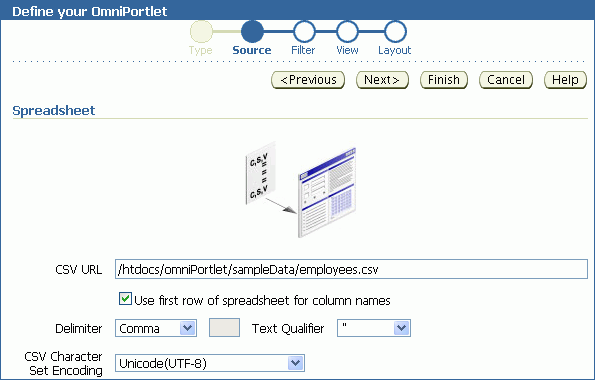
Spreadsheets are a common method of storing small data sets. OmniPortlet enables you to share spreadsheets by supporting character-separated values (CSV) as a data source. Use the Source tab to specify the location of the CSV file (Figure 27-4).
Figure 27-4 Source Tab: Spreadsheet (CSV)
Description of "Figure 27-4 Source Tab: Spreadsheet (CSV)"
If the file is located on a secure server, then you can specify the connection information in the Connection Information section illustrated in Figure 27-3. You can select the character set to use when WebCenter Portal reads the file, and also the delimiter and text qualifier.
Note:
-
As the OmniPortlet producer exists and executes in a tier different from the Framework application and does not have access to the session information, you must expose CSV files as PUBLIC for OmniPortlet to be able to access them.
-
The CSV file must be unsecured or must require only HTTP authentication; SSO authentication is not supported.
27.2.4.4 SQL
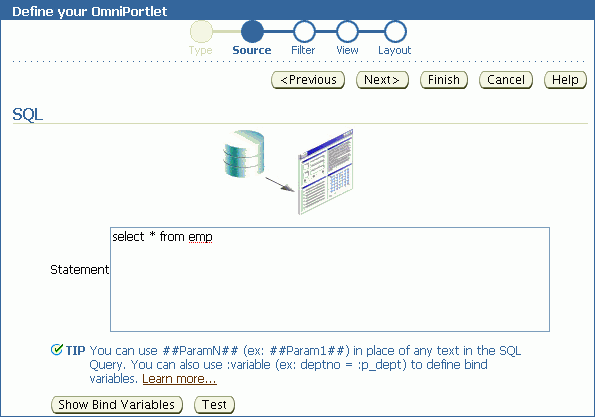
A relational database is the most common place to store data. OmniPortlet enables you to use standard JDBC drivers and provides out-of-the-box access to Oracle and any other JDBC database. You can specify the driver type when you configure the connection information.
Figure 27-5 shows the Source tab for a SQL data source.
You can use DataDirect JDBC drivers to access other relational databases. To do so, you must configure OmniPortlet to recognize the driver. This is a design-time activity, typically carried out by an application developer.
Notes:
For information about configuring OmniPortlet to use DataDirect drivers, see Appendix E, “Additional Portlet Configuration” in the Oracle Fusion Middleware Developer's Guide for Oracle WebCenter Portal.
For more information about DataDirect drivers, see the Certification Matrix for Oracle Application Server and DataDirect JDBC on the Oracle Technology Network (OTN) at http://www.oracle.com/technetwork.
Once the driver is installed, it displays in the Driver Name dropdown list on the Connection Information page (Figure 27-6).
Figure 27-6 Driver Name Dropdown List on the Connection information Page

Description of "Figure 27-6 Driver Name Dropdown List on the Connection information Page"
When you enter a connection string for a DataDirect driver, keep in mind that you must enter a value in the Connection String field using the syntax: host_name:port. The host_name is the name of the server where the database is running. The port is the database's listening port.
27.2.4.5 XML
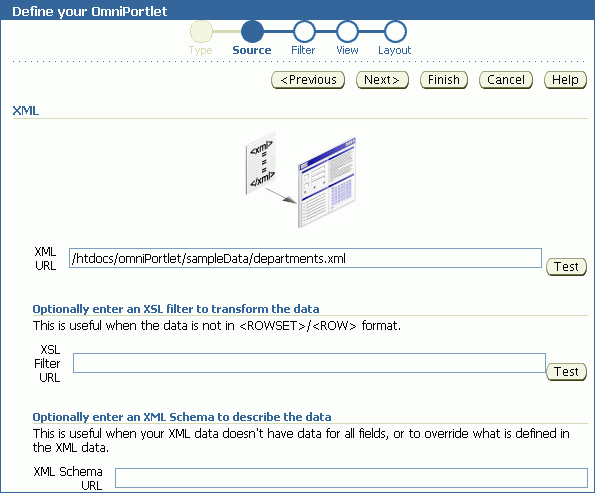
You can access XML data sources across an intranet or the Internet. On the Source tab, you can specify the URL of the XML file that contains your data (Figure 27-7).
Use the Test buttons next to the XML URL and the XSL Filter URL fields to validate your XML data source and the XSL filter.
The specified XML file can be in a tabular (ROWSET/ROW) structure, or you can provide an XML Style Sheet (XSL) that transforms data into the ROWSET/ROW structure. Example 27-1 provides an illustration of the ROWSET/ROW structure of an XML data source.
Example 27-1 ROWSET/ROW Structure of an XML Data Source
<TEAM>
  <EMPLOYEE>
    <DEPTNO>10</DEPTNO>
    <ENAME>KING</ENAME>
    <JOB>PRESIDENT</JOB>
    <SAL>5000</SAL>
  </EMPLOYEE>
    <DEPTNO>20</DEPTNO>
    <ENAME>SCOTT</ENAME>
    <JOB>ANALYST</JOB>
    <SAL>3000</SAL>
  <EMPLOYEE>
</TEAM>
In Example 27-1, the <TEAM> tags delineate the rowset, and the <EMPLOYEE> tags delineate the rows.
Regardless of the format of the XML file, OmniPortlet automatically inspects the XML to determine the column names, which are then used to define the layout. If you want to specify this information yourself, you can supply a URL to an XML schema that describes the data.
If the XML file is located on a secured server protected by HTTP Basic Authentication, you can specify connection information on the Connection Information page.
Note:
Because the OmniPortlet producer exists and executes in a tier different from the Framework application and does not have access to the session information, you must expose XML files as PUBLIC in order for OmniPortlet to access them.
27.2.4.6 Web Service
A web service is a discrete business service that can be programmatically accessed over the Internet using standard protocols, such as SOAP and HTTP. Web services are specific to neither platform nor language and are typically registered with a web service broker. When you find a web service you want to use, you must obtain the URL to the Web Service Description Language (WSDL) file. The WSDL file describes the web service and specifies the methods that can be called, including the expected parameters. It also describes the returned data.
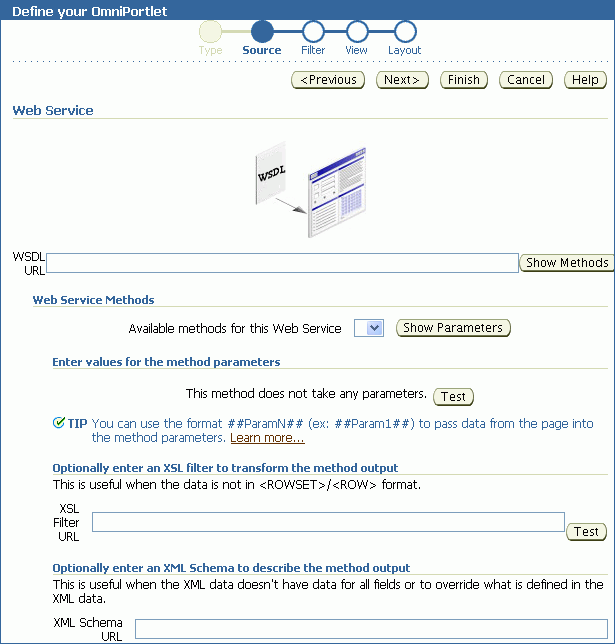
OmniPortlet supports both types of web Services: Document and Remote Procedure Calls (RPC). After a WSDL document/file is supplied, it is parsed, and the available methods that can be called display on the Source tab.
Similar to the XML data source, OmniPortlet expects the web service data in ROWSET/ROW format, though you can also use an XSL file to transform the data. OmniPortlet inspects the WSDL document/file to determine the column names, though you may also specify an XML schema to describe the returned data set.
Figure 27-8 shows the Source tab for a sample web service.
27.2.4.7 Web Page
OmniPortlet enables you to use existing web content as a data source. It integrates the Web Clipping portlet's Web Clipping Studio to provide a means of clipping and rendering web content within the context of an OmniPortlet instance.
OmniPortlet's Web Page data source extends the scope offered by the Web Clipping portlet to include scraping functionality. Additional features include:
-
Navigation through various login mechanisms, including form- and JavaScript-based submission, and HTTP Basic and Digest Authentication with cookie-based session management.
-
Fuzzy matching of clippings. If a web clipping gets reordered within the source page or if its character font, size, or style changes, then it is still identified correctly by the web page data source and delivered as the portlet content.
-
Reuse of a wide range of web content, including basic support of pages written with HTML 4.0.1 and JavaScript, retrieved through HTTP GET and POST (form submission).
By default, all web clipping definitions are stored persistently in Oracle Metadata Services (MDS). However, you can also use an Oracle database. Using MDS does not require any changes in the configuration files. If you use an Oracle database as the Web Clipping repository, then at design time you must update the provider.xml file.Any secure information, such as passwords, is stored in encrypted form, according to the Data Encryption Standard (DES), using Oracle Database encryption technology.
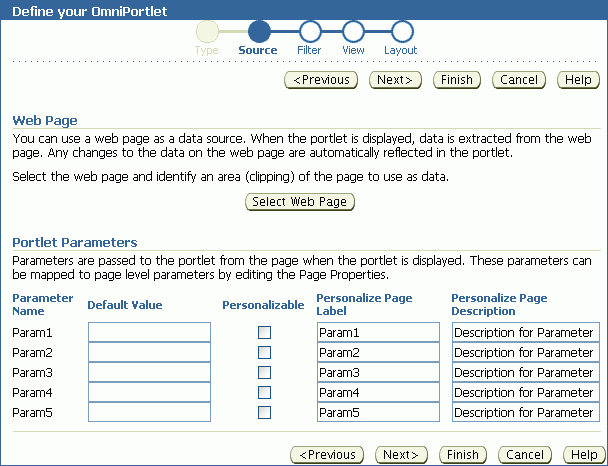
When Web Page is selected as the data type, the OmniPortlet wizard's Source tab (Figure 27-9) includes a Select Web Page button that launches Web Clipping Studio.
Within Web Clipping Studio, the Oracle Application Server Web Clipping online Help becomes available through the Help icon at the top of the page. You can use the Help to navigate your way through the process of sectioning and saving web content.
Note:
For more information about using the Web Clipping Studio or clipping content for a Web Clipping Portlet, see Chapter 28, "Working with the Web Clipping Portlet."
27.2.5 Setting Filtering Options
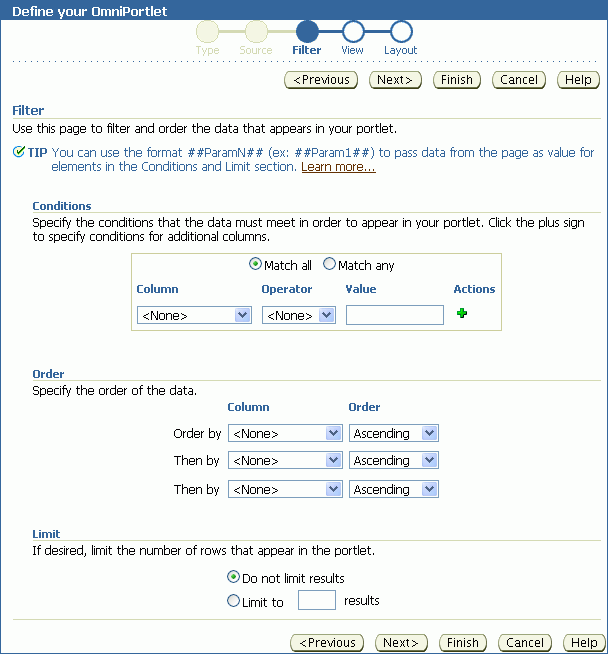
Once you have selected the data source and specified the data source options, you can further refine your data using OmniPortlet's filtering options. To use filtering efficiently, it is better to refine the data as much as possible at the data source level on the Source tab, then use the options on the Filter tab to streamline the data. For example, if you are using a SQL data source, then you could use a WHERE clause to return only specific data from the specified columns. In this case, you could skip the Filter tab and continue to the wizard's View tab. However, if there are no filtering options at the data source level, then you can use the options on the Filter tab to sort your data (Figure 27-10).
27.2.6 Setting View Options
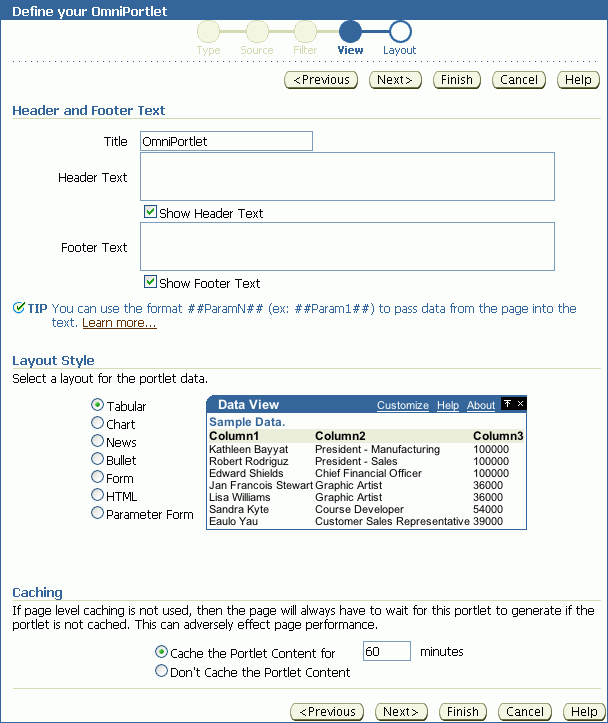
Once you have specified and filtered the data, you are ready to choose view and layout options for your OmniPortlet. The View tab (Figure 27-11) provides options for adding header and footer text, enabling caching, and choosing a layout style that you can later refine on the Layout tab.
On the View tab, you can choose from the following layouts:
-
Tabular
-
Chart
-
News
-
Bullet
-
Form
-
HTML
-
Parameter Form
Note:
For more information about the different layout styles you can use with OmniPortlet, see the next section or click Help in the OmniPortlet wizard.
27.2.7 Setting Layout Options
The Layout tab enables you to further customize the appearance of your OmniPortlet. The options on the Layout tab change according to your selection on the View tab. For example, when you select Chart Layout, options are provided for setting up chart hyperlinks. With chart hyperlinks, clicking a specific part of the chart triggers an event (for example, navigation to another URL).
For the other layout styles, you can define each column to display in a specific format, such as plain text, HTML, an image, a button, or a field. For example, suppose you selected a data source that includes a URL to an image. To see this image, you can select Image for the display of this column. Each column can also be mapped to an action, similar to the behavior of chart hyperlinks.
This section includes the following subsections that provide more detail about the layout options available on the OmniPortlet Layout tab:
Note:
Because events are not currently supported, selecting an action when designing your layout may produce unexpected results.
27.2.7.1 Tabular Layout
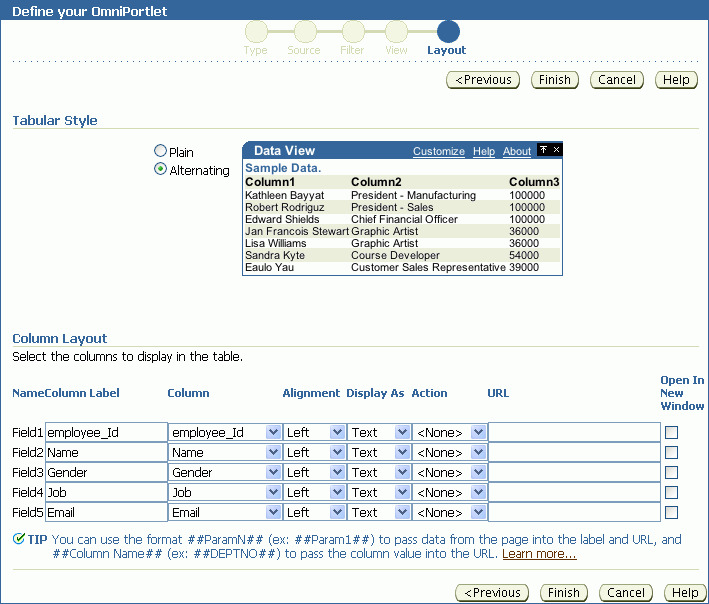
Typically, you use tabular layout when you have one or more columns of data to display in a table. You can choose Plain to display all rows in the table without any background color, or Alternating to display a background color for every other row in the table (Figure 27-12).
Note:
You can control the background color of a portlet using its style properties. Portlet style properties are exposed through the Properties panel in Composer. For more information, refer to Setting OmniPortlet Properties.
The Column Layout section provides options for selecting the data columns to display in the portlet and a display format. Additionally, you can associate a URL with a column to display column data as a hyperlink. You can also specify whether the secondary web page displays in a new window. Figure 27-13 shows an example of an OmniPortlet using a tabular format.
Figure 27-13 Example of an OmniPortlet Using a Tabular Layout

Description of "Figure 27-13 Example of an OmniPortlet Using a Tabular Layout"
Note:
For more information about using the OmniPortlet wizard, click the Help link on the Layout tab.
27.2.7.2 Chart Layout
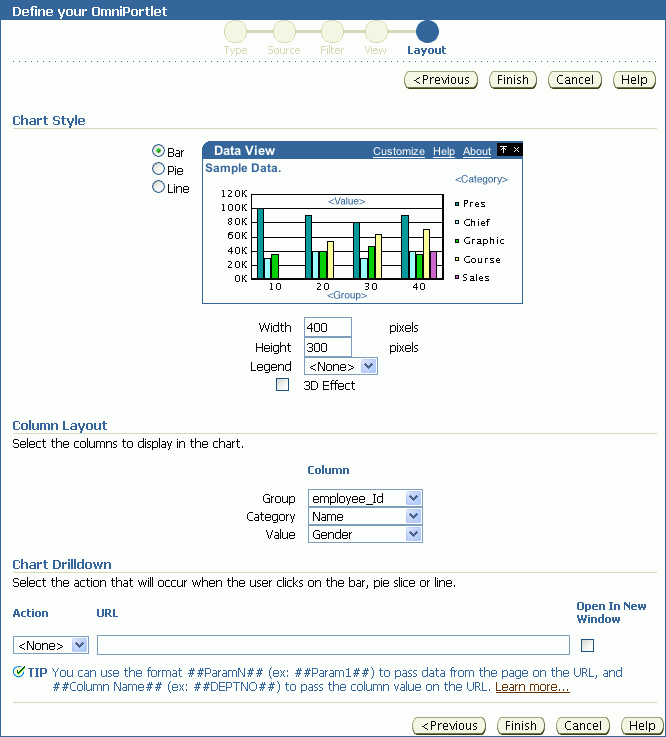
Use the chart layout to display your data graphically, as a bar, pie, or line chart. The Layout tab (Figure 27-14) provides options for specifying the chart style to use (Chart Style) and the data source columns to display (Column Layout).
Under the Column Layout section, you can choose the data source columns to use in the chart (Group); the values to use in creating the chart legend (Category); and the relative size of the chart's bars, lines, or pie slices (Value).
Note:
To group the information in the chart, you must group the information at the data level (for example, in your SQL query statement). Also, if numeric values in a data source contain formatted strings, commas, or currency (for example, $32,789.00), then they are considered to be text and ignored when the chart is generated. You should remove these formatting characters if you want them to be correctly read as numeric values.
You can also select whether the sections of the chart should point to a hyperlink and whether the link target should display in a new window.
You can define chart hyperlinks so that each bar, pie section, or line links to another web page. For example, you can place a pie chart and a report portlet on your page, then set up hyperlinks on the pie wedges. Users click a wedge to display a row in the report with detailed information about the wedge data.
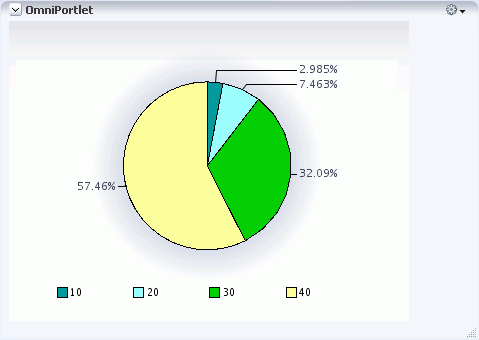
Figure 27-15 displays an example of a pie chart. In this example, the Category value DEPARTMENT is used as the chart legend.
Figure 27-15 Example of an OmniPortlet Using a Pie Chart Layout
Description of "Figure 27-15 Example of an OmniPortlet Using a Pie Chart Layout"
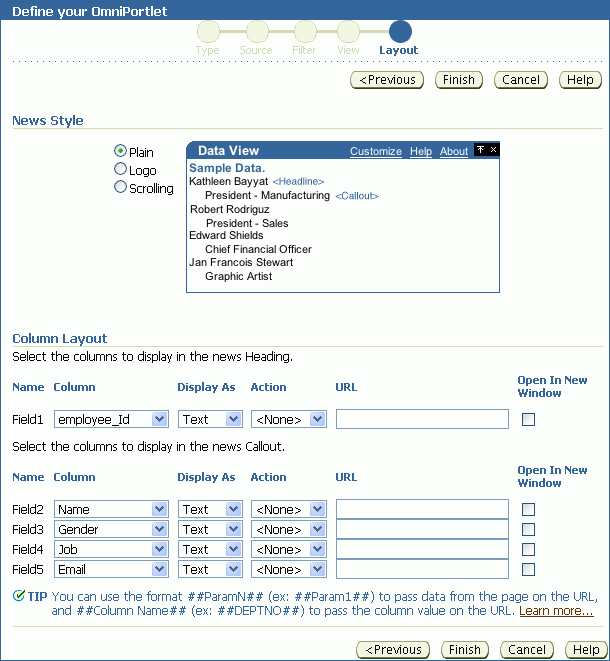
27.2.7.3 News Layout
Use the News layout to display links to articles and brief article descriptions. You can use the News layout to publish information in standard XML formats, such as Resource Description Framework (RDF) or RSS (Really Simple Syndication).
Use the Column Layout section (Figure 27-16) to add a heading that displays at the top of the portlet, a logo, or a scrolling layout that enables users to view all the information in the portlet as it moves vertically.
Note:
The OmniPortlet News Layout Scroll type is supported on Microsoft Internet Explorer and Netscape 7.0.
The Layout tab also provides options for associating a URL with column data. Users click column data in the portlet to navigate to your specified target location.
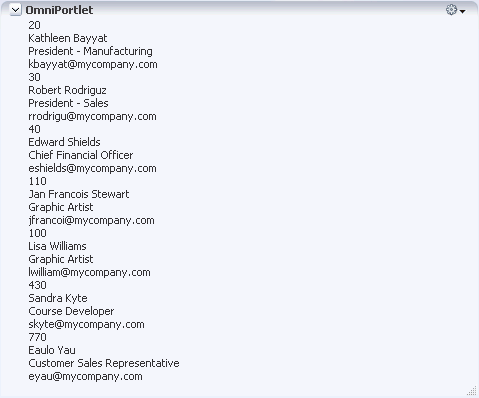
Figure 27-17 shows an example OmniPortlet using a News layout.
Figure 27-17 Example of an OmniPortlet Using a News Layout
Description of "Figure 27-17 Example of an OmniPortlet Using a News Layout"
Note:
For more information about using the OmniPortlet wizard, click the Help link on the Layout tab.
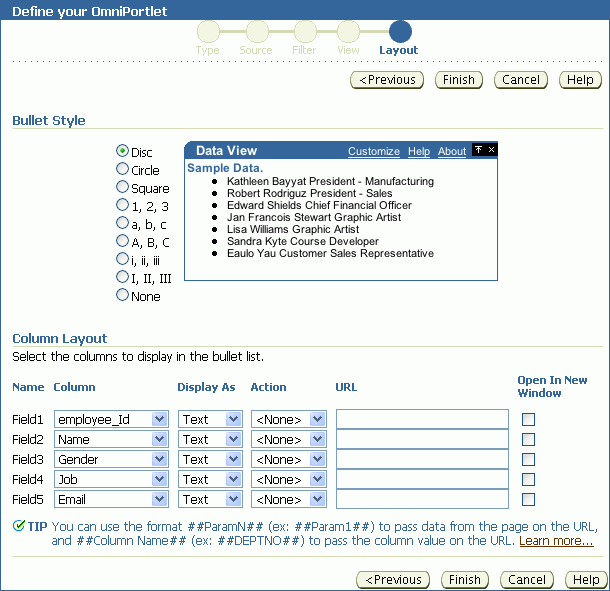
27.2.7.4 Bullet Layout
Use the Bullet layout to display your data in a bulleted or numbered list. The Layout tab (Figure 27-18) provides a variety of different bullet and numbering styles.
In the Column Layout section, you can choose how the columns display in the portlet and associate a URL with column data.
Figure 27-19 shows an example of an OmniPortlet using a Bullet layout.
Figure 27-19 Example of an OmniPortlet Using a Bullet Layout

Description of "Figure 27-19 Example of an OmniPortlet Using a Bullet Layout"
Note:
For more information about using the OmniPortlet wizard, click the Help link in the Layout tab.
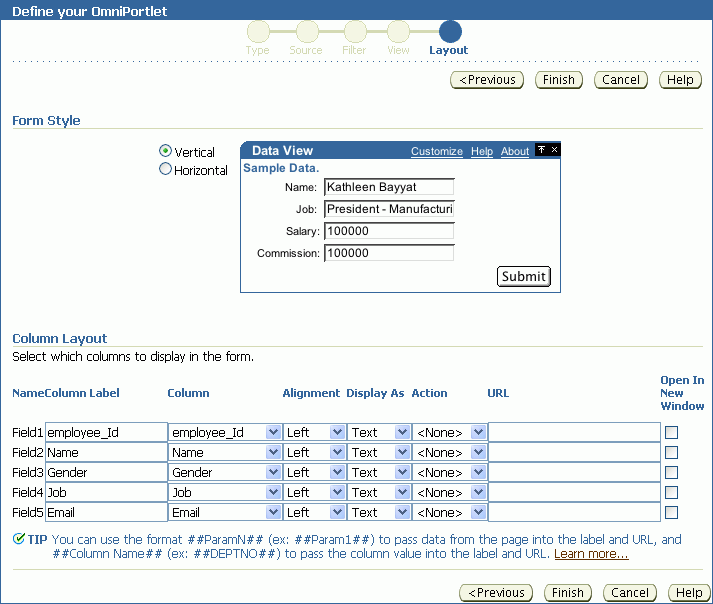
27.2.7.5 Form Layout
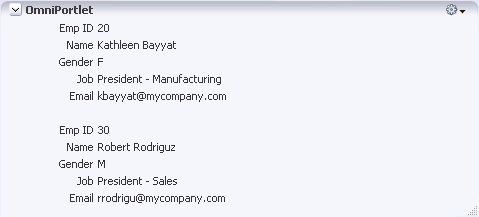
Use the Form layout when you want to display source data in a form with labeled fields, such as Name: <name>. You can then use portlet parameters to determine the data that displays.
Use the Column Label column to enter row labels and the Column column to specify which column to use from your data source. Additionally, you can specify data alignment, select a display mode (text, HTML, image, button, field, or hidden), associate a URL or an event with the column data, and specify whether to open the URL target in a new window.
Figure 27-21 shows an example of an OmniPortlet using a Form layout.
Figure 27-21 Example of an OmniPortlet Using a Form Layout
Description of "Figure 27-21 Example of an OmniPortlet Using a Form Layout"
Note:
For more information about using the OmniPortlet wizard, click the Help link in the upper right corner of the Layout tab.
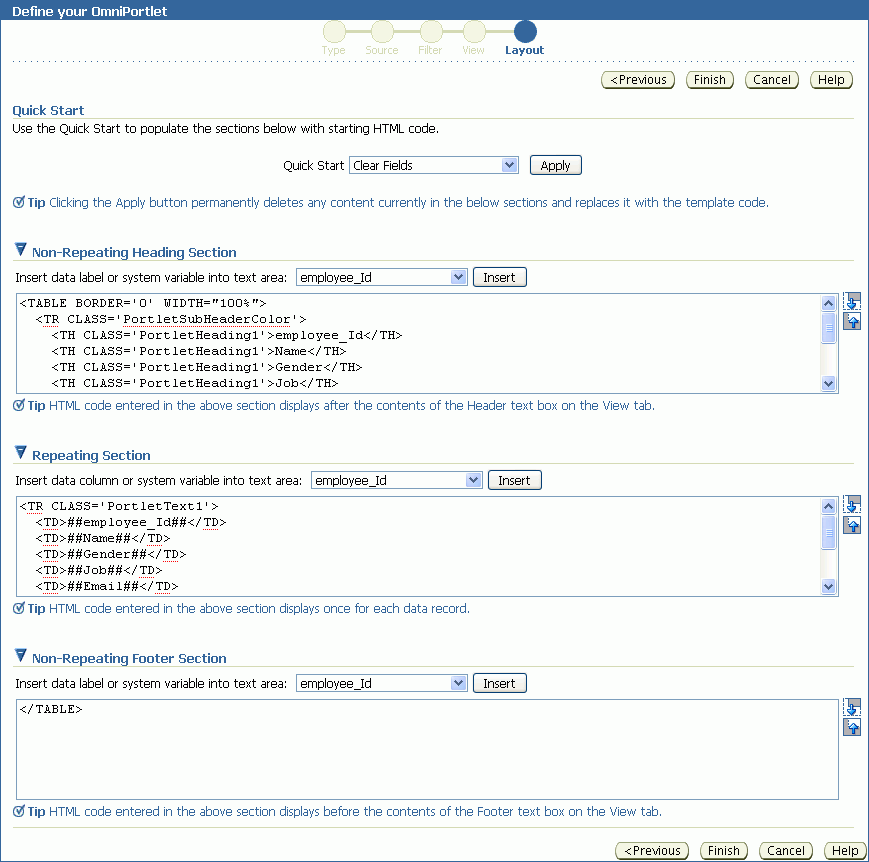
27.2.7.6 HTML Layout
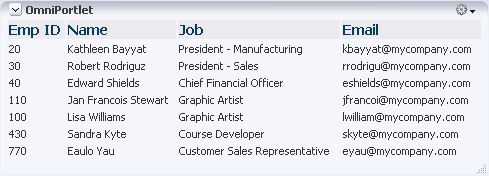
Use the HTML layout to create a customized look and feel for your OmniPortlet content. The Layout tab (Figure 27-22) provides a means of selecting a built-in HTML layout and modifying the code, or creating a new layout.
You can hand-code your own HTML or JavaScript based on data columns that OmniPortlet has retrieved from the selected data source. By coding your own HTML and JavaScript, you have full control over the portlet's appearance, enabling you to develop a rich portlet interface.
For more information about using the fields on the Layout tab, click the Help button in the wizard. For an example of using JavaScript in the HTML layout, choose the Sortable Table layout from the Quick Start dropdown list on this tab.
Note:
The maximum number of characters you can enter in each of the sections (Heading, Repeating, and Footer) is 30,000 (30k).
Figure 27-23 shows an example of an OmniPortlet using the HTML layout.
Figure 27-23 Example of an OmniPortlet Using the HTML Layout
Description of "Figure 27-23 Example of an OmniPortlet Using the HTML Layout"
27.2.7.7 Parameter Form Layout
Use the Parameter Form layout to create a customized parameter form for your OmniPortlet content. The Layout tab (Figure 27-22) provides a means of selecting a built-in parameter form layout and modifying the code, or creating a new layout.
You can hand-code your own parameter form based on data columns that OmniPortlet has retrieved from the selected data source. By coding your own parameter form, you have full control over the portlet's appearance, enabling you to develop a rich portlet interface. To do so, choose the Custom style option, then use the Custom HTML field to edit the parameter form (Figure 27-25).
Figure 27-25 Layout Tab: Parameter Form Custom HTML Field

Description of "Figure 27-25 Layout Tab: Parameter Form Custom HTML Field"
For more information about using the fields on the Layout tab, click the Help button in the wizard.
27.2.8 Customizing Your OmniPortlet
After you have created your OmniPortlet and returned to your application, you can select the Customize option from the portlet's Actions menu to revise your original selections. When you revise a defined OmniPortlet, tabs correspond to the different steps originally presented in the OmniPortlet wizard. An exception to this is the Type step—you cannot change the originally selected data type, and so there is no corresponding Type tab.
When you revise an OmniPortlet using customize mode, keep in mind the following notes:
-
Any modifications you make to your portlet using customize mode apply to all users, regardless of the current session language and the locale of the user's browser.
-
You can personalize the portlet at runtime by clicking the Personalize link on the portlet or by selecting the Personalize option on the portlet's Action menu. Personalizing the portlet creates a copy of the personalization object. As all properties are duplicated, subsequently modifying the portlet through Customize mode does not affect the personalized version of the portlet. To ensure the latest customizations are made to the portlet, after you make modifications in Customize mode, you must click Personalize again, and then select the Reset to Defaults option.
-
The personalization of OmniPortlet is stored in a file-preference store. For more information about configuring OmniPortlet and modifying the preference store, see Appendix E, “Additional Portlet Configuration” in the Oracle Fusion Middleware Developer's Guide for Oracle WebCenter Portal.
27.3 Working with OmniPortlet Parameters
You can define up to five portlet parameters for an OmniPortlet. You can define parameters in the following screens:
-
On the Source screen of the wizard when you define the OmniPortlet
-
On the Source tab when you select Customize for a defined OmniPortlet
Figure 27-26 shows the Portlet Parameters section on the Source tab.
Figure 27-26 Source Tab: Portlet Parameters Section

Description of "Figure 27-26 Source Tab: Portlet Parameters Section"
If you select any of these portlet parameters to be personalizable (by selecting the Personalizable checkbox), you can set their values on the Personalize screen.
Note:
You can learn more about portlet parameters in the online Help, which you can access by clicking the Help link on the Source tab in the OmniPortlet wizard. The online Help describes portlet parameters in detail, and how to set them up for your OmniPortlet.
Once you have set up portlet parameters in your OmniPortlet, you can contextually map the portlet to other portlets or components on a page. For more information about doing so, see Chapter 19, "Wiring Pages, Task Flows, Portlets, and UI Components."
27.4 Setting OmniPortlet Properties
OmniPortlet has associated properties that users with sufficient privileges can access through the Component Properties dialog in Composer (Figure 27-27).
For information about accessing the Component Properties dialog, see Section 17.5.2.3, "Setting Component Properties."
The following sections provide information about properties of the Events service task flows and describe the properties on the Parameters tab:
27.4.1 What You Should Know About OmniPortlet Properties
The properties on the Parameters tab of the Component Properties dialog control the default task flow content. For descriptions of the parameters on this tab, see Section 27.4.2, "OmniPortlet Properties." For some task flows, parameters on this tab facilitate the wiring of the task flow to page parameters and page definition variables. For information about wiring pages and components, see Chapter 19, "Wiring Pages, Task Flows, Portlets, and UI Components."
Changes to the properties on the Display Options, Style, and Content Style tabs affect the appearance and behavior of the task flow for all users. These properties are common to all task flows. For more information, see Section 17.5.2, "Setting Properties on Page Components."
The contents of the Events tab depend on the events supported by the task flow. For more information, see Section 17.5.2.8, "Working with Component Contextual Events."
All properties on the Parameters and Display Options tabs provide access to an Expression Language (EL) editor, which you can use to select or specify a variable value instead of a constant value. Click the Edit icon next to a property field to open the editor. For more information about using the editor and for descriptions of common EL expressions, see Appendix B, "Expression Language Expressions."
27.4.2 OmniPortlet Properties
Table 27-3 describes the properties that are unique to OmniPortlet.
Table 27-3 OmniPortlet Component Properties
| Property | Description | Location |
|---|---|---|
|
|
Use to map page parameters to the parameters specified when the OmniPortlet was defined. These parameters enable you to contextually wire portlets and pages. For more information, see Chapter 19, "Wiring Pages, Task Flows, Portlets, and UI Components." |
Parameters tab |
|
|
For OmniPortlet, set this property to |
Display Options tab |
|
|
Display Options tab |
|
|
|
Use to initialize a partial page refresh, which is a way of refreshing an area of a page without having to redraw the entire page. |
Display Options tab |
|
|
Use to render the portlet in an inline frame (IFRAME), omit an IFRAME, or let the portlet decide. Valid values are:
Placing a portlet inline on a page provides a better user experience as compared to placing it in an IFRAME. However, at times, it may be required to include a portlet in an IFRAME. For example:
|
Display Options tab |
|
|
Enter a title for the OmniPortlet, to display in the portlet header. |
Display Options tab |
27.5 Troubleshooting OmniPortlet
This section provides information to help you troubleshoot problems you may encounter while using OmniPortlet.
Cannot Define OmniPortlet Using the Customize Link
You are not able to define the OmniPortlet at runtime by using the Customize link.
OmniPortlet only supports a RenderPortletInIFrame value of true, which means that OmniPortlet must be rendered within an IFRAME and therefore, the OmniPortlet property, RenderPortletInIFrame, must be set to true. At design time, the RenderPortletInIFrame property is available in the Property Inspector under Display Options. At runtime, the RenderPortletInIFrame property is available on the Properties panel in Composer.
Currently, the RenderPortletInIFrame property has a value of false and, consequently, when you click the Define link at runtime, the Type tab may not display and you cannot proceed with defining the OmniPortlet.
You can choose Customize from the Action menu to define OmniPortlet, or, for Framework applications at design time, select the OmniPortlet in the Structure window in Oracle JDeveloper, and in the Property Inspector, set RenderPortletInIFrame to true.
