B Managed Attachments Screens
This appendix describes the Managed Attachments user interface screens, including screens for viewing attachments and their information, and checking in, scanning, editing, and searching for attachments.
The Managed Attachments solution includes the following screens:
Note:
For more information about Content Server screens, see the Oracle WebCenter Content User's Guide for Content Server.B.1 Managed Attachments Screen
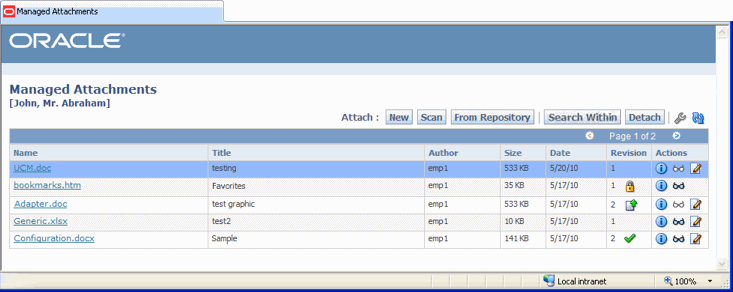
Use the Managed Attachments screen to view, attach, scan, detach, and edit Content Server documents attached to the selected business application record. You can also use Content Server search options to locate Content Server documents to which you have access.
The Managed Attachments screen lists all Content Server documents attached to the selected business application record, and provides the options listed in the following table.
| Element | Icon or Button | Description |
|---|---|---|
| Name | Lists the native name (including extension) of each Content Server document attached to the business application record. Click the document's link to open or save a Web-viewable rendition of the document. | |
| Title | Displays the title of the attached Content Server document, assigned at check-in. | |
| Author | Identifies the person who last checked in the file. | |
| Size | Displays the size (KB/MB) of the attached Content Server document. | |
| Date | Displays the date on which the Content Server document was last checked in to Content Server. | |
| Revision | Displays information about the attached revision. Depending on configuration, some items may not be shown.
|
|
| Info | Click this icon to display detailed information and content actions for the selected document on the Content Information Screen. | |
| View in AutoVue | Click this icon to view, print, collaborate, annotate, and mark up non-private (shared) attachments in the AutoVue document viewer, if configured.
The AutoVue icon is dimmed (grayed out) for private attachments, which cannot be viewed using AutoVue. |
|
| Edit | Click this icon to check out, open, and edit the attached Content Server document in its native application. | |
| New | Click to attach a document to the selected business application record, by completing fields on the Content Check-In Form. | |
| Scan | Click to scan or import a document and attach it to the business application record. | |
| From Repository | Click to search for files on the Content Server and attach them to the business application record. | |
| Search Within | Click to search within the Managed Attachments list on the Expanded Search Form. | |
| Detach | Click to detach the selected document. Detaching removes the document from the business application entity, but not from Content Server. | |
| Configure | Click to select and order fields for display in the Managed Attachments screen using the Configure Fields for Display Screen. | |
| Refresh | Click to update the Managed Attachments Screen display. |
B.2 Content Check-In Form
Use the Content Check-In Form to check in documents to Content Server, assign them metadata values, and attach them to the selected business application record.
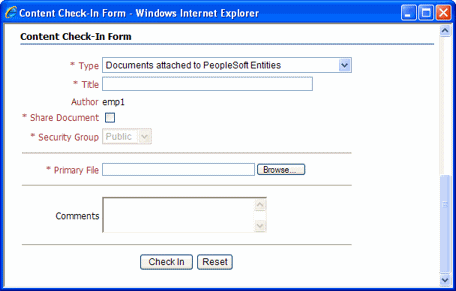
To display this screen, click the New button in the Managed Attachments Screen.
B.3 Configure Fields for Display Screen
The Configure Fields for Display screen enables business application users to specify the attachment information to display in the Managed Attachments screen.
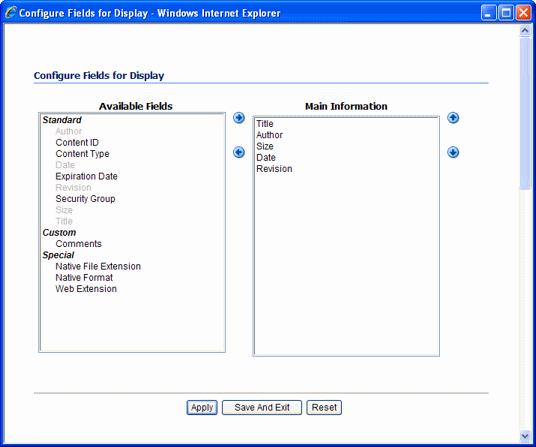
To display this screen, click the Configure button in the Managed Attachments Screen.
| Element | Description |
|---|---|
| Available Fields | Lists fields available for display in the Managed Attachments screen. Click the right arrow to move a selected field to the Main Information area. Fields selected for display are shown in dimmed characters. |
| Main Information | Lists fields selected for display in the Managed Attachments screen. Fields are displayed left to right in the order in which they are listed in this area. Click the up or down arrow button to reposition a selected field. |
| Apply | Click to preview your changes in the Managed Attachments screen. If needed, temporarily reposition the Configure Fields for Display screen to view screen changes. |
| Save And Exit | Click to save changes to the display configuration and return to the Managed Attachments screen. |
| Reset | Click to cancel any changes and restore the default display settings. |
B.4 Content Information Screen
Use the Content Information screen to view details about the attached file, view its web-viewable or native version, and check out or delete the document.
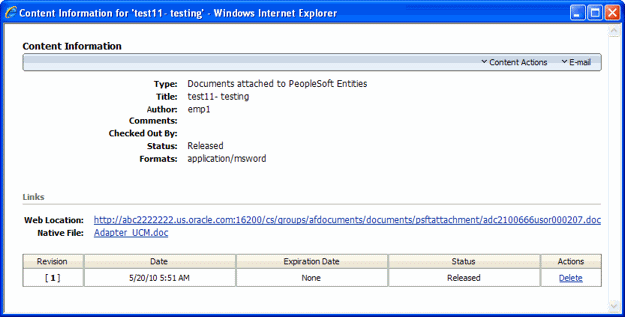
To display this screen, click the Info button shown below for a selected attached document in the Managed Attachments Screen.
B.5 Info Update Form
Use the Update Info Form to make changes to a selected document's metadata values. Users search for documents on the Content Server by their metadata values.
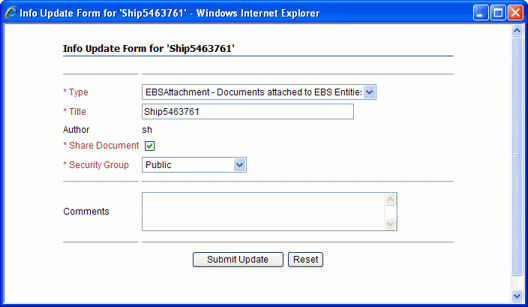
To display this screen, click the Info icon for a selected attachment in the Managed Attachments Screen, then choose Update from the Content Actions menu on the Content Information Screen.
| Element | Description |
|---|---|
| Type | Select the option that best describes the file. |
| Title | Enter a descriptive title for the document. |
| Author | Identifies the user who checked in the current document revision. |
| Share Document | Select this field to make the document available to other Content Server users with appropriate access. Leave the field deselected (default) to make the document available when viewed through the business application but hidden from the standard Content Server user interface. |
| Security Group | Specifies access permission to the file. You can enter text or select from the list of predefined values. |
| Comments | Enter notes about the document. |
| Submit Update | Click to save the metadata changes to the attached document. |
| Reset | Click to cancel metadata changes and restore them to their values upon entering this screen. |
B.6 Scan Document Screen
Use the Scan Document screen to specify the type of document to scan or import, and then attach to the business application entity.
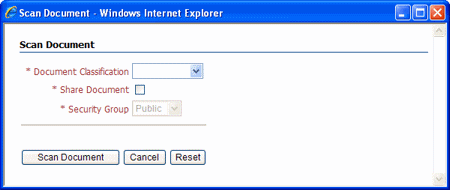
To display this screen, click the Scan button in the Managed Attachments Screen.
| Element | Description |
|---|---|
| Document Classification | Identify the type of document to be scanned or imported. |
| Share Document | Select this field to make the document available to other Content Server users with appropriate access. Leave the field deselected (default) to make the document available when viewed through the business application but hidden from the standard Content Server user interface. |
| Security Group | Select a group for the document.
|
| Scan Document | Click to begin scanning or importing the document. |
| Cancel | Click to exit without scanning or importing. |
| Reset | Click to cancel any selections and restore the default settings in this screen. |
B.7 Expanded Search Form
This search screen enables you to search the Content Server for documents to attach to the selected business application record. After specifying search criteria and clicking Search, results are listed in the Search Results Screen.
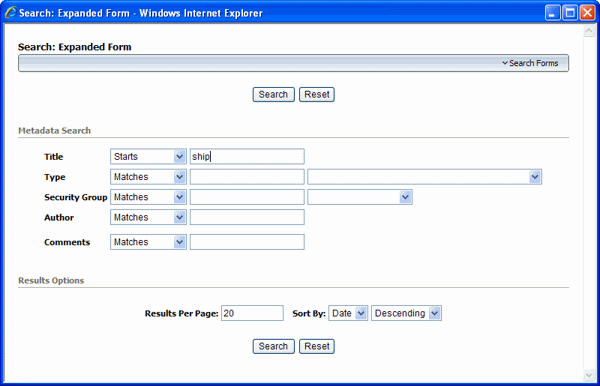
To display this screen, click the From Repository button in the Managed Attachments Screen. Alternatively, click the Search Within button to search within the results list.
| Element | Description |
|---|---|
| Title | Select an operator and enter a document title. |
| Type | Select an operator and select a document type. |
| Security Group | Select an operator and search for the document's security group. To search for private documents, select AFDocuments as the security group. |
| Author | Select an operator and search for the person who checked in the file. |
| Comments | Specify an operator and search for files by their comments. |
| Results Per Page | Determines the number of results that are displayed on the search results page. |
| Sort By | Determines which of the following options are used to sort the targeted search results, and whether those results are listed in ascending or descending (default) order:
|
| Search Forms | Switch between the expanded and query builder search forms. |
| Search | Click to perform the search using the selected search criteria. |
| Reset | Restores the screen to its default settings. |
B.8 Search Results Screen
This screen displays the results of a Content Server repository or Search Within search.
-
In the case of a repository search, the Search Results screen allows you to attach one or more documents.
-
In the case of a Search Within search, the screen is viewable but you cannot attach documents.
You can also save or restrict your search using standard Content Server query actions.
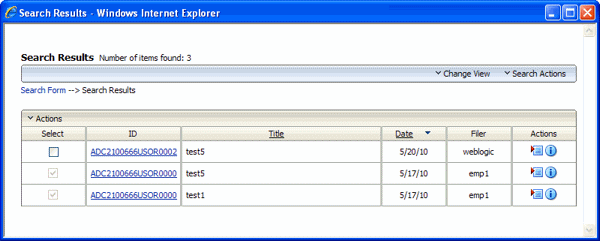
To display this screen, click the From Repository or Search Within button in the Managed Attachments Screen, specify a search in the Expanded Search Form, and click Search.