7 Examples: Data Transformation Using XQuery Mapper
This chapter provides a tutorial for performing data transformation with XQuery Mapper.
The examples described here are based on the sample project that is included in the product. For information about opening the sample project, see Section 6.2, "Importing the XQuery Mapper Sample Project."
Examples are provided for the following scenarios:
-
Section 7.2, "Mapping Repeating Elements and Creating Joins"
-
Section 7.4, "Creating Repeating-Source to Nonrepeating-Target Transformations"
-
Section 7.5, "Creating Nonrepeating-Source to Repeating-Target Transformation"
7.1 Combining Data from Different Schemas
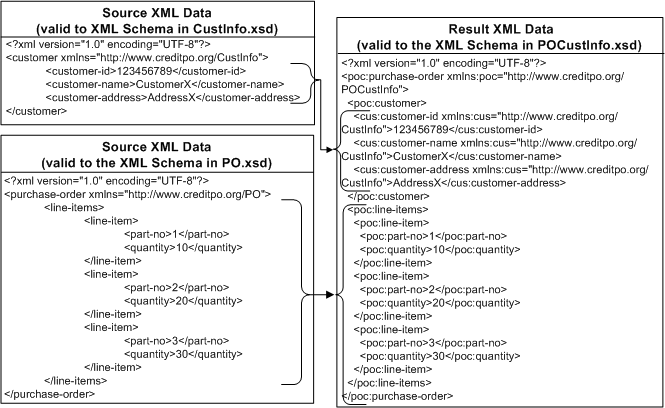
You can use XQuery Mapper to combine content from two different schemas, as shown in the following figure.
Figure 7-1 Combining Data From Different Schemas
Description of "Figure 7-1 Combining Data From Different Schemas"
In this example, customer data (valid against CustInfo.xsd) is merged with a repeating element line-items (valid against PO.xsd) to form a single XML document that is valid against the POCustInfo.xsd schema.
-
Launch Eclipse and open the sample project.
-
For information about launching Eclipse, see Section 6.1, "Launching XQuery Mapper."
-
For information about opening the sample project, see Section 6.2, "Importing the XQuery Mapper Sample Project."
-
-
Right-click the XQuery Transformations folder.
-
Choose New > XQuery Transformation.
-
Verify the name of the parent folder. For this example, the parent folder is /XQuery Transformation/XQueryTransformations.
-
Enter combineData as the file name and click Next.
-
Select the following source elements and click Next:
-
CustInfo.xsd\customer
-
PO.xsd\purchase-order
-
-
Select
POCustInfo.xsd\purchase-orderas the target element and click Finish.The combineData.xq file is created in the /XQuery Transformation/XQueryTransformations folder.
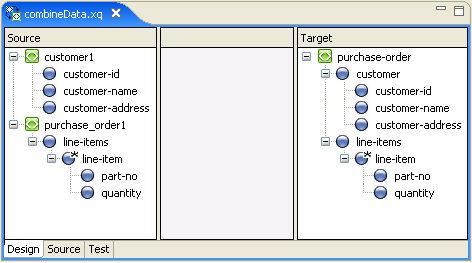
The source and target elements that you selected are displayed in the Design view, as shown in the following figure.
Figure 7-2 Design View of XQuery Transformation
Description of "Figure 7-2 Design View of XQuery Transformation"
-
Create links between the following source and target elements by dragging elements from the Source pane to the Target pane.
Source Element Link Image Target Element customer1

purchase-order\customer
customer1\customer-id

purchase-order\customer\customer-id
customer1\customer-name

purchase-order\customer\customer-name
customer1\customer-address

purchase-order\customer\customer-address
purchase_order1\line-items\line-item

purchase-order\line-items\line-item
purchase-order1\line-items\line-item\part-no

purchase-order\line-items\line-item\part-no
purchase-order1\line-items\line-item\quantity

purchase-order\line-items\line-item\quantity
Note:
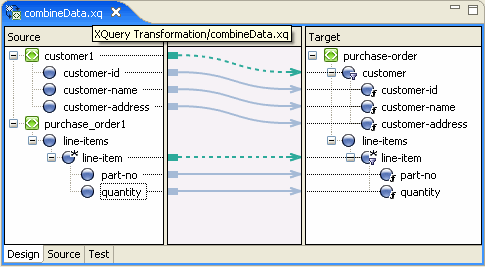
Dotted lines represent Structural links, which are created between parent structures and do not map data directly.
Solid lines represent Data links, which convert the value of the source node directly to the value of the target node.
For more information, see Section 6.10, "Graphical Features in Design View."
The links between the Source and Target elements are displayed, as shown in the following figure.
Figure 7-3 Data Transformation in Design View
Description of "Figure 7-3 Data Transformation in Design View"
-
Save the changes.
For information about testing XQuery transformations, see Section 6.9, "Testing Data Transformations."
7.2 Mapping Repeating Elements and Creating Joins
You can join data from XML files that are valid against different schemas (in this example, PriceQuote.xsd, AvailableQuote.xsd, and taxrate.xsd), and create an XML file that is valid against a single schema: Quote.xsd.
This example includes the following steps:
-
Section 7.2.4, "Step 4. Add Function to Calculate Value of Quote"
-
Section 7.2.5, "Step 5. Add a Constraint with Multiple Conditions"
7.2.1 Step 1. Create an XQuery File
In this step, we create an XQuery transformation by using the AvailQuote.xsd, PriceQuote.xsd, and taxrate.xsd schemas. Then, we map several priceQuote and availRequest source elements to corresponding target elements.
-
Launch Eclipse and open the sample project.
-
For information about launching Eclipse, see Section 6.1, "Launching XQuery Mapper."
-
For information about opening the sample project, see Section 6.2, "Importing the XQuery Mapper Sample Project."
-
-
Right-click the XQuery Transformations folder.
-
Choose New > XQuery Transformation.
-
Verify the name of the parent folder. For this example, the parent folder is /XQuery Transformation/XQueryTransformations.
-
Enter Join as the file name and click Next.
-
Select the following source elements and click Next:
-
PriceQuote.xsd\priceQuote
-
PriceQuote.xsd\taxRate
-
AvailQuote.xsd\availRequest
-
-
Select Quote.xsd\quote as the target element and click Finish.
The Join.xq file is created in the XQueryTransformation/XQueryTransformations folder.
-
Create links between the following source and target elements by dragging elements from the Source pane to the Target pane.
Source Element Target Element priceQuote1\customerName
quote\name
priceQuote1\shipAddress\street
quote\address
priceQuote1\shipAddress\city
quote\address
priceQuote1\shipAddress\state
quote\address
priceQuote1\shipAddress\zip
quote\address
priceQuote1\priceRequests\priceRequest
quote\quoteResponse
availRequest1
quote\quoteResponse
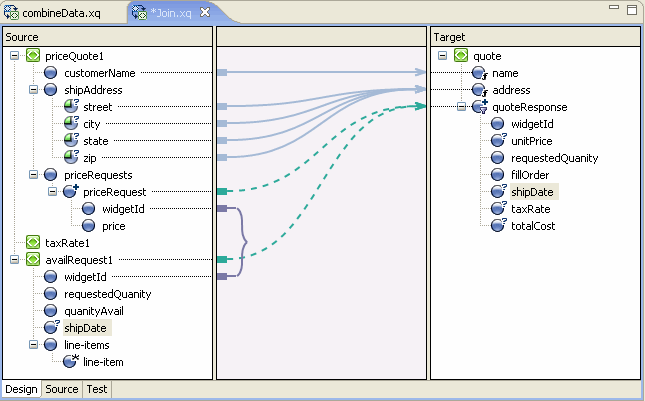
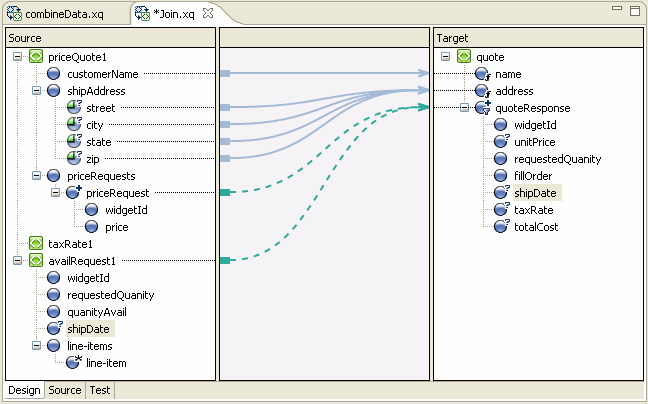
The links are displayed, as shown in the following figure.
Figure 7-4 Data Transformation in Design View
Description of "Figure 7-4 Data Transformation in Design View"
-
Save the changes.
7.2.2 Step 2. Add a Constraint
The priceQuote/priceRequests and availRequest source elements share the common element widgetId. In this step, we add a constraint that if widgetId of the availRequest schema is equal to widgetId of the priceQuote/priceRequests element, then the query must return the target repeating element, quoteResponse.
-
Open Join.xq in the Design view.
-
Drag the
priceQuote1/priceRequests/priceRequest/widgetIdelement from the Source pane and drop it on theavailRequest1/widgetIdelement of the Source pane.A connecting line appears between the two
widgetIdnodes in the Source pane, as shown in the following figure. -
Save the changes.
-
View the changes in the Source view.
The link between the two
widgetIdnodes is represented by a where clause within the for loop. The where clause specifies that the for loop must return the result of the expression only if the where clause is true. In this example, ifwidgetIdof theavailRequestelement is equal towidgetIdof thepriceRequestelement, the expression returns the XML data specified in thequoteResponseelement.Note:
You can also view the where clause in the Constraints view.
The quoteResponse element is currently empty. We add content to the element in the next step.
7.2.3 Step 3. Add Data to Return Element
In this step, we add data links in the quoteResponse target element.
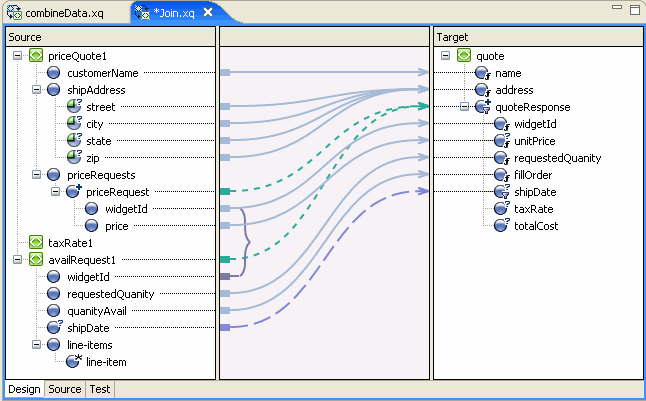
Open Join.xq in the Design view and create links between the following source and target elements:
| Source Element | Target Element |
|---|---|
|
priceQuote1\priceRequests\priceRequest\widgetid |
quote\quoteResponse\widgetid |
|
priceQuote1\priceRequests\priceRequest\price |
quote\quoteResponse\unitprice |
|
availRequest1\requestedQuantity |
quote\quoteResponse\requestedQuantity |
|
availRequest1\quantityAvail |
quote\quoteResponse\fillOrder |
|
availRequest1\shipDate |
quote\quoteResponse\shipDate |
The links between the Source and Target elements are displayed, as shown in the following figure.
Figure 7-6 Adding Data in the QuoteResponse Element
Description of "Figure 7-6 Adding Data in the QuoteResponse Element"
7.2.4 Step 4. Add Function to Calculate Value of Quote
In this step, we add a function to calculate the total value of the quote.
-
Open the Join.xq file in Source view.
-
Insert the following function declaration at any point in the source code between the namespace declarations and the Join function call. You can, for example, insert it just before the Join function declaration.
Example 7-1 calculateTotalPrice Function
declare function xf:calculateTotalPrice( $taxRate as xs:float, $quantity as xs:float, $price as xs:float) as xs:float { let $taxQuantity := ($taxRate * $quantity) let $totalTax := ($taxQuantity * $price) let $costNoTax := ($quantity * $price) let $totalCost := ($totalTax + $costNoTax) return $totalCost }; -
Switch to the Design view.
Note:
Join.xq now includes two function declarations: calculateTotalPrice and Join. When more than one function exists in an XQuery file, the function with the same name as the XQ file is rendered in the Design view. In this case, the Join function is displayed in the Design view.
-
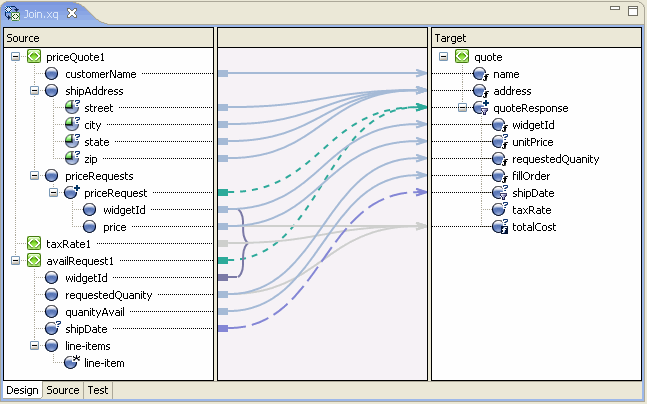
In the Target pane, select the totalCost node. Keep it selected for the next step.
-
Select the Target Expression view and select the General option.
-
Insert the following code in the General Expression pane.
xf:calculateTotalPrice($taxRate1,$availRequest/ns1:requestedQuanity,$priceRequest/ns0:price) -
Click Apply.
The expression is added to the totalCost element in the XQuery.
-
Save the changes.
The Design view shows the calculation for the totalCost target element.
Figure 7-7 totalCost Calculation in Design View
Description of "Figure 7-7 totalCost Calculation in Design View"
7.2.5 Step 5. Add a Constraint with Multiple Conditions
You can create a constraint by using the Where Clause pane of the Constraints view to limit the target repeating elements that are returned by the XQuery. At run time, the for loop in the XQuery iterates over only those repeating elements that satisfy the where clause.
In this step, we add another condition (resulting in a complex condition) to the where clause of the for loop to further limit the data returned by the for loop.
-
Open the join.xq file.
-
In the Design view, select the link between the
availRequest1source element and thequote\quoteResponsetarget element.The single condition that makes up the where clause is displayed in Where Clause pane of the Constraints view.
data($priceRequest/ns0:widgetId) = data($availRequest/ns1:widgetId) -
Drag the
availRequest1/requestedQuanityelement from the Source pane and drop it in the Left Hand Expression area of the Where Clause pane.The left hand expression of the where clause is created as follows:
data($availRequest/ns1:requestedQuanity) -
Select the < operator.
-
Remove the text in the Right Hand Expression area of the Where Clause pane, and enter "50".
Note:
Enter the number 50 within quotation marks ("50", not 50).
-
From the Join Type field select the AND option.
The Join Type determines how the conditions that make up the where clause are evaluated at run time.
-
Click Add. The second condition is added to the where clause of the for loop.
-
Save the changes.
This step completes the creation of the following where clause.
7.2.6 Test the XQuery
Perform the following steps to verify that the XQuery works when both the conditions of the where clause you created are satisfied.
-
Switch to the Test view.
-
In the Source Data pane of the Test view, select
priceQuotein the Source Variable field, and click the Generate Data icon. -
Note the value of the
widgetIdelement in the test XML data.<ns0:widgetId>value</ns0:widgetId> -
In the Source Data pane, select
availRequestin the Source Variable field, and click the Generate Data icon. -
Edit the value the value of the
widgetIdelement in the test XML data to match the value displayed in thepriceQuotetest XML data.<ns0:widgetId>value</ns0:widgetId> -
Locate the
requestedQuanityelement and edit the value to a number less than 50.For example:
<ns0:requestedQuanity>25</ns0:requestedQuanity> -
In the Result Data pane, click the Test XQuery icon and view the results of the XQuery.
7.3 Creating Unions
In this example, we use the Union option in the Constraints view to construct an XQuery that maps data of the same type into larger sets of data.
-
Launch Eclipse and open the sample project.
-
For information about launching Eclipse, see Section 6.1, "Launching XQuery Mapper."
-
For information about opening the sample project, see Section 6.2, "Importing the XQuery Mapper Sample Project."
-
-
Right-click the XQuery Transformations folder.
-
Choose New > XQuery Transformation.
-
Verify the name of the parent folder. For this example, the parent folder is /XQuery Transformation/XQueryTransformations.
-
Enter union as the file name and click Next.
-
In the Source Types dialog box, select
PO.xsd\purchase-ordertwice, and then click Next.Note:
To add an element more than once, you must change the parameter name.
-
Select
Order.xsd\orderas the target type and then click Finish.The union.xq file is created.
-
Create links between the following source and target elements:
Source Element Target Element purchase-order1\line-items\line-item
order\items\item
purchase-order2\line-items\line-item
order\items\item
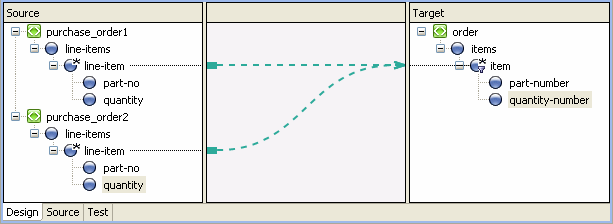
The following figure shows how the links appear in the Design view.
-
Select the link between the
$purchase-order1/line-items/line-itemsource element and theorder/items/itemtarget element. -
In the Constraint Type pane of the Constraints view, select Union.
-
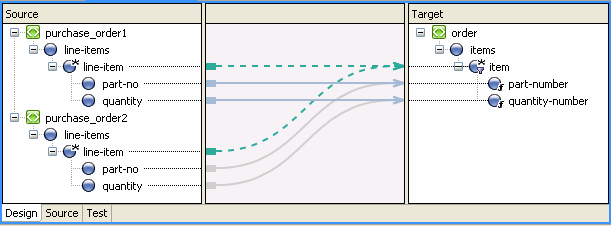
Create links between the following source and target elements:
Source Element Target Element purchase-order1\line-items\part-no
order\items\item\part-number
purchase-order1\line-items\quantity
order\items\item\quantity-number
Note:
When you want to create links between source and target elements of the same name, you can use the Induce Map option instead of creating the links manually. For more information, see Section 6.10.1, "Right-Click Menu Options."
Since the two structural links have a union constraint, a set of implied data links between the second set of subelements is generated as shown in Figure 7-9. The gray lines represent implied links that were created because Union was selected as the constraint type.
-
Save the changes.
For information about testing XQuery transformations, see Section 6.9, "Testing Data Transformations."
7.4 Creating Repeating-Source to Nonrepeating-Target Transformations
In this example, we map a repeating source XML element to a nonrepeating target XML element.
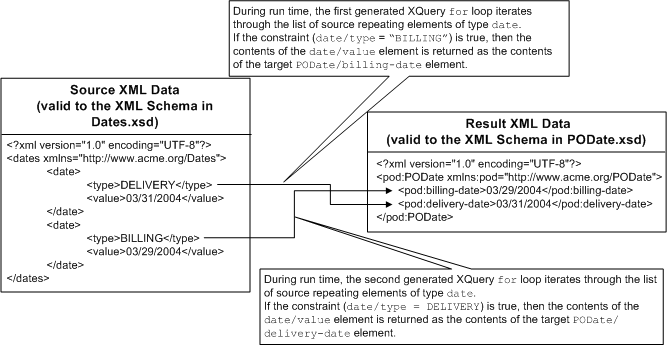
The following figure depicts the transformations that we create in this example.
Figure 7-10 Repeating-Source–to–Nonrepeating Target Transformation
Description of "Figure 7-10 Repeating-Source–to–Nonrepeating Target Transformation"
-
Launch Eclipse and open the sample project.
-
For information about launching Eclipse, see Section 6.1, "Launching XQuery Mapper."
-
For information about opening the sample project, see Section 6.2, "Importing the XQuery Mapper Sample Project."
-
-
Right-click the XQuery Transformations folder.
-
Choose New > XQuery Transformation.
-
Verify the name of the parent folder. For this example, the parent folder is
/XQuery Transformation/XQueryTransformations. -
Enter
repeatToNonRepeatas the file name and click Next. -
Select
Dates.xsd\datesas the source schema and click Next. -
Select
PODate.xsd\PODateas the target schema and click Finish.The repeatToNonRepeat.xq file is created and displayed, as shown in the following figure.
Figure 7-11 Repeating-Source–to–Nonrepeating-Target Data Transformation

Description of "Figure 7-11 Repeating-Source–to–Nonrepeating-Target Data Transformation"
-
Create a link between the
dates1/daterepeating element in the Source pane and thePODate/billing-dateelement in the Target pane.Keep this link selected for the next step.
-
Select the Constraints view.
-
Drag the
dates1/date/typeelement from the Source pane to the Left Hand Expression area of the Where Clause pane in the Constraints view. -
Select the = operator.
-
In the Right Hand Expression area, enter "BILLING" (including the quotation marks), and click Add.
-
Create a link between the
dates1/date/valueelement in the Source pane and thePODate/billing-dateelement in the Target pane.The constraint that you created in the preceding steps specifies that the value of the
dates1/date/typeelement in an XML document must be compared with the value "BILLING".At run time, if the value of the
dates1/date/typeelement is "BILLING", the XQuery returns the value ofdates1/date/valueas the value ofbilling-date. -
Create a link between the
dates1/daterepeating element in the Source pane andPODate/delivery-dateelement in the Target pane.Keep this link selected for the next step.
-
Drag the
dates1/date/typeelement from the Source pane to the Left Hand Expression area of the Where Clause pane in the Constraints view. -
Select the = operator.
-
In the Right Hand Expression area, enter "DELIVERY" (including the quotation marks), and click Add.
-
Create a link between the
dates1/date/valuerepeating element in the Source pane andPODate/delivery-dateelement in the Target pane.The constraint created in the preceding steps specifies that the value of the
dates1/date/typeelement in an XML document must be compared to the value "DELIVERY".At run time, if the value of the
dates1/date/typeelement is "DELIVERY", the XQuery returns the value ofdates1/date/valueas the value ofdelivery-date.Figure 7-12 Repeating-Source–to–Nonrepeating-Target Data Transformation

Description of "Figure 7-12 Repeating-Source–to–Nonrepeating-Target Data Transformation"
-
Save the changes.
For information about testing XQuery files, see Section 6.9, "Testing Data Transformations."
7.5 Creating Nonrepeating-Source to Repeating-Target Transformation
In this example, we map a nonrepeating source element to a repeating target element.
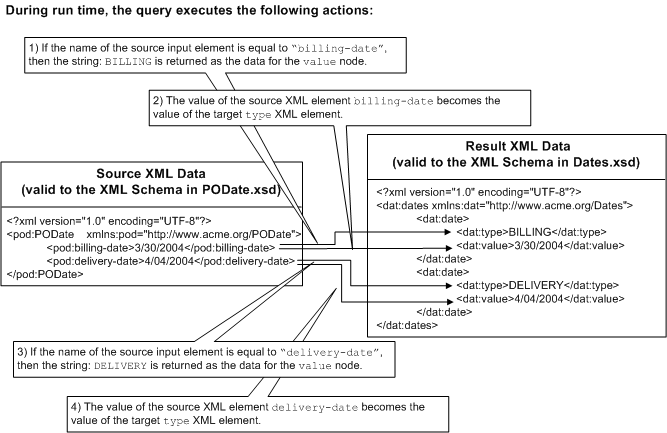
The following figure depicts the transformations that we create in this example.
Figure 7-13 Nonrepeating-Source–to–Repeating-Target Transformation
Description of "Figure 7-13 Nonrepeating-Source–to–Repeating-Target Transformation"
-
Launch Eclipse and open the sample project.
-
For information about launching Eclipse, see Section 6.1, "Launching XQuery Mapper."
-
For information about opening the sample project, see Section 6.2, "Importing the XQuery Mapper Sample Project."
-
-
Right-click the XQuery Transformations folder.
-
Choose New > XQuery Transformation.
-
Verify the name of the parent folder. For this example, the parent folder is /XQuery Transformation/XQueryTransformations.
-
Enter
nonRepeatToRepeatas the file name and click Next. -
Select
PODate.xsd\PODateas the source schema and click Next. -
Select
Dates.xsd\datesas the target schema and click Finish. -
The nonRepeatToRepeat.xq file is created and displayed in the Design view.
-
Create links between the following source and target elements:
Source Element Target Element pODate1/billing-date
dates/date
pODate1/delivery-date
dates/date
The following example shows the XQuery code that is generated.
<ns1:dates>
{
  for $PODate in $PODate1/ns0:billing-date union $PODate1/ns0:delivery-date
  return
  <ns1:date/>
}
</ns1:dates>
At run time, the for loop is executed twice. In the first execution, the iteration variable
$PODateis equal to the first element in the union$PODate1/ns0:billing-date; in the second execution,$PODateis equal to$PODate1/ns0:delivery-date.The XQuery returns two empty XML elements with the tag
<ns1:date/>.In the following steps, we add the XQuery code to return the billing and delivery dates to the query.
-
Switch to the Design view.
-
Create a link between the
pODate1/billing-datesource element and thedates/valuetarget element in the Target pane.Two data links are created, as shown in the following figure.
Figure 7-14 Creating a Union for Structural Links

Description of "Figure 7-14 Creating a Union for Structural Links"
The following structural links were joined when we created the link from
pODate1/billing-datetodates/value.-
pODate1/billing-datetodates/date -
pODate1/delivery-datetodates/date
A second data link between the
pODate1/delivery-dateelement anddates/valueelement was created automatically. -
-
Create a link between the
pODate1/billing-datesource element and thedates/typetarget element.Two data links are created.
Keep the
pODate1/billing-datetodates/typelink selected for the next step. -
Select the Target Expression view.
-
Select the If Then Else option.
The following XQuery if-then-else expression is added to the link:
if (fn:boolean("true")) then
    data($PODate)
else
    ()
-
In this step, we add a condition to the if section of the if-then-else expression.
-
Select If Condition in the Expression Structure area.
The Edit If Condition pane is displayed.
-
In the Expression Functions view, expand Node Functions.
-
Drag the local-name function to the Left Hand Expression area of the Edit If Condition pane. Leave the $node-var argument in the function selected.
-
Select the Expression Variables view.
-
Drag the
PODatestructural link variable to the $node-var argument of the local-name function in the Left Hand Expression area of the Edit If Condition pane. -
Select the = operator.
-
In the Right Hand Expression area of the Edit If Condition pane, enter "billing-date" (including quotation marks), and then click Add.
The following condition is added to the if section of the if-then-else expression:
fn:local-name($PODate)="billing-date"
-
-
Select Then Expression in the Expression Structure area.
The Edit Then Condition pane is displayed.
-
Replace the existing text with "BILLING" (including quotation marks), and then click the Apply icon.
-
Select Else Expression in the Expression Structure area.
The Edit Else Condition pane is displayed.
-
Replace the existing text with "DELIVERY" (including quotation marks), and then click the Apply icon.
-
Select If Then Else in the Expression Structure area.
The following XQuery code is displayed in the Expression Structure pane.
if (fn:local-name($PODate) = "billing-date") then
"BILLING"
else
"DELIVERY"
-
Save the changes.
For information about testing XQuery files, see Section 6.9, "Testing Data Transformations."
7.6 Creating Nested If-Then-Else Expressions
In this example, we create an XQuery transformation that calculates price based on a widget ID and tax rate for a state. We create an if-then-else expression for the following logic:
-
If widget ID is from 0 to 200, the price is $10.00
-
Else if the widget ID is from 201 to 400, price is $20.00
-
Else If the widget ID is from 401 to 600, price is $30.00
This example includes the following steps:
-
Section 7.6.3, "Step 3. Create the First Nested If-Then-Else Condition"
-
Section 7.6.4, "Step 4. Create the Second Nested If-Then-Else Condition"
7.6.1 Step 1. Create the XQuery Transformation
In this step, we create an XQuery transformation by using the PurchaseAgree.xsd and Supplier.xsd schemas.
-
Launch Eclipse and open the sample project.
-
For information about launching Eclipse, see Section 6.1, "Launching XQuery Mapper."
-
For information about opening the sample project, see Section 6.2, "Importing the XQuery Mapper Sample Project."
-
-
Right-click the XQuery Transformations folder.
-
Choose New > XQuery Transformation.
-
Verify the name of the parent folder. For this example, the parent folder is /XQuery Transformation/XQueryTransformations.
-
Enter ifthenelse as the file name and click Next.
-
Select
Supplier.xsd\Supplieras the source type and click Next. -
Select
PurchaseAgree.xsd\PurchaseOrderas the target type and click Finish.The ifThenElse.xq file is created.
-
Create links between the following source and target elements.
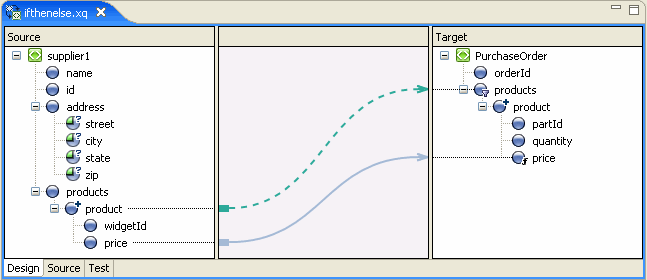
Source Element Target Element supplier1/products/product
PurchaseOrder/products/product
supplier1/products/product/price
PurchaseOrder/products/product/price
The links are displayed, as shown in the following figure.
Figure 7-15 XQuery Transformation for If-Then-Else Example
Description of "Figure 7-15 XQuery Transformation for If-Then-Else Example"
7.6.2 Step 2. Create the First "If" Condition
In this step, we create an If expression to specify that if the widget ID is from 0 to 200, then the price is $10.00.
-
Select the link between the
supplier1/products/product/pricesource element and thePurchaseOrder/products/product/pricetarget element. -
Select the Target Expression view.
-
Select the If Then Else expression type.
-
In the Expression Structure pane, select If Condition.
The Edit If Condition pane is displayed.
-
Drag the
supplier1\products\product\widgetIDelement from the Source pane and drop it in the Left Hand Expression pane. -
Select the >= operator.
-
In the Right Hand Expression pane, enter "0" (including quotation marks), and click Add.
-
Select the <= operator.
-
In the Right Hand Expression pane, enter "200".
-
Click the arrow next to the Update button and select Add.
-
In the Expression Structure pane, select Then Condition.
The Edit Then Condition pane is displayed.
-
In the Edit Then Expression pane, delete the existing data and enter "$10.00".
-
Click the Apply icon.
-
In the Expression Structure pane, select If Then Else.
The if-then expression is displayed as shown in the following listing.
7.6.3 Step 3. Create the First Nested If-Then-Else Condition
In this step, we create an If expression to specify that if the widget ID is from 201 to 400, then the price is $20.00. To accomplish this, we insert a nested if-then-else inside the Else expression we created in the previous step.
-
In the Expression Structure pane, right-click Else Expression, and select Insert Nested If-Then-Else.
-
In the nested If-Then-Else expression, select If Condition.
-
From the Source pane, drag the
widgetIDelement and drop it in the Left Hand Expression pane. -
Select the >= operator.
-
In the Right Hand Expression pane, enter "201" (including quotation marks), and click Add.
-
Select the <= operator.
-
In the Right Hand Expression pane, enter "400".
-
Click the arrow next to the Update button and select Add.
-
In the Expression Structure pane, select Then Expression.
-
In the Edit Then Expression pane, enter "$20.00".
-
Click the Apply icon.
-
In the Expression Structure pane, select If Then Else.
The if-then-else expression appears as shown in the following listing.
7.6.4 Step 4. Create the Second Nested If-Then-Else Condition
In this step, we create an If expression to specify that if the widget ID is from 401 to 600, then the price is $30.00. To accomplish this, we insert a nested if-then-else expression within the Else expression that we created in the previous step.
-
In the Expression Structure pane, select the Else clause of the nested if-then-else expression created in Section 7.6.3, "Step 3. Create the First Nested If-Then-Else Condition."
-
Right-click and select Insert Nested If-Then-Else.
-
Select the If condition in the nested if-then-else expression that we just created.
-
From the Source pane, drag
widgetIDand drop it in the Left Hand Expression pane. -
Select the >= operator.
-
In the Right Hand Expression pane, enter "401", and then click Add.
-
Select the <= operator.
-
In the Right Hand Expression pane, enter "600", and then click Add.
-
In the Expression Structure pane, select Then Expression.
-
In the Edit Then Expression pane, enter "$30.00", and click the Apply icon.
-
In the Expression Structure pane, select If Then Else.
The nested if-then-else expression is as shown in the following listing.
Example 7-5 Nested If-Then-Else Expression
if ((xs:string(data($product/ns0:widgetId)) >= "0"
   and xs:string(data($product/ns0:widgetId)) <= "200")) then
      "$10.00"
else
   if ((xs:string(data($product/ns0:widgetId)) >= "201"
      and xs:string(data($product/ns0:widgetId)) <= "400")) then
      "$20.00"
   else
      if ((xs:string(data($product/ns0:widgetId)) >= "401"
         and xs:string(data($product/ns0:widgetId)) <= "600")) then
         "$30.00"
      else
         ()
For information about testing XQuery files, see Section 6.9, "Testing Data Transformations."
7.7 Creating FLWOR Expressions
In this example, we use a For-Let-Where-Order By-Return expression to extract widget IDs from a quotation, for items with a total value more than 2000.
-
Create the XQuery file.
-
Launch Eclipse and open the sample project.
-
For information about launching Eclipse, see Section 6.1, "Launching XQuery Mapper."
-
For information about opening the sample project, see Section 6.2, "Importing the XQuery Mapper Sample Project."
-
-
Right-click the XQuery Transformations folder.
-
Choose New > XQuery Transformation.
-
Verify the name of the parent folder.
-
Enter flwor as the file name and click Next.
-
Select
Quote.xsd\quoteas the source type and click Next. -
Select
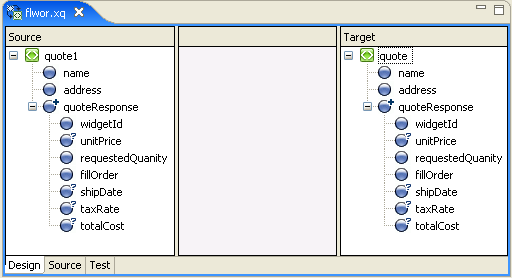
Quote.xsd\quoteas the target type and click Finish.The flwor.xq file is created, as shown in the following figure.
Figure 7-16 XQuery Example - FLWOR Expression
Description of "Figure 7-16 XQuery Example - FLWOR Expression"
-
-
Design the Let clause.
Note:
For this example, the let clause is not essential. It is used here merely to illustrate how to design it in XQuery Mapper.
-
In the Expression Structure pane, select Let Clause.
The Edit Let Clause pane is displayed.
-
In the Variable field, replace the existing value with
widget. -
Select the Expression Variables view.
-
Expand the
quotenode within the Structural Link folder. -
Drag
quote/widgetIDfrom the Expression Variables view and drop it in the Single Expression field. -
Click Update.
-
-
Design the Where clause.
-
In the Expression Structure pane, right-click For...Return and select Insert Where Clause.
-
Select Where Clause.
The Edit Where Condition pane is displayed.
-
Drag
quote/totalCostfrom the Structural Link folder of the Expression Variables view, and drop it in the Left Hand Expression field. -
Select the > operator.
-
Enter 2000 in the Right Hand Expression area.
-
Click Add.
-
-
Design the Order By clause.
-
In the Expression Structure pane, right-click For...Return, and select Insert Order By Clause.
-
Select Order By Clause.
The Edit Order By Clause pane is displayed.
-
In the Sort Order field, select ascending.
-
In the Single Expression field, enter $widget, which is the name of the variable that is declared in the let clause.
-
Click Update.
-
-
Design the Return expression.
-
In the Expression Structure pane, select Return Expression.
-
In the Expression Variables view, expand the Structural Link folder.
-
Drag
quotefrom the Expression Variables view, and drop it in the Single Expression field. -
Click the Apply icon.
-
-
Save the changes.
You can view the source code of the FLWOR expression by selecting For...Return in the Expression Structure pane. The code is as shown in the following listing.
Example 7-6 Code for FLWOR Expression
for $quote in ($quote1/quoteResponse)
let $widget := ($quote/widgetId)
where $quote/totalCost > 2000
order by $widget ascending
return
    $quote
For information about testing XQuery transformations, see Section 6.9, "Testing Data Transformations."
7.8 Using Recursive Schemas
In this example, we create a data transformation with schemas that have recursive elements.
An element in a schema is considered recursive when it contains a child element of the same type as the parent, as shown in the example in Example 7-7. In this example, the product element is a recursive element because it is of type productType, and productType contains a child-product element which is also of type productType (productType refers to itself).
Example 7-7 Example of Recursive Schema
<?xml version="1.0"?>
<xs:schema xmlns:xs="http://www.w3.org/2001/XMLSchema"
   targetNamespace="http://www.acme.org/Product"
   xmlns="http://www.acme.org/Product" elementformDefault="qualified"
   attributeFormDefault="unqualified">
   <xs:complexType name="productType">
      <xs:sequence>
         <xs:element name="part-description" minOccurs="0"
            maxOccurs="unbounded" type="xs:string" />
         <xs:element name="child-product" minOccurs="0"
            maxOccurs="unbounded" type="producttype" />
      </xs:sequence>
   </xs:complexType>
   <xs:element name="product" type="productType">
   </xs:element>
</xs:schema>
Perform the following steps to create a transformation with recursive schemas:
-
Launch Eclipse and open the sample project.
-
For information about launching Eclipse, see Section 6.1, "Launching XQuery Mapper."
-
For information about opening the sample project, see Section 6.2, "Importing the XQuery Mapper Sample Project."
-
-
Right-click the XQuery Transformations folder.
-
Choose New > XQuery Transformation.
-
Verify the name of the parent folder. For this example, the parent folder is /XQuery Transformation/XQueryTransformations.
-
Enter recursive as the file name and click Next.
-
Select
SupplierAcme.xsd\supplier_acmeas the source schema and click Next. -
Select
Product.xsd\productas the target schema and click Finish.The recursive.xq file is created.
-
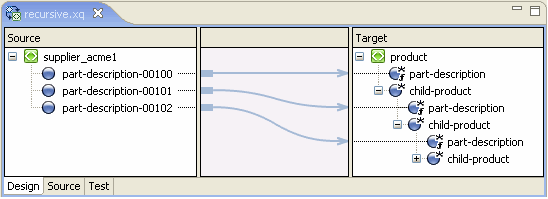
Create links between the following source and target elements:
Source Element Target Element supplier_acme1\part-description-00100
product\part-description
supplier_acme1\part-description-00101
product\child-product\part-description
supplier_acme1\part-description-00101
product\child-product\child-product\part-description
The following figure shows the links from the source elements to the recursive
child-producttarget elements. -
Save the changes.
For information about testing XQuery files, see Section 6.9, "Testing Data Transformations."
7.9 Grouping Data by Key Fields
You can use the Group by Key Fields feature to group data based on one or more key values.
Note:
The Group-By feature is not supported graphically in XQuery Mapper and there is no representation of the XQuery in the Design view. You must write the Group-By expression in the Source view.
The following listing shows the XML document that we use as input in this example.
Example 7-8 Example Input XML Document
<input-warehouse-inventory xmlns="http://www.creditpo.org/repkeyin">
<input-line-item>
   <input-warehouse-id>Warehouse1</input-warehouse-id>
   <input-location-desc>Location1</input-location-desc>
   <input-part-no>1</input-part-no>
   <input-quantity>10</input-quantity>
</input-line-item>
<input-line-item>
   <input-warehouse-id>Warehouse2</input-warehouse-id>
   <input-location-desc>Location2</input-location-desc>
   <input-part-no>2</input-part-no>
   <input-quantity>20</input-quantity>
</input-line-item>
<input-line-item>
   <input-warehouse-id>Warehouse1</input-warehouse-id>
   <input-location-desc>Location1</input-location-desc>
   <input-part-no>3</input-part-no>
   <input-quantity>30</input-quantity>
</input-line-item>
</input-warehouse-inventory>
In this example, we use the input-warehouse-id and input-location-desc elements as the key fields to group data in the output document:
The first and third instances of the input-line-item repeating element contain the same values for the input-warehouse-id and input-location-desc elements: Warehouse1 and Location1 respectively.
The goal of this example is to write an XQuery that groups the first and third instances of the line items, by using the Warehouse1 and Location1 keys in the output document, as shown in Example 7-9.
Example 7-9 Example Output XML Document
<ns0:output-inventory xmlns:ns0="http://www.creditpo.org/repkeyout";>
   <ns0:output-warehouse-inventory>
      <ns0:output-warehouse-id>Warehouse1</ns0:output-warehouse-id>
      <ns0:output-location-desc>Location1</ns0:output-location-desc>
      <ns0:output-line-item>
         <ns0:output-part-no>1</ns0:output-part-no>
         <ns0:output-quantity>10</ns0:output-quantity>
      </ns0:output-line-item>
      <ns0:output-line-item>
         <ns0:output-part-no>3</ns0:output-part-no>
         <ns0:output-quantity>30</ns0:output-quantity>
      </ns0:output-line-item>
   </ns0:output-warehouse-inventory>
   <ns0:output-warehouse-inventory>
      <ns0:output-warehouse-id>Warehouse2</ns0:output-warehouse-id>
      <ns0:output-location-desc>Location2</ns0:output-location-desc>
         <ns0:output-line-item>
            <ns0:output-part-no>2</ns0:output-part-no>
            <ns0:output-quantity>20</ns0:output-quantity>
         </ns0:output-line-item>
   </ns0:output-warehouse-inventory>
</ns0:output-inventory>
Perform the following steps to create a Group-By expression:
-
Launch Eclipse and open the sample project.
-
For information about launching Eclipse, see Section 6.1, "Launching XQuery Mapper."
-
For information about opening the sample project, see Section 6.2, "Importing the XQuery Mapper Sample Project."
-
-
Right-click the XQuery Transformations folder.
-
Choose New > XQuery Transformation.
-
Verify the name of the parent folder. For this example, the parent folder is /XQuery Transformation/XQueryTransformations.
-
Enter groupby as the file name and click Next.
-
Select
regroupKeyFldIn.xsd\input-warehouse-inventoryas the source schema, and click Next. -
Select
regroupKeyFldOut.xsd\output-inventoryas the target schema, and click Finish.The groupby.xq file is created.
-
Select the Source view.
-
Replace the existing code with the code in the following listing.
Example 7-10 XQuery Code for Group-By Expression
declare namespace ns0 = "http://www.creditpo.org/repkeyin"; declare namespace ns1 = "http://www.creditpo.org/repkeyout"; declare function Regrouping($input-warehouse-inventory as element(ns0:input-warehouse-inventory)) as element(ns1:output-inventory) { <ns1:output-inventory> { for $input-line-item in $input-warehouse-inventory/ns0:input-line-item group $input-line-item as $group by $input-line-item/ns0:input-warehouse-id as $key0, $input-line-item/ns0:input-location-desc as $key1 return <ns1:output-warehouse-inventory> <ns1:output-warehouse-id>{ data($key0) }</ns1:output-warehouse-id> <ns1:output-location-desc>{ data($key1) }</ns1:output-location-desc> { for $group0 in $group return <ns1:output-line-item> <ns1:output-part-no>{xs:byte(data($group0/ns0:input-part-no))} </ns1:output-part-no> <ns1:output-quantity>{xs:byte (data($group0/ns0:input-quantity)) } </ns1:output-quantity> </ns1:output-line-item> } </ns1:output-warehouse-inventory> } </ns1:output-inventory> }; declare variable $input-warehouse-inventory as element(ns0:input-warehouse-inventory) external; Regrouping($input-warehouse-inventory) -
Save the changes.
The changes are not visible in the Design view.
-
With the groupby.xq file open in the Source view, select the Test view.
-
In the Source Data pane, click the Import icon.
-
Import the Regrouping.xml file provided in the sample project (from the XML Transformation/XML/ folder).
-
In the Result Data pane, select the Test XQuery icon.
The result of the XQuery is displayed, as shown in Example 7-9.
