A Advanced Tuning of the Metadata
Oracle Studio enables you to define outbound adapter interactions. In addition, Oracle Studio defines input and output structures used for these interactions. The interactions and input and output structures are maintained as metadata by Oracle Studio in the Metadata tab of the Design perspective.
This appendix contains the following sections:
Metadata for the IMS/DB Data Source
Using Oracle Studio, perform the following steps to maintain the metadata for the IMS/DB data source:
-
From the Start menu, select Programs, Oracle, and then select Studio.
-
Expand the Machines folder, then expand the machine with the metada you are working with.
-
Expand the Bindings folder.
-
Expand the NAV binding.
-
Expand the Data sources folder to display the data sources.
-
Right-click the IMS/DB data source and select Show Metada View to display the Metadata view.
The Metedata tab is shown in the following figure:
-
Right-click the table you want to view in the Metadata Explorer and select Edit.
The metadata editor opens, displaying the General tab, with general table details. The following tabs are used to view and edit the metadata:
General Tab
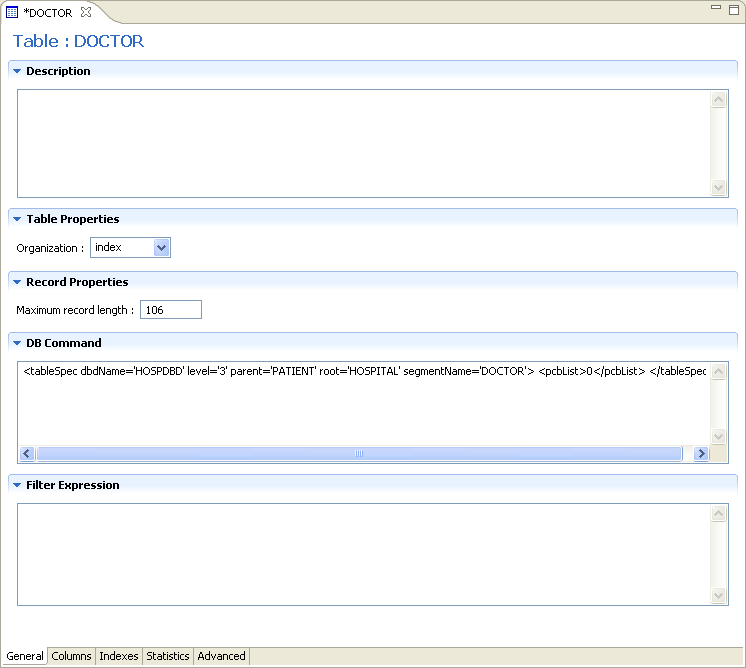
Use the General tab to maintain information about the whole table, such as the table name and the way the table is organized.
The General tab is shown in the following figure:
The General tab comprises fields, as listed in the following table:
Table A-1 General Tab Components
| Field | Description |
|---|---|
|
Description |
An optional description of the table. |
|
Table Properties |
|
|
Data file location |
The name of the file that contains the table. You must enter the full path and include the file extension for the file. For example, Note: Do not enter the file extension for DIASM or CIASM files. |
|
Organization |
Select how the record represented by the table is organized. The options that are displayed depend on the record. The following options are available:
|
|
Record format |
Specifies how the record, represented by the table, is formatted. The options that are displayed depend on the record. The IMS/DB records have a fixed format. |
|
Maximum record length |
The maximum allowable size of a record (in bytes). |
|
DB Command |
IMS/DB specific commands are displayed in the DB Command section of the General tab. The information displayed is generated automatically when the metadata is generated and should not be modified. |
|
Filter Expression |
A |
Columns Tab
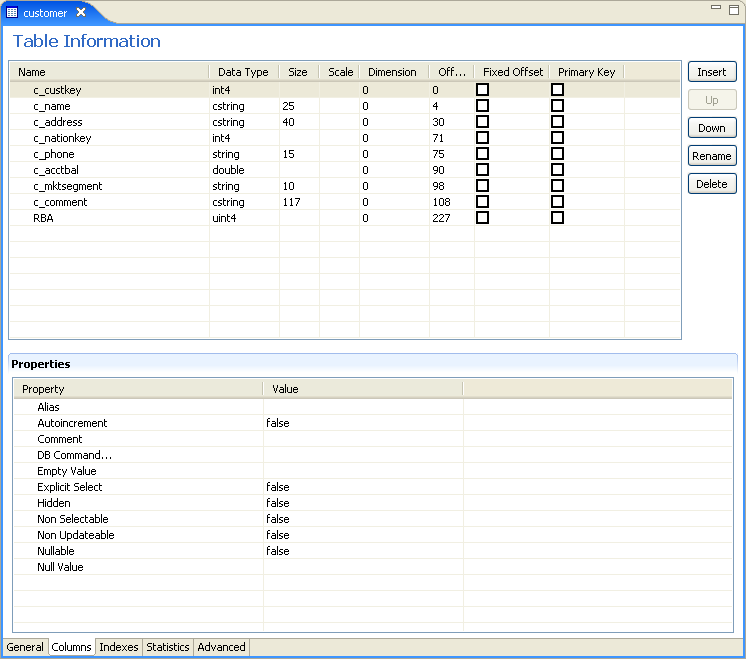
Use the Columns tab to specify metadata that describe the table columns. The tab is divided into the following:
The Columns tab is shown in the following figure:
Column Definition Section
The top section of this tab lets you define the columns in the source data. You can click in any row (which represents a column in the data base table) to edit the information. The following table describes this section.
Table A-2 Metadata Column Tab Definitions
| Field name | Description |
|---|---|
|
Name |
The name of the column |
|
Data type |
The data type of the column. Selecting this field displays a list of possible data types. |
|
Size |
The size of the column |
|
Scale |
The information entered in this field depends on the data type: For decimal data types, this is the number of digits to the right of the decimal place. This number must not be greater than the number of digits. The default value is 0. For scaled data types, this is the total number of digits. The number must be negative. |
|
Dimension |
The maximum number of occurrences of a group of columns that are part of an array. The (+) to the left of a column indicates a group field. This type of field has a Dimension value. Click (+) to display the group members. |
|
Offset |
An absolute offset for the field in a record. |
|
Fixed offset |
This column lets you determine whether to calculate the offset. There are two options:
|
|
Primary Key |
Select this to indicate that this column is a primary key. |
The buttons on the right side of the tab are used to manipulate the data in this section of the tab. The following table describes how you can move around in this section.
Table A-3 Definition Section Buttons
| Button | Description |
|---|---|
|
Insert |
Inserts a column to the table. You can insert a new column. If the table has arrays, you can add a new child column. |
|
Up |
Moves your selection to the column directly above where the currently selected column. |
|
Down |
Moves your selection to the column directly below where the currently selected column |
|
Rename |
Lets you rename the selected column. |
|
Delete |
Deletes the selected column. |
|
Find |
Click this button to open a list of all columns in the database. Select a column and click OK to select it in the table. |
Column Properties
You can change the property value by clicking in the Value column. To display the column properties, select a column from the Column Definition (top) section.
The properties for the column are displayed at the bottom of the tab.
The following table shows some properties available for selected columns.
| Property | Description |
|---|---|
|
Alias |
A name used to replace the default virtual table name for an array. Virtual table names are created by adding the array name to the record name. When an array includes another array the name of the nested array is the name of the record and the parent array and the nested array. When the default generated virtual table name is too long, use an Alias to replace the long name. |
|
Autoincrement |
The current field is updated automatically by the data source during an |
|
Comment |
A short note or description about the column. |
|
DB command |
IMS/DB specific commands for the column The information displayed is generated automatically when the metadata is generated and should not be modified |
|
Empty value |
The value for the field in an insert operation, when a value is not specified. |
|
Explicit Select |
When You cannot use an asterisk (*) in a query where you want to retrieve a field defined with the Explicit Select value. |
|
Hidden |
The current field is hidden from users. The field is not displayed when a |
|
Non Selectable |
When |
|
Non Updateable |
If |
|
Nullable |
This value allows the current field to contain |
|
Null value |
The null value for the field during an insert operation, when a value is not specified. |
|
Chapter of |
This property shows that the set member field is a chapter of an owner field. A value for this property must be used when accessing a set member as a chapter in an ADO application. This property is used for DBMS metadata |
|
OnBit |
The position of the bit in a |
|
Subfield of |
The value is generated automatically when you generate metadata from Adabas data that includes a superdescriptor based on a subfield. A field is created to base this index on, set to the offset specified as the value of the If no value is entered in the |
|
Subfield start |
The offset within the parent field where a subfield starts. |
Indexes Tab
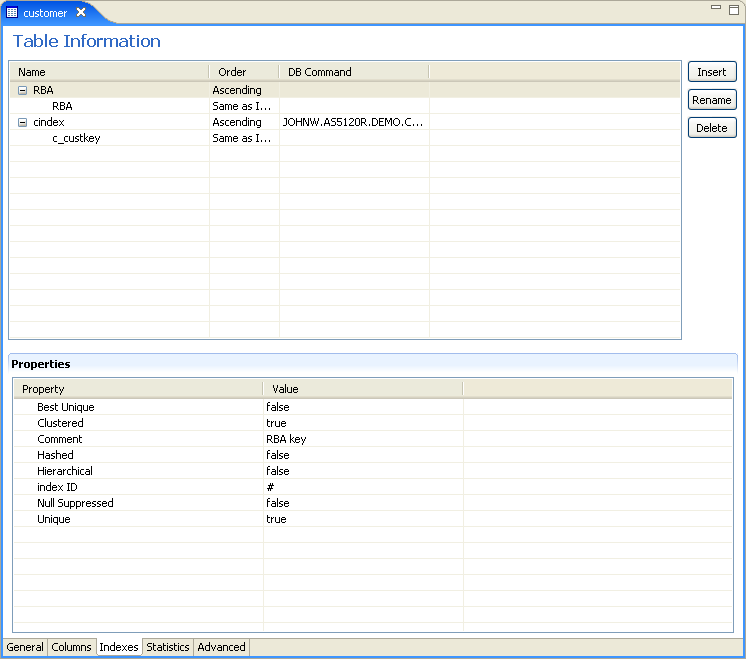
Use the Indexes tab to specify metadata describing the indexes of a table.
Note:
The Indexes tab contains information only if the Organization field in the Table tab is set toIndex.The Indexes tab is shown in the following figure:
This tab has two sections. The first section lets you define the index keys for the columns in the table. The bottom of the tab lists the properties for each of the columns at the top.
The following sections describe the Indexes tab:
Table Information
The following table describes the fields for the top part of the tab, which defines the indexes used for the table.
Table A-5 Indexes Tab Components
| Field | Description |
|---|---|
|
Name |
The names of existing indexes for the current table. |
|
Order |
The ordering of the rows retrieved by the index. |
|
DB Command |
IMS/DB-specific commands for the index. The information displayed is generated automatically when the metadata is generated and should not be modified. |
The buttons on the right side of the tab are used to manipulate the data in this section of the tab. The following table describes how you can move around in this section.
Properties
You can index properties for each index column. To display the index properties, select a column from the Index Definitions (top) section.
The properties for the column are displayed at the bottom of the tab.
This properties displayed at the bottom of the tab describe the index or segment. The properties available depend on the data source.
Statistics Tab
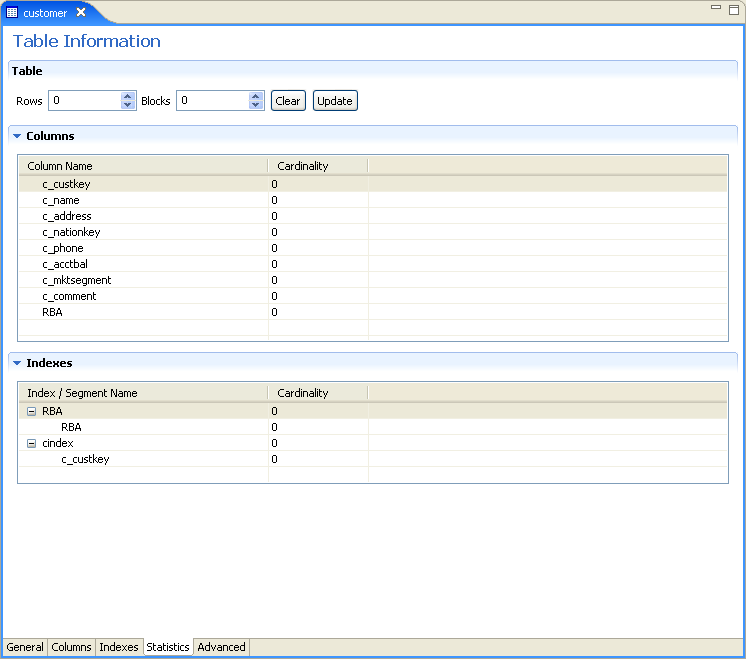
Use the Statistics tab to update statistics for a table. The Statistics tab is shown in the following figure:
The Statistics tab comprises fields as listed in the following tables:
Table A-7 Statistics tab Components
| Field | Description |
|---|---|
|
No. of rows |
The approximate number of rows in the table. If the value is |
|
No. of blocks |
The approximate number of blocks in the table. Note: If neither the number of rows nor the number of blocks is specified for a table, queries over the table might be executed in a nonoptimal manner. |
Use the Columns group box to specify cardinality for each of the columns in the table:
Table A-8 Columns group Components
| Field | Description |
|---|---|
|
Column name |
The columns in the table. |
|
Cardinality |
The number of distinct values for the column. If the value is |
Use the Indexes group box to specify cardinality for the columns in each of the indexes in the table:
Table A-9 Indexes group Components
| Field | Description |
|---|---|
|
Indexes and segments |
The indexes and segments in the table. |
|
Cardinality |
The number of distinct key values in the index. If the value is |
Generating Statistics
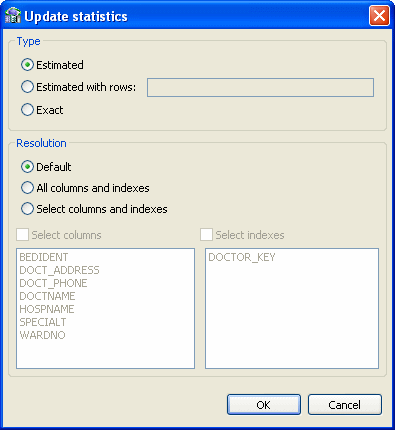
Click Update in the Statistics tab to generate updated statistics for the table. The Update Statistics screen is displayed, as shown in the following figure:
The following tables list the fields that are used to update statistics:
Use the Type group to specify the following:
Table A-10 Type group Components
| Field | Description |
|---|---|
|
Estimated |
An estimation of the amount of statistical information returned. |
|
Estimated with rows |
An estimation of the amount of statistical information returned. The estimate includes an estimation of the number of rows in the table. Specify the number in the text box. This number is used to shorten the time to produce the statistics if the value specified here is the correct value, or close to the correct value. |
|
Exact |
The exact statistical information returned. Note that this can be a lengthy task and can lead to disk space problems with large tables. |
Use the Resolution group to specify the following:
Table A-11 Resolution group Components
| Field | Description |
|---|---|
|
Default |
Only information about the table and indexes is collected. Information for partial indexes and columns is not collected. |
|
All columns and indexes |
Information about the table, indexes, partial indexes and columns is collected. |
|
Select columns and indexes |
Enables you to select the columns and indexes for which you want to collect statistics. In the enabled list of columns or indexes, left click those columns you want included (you can use shift-click and control-click to select multiple columns or indexes). |
Advanced Tab
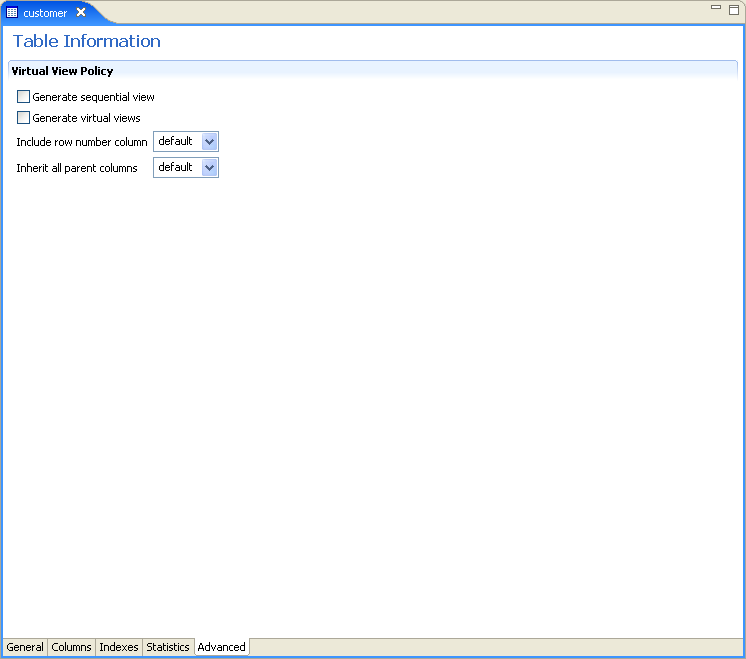
The Advanced tab lets you enter information about the virtual view policy for arrays. These parameters are valid only if you are using virtual array views. The configurations made in this editor are for the selected table, only. The same parameters are configured on the data source level in the data source editor.
Figure A-6 Data Source Metadata Advanced Tab
Description of "Figure A-6 Data Source Metadata Advanced Tab"
Enter the following information in this tab:
-
Generate sequential view: Select this to map non-relational files to a single table.
-
Generate virtual views: Select this to have individual tables created for each array in the non-relational file.
-
Include row number column: Select one of the following:
-
true: Select true, to include a column that specifies the row number in the virtual or sequential view. This is true for this table only, even in the data source is not configured to include the row number column.
-
false: Select false, to not include a column that specifies the row number in the virtual or sequential view for this table even if the data source is configured to include the row number column.
-
default: Select default to use the default data source behavior for this parameter.
-
-
Inherit all parent columns: Select one of the following:
-
true: Select true, for virtual views to include all the columns in the parent record. This is true for this table only, even in the data source is not configured to include all of the parent record columns.
-
false: Select false, so virtual views do not include the columns in the parent record for this table even if the data source is configured to include all of the parent record columns.
-
default: Select default to use the default data source behavior for this parameter.
-
Adapter Metadata
Use Oracle Studio to maintain the metadata for your database adapter.
-
From the Start menu, select Programs, Oracle, and then select Studio.
-
Expand the Machines folder, then expand the machine you are working with.
-
Expand the Bindings folder.
-
Expand the NAV binding.
-
Expand the Adapters folder to display the adapters list.
-
Right-click the adapter, and select Show Metadata View to open the Metadata view.
You can create and edit the adapter metadata as follows:
-
Adapter Metadata General Properties: Enter and edit information about the adapter, such as the adapter name and the way in which you connect to the adapter. You make these changes in the Design perspective, Metadata view.
-
Adapter Metadata Interactions: Enter details of an interaction. The interaction Advanced tab is displayed for some adapters only, such as the Database adapter and includes more details about the interaction.
-
Adapter Metadata Schema Records: The input and output record structure for a record in the adapter definition.
-
Adapter Metadata General Properties
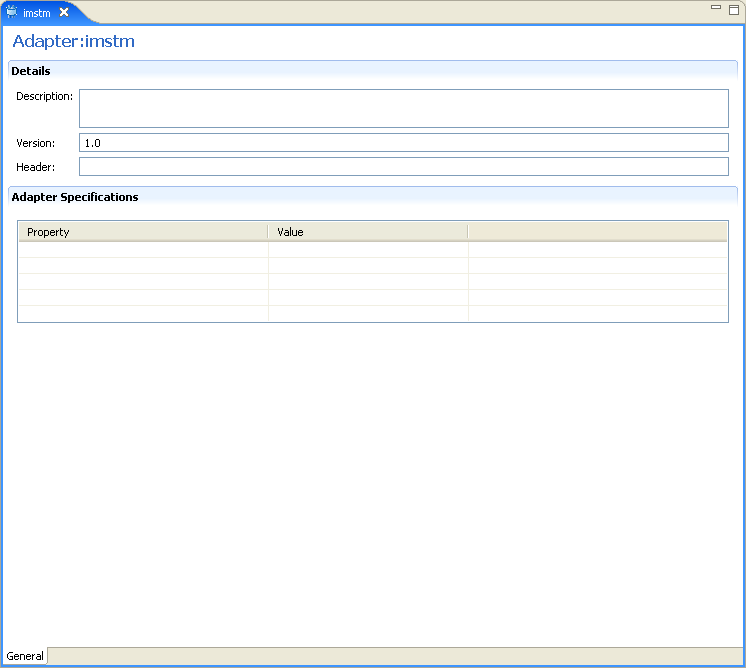
You can enter and edit information about the adapter, such as the adapter name and the way in which you connect to the adapter. You make these changes in the Design perspective, Metadata view. The following describes how to open the Adapter General Properties editor.
-
In Oracle Studio Design perspective, Metadata view, expand the Adapters folder.
-
Right-click the adapter to edit, and select Open.
The General properties editor is displayed.
The Adapter General Properties editor is shown in the following figure:
Figure A-7 Adapter Metadata General Properties
Description of "Figure A-7 Adapter Metadata General Properties"
The General properties are listed in the following table:
Table A-12 General tab Components
| Field | Description |
|---|---|
|
Description |
Specifies an identifying description of the adapter. |
|
Authentication mechanism |
Specifies the authentication to access the adapter. The available mechanisms are:
|
|
Max request size |
Specifies the maximum size in bytes for an XML request or reply. Larger messages are rejected with an error. |
|
Max active connections |
Specifies the maximum number of simultaneous connections for an adapter (per process). |
|
Max idle timeout |
Specifies the maximum time, in seconds, that an active connection can stay idle. After that time, the connection is closed. |
|
Adapter Specifications |
Specifies the adapter-specific properties for an interaction. The IMS/DB database adapter does not have any adapter-specific properties. |
Adapter Metadata Interactions
The Adapter Metedata Interactions editor defines an interaction and its input and output definitions. The following describes how to open the Adapter Metadata editor.
-
In Oracle Studio Design perspective, Metadata view, expand the Adapters folder.
-
Expand the adapter with the interaction to edit.
-
Expand the Adapter folder.
-
Right-click the adapter you want to edit and select Open.
The Adapter Metadata Interactions editor is displayed.
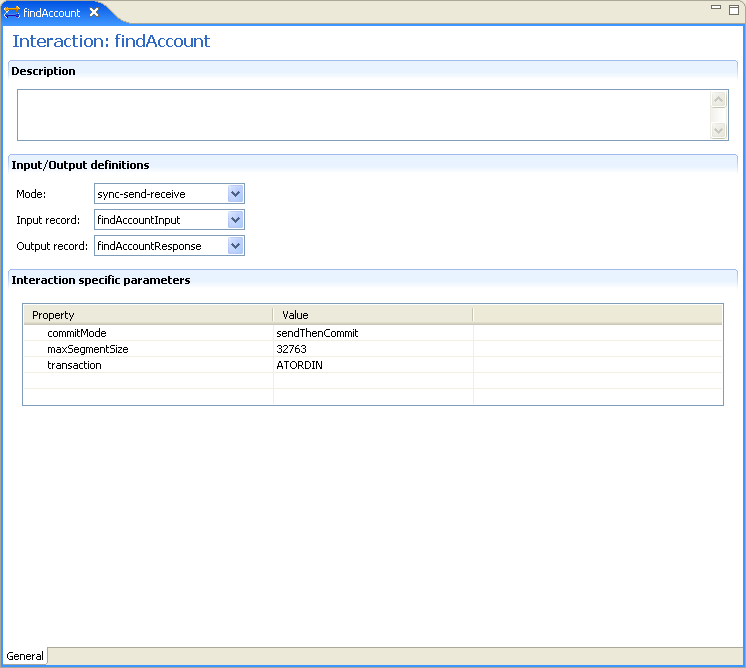
The Adapter Metadata Interactions editor is shown in the following figure:
The Adapter Metadata Interaction properties are listed in the following table:
Table A-13 Interaction General Editor Components
| Field | Description |
|---|---|
|
Description |
Provides a descriptive identifier for the interaction. |
|
Mode |
Determines the interaction mode. The following interaction modes are available:
|
|
Input record |
Identifies an input record. |
|
Output record |
Identifies an output record for the results of an interaction. |
|
Interaction Specific Parameters |
Specific properties for the interaction. When an Interaction Advanced tab is used, this section is not displayed. |
Interaction Advanced Tab
In the Adapter Metadata Interactions editor, click Advanced at the bottom of the editor to open the Interaction Advanced tab. Use this to enter advanced details for the interaction or to create interaction manually.
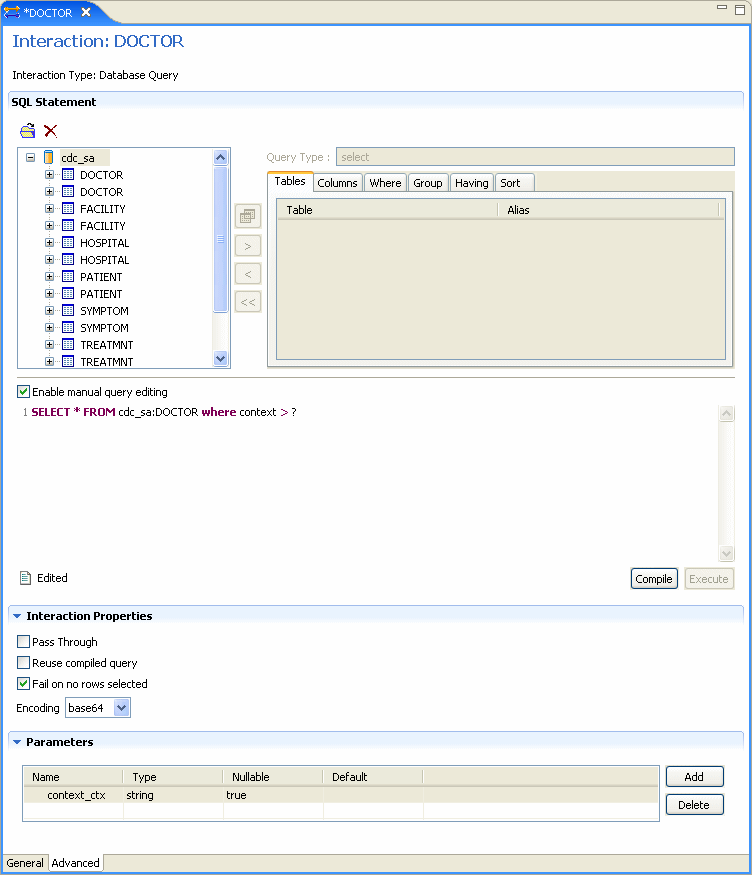
The following figure shows the Interactions Advanced tab.
This tab has three sections.
The SQL Statement section lets you build any valid SQL statement. Use the tabs to select the tables and statement types and build a statement. When you select Enable manual query editing, you can manually enter a valid SQL statement at the bottom of the screen.
The Interaction Properties section lets you select any of the following:
-
Pass Through: Select this to pass a query directly to the IMS/DB data.
-
Reuse compiled query: Select this to save query objects created in the previous execution to the cache. This allows the objects to be reused.
-
Fail on no rows returned: Select this if you want the system to return an error if no rows are selected.
-
Encoding: Select one of the following from the list:
-
base64: Select this for base 64 encoding
-
hex: Select this for hexadecimal encoding
-
The Parameters section lets you create parameters to use for the interaction. To create a parameter, click Add. Enter a name in the dialog box and click OK. The parameter is entered in the list. You can edit the following properties for each parameter you create. Click in the corresponding cell to edit the properties.
-
Name: The name of the parameter. This is automatically entered when you create a new parameter. You can click in the cell to change this parameter.
-
Type: The type of parameter. Select one of the following types from the list:
-
string
-
number
-
timestamp
-
binary
-
xml
-
-
Nullable: Select True or False to determine whether the parameter can be nullable.
-
Default: Enter a default value for the parameter, which is used if the parameter attribute is missing in the input record.
Notes:
-
If a field is not nullable and a default value is not supplied in the schema part of the Adapter Definition, an error occurs if the parameter attribute is missing in the input record.
-
The parameters must be entered in the same order as they are used in the SQL statement.
Adapter Metadata Schema Records
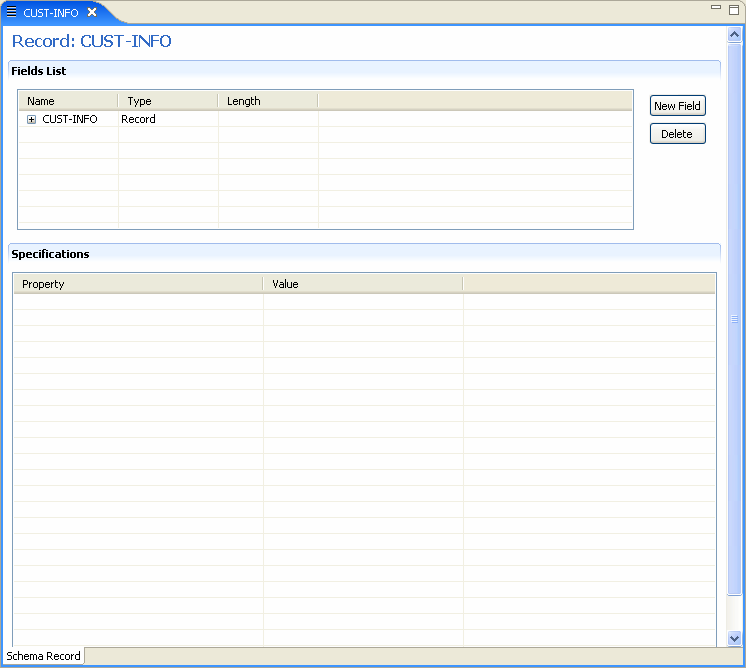
The Adapter Metadata Schema Records editor defines the general details of the input and output record structures for the interaction.The following describes how to open the Adapter Metadata Schema Records editor:
-
In Oracle Studio Design perspective, Metadata view, expand the Adapters folder.
-
Expand the adapter with the schema records to edit.
-
Expand the Schemas.
-
Right-click the schema you want to edit and select Open.
The Adapter Metadata Schema Records editor is displayed.
The Adapter Metadata Schema Records editor is shown in the following figure:
Figure A-10 Adapter Metadata Schema Records
Description of "Figure A-10 Adapter Metadata Schema Records"
The Adapter Metadata Schema Records properties are listed in the following tables:
| Field | Description |
|---|---|
|
Fields list |
Defines the single data item within a record. This section has a table with the following three columns:
|
|
Specifications |
Defines specific field properties. To display the properties, select the specific field in the Fields list. |
The following table describes the valid data types that can be used when defining these specifications in the Schema Record editor.
Adapter Metadata XML
You can also edit the adapter metadata by viewing its XML schema. The following describes how to open the adapter metadata XML editor:
-
In Oracle Studio Design perspective, Metadata view, expand the Adapters folder.
-
Right-click the adapter to edit, and select Open as XML.
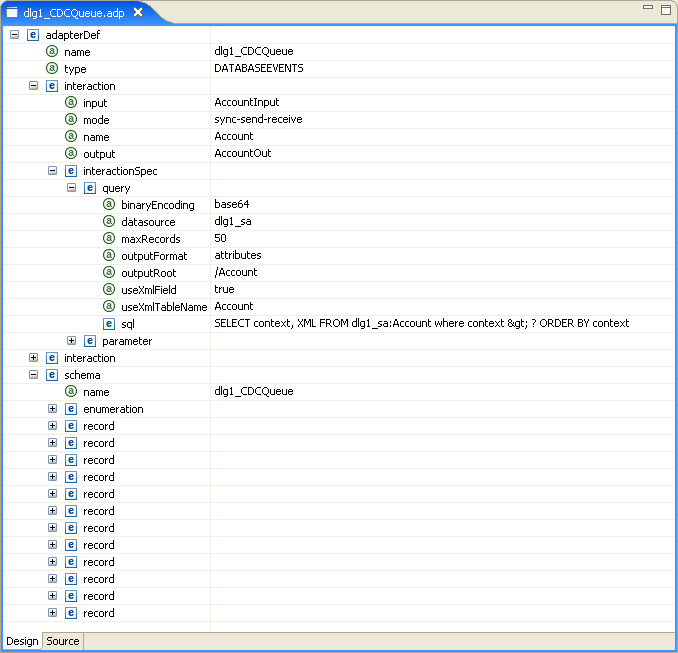
The adapter XML editor is displayed in the Design view.
The adapter XML editor is shown in the following figure:
For information on how to edit the properties in the XML editor Design view, see .
