This document describes how to install version 3.1 of the BEA Workshop Studio group of products, including:
These installation instructions work for all of the BEA Workshop Studio products:
- BEA Workshop Studio
- BEA Workshop for Struts
- BEA Workshop for JSF
- BEA Workshop for JSP
These instructions are for all of the Workshop Studio products, including free trials, free downloads, and purchased products. The screen shots are for the BEA Workshop Studio purchased product, but are similar for all products in the group.
Before you begin, you must have the Sun JDK/JRE (version 1.4) installed. For more information, go to the Sun web site.
When you purchase a Workshop Studio product, you receive a free subscription to all product updates for one year from the date of purchase. After the end of your subscription, you cannot install new versions of your Workshop Studio product, unless you purchase a subscription extension at http://www.bea.com/buyworkshop.
Standalone Installation
To install a BEA Workshop Studio product, do the following steps.
- Download free trial and free license installers from the BEA Workshop Studio Downloads page OR use the link that was provided when you purchased your product.
- Uncompress the installer file.
- For Windows, this means unzipping the installer files into a temporary installation directory
- For Linux, you must extract the .tar file into a temporary installation directory
tar xvf StudioTarFileName.tar -C <temp-directory-path>
- For Linux, make sure that the PATH variable is updated with the required JDK path. If the PATH variable is not correct, use the command
export PATH=/usr/java/jdk1.5.0/bin:$PATH
Alternatively, the JDK path can be passed to the installer using the LAX_VM argument.
- Run the installer
- For Windows: run WorkshopInstaller.exe .
- For Linux: run ./ WorkshopInstaller.bin OR if the PATH variable is not correct, run ./ WorkshopInstaller.bin LAX_VM /usr/java/jdk1.5.0/bin/java
- The installer opening screen provides information about the installation process. Review the information and click Next to proceed.
- The next screen is the license agreement. Review the terms of the license carefully before proceeding. If you do NOT accept the terms of the license agreement, you will not be able to install this Workshop Studio product at this time. Click Next to proceed.
- Workshop Studio only: This screen presents the license for using Hibernate. If you do not accept this license, the installation will proceed but Hibernate will not be installed.
-
The next screen allows you to select the folder where your Workshop Studio product will be installed. You can specify a location anywhere you wish.
Click Next to continue.
- The next screen allows you to specify whether you wish to install your Workshop Studio product as a standalone product.
Click Next to continue.

- The next screen allows you to choose whether to install the Spring IDE. The Spring IDE is bundled with all Workshop Studio products. It is purely optional and has no effect on the installation of your Workshop Studio product. If selected, the Spring IDE is installed as an additional plugin to Eclipse. Click Next to continue.
- From the next screen, you can choose whether program shortcuts should be created and where. After you make your selection, click Next to proceed.
- The next screen summarizes your installation choices. If you wish to proceed, click Install and the files will be copied to your hard drive and installed.
Plugin Installation to an Existing Installation of Eclipse
If you wish to install a Workshop Studio product as a plugin to an existing installation of Eclipse,
- Check the supported platforms to ensure that you have a suitable version of Eclipse installed.
Workshop Studio products require Web Tools Platform (WTP) and if you do not have WTP installed (or if your installed version of WTP is not supported), the installation procedure will install the supported version of WTP.
- To install as a plugin, follow the instructions in Standalone Installation except that when prompted with the following screen, choose Install Workshop Studio as a plugin to an existing Eclipse . Click Next to continue.
You will be prompted with an additional screen to specify the location of the existing Eclipse installation files. Once you have chosen the Eclipse installation folder, click Next to continue.
Upgrading from Version 3.0
If you are upgrading from version 3.0 or earlier, we strongly recommend that you use the installer rather than upgrading your older version. If you upgrade, downloading all of the necessary components takes at least 30 minutes, and it takes many restarts to update all the components in Eclipse and WTP. The installer is a much faster and more reliable alternative.
If you prefer to update an existing Workshop Studio product installation rather than do a new installation, you must do the following steps:
- Fix any configuration errors by choosing
Help > Software Updates > Manage Configuration and choose Scan for Updates to fix the following:
- Eclipse Modeling Frame Workshop
- Java EMF Model 1.1.0.1
- Upgrade your existing Eclipse installation to Eclipse 3.1.2 by following the instructions at http://www.eclipse.org/eclipse/platform-releng/updatesfor3.1.1.html.
- Install/update to WTP 1.0.2 by following the instructions at http://download.eclipse.org/webtools/updates/.
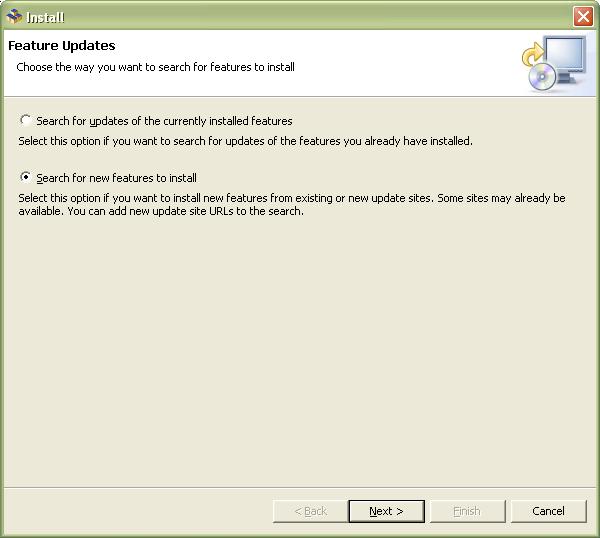
- Update to Workshop Studio 3.1.0 by clicking Help > Software Updates > Find and Install > Search for new features to Install. Choose Search for new features to install and click Next to continue.
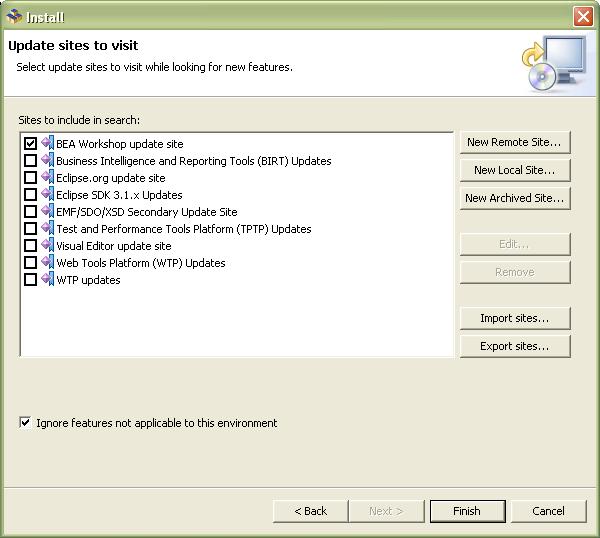
- The next screen allows you to specify the update sites to check. Be sure that you select BEA Workshop update site before clicking Finish to search for updates.
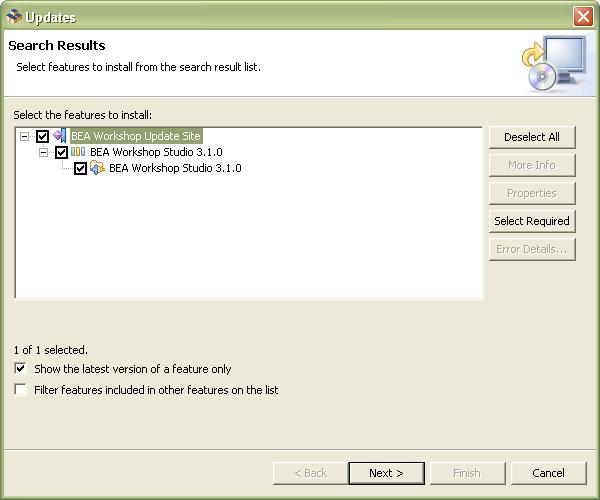
- The next screen shows any updates available at the BEA Workshop update site. The options available may differ, depending on the products you have purchased. Once you have selected the desired updates, click Next to start the update process.
License Activation
All BEA Workshop Studio products (except free trials) require license activation. Activating your license activates your subscription to product updates from BEA.
When you install any BEA Workshop Studio product, it will operate for 15 days without a license. After that time, you must provide a license. For BEA Workshop for JSP, a free license is available at https://dev2devclub.bea.com/getFreeJsp.do. For purchased products, a license is provided by email on completion of your purchase.
When your subscription expires, you may renew it at http://www.bea.com/buyworkshop. You will receive an email confirming the renewal. After your renewal, you must activate the product again, using the original Order ID and Serial Number.
To activate your license choose Help > Workshop License. You may also activate your license from the Welcome screen that is displayed when you first launch the IDE. Enter the Order ID and Serial Number and click Activate to proceed.
If you want to install a BEA Workshop Studio product on a DIFFERENT machine, you must first deactivate the license on the current machine. BEA licenses can be used on only one machine at a time.
Uninstallation
To uninstall BEA Workshop Studio products:
- For Windows: From the Start Menu, choose All Programs > BEA Workshop > Uninstall_Workshop_Studio_3.1_536
- For Linux: Run <User-home>\Uninstall_Workshop_Studio_3.1_536 OR <Workshop_Studio_3.1_536\Uninstall_Workshop\Uninstall_Workshop
The uninstaller removes everything that was installed: If the original installation was as a plugin, only the plugin will be removed. If the original installation was as a complete Eclipse installation, then Eclipse and WTP will also be removed.
If you installed the Spring IDE with your Workshop Studio installation, that will automatically be removed as well.
Upgrading from the Free Trial to a Subscription
If you have installed a free trial version of Workshop Studio, you can upgrade to a full product and subscription:
- Purchase the product online at http://www.bea.com/buyworkshop.
- Download and install the latest version of the product.
- Activate the license.
Troubleshooting
If you experience problems getting the installation to work, review the following points:
- Check that your subscription has not ended. When you purchase a Workshop Studio product, you receive a free subscription to all product updates for one year from the date of purchase. After the end of your subscription, you cannot install new versions of your Workshop Studio product, unless you purchase a subscription extension at http://www.bea.com/buyworkshop.
- Check the supported platforms for a complete list of supported environments.
- The Workshop Studio installer zip/tar file is bundled with executable and properties file, extract both of them to a temp folder before
executing the installer.
- The Workshop Studio installer and activation requires admin privilege
for the user login. Without this, installation or activation might end
up with an un-expected result.
- JDK Configuration
The Workshop Studio installer requires JDK/JRE 1.4+ to be installed
and running properly on the system. In case you have both JDK 1.3 &
1.4 on the system, make sure the 1.4 entry appears before 1.3 on the
system PATH variable
|
On Windows:
|
Using "console" to run the Workshop installer
- set PATH=C:\Program Files\Java\jdk1.4.2_05\bin;%PATH%
- run WorkshopInstaller.exe
|
|
Using system PATH variable
- My Computer > Properties > Advanced >
Environment Variables > Path - edit and prefix C:\Program
Files\Java\jdk1.4.2_05\bin at the beginning
- double click on WorkshopInstaller.exe
|
|
On Linux:
|
Using LAX_VM argument
- inside Workshop installer folder run
./WorkshopInstaller.bin LAX_VM
/usr/java/jdk1.5.0_03/bin/java
|
|
Using PATH variable
- export PATH=/usr/java/jdk1.5.0/bin:$PATH
./WorkshopInstaller.bin
|
- If you are using JRockit as your primary JVM (i.e., JRockit is the only JVM installed OR JRockit appears before the Sun JVM in the PATH environment variable), the Workshop Studio installer will fail with the error message:
"Can't launch executable.
Could not load jvm.dll

Try re-installing the Java VM or change the Java VM used by the application"
To resolve this error, create a new folder /jre/bin/client and in this folder make a duplicate copy of the contents of the folder /jre/bin/jrockit . Then run the Workshop Studio installer again.
- For any of the installer failure/errors, follow these steps
and send the debug output to workshop.support@bea.com
- Quit the installer
- Launch the installer again and hold the CTRL key
until a console comes up in the background
- Continue with installation until you hit the error
dialog
- Send the debug statements
- On systems with JDK 1.3 & 1.4.2/1.5, make sure to use
the shortcut or launch Eclipse using JDK 1.4.2/1.5 vm
|
|
- Launch the Workshop Studio product (Start > Programs > BEA Workshop)
C:\\eclipse\eclipse.exe -feature com.m7.nitrox -application org.eclipse.ui.ide.workbench -vm C:\\bin\javaw.exe -vmargs -Xms256M -Xmx512M -XX:MaxPermSize=128M -Dosgi.splashLocation=C:\Workshop_Studio_3.1_bb\Workshop\splash.bmp
|
|
|
- Launch Workshop Studio product (<Install Folder>/Workshop.sh)
/home//eclipse/eclipse -feature com.m7.nitrox -application org.eclipse.ui.ide.workbench -vm /usr/java/jdk1.5.0/bin/java -vmargs -Xms256M -Xmx512M -XX:MaxPermSize=128M -Dosgi.splashLocation=/home//NitroX/splash.bmp |
| |