In this section, you will open the Struts configuration used by the
project. You will use the Struts Outline View and the Struts Configuration
Editor to view and modify the Struts configuration.
Background
BEA Workshop provides Struts configuration file Source and Design editors.
In addition, a Struts configuration file Compound editor combines the
benefits of both editors' capabilities. Changes in the Design editor
automatically update the Source editor and vice versa. The Compound
editor also synchronizes the selection between the Design and Source
editors. Of course, all of the other benefits of the environment, including
the Smart Editors, the Workshop Palette and the Property Sheet are also
extended for use with the Struts Configuration editor as well.
Activating the Struts configuration file editor
In the Project Explorer, expand the WEB-INF folder.
Double-click on struts-config.xml to open this configuration file for editing.
By default the Compound editor is activated. (Notice that the Struts Config tab is selected.)
Click on the Source tab to activate the Source editor.
Click on the Navigation tab to activate the
Navigation editor.
Click on the Struts Config tab to activate the Struts Config form editor.
Using the Struts outline view
In the Outline view, expand Form Beans to show the list of the Struts form beans defined in this configuration file.
Select logonForm. Notice that the logonForm properties are loaded in the Struts Config view.
Expand Action Mappings to view all the actions defined in this configuration
file.
Select the /checkoutShipping action to highlight the
corresponding source elements.
Using the Compound editor
Click on the Struts Config tab at the bottom of the Struts editor.
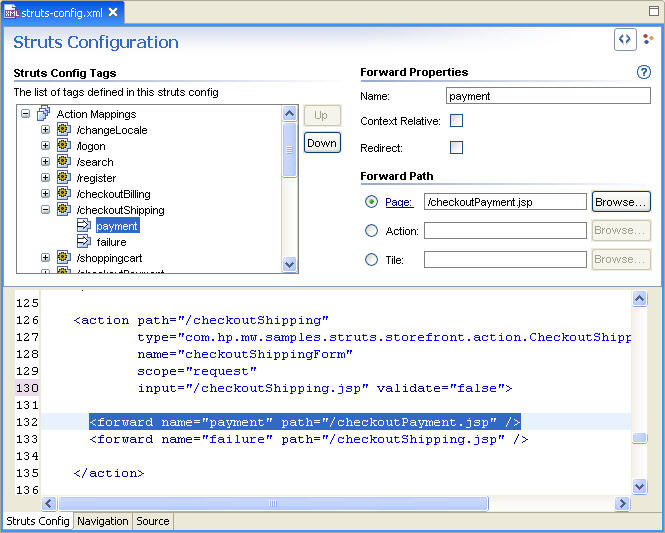
In the Struts Config view, expand the Action Mappings node and select the payment forward
underneath the /checkoutShipping action in the graph, as shown below.
Note that the source code now shows where this is defined.
In the Struts Config view, change the value of the
Name field under the Forward Properties panel
to read "payments" and
the press Enter.
Note that the forward name changes to payments in the Navigation and Source views.
In the Source view, change the forward name payments back to payment.
Note that the forward name changes into payment in the Navigation view as well.
Click one of the following arrows to navigate through the tutorial: