Workshop provides a powerful and flexible object relational mapping interface to popular persistence services like Hibernate. Depending on the development scenario, O/R Mappings can be generated through different mechanisms:
Reverse Engineering the Schema to create object relational mappings
Generating Mappings from an Object Model
In this step, we will follow both scenarios to generate O/R Mappings. The tasks in this step are:
To Create Object Model and Mapping Files from the Database Schema
In this step, we will use Workshop to automatically generate the associated object model and mappings by reverse engineering from database schema.
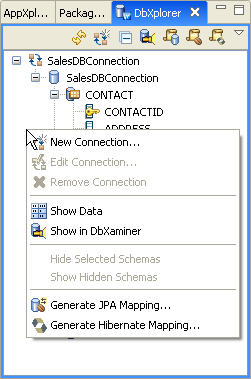
In the DbXplorer view, right-click within the view and select Generate
Hibernate Mapping...
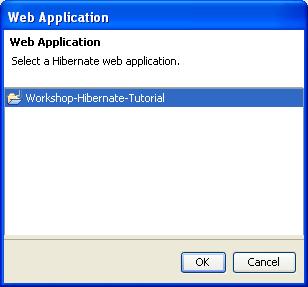
Select the Hibernate Web application project, workshop-hibernate-tutorial, from the Web Application dialog. Workshop considers a web application to be a Hibernate application if it has the Hibernate configuration file hibernate.cfg.xml at the root level of an Eclipse source folder.
Similarly, Workshop identifies a JPA web application based on the existence of a persistence.xml file.
Click OK.
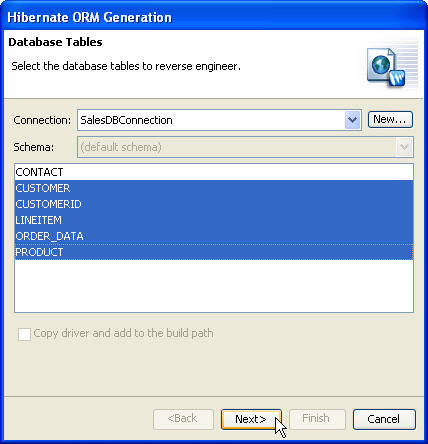
Select the database tables from the Hibernate ORM Generation dialog as shown below.
Do not select the CONTACT database
table. Later on in this tutorial you will use the CONTACT database table to
generate Hibernate mapping files from the Contact object model to better understand the top-down
development approach.
Click Next
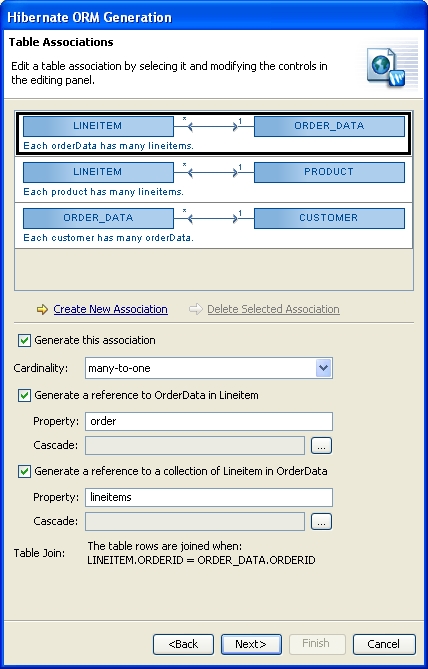
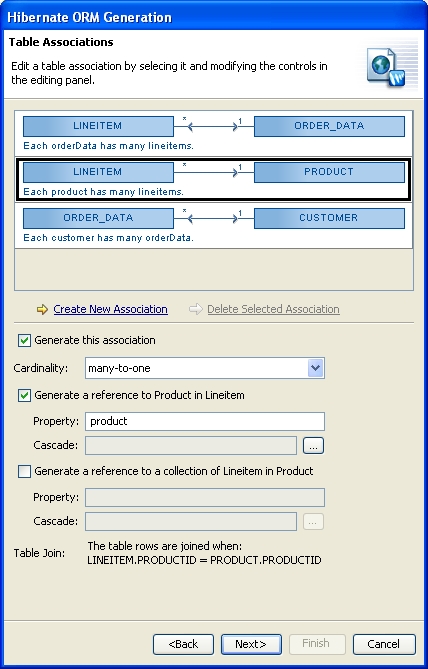
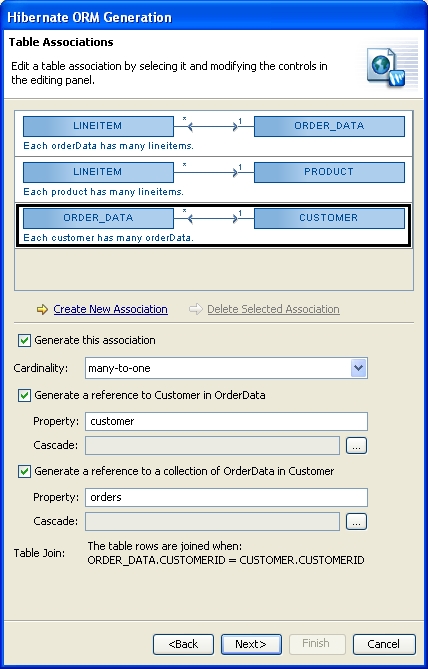
The Table Associations dialog displays entity relationships
as observed in the database schema from the foreign key definitions. The dialog allows you to edit a table association by selecting
each association and modifying its options in the editing panel.
Select the association between LINEITEM and ORDER_DATA.
Change the value of the first Property field from orderData to order.
Select the association between LINEITEM and PRODUCT.
We want to define many-to-one unidirectional relationship between LINEITEM and
PRODUCT. Uncheck the checkbox Generating
a reference to a set of LineItems in Product.
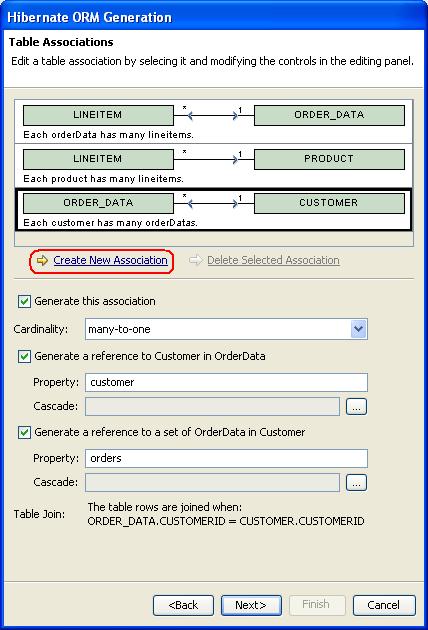
Select the association between ORDER_DATA and CUSTOMER.
Change the value of the second Property field from orderData to orders.
Do NOT click Next.
To Create a new One-to-One Association between CUSTOMER and CUSTOMERID
Workshop also supports the creation of new associations.
It can create Simple Associations (one to one, one to many, many to one) between two tables and Many to Many Associations through an intermediate table.
Click the Create New Association option to specify the properties of the new association.
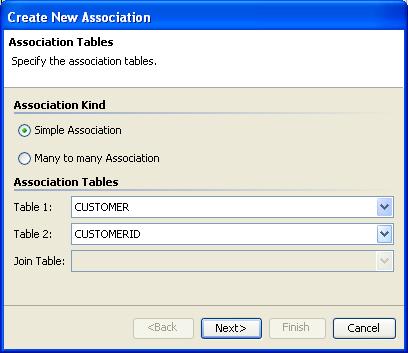
We want to define a simple one-to-one association between the CUSTOMER and CUSTOMERID tables.
In the Create New Association dialog, select the CUSTOMER and CUSTOMERID tables as shown below and click Next.
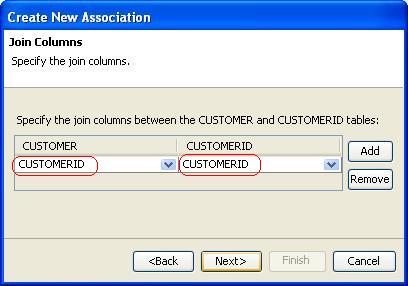
In the Join Columns dialog, specify the join columns between tables. Select the CUSTOMERID column for the CUSTOMER table and the CUSTOMERID
column for the CUSTOMERID table.
Click Next.
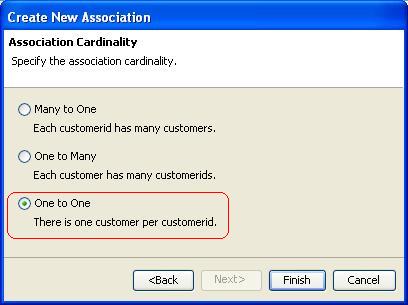
Select One-to-One to specify one customer per customerid.
Click Finish.
Since the new associations (shown in brown) are not observed in the
database schema, they will be created programmatically in the Hibernate
mapping file and object model. If, by accident, the association is grayed
out make sure the Generate this association checkbox
is enabled before clicking Next.
Click Next in the Hibernate ORM Generation dialog.
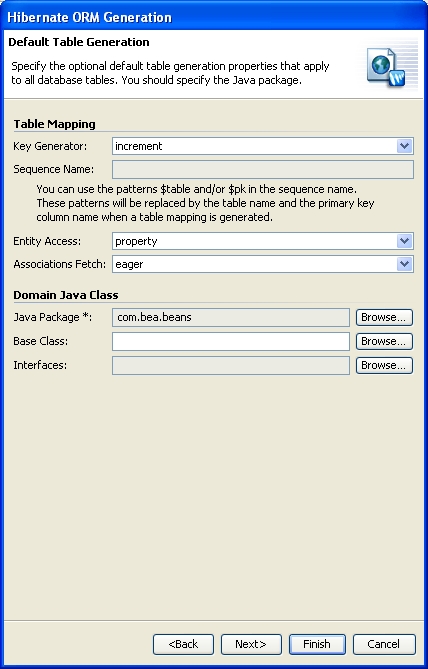
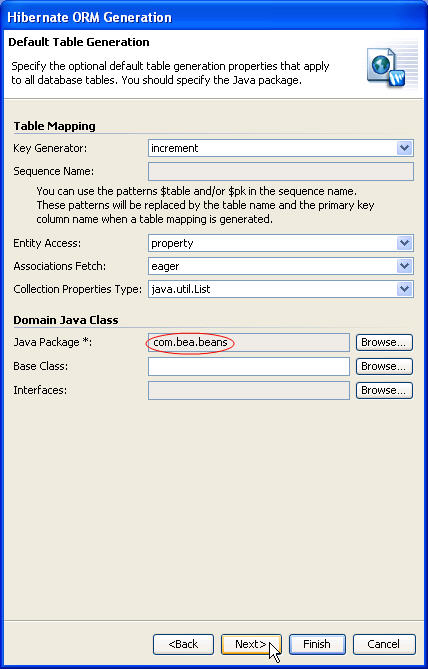
In the Default Table Generation dialog, select increment strategy for the key generation.
A Java Package is required for generating the object model classes. Click Browse... in the Java Package field and create a new Java package com.bea.beans using the New Java Package link. Select the new package by clicking OK.
Click Next.
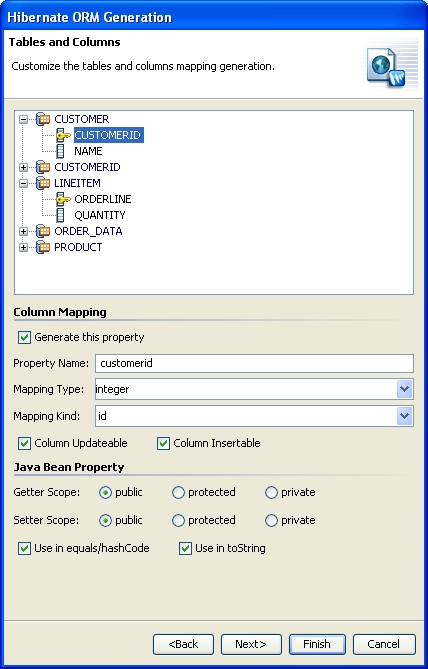
The Tables and Columns dialog defines the table and column
mapping names for the generated mapping files and bean classes. By default,
the schema's table and column names are used for the Hibernate mapping file
and Java Beans. Note that when you hover over a table or column a tooltip
displays the table and column properties as defined in the database schema.
Customize the tables and columns mapping generation as described below:
For the LINEITEM table, ensure that the checkbox Implement
equals/hashCode is enabled.
For the ORDER_DATA table, ensure that the checkbox Implement
equals/hashCode is
enabled.
Click Next.
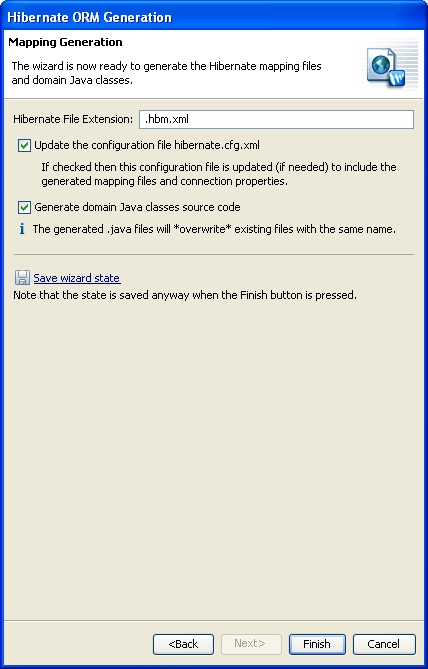
In the Mapping Generation dialog you can choose the mapping
file extension. You can also specify whether to generate the domain Java
classes and whether to update the Hibernate configuration file hibernate.cfg.xml.
Accept the defaults and click Finish.
BEA Workshop will generate all of the Hibernate mapping files and Java Beans based on the properties supplied to the ORM Generation wizard.
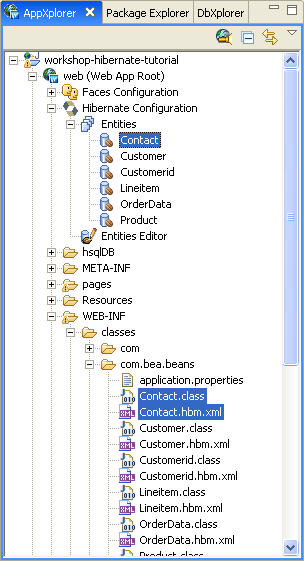
Once generation is complete, the Entities can be accessed through the AppXplorer view, inside the web (Web App Root) directory under the Hibernate Configuration branch of the project.
Workshop remembers all the settings specified in Hibernate ORM Generation wizard to assist the next time you use it for the same database connection.
In the AppXplorer view, open the node workshop-hibernate-tutorial
> web
> Hibernate Configuration > Entities.
You can observe the set of Persistence entities generated by the Workshop. Workshop identifies the persistent entities based on the mapping resources specified in hibernate.cfg.xml file with extension .hbm.xml
You can find the object model under your package in the branch web/WEB-INF/src/java
To Create Hibernate Mapping files from a Persistent Class
In this step, you will create a persistent java class Contact and use Workshop to generate Hibernate mappings for the Contact object. This way, we will follow a top-down development scenario.
In the AppXplorer view, locate and open the node workshop-hibernate-tutorial > web/WEB-INF/src/java
> com.bea.beans.
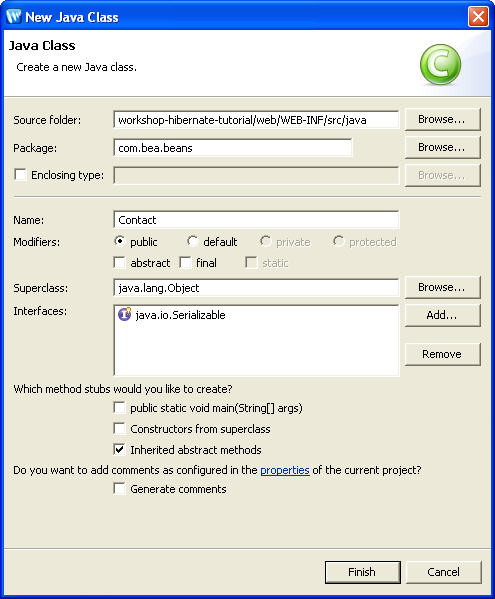
Right-click com.bea.beans and select New > Class.
In the New Java Class dialog, create
a Java class Contact which implements the java.io.Serializable interface.
Add following set of private variables of type String to Contact class. Note: We are defining
properties that maps to columns in CONTACT database table.
Add getter and setter methods for each property by right-clicking inside
the source pane and selecting Source > Generate Setters and Getters.
Add the following property.
private static final long serialVersionUID = 1L;
Override the equals( ) and hashCode( ) methods as we are going to use Contact instances in Set.
public boolean equals(Object other) {
if ( (this == other ) ) return true;
if ( !(other instanceof Contact) ) return false;
Contact castOther = (Contact) other;
if( this.getContactId( ).equals(castOther.getContactId( )) ) {
return true;
} else {
return false;
}
}
public int hashCode() {
return this.getContactId( ).hashCode( );
}
Save the Contact class. Now, we have the object representation for CONTACT persistence data. So next, we will create Hibernate O/R mapping files from the Contact object.
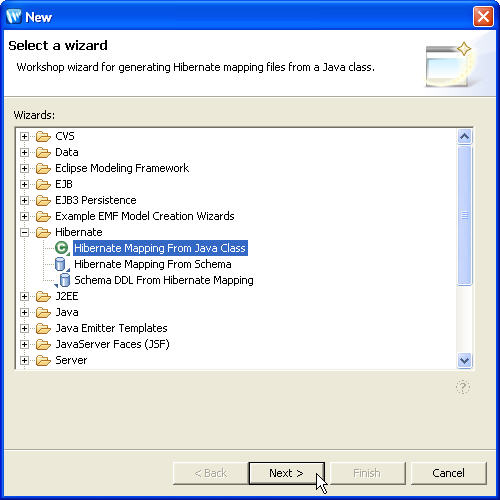
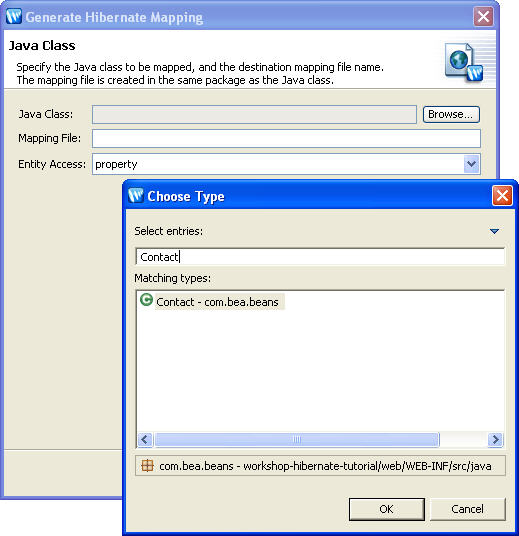
From AppXplorer view, right-click the project workshop-hibernate-tutorial and select New > Other . Expand Hibernate and select Hibernate Mapping from Java Class and click Next.
Click Browse... button for Java Class and select the com.bea.beans.Contact object to be mapped.
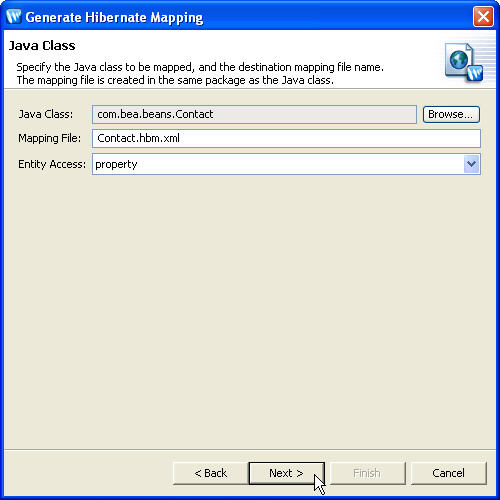
Check the name for the automatically generated mapping file, and click OK.
Click Next.
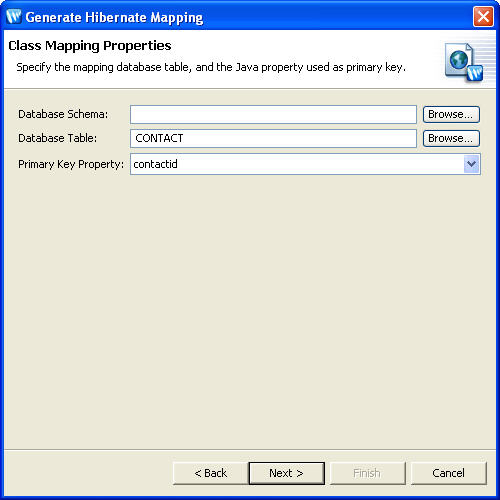
In the Class Mapping Properties dialog, browse and select the CONTACT table as mapping database table and select the Java property contactId as primary key property.
Click Next.
The Bean Properties Mapping dialog allows you to specify which bean properties should be mapped. If required, you can select the property and click Edit.. to specify the column mapping information or click the Remove button to unmap the property from the Hibernate mapping file. For this tutorial, we do not need to change any mapping information.
Click Finish.
Workshop generates Hibernate O/R mapping file based on the information from the Contact object
and maps to CONTACT database table.
Click one of the following arrows to navigate through the tutorial: