Using the WebLogic Beanbar
- I. Introduction
- Overview of WebLogic Beans
- WebLogic Bean architecture
- II. The WebLogic Bean Library
- III. Implementing with WebLogic Beans
- Installing WebLogic Beans
- Installing for use with Symantec's Visual Cafe 3.0
- Installing for use with Borland's JBuilder 2.0
- Upgrading from an earlier release of the WebLogic Bean Library
- Examples using WebLogic Beans
- Example 1: Database query
- Example 2: Database query -- master and detail
- Example 3: Workspace example
- IV. Tips on using WebLogic Beans
- Use a JFrame for building your application
- Tips on using Visual Cafe
- Tips on using JBuilder
- V. Alphabetical list of WebLogic Beans
- Other related documents
- Installing WebLogic (non-Windows)
- Installing WebLogic (Windows)
- Writing a T3Client application
- Developers Guides
- API Reference Manual
- Glossary
See
Upgrading from an earlier release of the WebLogic Bean Library
for details on converting existing projects.


Overview of WebLogic Beans
WebLogic Beans are reusable software components that can be
used in a visual builder to create T3Client applications.
A library of WebLogic Beans
(weblogic.library.beans)
is included in the WebLogic distribution
that you can add to your integrated development environment (IDE).
This collection provides access to the WebLogic Server and selected WebLogic services.
You can use these Beans along with JavaBeans from other vendors
to build your T3Client application.
and selected WebLogic services.
You can use these Beans along with JavaBeans from other vendors
to build your T3Client application.
The WebLogic Library of Beans work with
Borland's JBuilder v2 and Symantec's Visual Cafe v3.
WebLogic Beans provide a simple approach to testing,
prototyping and building
distributed applications using WebLogic Server technology.
They allow you to add "hot-pluggable" business logic
to your applications.
If you are just beginning to work with WebLogic, they're a
starting place for training and education in WebLogic Server technology.
WebLogic Beans are based on the
semantics of JavaSoft's JavaBean architecture.
A WebLogic Bean can be used for client or server-side programming.
Like a JavaBean, a WebLogic Bean has a set of properties it exposes, a
set of events that it listens for, and an object that it triggers.
WebLogic Beans can fire events and service
method invocations; however,
WebLogic Beans can also migrate from the client to the WebLogic Server
and operate as distributed objects across multiple Java virtual machines.
WebLogic Beans are distributed with classes, resources, and
a manifest, all contained within a JAR file.
The contents are loaded into the IDE
during development following
instructions specific to the IDE.
This document covers aspects specific to writing applications with
the WebLogic Beans API. You should also read:
WebLogic Bean architecture
In general, WebLogic Beans exhibit local-remote transparency,
such that most Beans from the library can be used either on the client or
the server. Certain Beans (such as
Login) are intended
to be used explicitly on the client and server sides respectively.
WebLogic Beans do not necessarily have a visible face; Beans
that either operate
only on the server or do not require/provide input and output while
running are invisible beans and do not always have an icon in the design
environment of the visual builder.
WebLogic Beans take advantage of the WebLogic Server's efficient
communications and resource management to make available
selected integrated WebLogic Server services and facilities to the
client application.
WebLogic Bean properties
WebLogic Beans have properties that
are generally editable with the IDE's property editor
or settable with events -- sometimes both.
There are four types of properties that a bean can possess:
- Properties editable only through the property editor of the IDE.
Example: the name of the bean.
- Properties that are either editable with the property editor of the IDE or
settable with an event.
Example: the text of a button.
- Properties that are stored in response to an event, to be forwarded when triggered.
Example: a query stored in a button, to be forwarded when the button
is pushed.
- Properties that are fixed and not editable.
Example: the class of a bean.
In the WebLogic Bean Library, all of the important
properties of the Beans are described. Additional properties
may be available depending on the IDE -- such as the class of the Bean or
its size and location on the window -- and as these are self-explanatory,
they are not included here.
We have listed the properties alphabetically, but the actual order in the
property editor will vary depending on the IDE.
Communication between WebLogic Beans
WebLogic Beans communicate changes in state using
InfoBus,
a standard Java library.
The Beans send InfoBus Change Events, which are objects
that combine an Event and Data. Most Beans
will accept an InputEvent, and most will generate an OutputEvent.
Because the property editors of IDEs often limit a property
value to a single string, the InfoBus is used to create more
sophisticated objects that can be used by the beans.
An InputEvent represents a named event that a bean is listening for.
When the event occurs, it is passed to the beans that have registered
as listeners. They then take action depending on their particular behaviors.
In the case of a button, it might become enabled. In the case of a table adapter
that displays queries, it might display newly fetched rows.
An OutputEvent represents a named event that a bean generates
or triggers. The event combines both notification of
existence and data -- or, if the object existed before, a change in the data.
There is a couple of implicit events that are used that you should be aware of:
- Login event: This happens when a successful login to a WebLogic
Server occurs. In general, WebLogic Beans become active after the login.
Certain beans -- such as a JfcButton -- can
be configured to be enabled after such an event.
- IsTriggeringEvent: Every change
event has an IsTriggeringEvent property associated with it. The
bean that listens to it can take action based on this property. It may
just store the value, but not trigger itself or an OutputEvent.
An example is a JfcTextField: with each
keystroke, it broadcasts a change event, but generally you set its
TriggerOnEdit property (which sets IsTriggeringEvent)
to "False". When a carriage return is pressed (and sent), IsTriggeringEvent
is set to "True".
This is so other beans such as DbRecord
can capture all the keystrokes from different fields, concatenate
them to build a query-by-example, and yet still know when to trigger
the query.
- Table event: A table event is used to announce changes in the
selected rows of a database table. This is further described in DbRecords
and DbButtons.
Event names and properties
The InputEvents and OutputEvents can be accompanied by
selected properties that the receiving bean may inspect.
In many cases, these properties mirror editable properties of the bean.
The bean may modify its behavior based on these InputEvent properties.
In all cases, InputEvents have precedence over similar properties set
via a property editor.
For example, a text entry bean might be used to set the query string associated
with a DbQuery bean. Here is how this can work:
- The DbQuery bean has a query property that is
a SQL string.
To trigger the DbQuery bean, it needs to
receive an InputEvent.
- If the DbQuery receives an InputEvent
without a query property, it will use the query property that
was set in the property editor.
- If the DbQuery receives an InputEvent
with a query property, it will use that query property instead.
To both modify the query and trigger the bean, it needs to
receive an InputEvent of the form "EventName.query",
where EventName is a unique name used to identify the event.
You will need to generate an Event that has a
query property and -- in this case -- the
property must be a text string that is an appropriate SQL query.
- To do that, you can use
a JfcTextField.
Set its OutputEvent to be "EventName.query", using the EventName
of the DbQuery's InputEvent.
- When an appropriate SQL statement is entered in the
JfcTextField, and the Enter key is pressed,
an Event will be generated that has a query
property with the string in the JfcTextField.
The DbQuery bean will then use that query as it is
triggered by the InputEvent.
Properties that can be set by InputEvents and OutputEvents
are case-sensitive and are listed after other bean
properties.
The WebLogic Bean Library
Package weblogic.library.beans
(shipped as weblogic/lib/weblogicbeans.jar)
An alphabetical list of WebLogic Beans
is included as an appendix.
 LoginButton LoginButton
|
Type: Visible
|
| Hostname |
[default "localhost"] |
| Name |
Name of bean. |
| Password |
Password for login; may be left blank. |
| Port |
[default "7001"] |
| Protocol |
[default "t3"] |
| UserName |
Username for login; may be left blank for "guest" login. |
This bean is used to initiate a connection to a WebLogic Server.
All WebLogicBean applications must have either a LoginButton
(or a Login bean)
to log into the WebLogic Server.
A LoginButton creates an implicit LoginEvent that can be listened
to by other beans such as a JfcButton.
The bean is a button with a text field displaying the
current connection status.
If all values have been specified in the properties,
login will take place without any further dialogs.
Unless guest connections are allowed or an error occurs, a login dialog appears,
with default values as specified in the properties.
After a successful login, the bean's text changes to "Logout"
and can be used to logout from the server.
| Login |
Type: Invisible |
| Hostname |
[default "localhost"] |
| Name |
Name of bean. |
| Password |
Default password; may be left blank. |
| Port |
[default "7001"] |
| Protocol |
[default "t3"] |
| UserName |
Username for login; may be left blank for "guest" login. |
A non-GUI Bean for connecting to the WebLogic Server. All WebLogicBean
applications must have either a Login bean (or a LoginButton) to log into the WebLogic
Server.
A Login creates an implicit LoginEvent that can be listened to
by other beans such as a JfcButton.
After setting the connection properties, you must manually call the
connect() and disconnect() method on the bean to connect and
disconnect from the server.
When using the disconnect()
method, you will need to wrap it in a try block to catch any exceptions:
  {
    try {
      Login.disconnect();
    }
    catch (Exception ee) { }
  }
 Workspace Workspace |
Type: Invisible |
| Hostname |
[default "localhost"] |
| Mode |
ATTACH, CREATE or OPEN
If ATTACH, the workspace must already exist.
If CREATE, the workspace is created if and only if it
does not already exist.
If OPEN, the workspace is created if it does not exist,
else the existing workspace is used. |
| Name |
Name of bean. |
| WorkspaceName |
Name of workspace on the server;
may be left blank if SCOPE_CLIENT
for default client workspace. |
| WorkspaceScope |
SCOPE_CLIENT or SCOPE_SERVER
If SCOPE_CLIENT, then this workspace is specific to the client,
and cannot be shared.
If SCOPE_SERVER, then this is a global workspace
which may be shared among other WebLogic clients. |
The Workspace bean is used to open, create and attach to Workspaces on the
server -- either the client Workspace or a shared Workspace.
If no WorkspaceName is provided and the
scope is SCOPE_CLIENT, the default client Workspace is used.
For information on workspaces, modes and scopes,
read the Developers Guide
Using WebLogic Workspaces.
 WorkspaceValue WorkspaceValue |
Type: Invisible |
| AutoUpdate |
True or False:
If True, then the OutputEvent is triggered
whenever the value changes (is updated).
|
| InputEvent |
Name of a change event that triggers this bean. The value of the triggering
event is stored in the workspace.
|
| Name |
Name of the WorkspaceValue bean. |
| OutputEvent |
Name of the change event triggered by a change
in the value of this bean. |
| Key |
The unique key under which the data is stored in the Workspace. |
| TriggerOnUpdate |
True or False:
If True, then when the OutputEvent is triggered,
it will have a true IsTriggeringEvent.
|
| WorkspaceName |
The name of a Workspace bean.
If not specified, or if a Workspace bean
cannot be located, the default client workspace is used.
|
| InputEvent
attributes |
This property is available as an InputEvent attribute: TriggerOnUpdate |
| OutputEvent attributes |
These properties are available as OutputEvent
attributes:
Key, TriggerOnUpdate and any OutputEvent tags. |
This bean is for accessing (storing and fetching) a value in a Workspace.
Values in a workspace are stored as key-value pairs,
and are stored and fetched using the unique key to locate the value.
Values can be any serializable object.
You can use this bean by making it the OutputEvent property of another bean,
and then
making the WorkspaceValue trigger an object to display the value,
such as a JfcTextField.
When the workspace value is updated, the
new value will be propogated to other beans.
At initialization time, if the workspace already has a value, then a
notification is immediately broadcast.
An OutputEvent of the form OutputEventName.propertyName
can be used to associate a
property name with the workspace value.
Other beans will inspect the properties of their data inputs to override
their default behavior (see DbQuery and
JfcButton for examples).
By default, the key name is also treated as a property name.
 EventTopic EventTopic |
Type: Invisible |
| InputEvent |
Name of the Event that triggers this EventTopic. |
| Lifetime |
DURABLE or EPHEMERAL:
The lifetime of the event topic.
If DURABLE, the EventTopic remains in the topic tree even
when there are no longer any registered clients.
If EPHEMERAL, the EventTopic is removed from the topic tree
when there are no longer active registrations. |
| Name |
Name of the EventTopic bean. |
| OutputEvent |
The name of the Event triggered when a WebLogic event is received by this topic. |
| TopicName |
The name of the topic in the topic tree.
Topics are hierarchical, with nodes separated by periods (".").
|
| OutputEvent attributes |
These properties are available as OutputEvent
attributes:
topic, and any attributes
of the value stored in the OutputEvent. |
This bean is used to send and receive WebLogic Events
Sending WebLogic Events
If an InputEvent is specified, then the EventTopic bean
will send WebLogic Events whenever there is a change event for that
InputEvent.
The InputEvent will be submitted as the body of the WebLogic Event.
Receiving WebLogic Events
If an OutputEvent is specified, the EventTopic bean is registered
as a listener for the WebLogic Event TopicName, and when the event is received,
a change event is fired for OutputEvent.
If the body of the change event can be treated as name-value pairs,
then the those names are available as properties to receivers of the
change event OutputEvent.
For example, an OutputEvent with a
query parameter set to "select * from emp" may be delivered to a
DbQuery bean to cause a particular query to be executed.
For more information on events, see
Using WebLogic Events,
the Developers Guide that covers
the event-related services and facilities within WebLogic.
 JfcButton JfcButton |
Type: Visible |
| Enable |
Always, By Input Event or By Login
Determines when the JfcButton is enabled.
If Always, the button is always enabled.
If By Input Event, it will only be enabled when it has been supplied
a non-null value via its InputEvent.
If By Login, it is only enabled when the user has connected to the
WebLogic Server. |
| InputEvent |
A JfcButton
may receive events from other
beans that it will rebroadcast when pressed.
Properties of that event may change the button's appearance. |
| Name |
Name of this JfcButton. |
| OutputEvent |
Specifies the name of the change event
which is triggered when the button is pressed. A tag of the
form OutputEvent.PropertyName associates a property name
with the toString()
representation of the data value.
Other beans can use particular property tags to override their
default behavior. |
| Text |
Specifies the button text. |
| ToolTipText |
String label displayed when cursor
is over this JfcButton. |
| InputEvent attributes |
These properties are available as InputEvent
attributes:
text, image and any InputEvent tags. |
| OutputEvent attributes |
These properties are available as OutputEvent
attributes:
text, any OutputEvent tags, and any attributes
of the value stored in the bean. |
This bean is a button that can be used to trigger other beans.
If an InputEvent is supplied, the button will
store the data of that event, and forward it in its
OutputEvent when the button is pressed.
Any attributes of that InputEvent will
be included in that OutputEvent.
| JfcButtonAdapter |
Type: Invisible |
This bean is used to adapt a Swing JButton for
use with WebLogic Beans. You can configure a JButton
to your liking -- setting fonts, options, etc. -- and
by using the adapter, it can interact with your WebLogic Beans.
To use it, you will need to add a line of code to the class
where the components are initialized -- typically, a class
that extends com.sun.java.swing.JFrame.
This will tell the JfcButtonAdapter which JButton it is adapting:
myJfcButtonAdapter.setJButton(myJButton);
where
- myJfcButtonAdapter is the instance
variable of the JfcButtonAdapter
- myJButton is the instance variable of the JButton
(Note that in JBuilder 2, you do not need to add this code, as JBuilder
includes a property that allows you to specify the bean
you are adapting.)
The options available for the JfcButtonAdapter are the same as those for the
JfcButton.
 JfcComboBox JfcComboBox |
Type: Visible |
| InputEvent |
A JfcComboBox
can receive events from other beans that will change the
JfcComboBox's value.
A tag of the form InputEvent.PropertyName can be
used to extract
a named property from the InputEvent for setting
the value of the JfcComboBox. |
| Label |
The label that will appear before the Option menu. |
| Name |
Name of this JfcComboBox. |
| OptionMap |
A comma-separated set of integer values to be mapped onto
the set of displayed Options.
By establishing an OptionMap, the option field may be set
with an integer value, while the menu will display a symbolic
representation.
For example: if the OptionMap is set to "3,6,8,12"
and Options is to "Small, Medium, Large, Extra-large";
setting the OptionField to the "8"
would result in the item "Large" being displayed.
When the option menu is changed, the mapped integer value
is passed in the OutputEvent. |
| Options |
A comma-separated set of options to display.
An additional blank option is added to the end of the list to
display an unselected (or illegal) state. |
| OutputEvent |
Specifies the name of the change event
which is triggered when the option menu is changed. A tag of the
form OutputEvent.PropertyName associates a property name
with the data value. |
| ToolTipText |
String label displayed when cursor
is over this JfcComboBox. |
| TriggerOnEdit |
True or False:
If True, then altering the option menu triggers the OutputEvent. |
This bean displays a label and an option menu. Changing the option menu can
trigger a change event, and the option menu can be set by InputEvents.
| JfcComboBoxAdapter |
Type: Invisible |
This bean is used to adapt a Swing JComboBox for
use with WebLogic Beans. You can configure a JComboBox
to your liking -- setting fonts, options, etc. -- and
by using the adapter, it can interact with your WebLogic Beans.
To use it, you will need to add a line of code to the class
where the components are initialized -- typically, a class
that extends com.sun.java.swing.JFrame.
This will tell the JfcComboBoxAdapter which JComboBox it is adapting:
myJfcComboBoxAdapter.setJComboBox(myJComboBox);
where
- myJfcComboBoxAdapter is the instance
variable of the JfcComboBoxAdapter
- myJComboBox is the instance variable of the JComboBox
(Note that in JBuilder 2, you do not need to add this code, as JBuilder
includes a property that allows you to specify the bean
you are adapting.)
The options available for the JfcComboBoxAdapter are the same as those for the
JfcComboBox.
 JfcTextField JfcTextField
|
Type:
Visible
|
| InputEvent |
A JfcTextField
can receive events from other beans that will change the
JfcTextField's text. |
| Label |
String displayed to left of the field. |
| Name |
Name of this JfcTextField. |
| OutputEvent |
Specifies the name of the change event
which is triggered when either a keystroke
or a CarriageReturn is pressed. A tag of the
form OutputEvent.PropertyName associates a property name
with the text of the bean.
Other beans can use particular property tags to override their
default behavior.
If the OutputEvent is empty, the JfcTextField will be
display-only. |
| Text |
Initial value displayed by the
JfcTextField |
| ToolTipText |
String label displayed when cursor
is over this JfcTextField. |
| TriggerOnEdit |
True or False:
If True, then OutputEvent is triggered after every keystroke;
If False, then OutputEvent is triggered only after a CarriageReturn. |
This bean is used as a text entry field and as a means of triggering
other beans.
Comprised of a label and a text field,
the initial text may be set from another bean by
specifying the InputEvent of the JfcTextField.
The JfcTextField can supply
information to other beans via its OutputEvent. A carriage return
signals other beans that the text field has changed.
The OutputEvent is triggered either after each keystroke or only after a
carriage return, depending on the setting of TriggerOnEdit.
If the OutputEvent is empty, the JfcTextField will be
display-only.
| JfcTextFieldAdapter |
Type: Invisible |
This bean is used to adapt a Swing JTextField for
use with WebLogic Beans. You can configure a JTextField
to your liking -- setting fonts, options, etc. -- and
by using the adapter, it can interact with your WebLogic Beans.
To use it, you will need to add a line of code to the class
where the components are initialized -- typically, a class
that extends com.sun.java.swing.JFrame.
This will tell the JfcTextFieldAdapter which JTextField it is adapting:
myJfcTextFieldAdapter.setJTextField(myJTextField);
where
- myJfcTextFieldAdapter is the instance
variable of the JfcTextFieldAdapter
- myJTextField is the instance variable of the JTextField
(Note that in JBuilder 2, you do not need to add this code, as JBuilder
includes a property that allows you to specify the bean
you are adapting.)
The options available for the JfcTextFieldAdapter are the same as those for the
JfcTextField.
 JfcTextArea JfcTextArea |
Type: Visible |
| Append |
True or False:
If True, new data will be appended to the JfcTextArea,
rather than overwriting the data already displayed. |
| InputEvent |
A JfcTextArea
can receive events from other beans that will change the
JfcTextArea's text.
A tag of the form InputEvent.PropertyName can be
used to extract
a named property from the InputEvent for display in the
text component. |
| Name |
Name of this JfcTextArea. |
| ToolTipText |
String label displayed when cursor
is over this JfcTextArea. |
This bean is a text area that can display data sent by other beans.
It can be used to display the results of a database query,
an event message, or a workspace value.
| JfcTextComponentAdapter |
Type: Invisible |
This bean is used to adapt a Swing JTextComponent
(and any of its child classes: JEditorPane;
JTextPane; JTextArea; JTextField; or JPasswordField) for
use with WebLogic Beans. You can configure a JTextComponent
to your liking -- setting fonts, options, etc. -- and
by using the adapter, it can interact with your WebLogic Beans.
To use it, you will need to add a line of code to the class
where the components are initialized -- typically, a class
that extends com.sun.java.swing.JFrame.
This will tell the JfcTextComponentAdapter which JTextComponent it is adapting:
myJfcTextComponentAdapter.setJTextComponent(myJTextComponent);
where
- myJfcTextComponentAdapter is the instance
variable of the JfcTextComponentAdapter
- myJTextComponent is the instance variable of the JTextComponent
The options available for the JfcTextComponentAdapter are the same as those for the
JfcTextArea.
 JfcTable JfcTable |
Type: Visible |
| InputEvent |
The set of rows (usually the OutputEvent of a
DbQuery) to be displayed.
The rows must implement RowsetAccess. |
| Name |
Name of this JfcTable. |
| OutputEvent |
Specifies the name of the change event
which is triggered when a row is selected.
The change event implements RowsetAccess and includes the data
of the selected row.
|
| SelectIfUnique |
True or False:
If True, and if the table is displaying only one row, then
the row is automatically selected and the OutputEvent sent. |
This bean is used to display a set of rows,
such as the data produced by a DbQuery.
| JfcTableAdapter |
Type: Invisible |
This bean is used to adapt a Swing JTable for
use with WebLogic Beans. You can configure a JTable
to your liking -- setting fonts, options, etc. -- and
by using the adapter, it can interact with your WebLogic Beans.
To use it, you will need to add a line of code to the class
where the components are initialized -- typically, a class
that extends com.sun.java.swing.JFrame.
This will tell the JfcTableAdapter which JTable it is adapting:
myJfcTableAdapter.setJTable(myJTable);
where
- myJfcTableAdapter is the instance
variable of the JfcTableAdapter
- myJTable is the instance variable of the JTable
(Note that in JBuilder 2, you do not need to add this code, as JBuilder
includes a property that allows you to specify the bean
you are adapting.)
The options available for the JfcTableAdapter are the same as those for the
JfcTable.
 DbConnection DbConnection |
Type: Invisible |
| cacheRows |
The number of rows the server should pre-fetch and cache when doing database queries. |
| ConnectionID |
Name for caching a connection in a client's workspace so that it can be re-used. |
| ConnectionName |
The name of the connection displayed in the
WebLogic Console (required). |
| ConnectionPool |
Specifies the name of a ConnectionPool on the server.
If a ConnectionPool is specified, then other properties --
ConnectionID, DbLogin, DbPassword, DbServer, JdbcDriver, JdbcURL
-- are ignored and the ConnectionPool is used instead.
(The ConnectionName must still be specified.) |
| DbLogin |
The database login name. |
| DbPassword |
The database password associated with dbLogin. |
| DbServer |
Hostname of the database server. |
| JdbcDriver |
Package name of the JDBC driver to be loaded on the server. |
| JdbcURL |
JDBC connection URL. |
| Name |
Name of this DbConnection. |
The DbConnection bean connects to a JDBC driver on a specified server.
You can then use a DbQuery bean to send queries
to the connection once it is established.
Note that the ConnectionName must always be specified.
You can also use a connection pool, which eliminates needing to know the
details of the database connection.
For more information on connection pools, read
Using connection pools
in the WebLogic JDBC Developers Guide.
 DbQuery DbQuery |
Type: Invisible |
| ConnectionName |
Name of a
DbConnection. |
| InputEvent |
Specifies the name of the change event which will trigger the query.
If the change event has a query property, then that query will be
used in place of the default Query. |
| Name |
Name of this DbQuery. |
| OutputEvent |
The name of the OuputEvent
where the results of the query are returned. |
| Query |
The default query to execute. This may be overridden by a
query property in the InputEvent. |
| InputEvent attributes |
These properties are available as InputEvent
attributes:
query, fieldName, and displayColumns. |
| query |
Specifies the query to execute in place of the default Query. |
| fieldName |
If the query represents a
prepared statement,
extract fieldName from each occurrence of "?fieldName" in the query. |
| displayColumns |
This property is not used by DbQuery, but is passed
along with the query results. |
| OutputEvent attributes |
These properties are available as OutputEvent
attributes:
displayColumns, and columnName. |
| displayColumns |
This property is not used by DbQuery, but is passed
along with the query results. |
| columnName |
Fields of the results can be extracted as properties. |
Use this bean in conjunction with a dbConnection
to execute a query on the specified server.
When an InputEvent is received, a database query is executed.
If a "query" property accompanies the change event, then that
query is used in place of the default query.
The query may be a JDBC PreparedStatement that can accept parameters
from the triggering event. A PreparedStatement differs from a
standard SQL statement in that the "?" parameters are immediately
followed by a string which specifies the name of the property to
extract from the event.
For example, the query "select * from emp where fname = ?firstname"
would instruct the DbQuery bean to construct the
PreparedStatement "select * from emp
where fname = ?" and substitute the "firstname" property
extracted from the InputEvent for the "?" in the PreparedStatement.
DbQuery returns a QueryDataSet that can be passed to another bean
-- such as JfcTable -- via the
OutputEvent for further processing or display.
The OutputEvent implements the data in RowsetAccess format.
| DbRecord |
Type: Invisible |
| ConnectionName |
Name of
DbConnection this record is associated with. |
| DisplayColumns |
Comma-separated list of fields to display when showing results
from queries against this table. This property is passed along. |
| ForeignKeys |
A comma-separated list describing the columns in this table
that map to foreign keys of other tables.
The syntax of this list is:
"column1=table1.primarykey, column2=table2.primarykey2" where
column1 and column2 name columns in this table, and
table1.primarykey1 and table2.primarykey2 list
the table names and primary keys of the foreign tables
to which the columns refer. |
| InputEvent |
The name of the change event that will trigger the
DbRecord. |
| Name |
The name of this DbRecord. |
| OutputEvent |
The change event associated with this particular DbRecord. |
| PrimaryKey |
The primary key field for this table. |
| TableEvent |
The table event associated with this particular DbRecord. |
| TableName |
The name of the table represented by this bean. |
This bean represents a record in a database table.
It can be populated either by selecting a record
from a JfcTable,
or directly from a DbQuery.
There is a special mechanism for associating fields and buttons with a DbRecord.
The DbRecord not only communicates with other beans
through its InputEvent and OutputEvents,
but also communicates with other
beans via the TableEvent.
To associate an entry field (e.g.
a JfcTextField
or a JfcComboBox) with a DbRecord,
their InputEvent and
OutputEvent would be set to TableEvent.fieldname.
For example, a DbRecord might have a TableName of "customer",
and a TableEvent of "customerEvent".
Then, a JfcTextField that shows a
customer's first name would have InputEvent
and OutputEvents of customerEvent.firstname where
"customerEvent" is the TableEvent of the
DbRecord bean, and "firstname" is a column from the customer table
that will be displayed by the text field bean.
Similarly, buttons that act on the record would have OutputEvents of the form
TableEvent.action,
where action is one of search, clear, update, or delete.
The DbButtons bean
provides a set of buttons pre-configured for these operations.
The two properties -- TableEvent and TableName --
allow you to have
multiple beans that point to the same database table and yet listen to
and generate separate events. It allows you to have more than one view
of the same table, and work with multiple records simultaneously.
 DbButtons DbButtons |
Type: Visible |
| Name |
Name of this DbButtons. |
| TableEvent |
Name of the TableEvent in a DbRecord
that these buttons are associated with. |
| ToolTipText |
String label displayed when cursor
is over these DbButtons. |
This is a collection of buttons that are configured for database operations.
Functions include search, clear, update and delete.
 Params Params |
Type: Invisible |
| InputEvent |
The name of the change event the Params bean listens to.
When the changing bean's OutputEvent is of the form
OutputEvent.PropertyName, the PropertyName
is the key under which the value is stored.
|
| Name |
Name of this Params. |
| OutputEvent |
The name of the change event supplied by the Params bean
when it is triggered.
The bean is triggered when one of the change events it listens to
has an isTriggerEvent
property of "True". (The hashtable is updated regardless of the
setting of the isTriggerEvent.) |
This bean is used to gather data from other beans,
so that they can be output as a single data item.
The data is represented as a
hashtable, where the suffix of the OutputEvent property of
the data supplier is used as the key.
For example, a JfcTextField whose
OutputEvent was "params.query" would supply the "query"
parameter to a Params bean whose InputEvent was "params".
The value of the JfcTextField would
be paired with a key value of "query".
You can use a Splitter bean to rename an OutputEvent
so that a Params bean can collect it.
For more information on ParamSets, see the Developers Guide
Writing a T3Client application:
Using ParamSets, ParamValue, and ParamTypes in WebLogic.
 EventScheduler EventScheduler |
Type: Invisible |
| InputEvent |
The change event that
starts the EventScheduler. |
| MaxExecutions |
The maximum number of times the EventScheduler
is to fire. |
| Name |
Name of this EventScheduler. |
| OutputEvent |
The change event that occurs when the
EventScheduler fires. |
| RepeatMillis |
The time interval in milliseconds
between EventScheduler firings. |
This bean may be used to set up recurring actions on a client or a server.
It may be used from a client application to set up a repetitive
server-side action.
 Splitter Splitter |
Type: Invisible |
| InputEvent |
The change event to be
renamed by this bean. |
| Name |
The name of this Splitter. |
| OutputEvent |
The new change event passed on by this bean. |
This bean passes on its InputEvent under a new name. It can either simply
rename the change event, extract or rename a property:
| InputEvent |
OutputEvent |
Description |
| selectedRow |
currentRow |
Renames the change event. |
| selectedRow |
Row.ID |
Extracts the "ID" property from
selectedRow. |
| selectedRow.ID |
Row.ID |
Extracts the "ID" property from
selectedRow. |
| selectedRow.ID |
Row.Number |
Extracts the "ID" property from
selectedRow and sets it as the "Number property
of Row. |
 RemoteMethod RemoteMethod |
Type: Invisible |
| InputEvent |
Name of a change event that triggers this bean. The value of the
InputEvent is passed as the parameter of type given by
ParamClassName to the MethodName. |
| JndiName |
JNDI Name of the RMI object that's being called. |
| MethodName |
Method on the RMI object being called. |
| Name |
Name of this RemoteMethod bean. |
| OutputEvent |
Change event with return value from
MethodName. |
| ParamClassName |
Class of the parameter being passed
in InputEvent. If blank, defaults to "java.lang.String". |
This bean calls RMI objects on the server. A single parameter can be passed to
a method on the RMI object through the InputEvent; the return value of the method is
encapsulated in the OutputEvent.
Implementing with WebLogic Beans
- Installing WebLogic Beans
- Installing for use with Symantec's Visual Cafe 3.0
- Installing for use with Borland's JBuilder 2.0
- Upgrading from an earlier release of the WebLogic Bean Library
- Examples using WebLogic Beans
- Example 1: Database query
- Example 2: Database query -- master and detail
- Example 3: Workspace example
Installing WebLogic Beans
Specific installation instructions for
Symantec's Visual Cafe 3.0
and
Borland's JBuilder 2.0
are included below.
For other integrated development environments (IDEs)
that support JavaBeans, it may be possible to use WebLogic Beans.
As each IDE has a different method for installing beans, it is only possible to
give general hints. You usually need to tell the IDE:
- the location of the weblogic classes,
usually weblogic/classes
- the location of the weblogicaux.jar,
usually weblogic/lib/weblogicaux.jar
- the location of the WebLogicbeans.jar,
usually weblogic/lib/weblogicbeans.jar
Once you have done that (and you might need to restart the application), there is usually
some process for importing or loading beans into the IDE. Consult the documentation
for the IDE, paying close attention to settings for
CLASSPATH, loading .jar files,
and setting directories. Some IDEs set the classpath within the application,
while others use an external file or on the command line that starts the application.
Note that many IDEs do not support directory names
with spaces or non-ASCII characters.
Installing for use with Symantec's Visual Cafe 3.0
These instructions apply to Symantec Visual Cafe 3.0. The WebLogic
Bean Library should work in the Visual Cafe environment; however,
WebLogic does not offer technical support for Cafe, and is not
responsible for any bugs encountered in the IDE.
The following instructions assume that WebLogic is installed in
\weblogic.
Substitute the appropriate directory if different in your
environment.
- Install Visual Cafe 3.0.
- Edit the CLASSPATH variable in the
bin\sc.ini file to include the
following:
\weblogic\classes;\weblogic\lib\weblogicaux.jar
- Run Cafe. From the File menu, select Add Component to
Library.... Using the file browser, browse to and select the
\weblogic\lib\weblogicbeans.jar.
This will add the WebLogic Bean library
as a group
to the set of known components, but will not alter the palette.
-
To create the WebLogicBean group and have it show up on its own tab,
select Environment Options... from the Tools menu and click the
Component Palette tab.
-
Drag the "weblogicbeans" folder from the "Available components:" to the
"Palette:" list.
This will create a WebLogicbeans group.
Installing for use with Borland's JBuilder 2.0
These instructions apply to JBuilder 2.0. The WebLogic Bean Library
should work in the JBuilder environment; however, WebLogic does not
offer technical support for JBuilder, and is not responsible for any
bugs encountered in the IDE.
The following instructions assume JBuilder is installed in the
\JBuilder
directory, and WebLogic is installed in
\weblogic.
Substitute the appropriate directory if different in your
environment.
Note: JBuilder does not support directory names with spaces or any non-ASCII
characters. Don't install WebLogic in such a directory
if you are using JBuilder.
- Copy
\weblogic\lib\weblogicbeans.jar
into \JBuilder\beans.
- Open the \JBuilder\bin\JBuilder.INI.
Add to IDEClassPath (on one line):
\weblogic\classes;\weblogic\lib\weblogicaux.jar
- Run JBuilder.
To modify the project classpath to include the necessary WebLogic
libraries:
- From the Tools menu, select Default Project Properties.
- Click the Libraries... button.
- In the window Available Java Libraries, press New....
- In the Name field, type "WebLogic".
- Click the ... button by the Class Path field.
- Click Add Path, and browse to the \weblogic\classes directory and select it.
- Click Add Zip/Jar to add:
\weblogic\lib\weblogicaux.jar
(If you have any existing projects, you will need to modify their project properties
using the Properties menu item of the File menu.)
To modify the palette to include the WebLogic
Beans:
- From the Tools menu, Select Configure Palette.
- Select Add... in the Palette Properties window.
- Type the word "WebLogic" in the Page Name field. Press "OK" to create the page.
- Select "WebLogic" from the Pages list.
- Select the "Add from Archive" tab.
- Browse to \JBuilder\beans\weblogicbeans.jar and select all of the
beans in the list.
- Press the Install button.
The WebLogic Beans you selected will now be installed and their
icons visible when you select the WebLogic tab in the palette.
Upgrading from an earlier release of the WebLogic Bean Library
If you have an earlier release of the WebLogic Bean Library
(any version previous to version 4.0), the name "Tengah" has been
changed to "WebLogic" as part of a global change of the WebLogic Application Server.
The packaging and methods of the WebLogic Beanbar changed accordingly.
You will need to convert your code to the new classes following these steps
(the steps describe converting a Visual Cafe project):
- Replace your current version of
tengahbeans.jar with the new version
shipped with this release.
- Add the new weblogicbeans.jar
to the Component Library. Make sure both the
tengahbeans.jar and the
weblogicbeans.jar
are displayed in the palette.
- Open the project you want to convert.
- Edit the source code, converting names following this table:
|
New name
|
Old name
|
|
Changed jar file
|
|
weblogicbeans.jar
|
tengahbeans.jar
|
|
Changed classes
|
|
WebLogicBean
|
TengahBean
|
|
Login
|
TengahLogin
|
|
LoginButton
|
TengahLoginButton
|
|
WebLogicBeanEvent
|
TengahBeanEvent
|
|
Changed constants
|
WebLogicBean.WEBLOGIC_SERVICES
|
TengahBean.TENGAH_SERVICES
|
|
WebLogicBean.WEBLOGIC_INITIALIZED
|
TengahBean.TENGAH_INITIALIZED
|
|
WebLogicBean.WEBLOGIC_SERVER_URL
|
TengahBean.TENGAH_SERVER_URL
|
|
WebLogicBean.CLIENT
|
TengahBean.TENGAH_CLIENT
|
|
WebLogicBean.WEBLOGIC_ERROR_LOG
|
TengahBean.TENGAH_ERROR_LOG
|
-
You may have references to these items that will require updating
if you have subclassed any of the beans
in the beanbar or worked outside of the visual editors:
|
New name
|
Old name
|
|
Changed classes
|
|
LoginBeanInfo
|
TengahLoginBeanInfo
|
|
LoginBeanInfo
|
TengahLoginBeanInfo
|
|
LoginFrame
|
TengahLoginFrame
|
|
WebLogicBeanListener
|
TengahBeanListener
|
|
WebLogicBeanAdapter
|
TengahBeanAdapter
|
|
WebLogicBeanDelegate
|
TengahBeanDelegate
|
- Save your project and rebuild and recompile all classes.
- After you have converted all your projects, you can remove the
tengahbeans.jar from your
Component Library as you will no longer have any references to it or be using it.
Examples using WebLogic Beans
- Example 1: Database query
- Example 2: Database query -- master and detail
- Example 3: Workspace example
Example 1: Database query
This example demonstrates connecting to a database using the
DbConnection bean and JDBC, issuing a query, and then displaying the
results in a window item. The instructions are written for Visual Cafe,
though the process for JBuilder is very similar. We have also
assumed that you are using the Cloudscape database demo
shipped with the release with the table "ejbAccounts",
though any other database that you can connect can be substituted.
Also, you probably want to turn on the connection pool "ejbPool"
included in your weblogic.properties
file to give yourself easy access to the Cloudscape database.
Building the example
-
Create a new application by selecting New Project from the File menu,
then select JFC Application from the resulting dialog.
(Before continuing, you should save the project, saving it in its own directory
under an appropriate name such as "DatabaseDemo.vep", using
File ¬ Save All.)
Set the Package to "Example" and
the Class to "DbQuery".
- With the "JFrame1.java" file selected in Form Designer, and
the weblogicbeans
page selected in the palette, click on the
 LoginButton bean.
- Then click once in the GUI frame in the Design view to add the
bean to your application. The properties for the bean can be
inspected in the Property List. Check that the Hostname property is valid for
your server.
- Now, add a
 DbConnection bean to the application. Because
the bean will not be visible in the window when the application is
running, place it below the panel.
DbConnection bean to the application. Because
the bean will not be visible in the window when the application is
running, place it below the panel.
Set the DbLogin, DbPassword, and DbServer properties. By
default, the JdbcDriver and JdbcURL are configured for
Cloudscape. Modify these as required for your actual database.
Alternatively, you can use a connection pool for the database
connection, if you have an appropriate pool setup in your weblogic.properties file. If so, enter its
name for the ConnectionPool.
- Add a
 DbQuery
to the application:
DbQuery
to the application:
- Set the InputEvent to "queryRequest".
- Set the OutputEvent to "queryResult".
- Set the Query to "select * from ejbAccounts", or
a similar query valid for your database.
- Add a
 JfcButton
to the application. When this button is pressed, the
query will be executed.
JfcButton
to the application. When this button is pressed, the
query will be executed.
- Set the OutputEvent to "queryRequest", the InputEvent of the
DbQuery created in the previous step.
- Set the text of the button to "Query".
-
Add a
 JfcTable
to the application. This table area will be used to display the
results of the database query. You may need to move the JfcTable to
the center of the window.
JfcTable
to the application. This table area will be used to display the
results of the database query. You may need to move the JfcTable to
the center of the window.
- Set the InputEvent to "queryResult", the OutputEvent of the
DbQuery created in the previous step.
- Set the OutputEvent to "recordSelected".
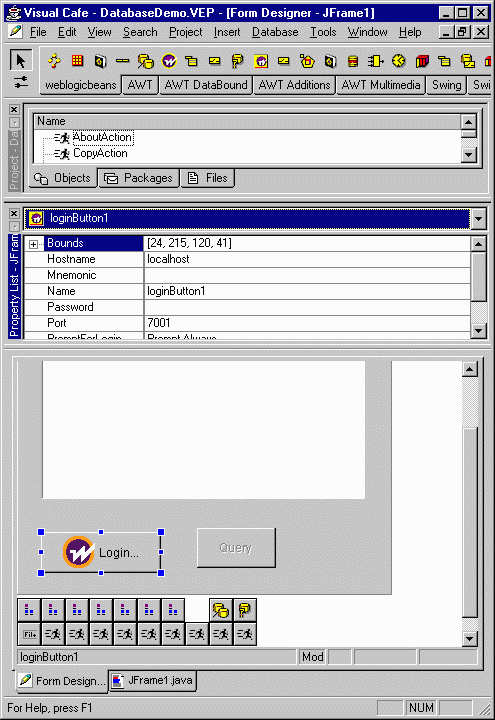
The window should look approximately like this, though you will want to make your
window wider and the table larger to see all the data:
Running the example
- To run the example, start your WebLogic Server and then
choose Project ¬ Execute (Locally) from the menubar.
The application will first be compiled, and then run.
- Press "Login" to connect to the WebLogic Server. A login window
will appear; complete an appropriate user name and password and then press
the "Connect" button.
When the login is complete, the Query button will be enabled and the
WebLogicLoginButton will read "Logout".
- Click Query button to run the query.
- The results of the query will be displayed in the JfcTable.
Example 2: Database query -- master and detail
This example uses the same steps as Example 1:
Database query. Now we'll add another JfcTable and connect it to the first table as a
detail view. You will need a connection to a database which has two
related tables. In this example, we show using the sample database
included with Oracle, which has two related tables, "dept" and "emp".
Building the example
-
Follow the steps in Example 1: Database query.
-
Add an Oracle connection pool to the weblogic.properties file of your Server,
and set that as the ConnectionPool for the
DbConnection.
-
Add another
DbQuery
to the application:
- Set the InputEvent to "recordSelected"
(the OutputEvent of
the JfcTable created in the previous example.)
- Set the OutputEvent to "relatedQueryResult".
- Set the Query to
"select * from emp where deptno = ?deptno"
where deptno is the column that relates the two tables.
-
Add another
JfcTable
to the application.
This table area will be used to display the detail results
of a selected row of the first database query.
Set the InputEvent to "relatedQueryResult" (the OutputEvent
of the DbQuery created in the previous step.)
Running the example
-
Run the example as described in Example 1:
Database query.
- After making the initial query, select a row in the first table.
The set of contacts for the customer of the selected row will appear
in the second table.
How the example works
When the user logs in to WebLogic, the beans become initialized; the
database connections are established, and the beans establish
relationships with each other by broadcasting their InputEvents
on the InfoBus to determine the flow of data through the application.
When the "Query" button is pressed, the "select * from dept" query is
fired, and the results are sent to the first table bean. That table
bean has an OutputEvent which is fired when a user selects a
record.
In that case, the OutputEvent goes to another query. That
query extracts the deptno field from the selected record to use
as a constraint on a query against the "emp" table. The results of
that query are forwarded to the second table which displays the set of
employees for the selected department.
Example 3: Workspace example
This example shows how a Workspace can be used by multiple clients to
share data. It also demonstrates the power of WebLogic Events, since a
client update to a workspace value will be immediately propagated to
other clients via an event notification. The event-processing logic
is built into the WorkspaceValue bean.
Building the example
- Create a new project with a new JFC Application as described for Example 1.
- Add a LoginButton bean to the application. Check
that the URL is valid for your server.
- Add a
 Workspace bean to the application.
- Set the WorkspaceName to "bulletinBoard".
- Set the WorkspaceScope to "SCOPE_SERVER".
- Add a
 WorkspaceValue bean to the application.
- Set the InputEvent to "messageValue".
- Set the Key to "message".
- Set the OutputEvent to "messageChanged".
- Set the TriggerOnUpdate to "true".
- Set the Workspace to "bulletinBoard".
- Add a
 JfcTextField
bean to the application.
JfcTextField
bean to the application.
- Set the Label to "Send Message".
- Set the OutputEvent to "messageValue".
- Add another
JfcTextField
bean to the application.
- Set the InputEvent to "messageChanged".
- Set the Label to "Received Message".
Running the example
- Run the example as described in the first two steps of Example 1: Database query.
- Enter a message in the Send Message field, and press the "Enter" key.
- You will see the same message in the Received Message
field coming back from the Workspace.
- If you logout and login again, you will see that the value has been preserved in the
workspace on the server.
- If you start additional clients, you can send a message from one client and see it received
in the other clients.
Tips on using WebLogic Beans
- Use a JFrame for building your application
- Tips on using Visual Cafe
- Tips on using JBuilder
Use a JFrame for building your application
As the visual WebLogic Beans are built on top of Swing components, it is best to
build your application in a Swing JFrame rather than an AWT Frame.
Swing components which wish to use automatic double-buffering rely on
the enclosing frame to manage the offscreen graphic.
If that frame is an AWT Frame instead of a Swing JFrame,
the component is not going to find any buffering services
and the result can be an unacceptable amount of flicker.
Mixing AWT and Swing components in the same frame can cause other aesthetic problems.
Tips on using Visual Cafe
- To start a new Visual Cafe project with a JFrame, choose either a JFC Frame or a JFC Applet
from the list of Project Templates.
- For new project that includes a JFrame, you may want to set the
JFrame's layout property to "None", as that will make placing the
elements easier.
Tips on using JBuilder
Problems that you may find include:
- Icons for WebLogic Beans do not appear properly in the page of
the Component Palette.
- Properties are uneditable in the property editor.
- Problems compiling and running projects, especially with errors
reported by the WebLogic Server.
These steps can help solve these problems:
- Check the project's CLASSPATH, in case you have modified the
JBuilder.INI
file after beginning a project. Each new project uses the default
CLASSPATH described in the
JBuilder.INI file; however,
once the project is created, the CLASSPATH becomes an individual property
of the project.
Use the File | Properties to change the CLASSPATH of existing projects.
- JBuilder caches information about beans in different locations in
its file hierarchy. Deleting these caches and then restarting JBuilder
twice (to force the rebuilding of the caches) can resolve many
problems. The caches to delete are:
- JBuilder/dependency
- JBuilder/myclasses
Also, note that JBuilder will give warning messages when you first compile your
projects that include WebLogic Beans because it cannot find the source
files for these beans. These warnings may be ignored.
Alphabetical list of WebLogic Beans
An functional list of WebLogic Beans is included above.