Step 4: Add Portal Resources to a Desktop
The desktops that you have just created contain a
number of portlets and have a specific look and feel. In this step you will
further customize the second desktop to distinguish it from the first desktop.
You will add a third page to the desktop, add portlets to it, and change the
look and feel of the desktop. This type of customization is a common activity
when creating portal applications that are targeted at specific types of users.
In a later task you will entitle these resources so that only specific users
can access them.
The tasks in this step are:
Add
a Page
A page provides a way to organize portlets into groups
based on related content, similar tasks, or simply user preference. Examples
include an HR page that contains company-specific portlets, a finance page that
includes banking and portfolio portlets, and a personal page that includes frequently
accessed portlets. In this step you will add a new page to the desktop and select
the type of layout to use.
- In the Portal Resource tree, select MyPortal
-> Desktop2-> Main Page Book.
- Select the Manage Book Contents tab:
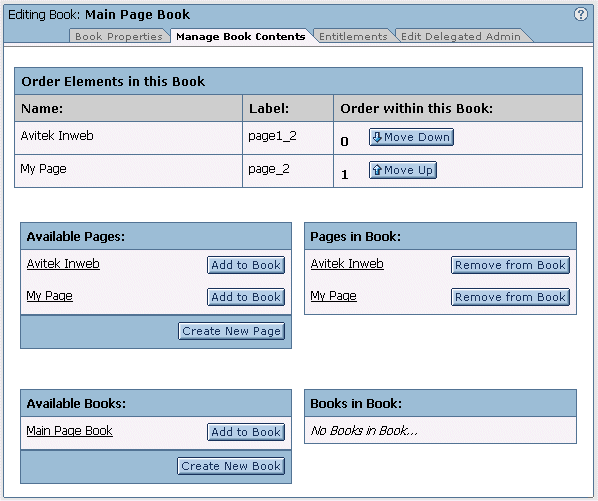
- Click Create New Page in the Editor
pane in the Available Pages section. This new page will be
added to the Pages in Book section, and will also appear in the hierarchical
view.
- In the Order Elements in Book section, change
the order of the pages using the Move Down and Move
Up buttons to match the following:

- Click on the New Blank Page link
in the Pages in Book section to edit the book.
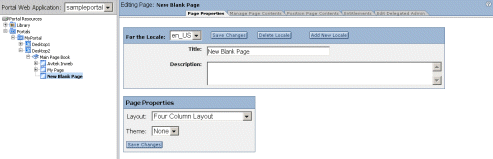
- Select the Page Properties tab,
and enter the following information in the For the Locale
section:
| For This Field: |
Enter This Information: |
| Locale |
en_US |
| Title |
Tutorial Page |
| Description |
My tutorial page |
- Click Save Changes in this section.
- Enter the following information in the Page
Properties section:
| For This Field: |
Enter This Information: |
| Layout |
Three Column Layout |
| Theme |
none |
- Click Save Changes in this section.
You have now added a new blank page to Desktop2, for
a total of three pages – Avitek, My Page, and Tutorial Page. In the next
section you will add portlets to Tutorial Page.
Add
Portlets
- In the Portal Resource tree, select Desktop2
-> Main Page Book -> Tutorial Page.
- Select the Manage Page Contents tab
in the Editor pane to show that there are currently no portlets on the page:
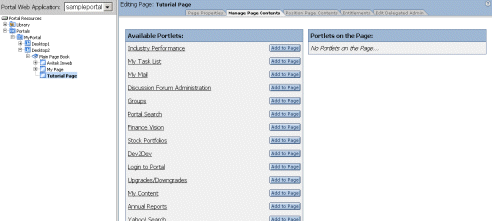
- To add a portlet to the page, click Add
to Page next to the desired portlet in the Available Portlets
section. Add the following portlets to the page
- Dev2Dev
- My Mail
- RSS News Feed
- Tutorial
- Select the Position Page Contents
tab to change the position of these portlets on the page.
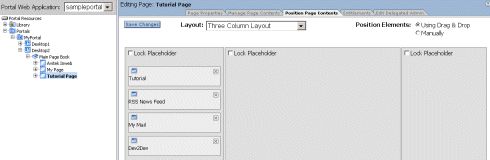
- Using the drag-and-drop method, move the portlet
positions to match the following.
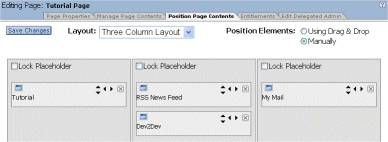
- Click Save Changes to save the
position of the portlets.
- Right click Desktop2 in the Portal
Resource tree, and select Fully Expand Node.
- To preview the new desktop in a browser, right click
Desktop2 and click View Desktop.
Change the Look
and Feel
- In the Portal Resource tree, select MyPortal
-> Desktop2, and select the Desktop Properties
tab.
- In the Properties section, select the Classic
look and feel from the Look and Feel drop-down list, and
click Save.
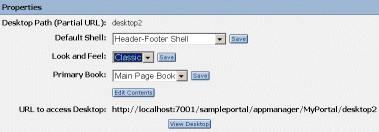
- Click View Desktop in the Properties
section to view Desktop2 in a browser.
You have now successfully added and configured a page,
added and configured multiple portlets on the page, and changed the look and
feel of the desktop.
In the following tasks you will set entitlements for
this desktop to control what is accessible, you will use personalization to
determine what content is displayed, and you will control which administrators
are allowed to modify the desktop.